
I am a member of the FixThePhoto team, and sometimes, it feels that I practically live in Photoshop. So, I was very pleased when Adobe released its AI-powered upgrades.
For years, Photoshop has been my right-hand tool. With it, I can turn my ideas into unique visuals. But now, thanks to Photoshop AI plugins, I can create even more impressive projects. Still, I decided to run a test to figure out whether AI features were just flashy gimmicks or if they could really facilitate my workflow at FixThePhoto.
AI technologies are penetrating every sphere, photo editing included. Still, I don’t want fancy frills in my work. I need reliable and efficient tools, using which I can deliver high-quality results to my FixThePhoto clients. That’s why I decided to put them through a proper test and pick instruments that can assist me with regular assignments.
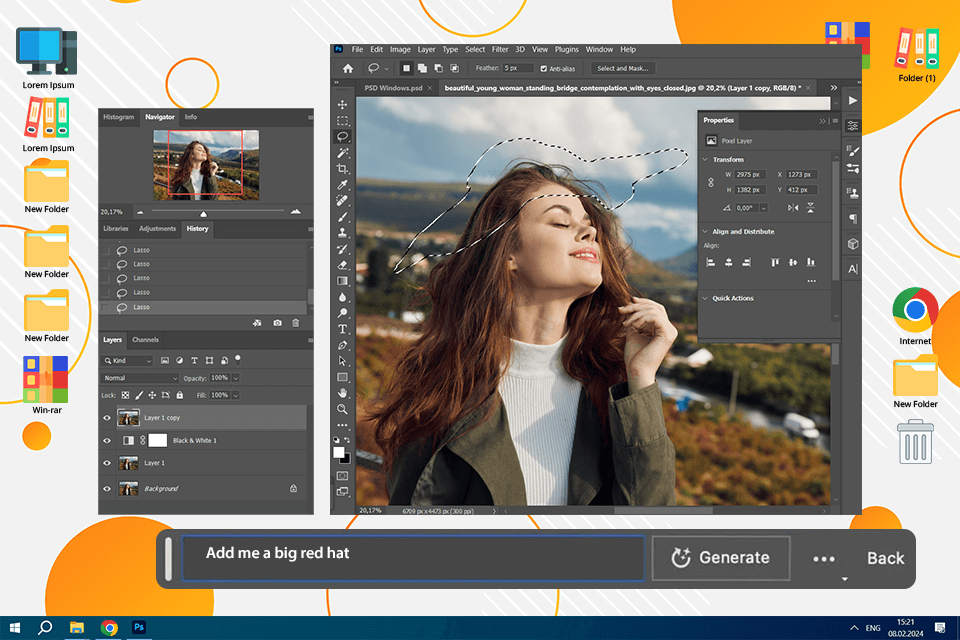
You may forget about endlessly cloning pixels and spending hours on image retouching. The company has released Adobe Firefly’s Generative Fill, which takes care of such repetitive processes. You just need to type a prompt and watch as elements appear, disappear, or transform almost immediately. I find it especially useful for:
✔️ Extending background. When I need a wider portrait or a more dramatic skyline, I resort to the Generative Fill. It accurately expands backgrounds in just seconds, blending everything together like it was always meant to be there.
✔️ Filling in missing elements. Sometimes, I’m faced with an awkward crop in a product photo. Or, it happens that I failed to capture an important element. Fortunately, Generative Fill can fill in the gaps in seconds.
✔️ Removing distractions. Do your photos look less professional because of photobombers or messy backgrounds? Generative Fill can sweep them away in an instant.
One of my most memorable edits with AI Photoshop was for a client who wanted their wedding photo to be like a scene straight out of a fairy tale. The original setting was a bare, uninspiring field. But with Generative Fill, I wove in a dreamy landscape of soft wildflowers and added the desired atmosphere. The transformation was amazing and so natural. My client couldn't believe her eyes.
How to use Generative Fill:
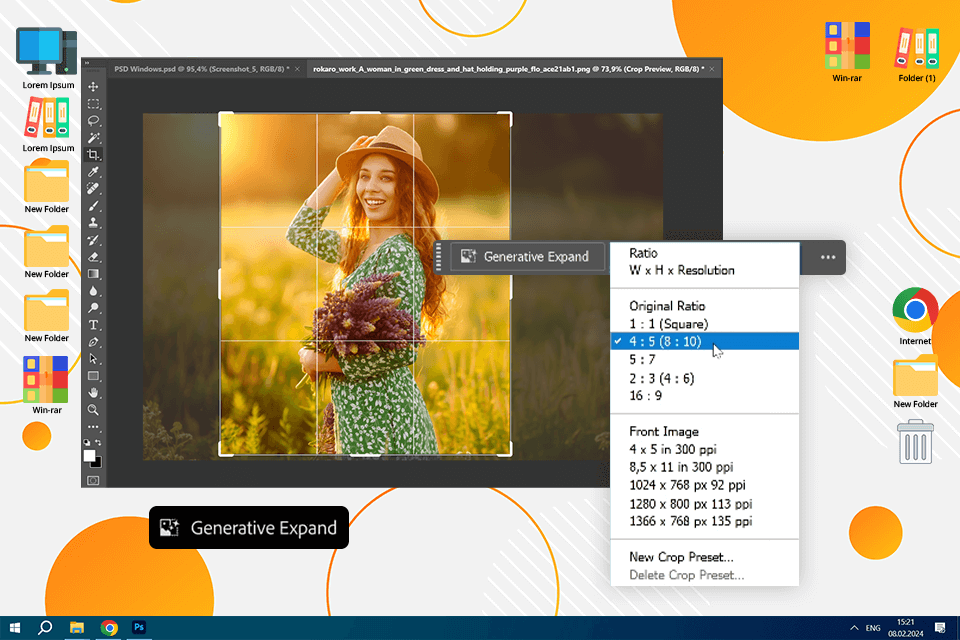
This AI picture expander can extend an image without awkward distortions. Generative Expand tweaks your aspect ratio while keeping your subject intact. You need to drag the crop tool beyond the frame and let Photoshop AI photo editor fill in the gaps with natural-looking content. It’s my favorite tool for:
✔️ Adapting images for different formats. Whenever I need to turn a portrait into a landscape-friendly version, I simply extend the sides and prompt the AI with "expand studio background". This AI plugin for Photoshop will create a flawless, natural-looking expansion that fits perfectly into a wider layout.
✔️ Adding just a little more space. A crowded composition can make a photo feel off, but AI canvas expansion solves that in seconds. One of my favorite tricks is adding more sky to a real estate photo or one snapped in a dense city. I simply extend the frame upward and type “expand clear blue sky.” In the end, I get a well-balanced, airy image with just the right amount of breathing room.
How to use Generative Expand:
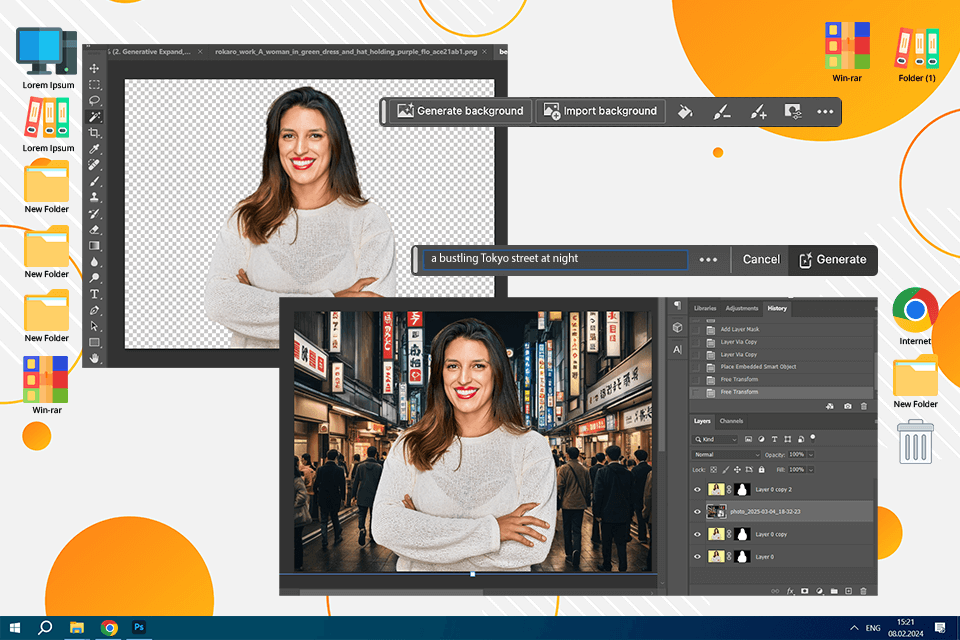
In the past, when I needed to swap a background, I had to spend hours meticulously selecting, masking, and blending different objects. Now, I can just type a description into the “Generate Background” tool, and Photoshop AI image generator will produce a new backdrop that matches the initial lighting and depth. I turn to this feature when:
✔️ Need to change a dull background with something more interesting. Using this tool, I can digitally move my subject anywhere. For instance, once I turned my studio portrait into a "neon-lit Tokyo street at night. By making such location tweaks, it is possible to alter the entire vibe of a shot.
✔️ Want to set the mood for a product. Once, I worked with images of skincare products. To show them in the best light, I had to change the initial setting. I tried a soft pastel gradient for a soothing feel and a lush green forest for a natural, organic look.
How to use the Generate Background feature:
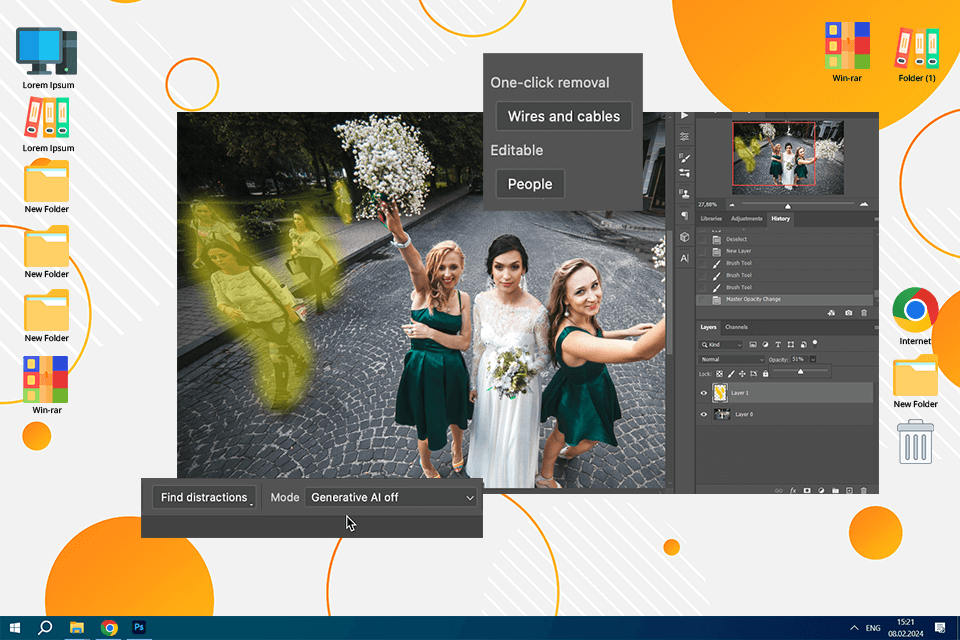
This feature makes it much easier to get rid of distractions. The Remove Tool accurately detects and removes unwanted elements no matter how intricate they are. It perfectly copes with stray wires, blemishes, or small distractions. Here’s when I use it to:
✔️Remove tourists in travel photos to make locations the centerpiece.
✔️ Clean up distractions, e.g., dust or stray objects, in product photos.
✔️ To eliminate passers-by or vehicles from street images.
A client once asked me to turn their engagement photo taken in a bustling park into a more private and romantic scene. That felt like a challenge, as the background was full of runners and cyclists. I used the "Distraction Removal" tool and was pleased with how it erased them in seconds while keeping the natural scenery intact. Otherwise, I had to spend hours on manual portrait photo retouching.
How to use Distraction Removal:
What could be better: The "Distraction Removal" tool is a wonderful option for getting rid of small distractions. However, when I’m dealing with larger, trickier edits, I choose manual tools or Generative Fill. Generally, an automated Distraction Removal is a trusty shortcut, but it is not 100% perfect.

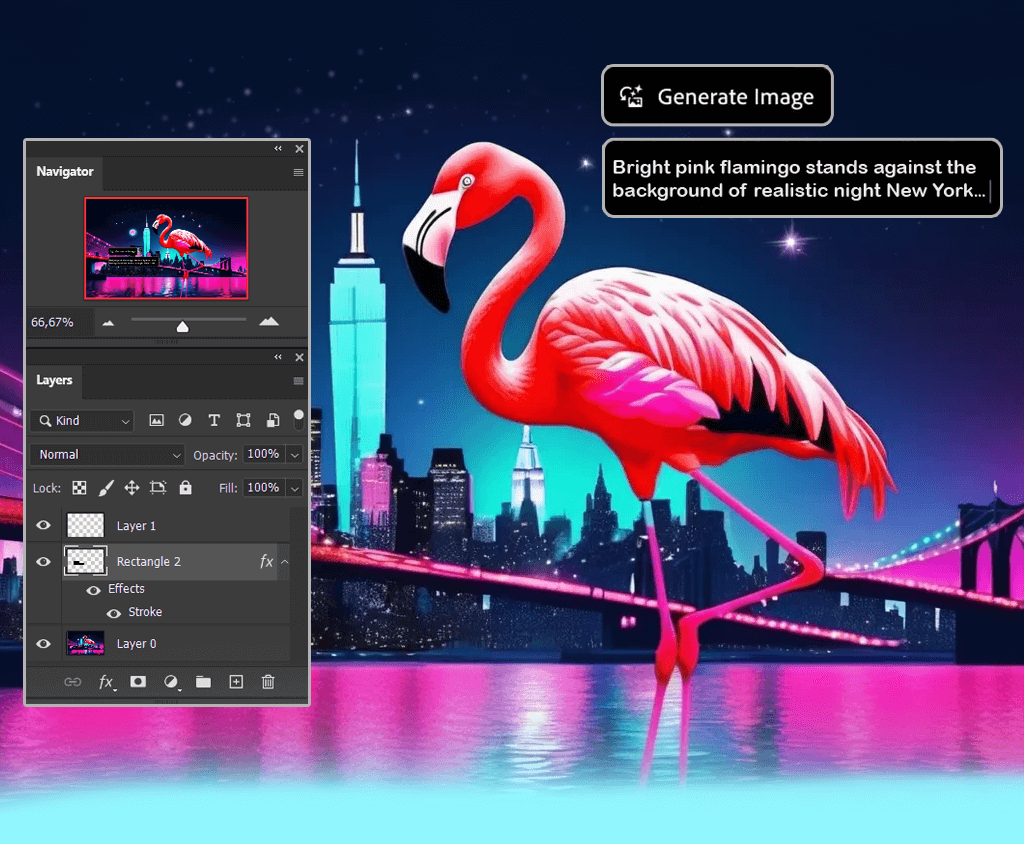
Photoshop’s AI text-to-image feature is a perfect tool for generating unique visuals. You just need to enter a description, and Photoshop will create an original image from scratch. When stock websites lack interesting assets, this technology fills the gap. Here’s how I use it:
✔️ To create bespoke textures/elements. I don’t rely on this AI tool for everyday photo retouching. However, I think it is a great AI tool for designers, who need custom textures or backgrounds. For example, if you want a mesmerizing gold leaf texture for your design, this feature will come in handy.
✔️ To get visuals based on my ideas. This tool quickly transforms text descriptions into fresh design elements. So, it is ideal for concept development and creative experiments.
Once, I wanted to create a glowing, enchanted doorway hidden deep in a dark forest. Still, I lacked the time to create that from scratch. So, I used this AI tool for Photoshop. I typed in a description, and within moments, I had several mystical portals at my fingertips. I adjusted some minor details and ended up with an eye-pleasing fantasy scene.
How to use the Text to Image feature:
What could be better: AI is very powerful, but it still can’t cope perfectly with tricky details like hands and faces. Sometimes, you need to adjust the generated results. To my mind, it is like a creative exploration tool rather than a fail-safe solution. It’s good, but it can’t fully compete with Generative Fill in terms of the quality of image manipulation.
Photoshop for iPad and iPhone make image editing on the go a convenient reality. Still, these versions are a bit raw, and require fine-tuning. Currently, users can take advantage of Generative Fill, but they should expect it to function on mobiles as flawlessly as on desktops. Here’s how I use it:
✔️ For photo editing on the go. It’s great for quick adjustments and creative experiments without being tied to a desk. I often use Generative Fill on my iPad while traveling to get polished photos quickly. Besides, I like that I can start a project on my phone and finish it on my computer and vice versa.
✔️ For smooth collaboration. It is a breeze to share files with others and collect their feedback right in a web version.
✔️ For completing basic tasks. When I want to apply quick changes to a photo before posting it, I often use this mobile-friendly tool.
What could be better: Mobile devices can lag, and not all AI features have made the jump yet. Plus, performance varies depending on your hardware and internet connection. While mobile Photoshop is satisfying in terms of accessibility, it’s not a full-fledged replacement for the desktop program. It is best recommended for light edits, but you’d better use a desktop version for more serious manipulations.
One of the most powerful Photoshop AI tools is Neural Filters. They employ machine learning algorithms, and I often use them in my Photoshop portrait tutorials for improving images, applying artistic styles, and even changing facial expressions in an instant. Here are some examples of how I use neural filters:
✔️ With the “Colorize” filter, I turn my black and white images into color ones. Photoshop AI analyzes the image and automatically applies colors to different areas.
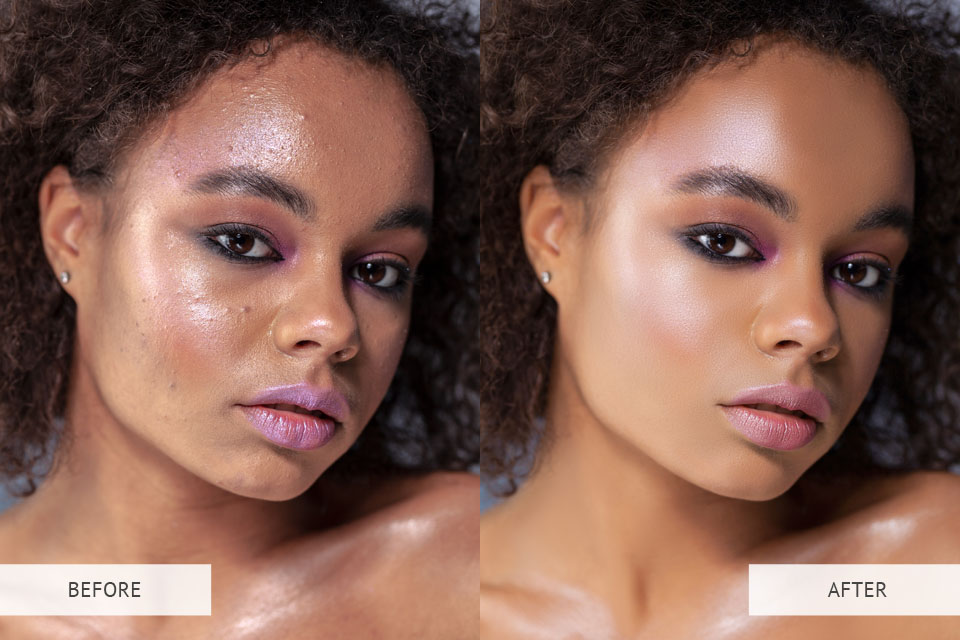
✔️ The “Smooth skin” filter allows for evening out the texture of the skin in portraits, removing visible pores and wrinkles. AI analyzes the texture of the skin and smooths it without sacrificing the natural look. So, you no longer need to learn complicated techniques to smooth skin in Photoshop.
✔️ I use “Style Transfer” to apply artistic styles to my images. I experiment with this AI image style transfer for creative projects, especially when clients want a more artistic or stylized look. You can choose from various styles, such as oil painting, watercolor, and pencil sketching, and the AI will apply the style to your photo in virtually no time.
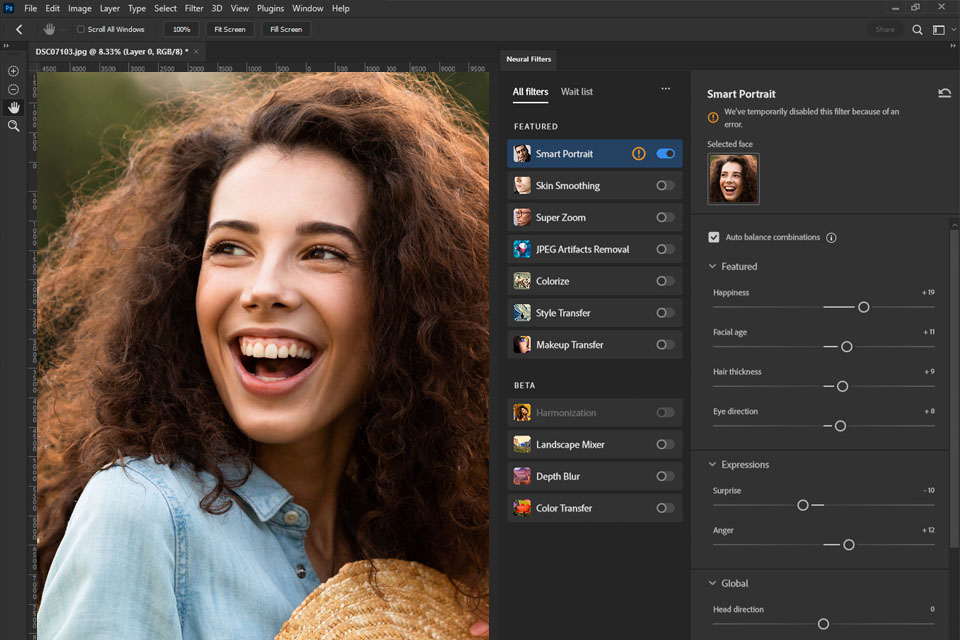
Moreover, there are a number of beta filters that are still being finalized. For example, you can use “Smart Portrait” to make a person look older or younger by changing and enhancing facial features.
You can change the thickness of hair, smile broadness, remove wrinkles, make eyes more expressive, or add emotion to a face. In addition, there are sliders for altering the direction of the light, so you can change the shadows in a photo.
I love using the Makeup Transfer feature. With just a few clicks, I can apply the same stunning makeup to different faces or even switch up a model’s entire look after the shoot. With this tool, it is easy to achieve a particular look across a set of pictures.
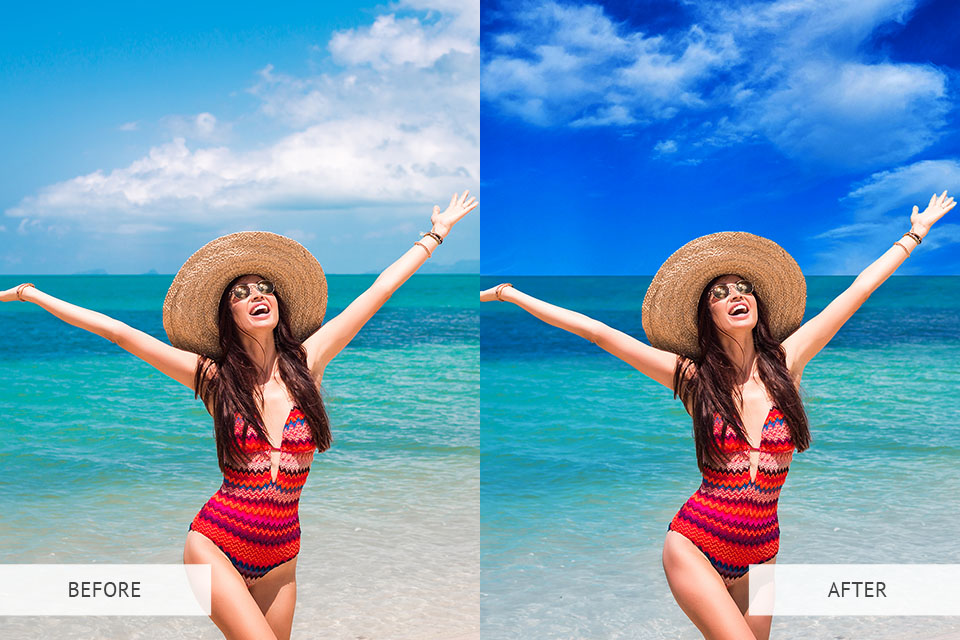
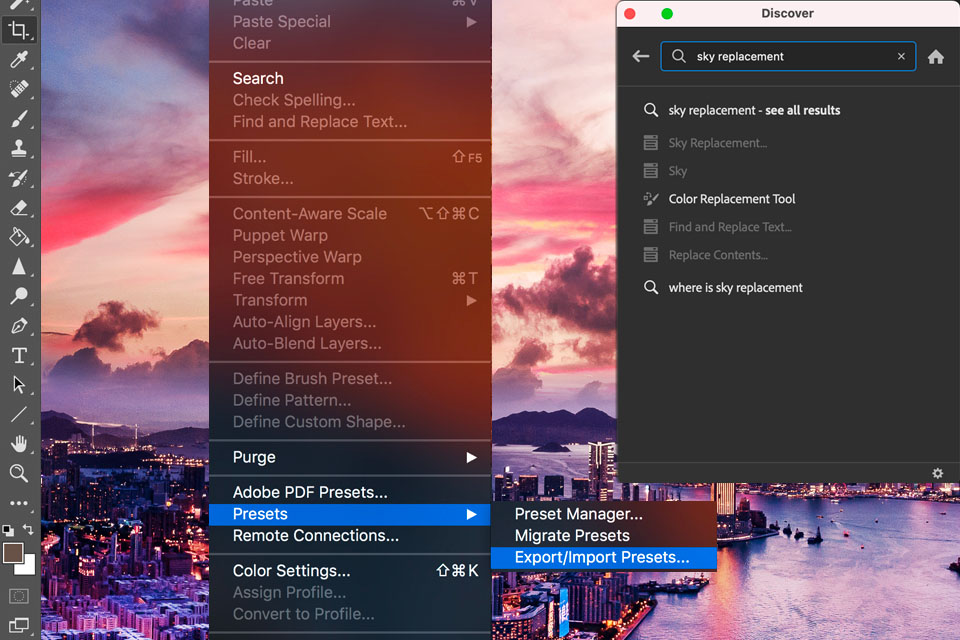
Using the “Sky Replacement” AI Photoshop tool, you can select the sky in your photo in one click and replace it with a more interesting option. There is an internal library of variants, but if the variety of embedded images isn’t sufficient for you, you can upload third-party free sky Photoshop overlays.
Instead of replacing sky in Photoshop manually, you just need to:
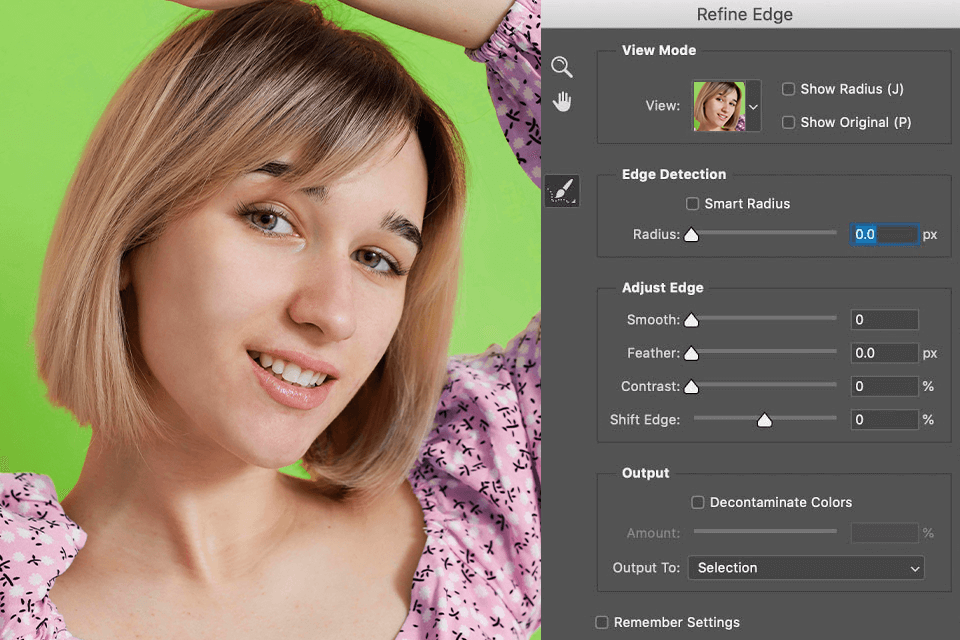
The Smart Edge Refinement leverages Adobe Photoshop AI algorithms for image analysis and automatic edge refinement. Thus, you can be sure your selections will look accurate and professional.
For example, I use this Photoshop AI tool to accurately highlight hair or tree foliage in my photos. I start by using the Lasso tool, Magic Wand, etc., and then click Selection > Refine Edge. Photoshop analyzes the edges of my selection and automatically refines them.
You probably know how challenging it is to select hair strands or tiny leaves. To avoid such problems, I rely on this feature. It refines edges automatically, giving me sharp selections without jagged edges or awkward cutouts every time.

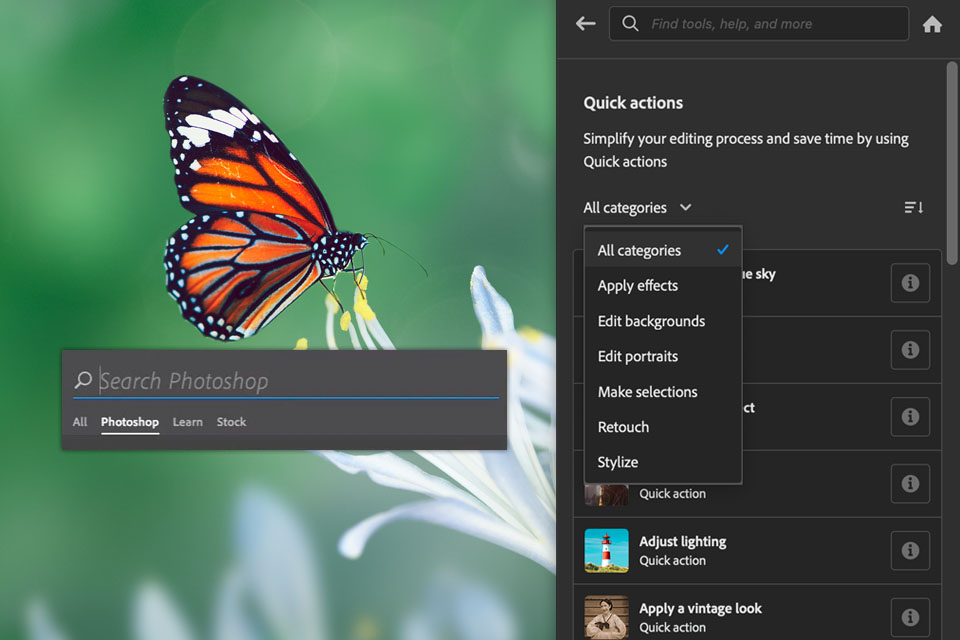
The new Search Panel is an AI-powered tool that makes it easier to find the necessary features. This tool operates on artificial intelligence algorithms to provide relevant results based on your search query.
Now, instead of searching for specific instruments in the top bar, I just enter keywords into AI search, for example, smooth skin, remove unwanted object from photo, improve colors, etc.
In addition, the new Search panel also has contextual-sensitive help and lists the steps I need to take to achieve a specific result. Therefore, the editing process becomes easier for novices.
You can even ask questions like how to fix red eye, how to make a photo brighter, or how to apply a B&W filter.
Remember that you can access the help menu at any time by clicking the magnifying glass icon in the top right corner of the window, pressing Cmd + F, or via Photoshop's help menu.
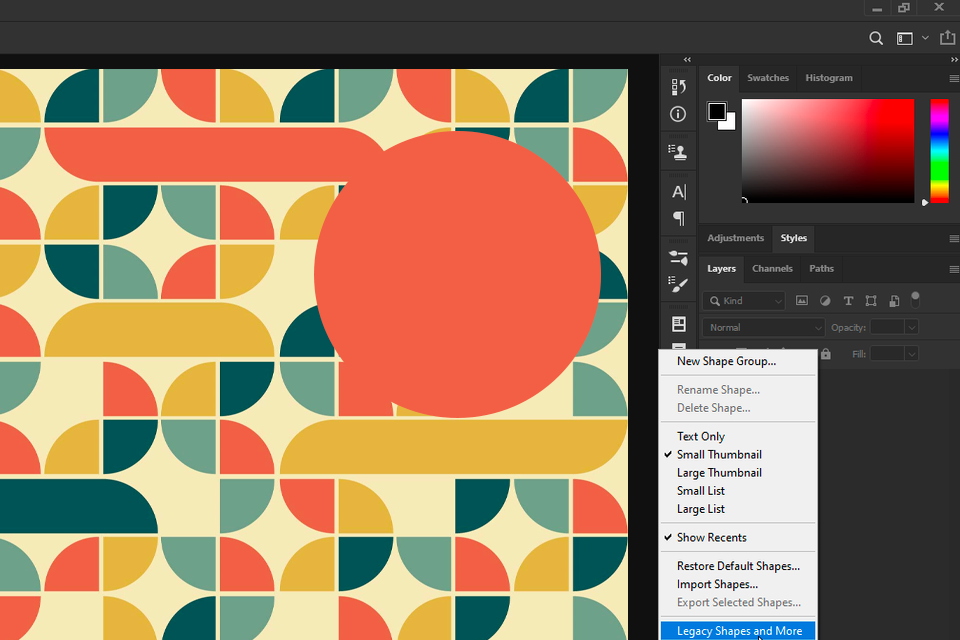
With the new AI Live Shapes, you can no longer use third-party free vector programs to design logos or web interfaces. It has become very easy to create your own vector shapes in Photoshop.
To use Live Shapes, follow these steps:
Once you've created a Live Shape, you can easily edit it by clicking and dragging its anchor points. You can also adjust its properties, such as fill color, stroke color, and stroke width in the options bar.
In addition, Live Shapes has several other useful features, such as the ability to round the corners of a shape, add dashed lines, and create variable-width shapes.
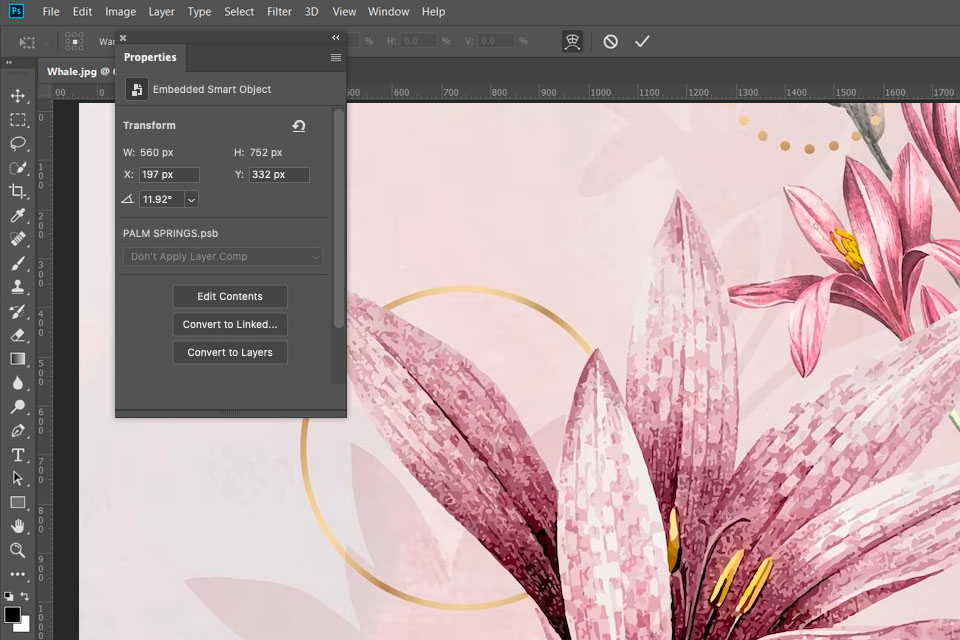
If you are just going to make your first mockup in Photoshop and want to experiment with your smart objects, rotate and transform them, and add various effects and styles, you will probably appreciate the availability of the Reset Smart Objects AI Photoshop function. Clicking this button, you can quickly reset your smart objects to their original state.
To use this feature, simply select “Reset Smart Object” in the right corner of the context menu.
Smart objects are favorite tools when dealing with templates and reusable assets. But I should admit that sometimes I get carried away with edits. That’s where the reset feature saves the day. I can undo everything and get back to the original in seconds. It is very helpful.
Some of them are built-in and used to tackle basic tasks. Others are developed by individual users and should be uploaded into the software.
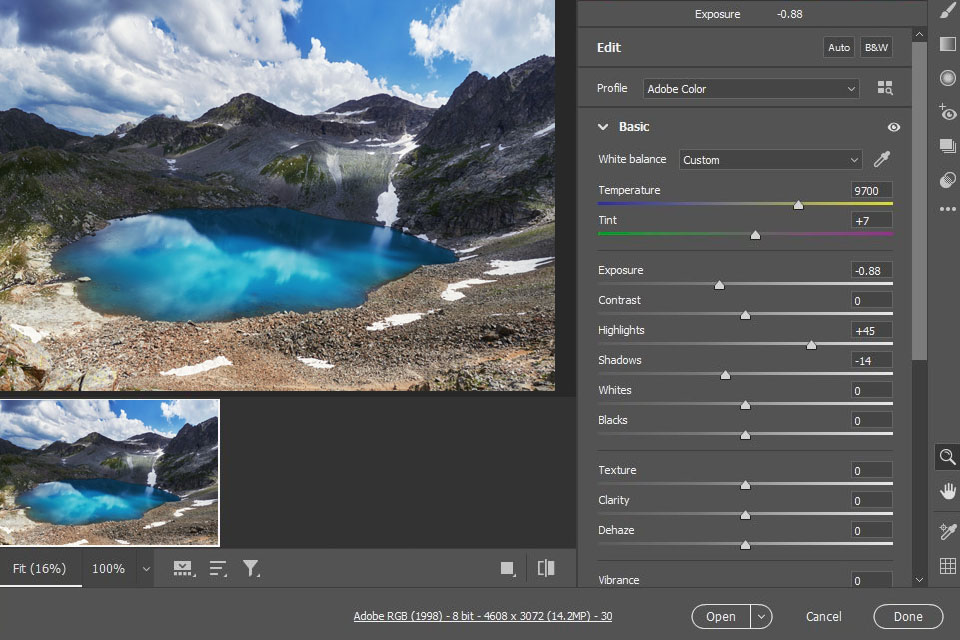
Adobe Camera Raw is one of the most useful built-in Photoshop AI plugins. It offers advanced image processing features such as color correction, noise reduction, and lens correction.
I often use Camera Raw in my photo retouching workflow. It is great for tweaking colors, fixing exposure defects, reducing noise, and even masking and restoration. Once I’m done with Camera Raw, I jump into Photoshop to refine the details.
Most editing tasks can be performed with the help of artificial intelligence at the touch of a button. For example, you can eliminate aberration defects and red-eye, improve exposure, and more. However, this plugin can only be applied to RAW images.
As for third-party UXP-based plug-ins, you can find lots of high-quality tools. There are instruments for managing assets and inventory, collaborating with other users by pre-integrating Photoshop with the major photo cloud services such as Dropbox, Monday, Trello, Slack, and Xero, and even auto-retouching with Pro Add-Ons, Picture Instruments, Tony Kuyper, Greg Benz, and Davide Barranca.
In addition, some AI plugins allow you to connect to hardware consoles such as Loupedeck or capture augmented reality objects using ClipDrop.
Photoshop AI Preset Search makes it easy to find the presets you need. This tool uses artificial intelligence to analyze your image and suggests appropriate presets based on the color scheme and lighting.
To use the preset search for AI presets, I open the “Presets” toolbar and enter keywords in the search, such as “vintage look” or “black and white”. Photoshop will generate a list of presets that match my search.
The search is synced every time you upload third-party free Photoshop actions for portrait or other filters into Photoshop, so it will show them upon your next matching query.
Photoshop generative AI tools make editing faster and more enjoyable than ever. Still, don’t rely on them too much. It’s your artistic eye, your creative instincts, and your personal touch that set your work apart. AI can be an incredible time-saving solution, but don’t let it do all the thinking for you. Instead, use it to sharpen your skills, experiment with fresh ideas, and explore new creative possibilities.
Still, AI makes mistakes. You have probably seen weird, wonky AI-generated images online. Photoshop’s AI profile picture generator is getting better with each subsequent upgrade, but it isn’t error-free. I’ve had Generative Fill surprise me with a three-legged pup or a background straight out of a sci-fi movie. Actually, you can never be 100% sure you’ll get a perfect image.
I once used Generative Expand to extend a café scene, asking it to "add more tables and chairs." Photoshop got a little too creative. Instead of a charming setup, I got levitating tables and chairs straight out of an abstract art exhibit. At that moment, I discerned that AI tools can’t fully replace humans. You can use AI art prompt generators to customize your prompts and then try again.
Some retouchers fear that Photoshop AI free and paid tools will take over their jobs. I disagree with this idea. AI is changing the way we work, but it’s important to master it and use it to complete tasks faster. The real winners are those who integrate AI into their workflow, combining its capabilities with their own artistic expertise.
To evaluate the true capabilities of Photoshop AI tools, I used images from FixThePhoto’s extensive archive instead of generic pictures. Each photo had different defects that required prowess to tackle. I selected various pictures, including:
Portrait photos. I selected close-ups and full-body shots, studio setups and outdoor vibes, as well as a mix of ages, skin tones, and lighting conditions. Thus, I managed to use Photoshop’s Neural Filters for smoothing skin and retouching faces. Besides, I used the Generative Fill to extend the background and remove distractions.
Landscape and urban photos. I used AI-based tools to replace dull skies, expand compositions, and remove distractions. I wanted to see the capabilities of Sky Replacement, Generative Expand for extending scenes, and Distraction Removal.
Product images. Product shots come in all forms, but sometimes they require manual tweaking. I tested Generative Background and Generative Fill by altering backgrounds and fine-tuning product details.
Photos with minor defects. It happens that a picture has a cluttered background, an awkward crop, or a dull sky. These photos served as an ideal testing ground to evaluate how AI Photoshop tools can efficiently resolve these common issues.
To assess each AI tool, I created custom tests.
For Generative Fill, I tested:
For Generative Expand, I focused on:
For Sky Replacement, it was all about:
For Distraction Removal, I tested its speed and effectiveness on:
The testing process was genuinely engaging. When evaluating AI Photoshop plugins and tools, I also considered the following factors.
Realism and quality. When it comes to AI-generated content, there’s one golden rule: if it looks fake, it should be improved. The FixThePhoto team has eagle eyes for blurry edges, weird textures, and robotic details. For us, realism isn’t just a goal, it’s a must.
Prompt accuracy. When testing Generative Fill and Background, I considered whether AI correctly understood and executed my text prompts. Did it deliver the expected results, or was the outcome far from what I intended?
Productivity boost. I checked whether these AI tools actually saved me time. When it comes to professional retouching, speed and accuracy can either make or break your entire workflow.
Control and customization. Can I fine-tune the AI’s output to match my vision? Am I stuck with its automatic results? Professional retouching requires precision and customization.
Real-world application in photo retouching. Do these AI tools truly assist in the retouching work we do at FixThePhoto? Can they help me solve common editing problems? Can I use them to enhance our final results?


