Jobs that used to need multiple applications and plenty of hands-on effort, such as fixing grain, increasing clarity, and improving picture quality, can now be done on their own by smart tools like Luminar Neo and Topaz Photo AI. As a result, photographers now pick software based not only on what it can do, but on how well and easily it works within actual editing routines.
Luminar Neo and Topaz comparison shows that both tools use AI to simplify tough editing work, but they focus on different needs and jobs. This review describes how each software performs in key areas such as making images look better, how easy it is to use, speed, and fitting into your workflow. This helps you see their strengths and where they work best in practice.
I photograph both travel scenes and people. After a long trip, I returned with many pictures that seemed fine at the time but looked disappointing on my computer. Quite a few were taken in dim conditions, like early dawn, evening streets, and small coffee shops, so graininess was a serious problem.
On top of that, some pictures came out a bit blurry from shooting by hand or capturing moving subjects, and others just looked dull, as if they were lacking depth or fine detail. Usually, I'd move between Lightroom, a separate tool for sharpening, maybe some work with masks, and waste too much time trying to "rescue" each image by hand.
Eventually, I saw the same pattern. I wasn't doing creative editing. I was just fixing the same technical problems over and over. Reducing noise, sharpening, restoring detail, and fixing lighting. The same steps on repeat. So, I started looking into AI tools that could do this work faster and smarter.
That’s when I remembered that my colleagues from the FixThePhoto team once recommended trying AI-based platforms like Luminar Neo and Topaz Photo AI.
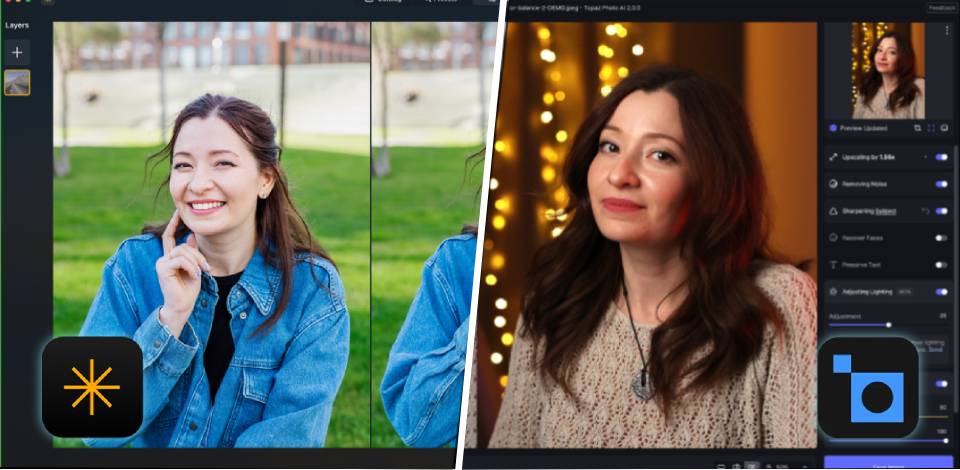
Both tools said they could solve exactly the problems I had, like AI noise cleanup, sharpening, enlarging, and overall photo improvement, but they went about it in different ways. Luminar Neo seemed more like a full editing suite with creative options built in, while Topaz Photo AI seemed more focused on pure image sharpness and detail restoration.
So, instead of just wondering, I decided to try both on the same group of photos. This included noisy night pictures, slightly blurry portraits, and a few too-dark landscapes. I wanted to see which one actually helps more in real work, not just in promotional videos.
Luminar Neo is built as a complete AI-powered photo editor, not just a single-purpose fixer. During testing, it came across as a full editing space where I could both correct problems and creatively change pictures all in one place.
I started with some boring travel and portrait photos. Inside the Edit module, I used tools like AI Enhancement, Relighting, Detail Sharpening, and Color Tuning. For example, in a backlit portrait, Relighting let me brighten the person separately from the background, while Face AI carefully improved face details without making them look fake.
What makes Luminar Neo different is that you work in steps - you build your edits one on top of another, almost like adding layers. I also tried the Sky AI tool, which swapped a boring gray sky for a sunset. The AI handled trees and horizon lines well and automatically adjusted the lighting in the image. Similarly, GenErase removed unwanted things, like people in the background of a street shot, very cleanly.
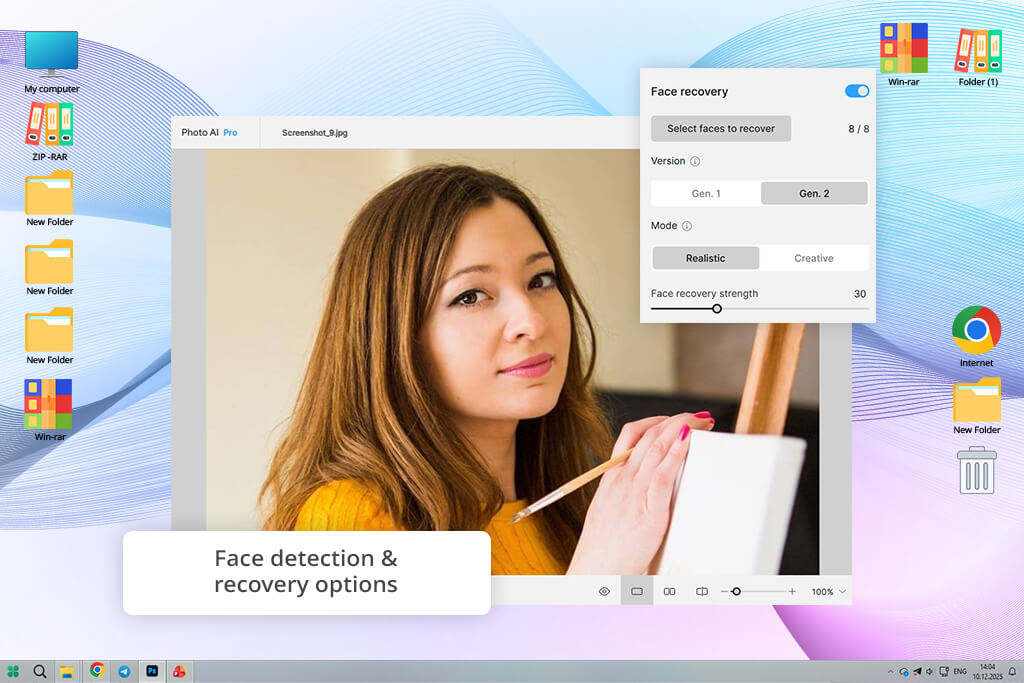
Topaz Photo AI is a technical AI photo restoration tool to fix and restore pictures, not a program for creative adjustments. In my tests, it acted more like an automatic "repair system" meant to fix damaged or poor-quality images.
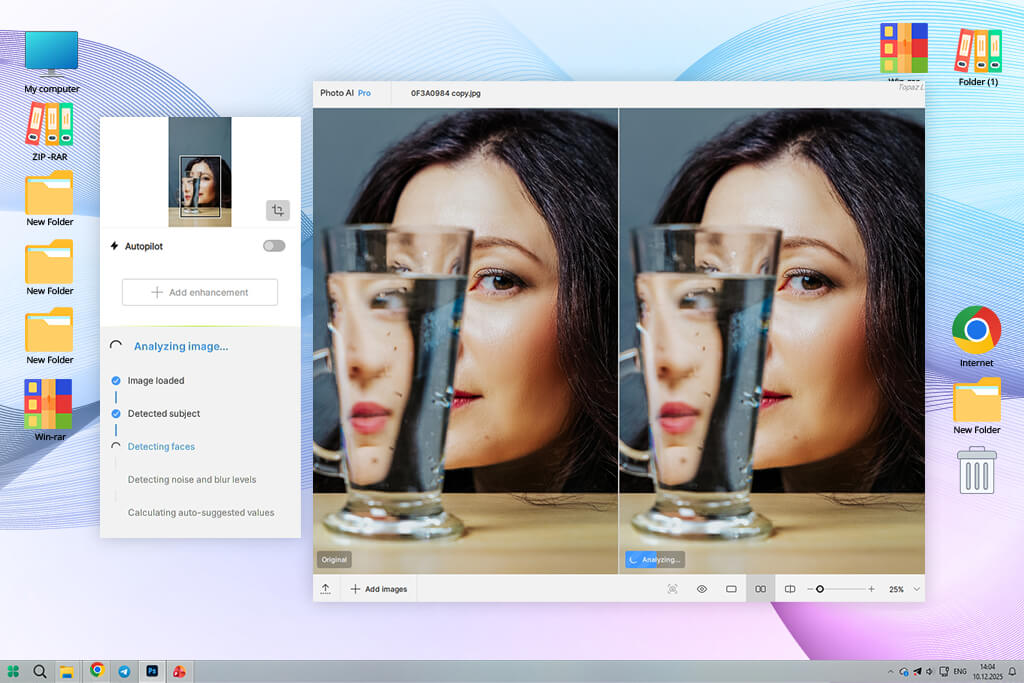
I tried it on grainy night photos (ISO 6400) and a bit blurry handheld portraits. After opening an image, the auto feature studied it, finding noise, blur, and faces. Then it applied tools like Remove Noise, Sharpen, and Face Recovery without me needing to set anything up.
The most impressive part is how it handles each issue separately:
For instance, in a blurry portrait, Face Recovery rebuilt details such as eyes and lips. In a noisy street shot, Remove Noise AI cleaned up the grain without losing the edges.
Topaz software also includes Gigapixel, which is an upscaling tool. It can make photos up to six times larger or even give you extremely high-resolution results. This is very useful for making prints or fixing photos that have been heavily cropped.
| Feature | Luminar Neo | Topaz Photo AI |
|---|---|---|
|
General Purpose
|
Full editor
|
Technical-only tool
|
|
Editing Approach
|
Creative + corrective workflow
|
Restoration-focused
|
|
Non-Destructive Editing
|
✔️
|
✔️
|
|
Interface Complexity
|
Intuitive but feature-rich
|
Minimal & simple
|
|
Workflow Integration
|
Standalone + plugin support
|
Plugin for Photoshop/Lightroom
|
|
Catalog & Asset Management
|
✔️
|
❌
|
|
Layer Support
|
✔️
|
❌
|
|
AI Automation
|
✔️
|
✔️
|
|
Noise Reduction
|
✔️
|
✔️
|
|
Sharpening & Upscaling
|
Limited
|
✔️
|
|
Portrait Tools
|
✔️
|
Limited
|
|
Generative AI
|
✔️
|
Limited
|
|
Creative Features
|
✔️
|
❌
|
|
Filters & Presets
|
✔️
|
❌
|
|
Batch Processing
|
Limited
|
Limited
|
I didn't focus much on image quality. Instead, I looked at what really matters in daily work - how each tool fits into a real editing workflow. I used both Luminar Neo and Topaz Photo AI in a full editing job: importing a mix of portraits and travel photos, applying edits, and exporting final images as if I were delivering a gallery to a client.
The aim was to see which photo editing software feels like a natural fit within the editing workflow, and which one feels like an added task you have to "find a way around."
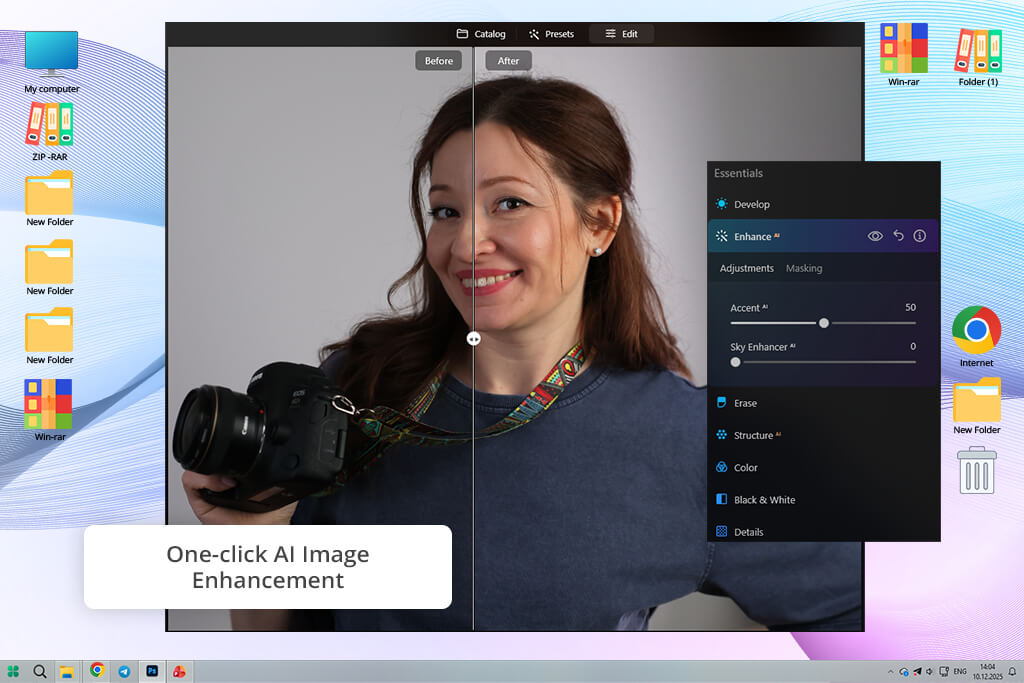
With Luminar Neo, the process feels like a complete editing workspace. I began by bringing pictures into the Catalog, which already offers simple sorting and viewing tools. From there, I went to the Edit section, where all changes take place in an organized, layer-based setup.
What impressed me during testing was how easily the workflow goes from one phase to another. I'd start with Enhance AI for broad adjustments, then move to Light Depth for lighting fixes, followed by face tools like Face AI, and finish with creative options like Atmosphere AI or Sky AI if needed.
Templates (what the app calls presets) also helped speed up my work. On a set of travel photos, I applied a template as a starting look and then fine-tuned brightness and detail. Everything happened in one place, and I never had to leave the program to complete a full edit.
When it came to Topaz Photo AI, the experience was totally different. There is no photo library, no layered adjustment system, and no creative step-by-step process. Instead, I used it as a technical fixing stage within a larger workflow.
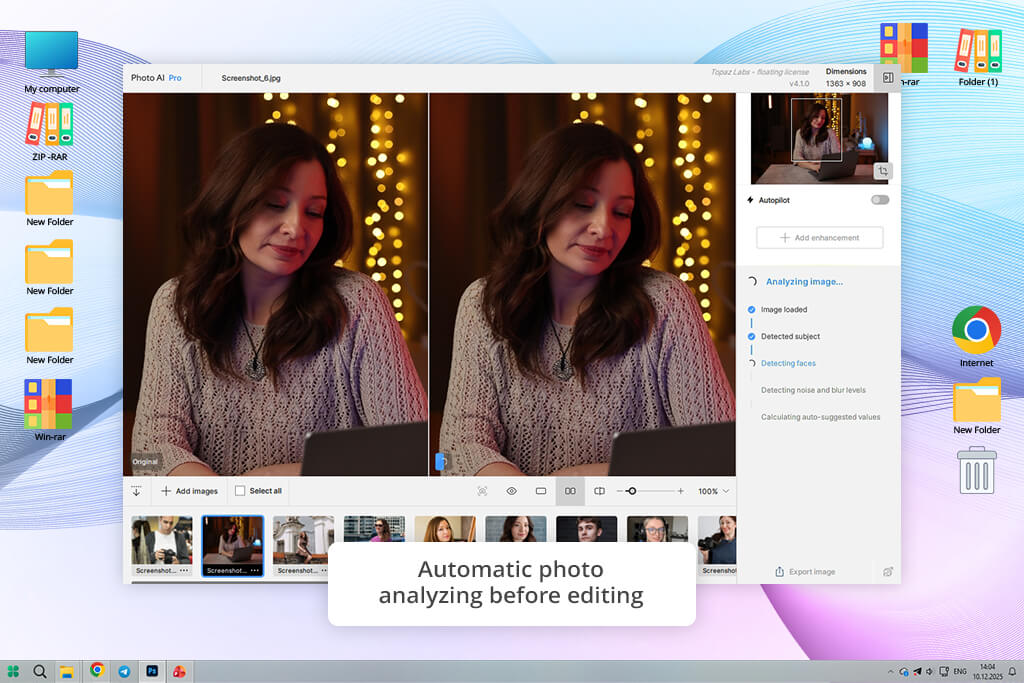
When I used it, I opened a folder of photos, and Autopilot immediately scanned each one, applying tools like Remove Noise AI, Sharpen AI, or Face Recovery based on what it saw. The process is fast, but also very simple - you don't really "edit" a picture here, you just "fix" it.
After finishing the processing, the workflow naturally pushed me to send the picture back into another program, such as Lightroom or Photoshop for color toning, cropping, or final tweaks. Topaz does not replace an editor - it improves files before or after editing.
“This tool is very simple - you just load a picture, it scans everything, and produces an output. I didn't have to put much thought into it, but it also felt less adjustable. It's more like "click and let it work" than real editing.”

Winner: Luminar Neo (a complete editing workflow vs a specialized tool for technical image repair)
When I began testing Luminar Neo vs Topaz Photo AI, I used the same collection of "tricky pictures" from an actual trip - dull nature shots, too dark city scenes, and several face photos that were technically okay but lacked visual energy. My aim was not to see which tool could "repair" a picture, but which one could truly turn a decent file into something I would be comfortable handing over to a customer or showing in my portfolio.
With Luminar Neo, I felt like I was editing a photo from scratch, not just fixing it. I started in the Edit tab and slowly built the result using stacked AI tools. My first step was usually Enhance AI, which adjusted brightness, contrast, and texture automatically, already making the photo look more "finished." On a flat mountain landscape, I tested, this alone recovered hidden details in the shadows and gave depth to the sky without looking overdone.
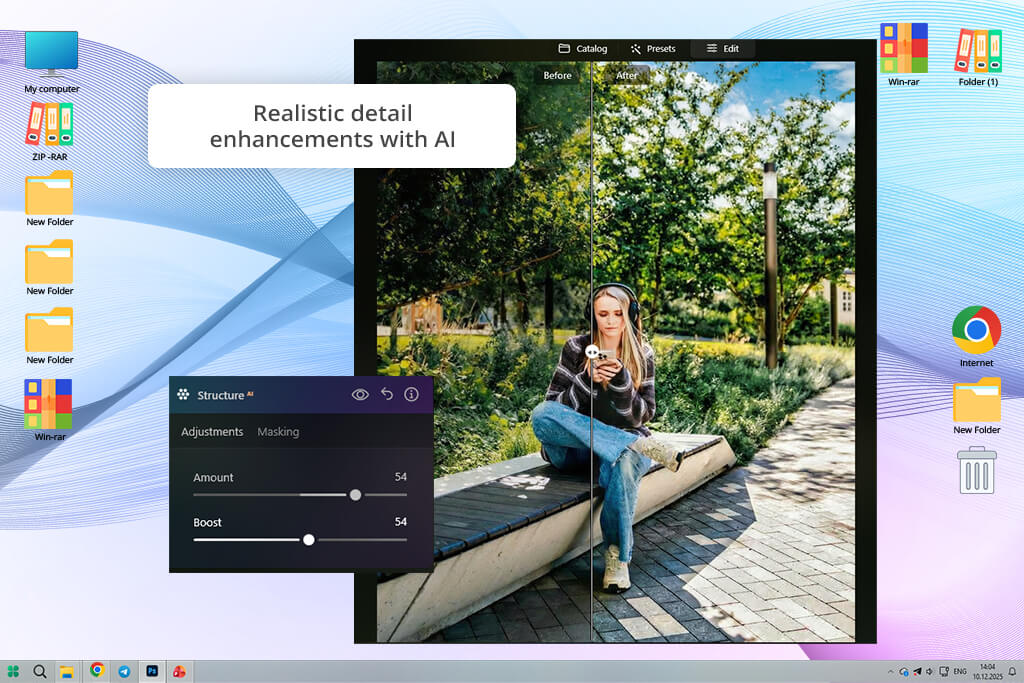
Then I used Structure AI, which made small details in rocks, trees, and buildings stand out more. This is when the picture began to feel more "lifelike" rather than flat.
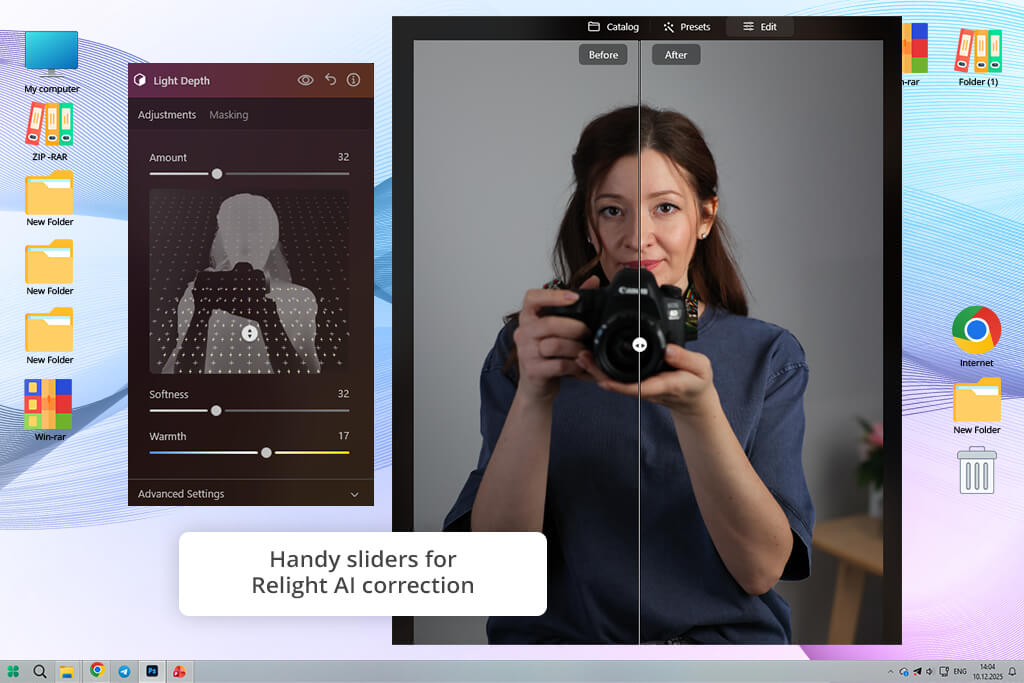
Finally, I used Light Depth, which was the coolest part of the test. It made a map of the scene's depth and let me brighten the foreground separately from the background. In a sunset street photo, I could lighten the front subject while keeping the sky's mood, which completely changed the image's balance.
What really stood out is that this free photo editing app didn’t just clean up the image - it helped rebuild the atmosphere and depth. By the end, the photo no longer felt like something that had been repaired. It looked like a fully finished edit that could be uploaded straight to a portfolio or Instagram without any extra work.
“When I worked on flat-looking travel photos, it gave them a more cinematic feel - improving the lighting, adding stronger atmosphere, and making the colors stand out more. Sometimes the result looked a bit stylized, but it definitely made the images feel more visually engaging.”

Topaz Photo AI was almost the opposite. I opened the same landscape photo, and within seconds, Autopilot scanned it and applied Remove Noise AI and Sharpen AI. The improvement was immediate and very obvious technically - sky noise was gone, rock details were sharper, and edges looked cleaner.
But once the processing was done, the photo still looked like a cleaned‑up RAW file, not a finished picture. The feel of the image hadn't changed, the lighting didn't look any better, and there was no creative touch to the scene. Even though the technical quality improved, the story the photo was telling stayed pretty much the same.
For instance, in a dark city scene, Topaz did a good job getting rid of grain and bringing back crispness to the outlines of buildings, but the picture still lacked depth in exposure and had uneven light. It appeared tidier, but not more interesting to look at. I still had to use Lightroom or another program later to truly "complete" the image.
“This one feels more technical. I tested it on soft and noisy photos, and it focused on fixing clarity instead of changing the look. It doesn't try to make photos "nicer," just cleaner and more technically correct.”

Winner: Luminar Neo (more complete transformation that combines technical improvements with creative enhancement instead of just fixing the image)
For this test, I focused on one of the most common real-world photo problems - heavy noise in low light. To compare which is better, Luminar Neo or Topaz Photo AI, I used a series of images shot at ISO 3200–6400 during nighttime walks around the city, including neon-lit streets, dark cafés, and handheld shots with uneven lighting. These are the kinds of photos where noise reduction tools either really improve the image or completely ruin the details.
My aim wasn't simply to find out which program does a better job of cleaning up grain in a lab-like test. Instead, I wanted to evaluate something more hands-on. Which tool gives you pictures that still look real and ready to use after the edits are done?
With Topaz Photo AI, I started by importing each image and letting Autopilot handle the process. It instantly analyzed the photo and applied Remove Noise AI, often combined with s Sharpen AI when it detected softness. In most cases, I barely needed to adjust anything - the default result already looked very good.
On a grainy night street shot taken at an ISO 6400, this noise reduction software made the dark areas look much cleaner. Parts of the image that were once rough and full of texture turned smooth and tidy.
However, when I zoomed in and compared multiple images, a pattern started to appear. While the noise was effectively eliminated, some images developed a slightly over-smoothed or “plastic” texture, especially in areas with subtle gradients like skies, walls, or skin. It didn’t ruin the image, but it definitely shifted it toward a more processed look.
With very noisy images, Topaz felt more like a "rebuilding tool." It doesn't simply clear up the picture - it attempts to recreate it. That's quite impressive, but it also means the result can sometimes look less like a real photograph and more like something artificially constructed.
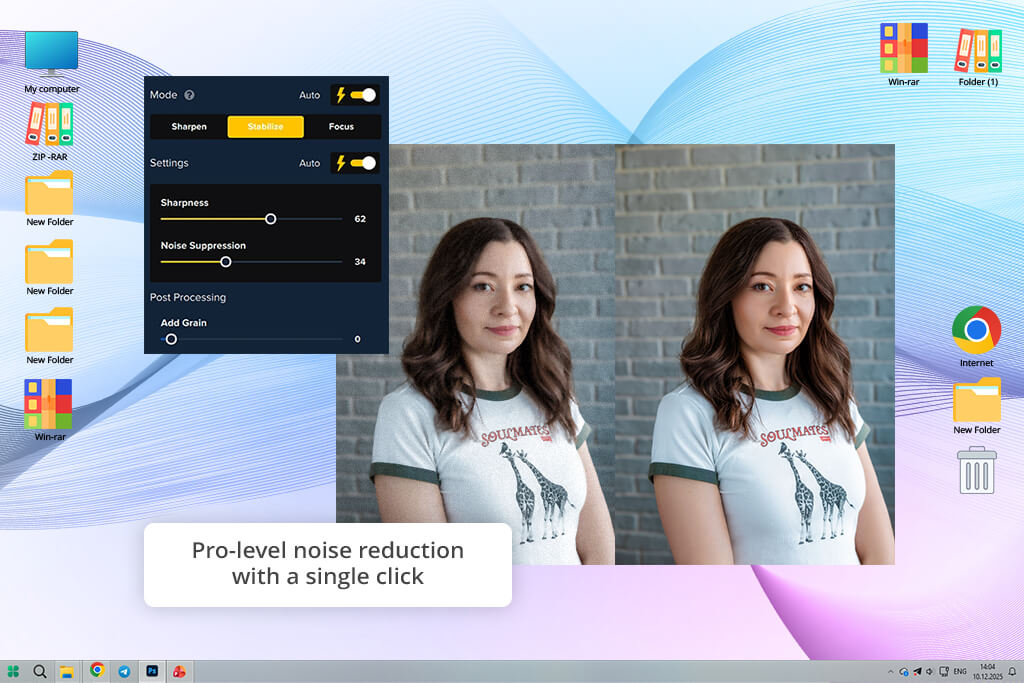
While editing photos in Luminar Neo, I tried the Noiseless AI tool on the same batch of images. The first thing I noticed was that it takes a gentler approach than Topaz. Instead of wiping away every bit of grain, it cleans up the noise while trying to keep the original feel of the picture intact.

In a dimly lit portrait taken beneath street lamps, Luminar cleaned up noticeable noise on the person's face and in the darker parts of the frame. However, it didn't fully remove all the fine texture. Skin still appeared natural, and the shadowy areas kept a subtle, almost film-like grain. This made the final image feel more organic, even though it wasn't as technically spotless as what Topaz produced.
Luminar Neo truly came together when I started stacking its features. After using Noiseless AI, I added Enhance AI to boost exposure and contrast, followed by Structure AI to restore detail in clothing and background areas. This mix didn't just cut down on noise - it reshaped the picture into something well balanced and visually unified.
Winner: Topaz Photo AI (top-level noise reduction, especially for extreme ISO shots and difficult image recovery situations)
To compare Luminar Neo vs Topaz Photo AI, I focused on a very common issue - slightly blurry handheld portraits. These kinds of shots happen all the time during travel or event photography: the moment looks perfect, but the image turns out a bit soft because of camera shake, missed focus, or a slow shutter speed. I selected several portraits with different levels of blur - from mildly soft to heavily blurred - to see how much each tool could realistically recover.
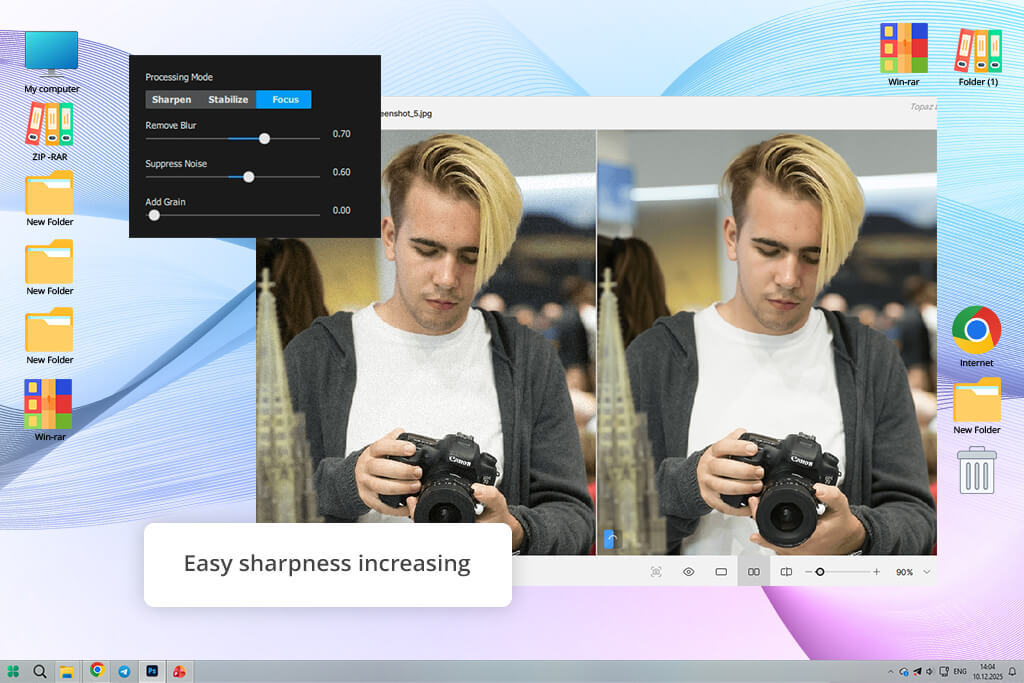
With Topaz Photo AI, I first let Autopilot examine each image. In most situations, it automatically turned on Sharpen AI, and if faces appeared in the photo, Face Recovery was activated too. Together, these tools instantly made the images look noticeably different from the originals.
One handheld portrait I tested had slight focus issues, and the improvement was obvious right away. The eyes, which initially looked blurry and undefined, appeared much cleaner afterward. Areas around the face became more refined, while details such as eyelashes, eyebrows, and lips were rebuilt well enough to recover the shot. Instead of only increasing edge sharpness, Topaz Photo AI used AI models to generate lost detail from its trained image data.
I tried this photo sharpening software on another picture that was a little blurry from movement. Even though the blur wasn't strong, the program was able to bring back details in the fabric of the clothes and some parts of the face that you could hardly see at all before.
“I tried it on photos that were blurry from movement, and it actually brought back details I never thought I'd see again. Hair, eyes, and textures looked like they were naturally fixed, not just made sharper.”

As for the Luminar Neo features, when I tried sharpening using Structure AI and Details, I noticed it works differently from Topaz. It doesn't try to rebuild missing information. Instead, it focuses on bringing out what's already there in the picture.
On the same portrait that was a little out of focus, using Structure AI made the nearby contrasts stronger and brought out more detail in the hair, clothes, and face. The eyes looked clearer, but not because the software rebuilt them - it just made what was already there stand out more. The photo still felt like it came straight from the camera, only sharper and more defined.
I also combined Enhance AI with Structure adjustments, which helped boost clarity and micro-contrast, especially around skin tones and the separation between the subject and background. But when a photo was seriously out of focus, Luminar Neo couldn’t fully restore lost detail - it mainly improved the detail that already existed in the image.
“I tried it on some portraits that weren't totally sharp, and it helped them look cleaner and more punchy. Every now and then, though, it adds a bit too much contrast along the edges. It's great for social media, but it doesn't always look totally true to life.”

Winner: Topaz Photo AI (better technical restoration and real AI rebuilding of blurred details, especially in very soft or out-of-focus photos)
I stopped worrying about fixing every little technical flaw and began using the software for everyday creative situations: dull travel pictures, plain skies, patchy lighting, and messy backgrounds that would usually need Photoshop to clean up.
The idea was simple: can this software take an ordinary photo and make it strong enough for a portfolio or social media - without needing to manually mask or edit anything by hand?
With Luminar Neo, I stayed in the Edit section and piled on several AI tools to see how much I could improve one photo without switching to any other program.
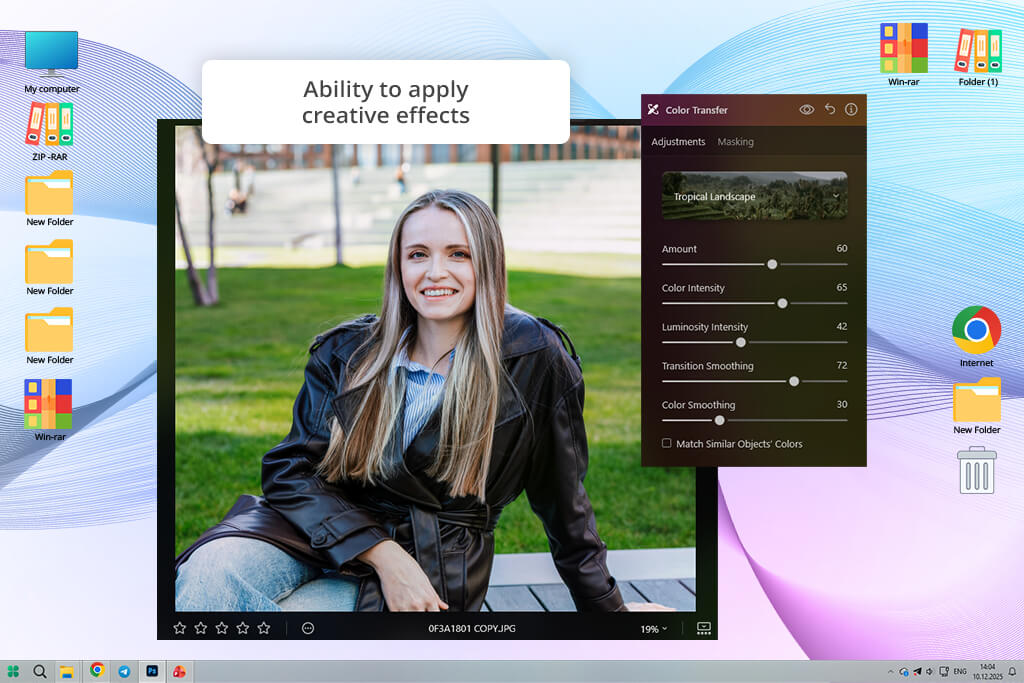
The first feature I tried in Luminar Neo was Sky AI. I took a dull landscape image with a gray, overcast sky and swapped it with a sunset option from the built-in collection. What really impressed me was how naturally the replacement fit into the scene. The software accurately handled details like trees, horizon edges, and reflections, while also adapting the foreground lighting so the final result looked realistic instead of artificially edited.
After that, I tried Light Depth in Luminar Neo on a portrait that was too dark because of strong backlighting. Rather than lifting exposure across the entire frame, the tool built a depth map and let me brighten the person separately from the background. This made it possible to recover a silhouette-like image and turn it into a balanced portrait while still keeping the original mood of the scene.
I also tried GenErase in Luminar Neo, and it turned out to be very useful for removing distractions. In one crowded street image, I painted over several people in the background, and the AI rebuilt the missing areas naturally - recreating ground textures, shadows, and nearby building details without obvious glitches. The experience felt similar to using content-aware tools in Adobe Photoshop, but much quicker and easier.
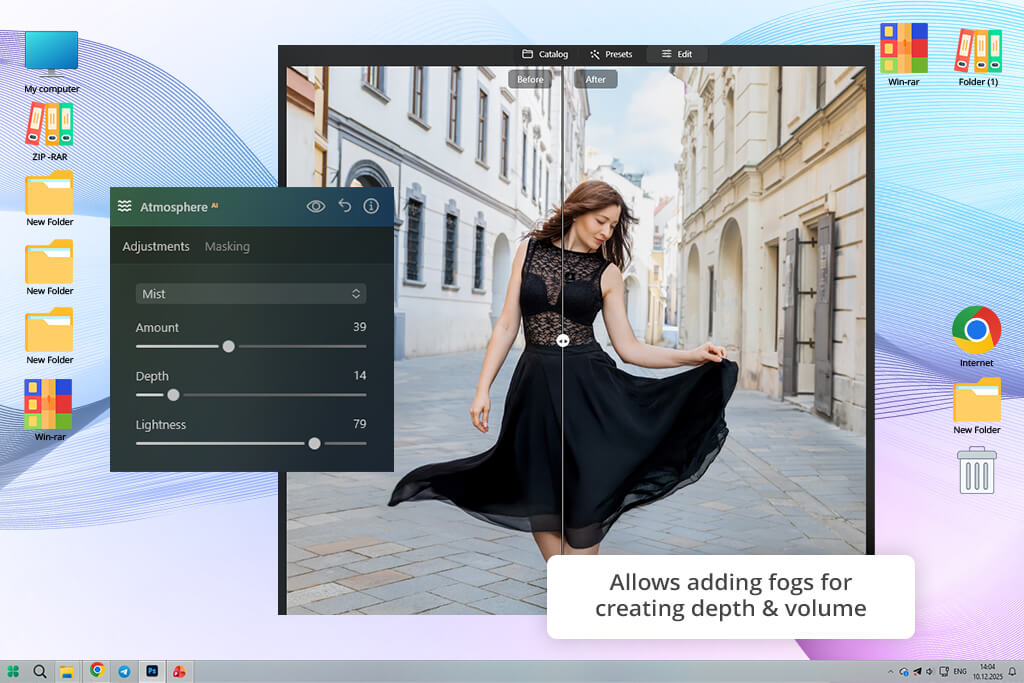
Finally, I experimented with Atmosphere AI in Luminar Neo by adding fog and depth layers to a flat mountain landscape. Instead of simply placing an effect over the image like many casual automatic filter apps, the tool actually changed the sense of depth in the scene, making the foreground and background feel much more separated.
Using Topaz Photo AI felt very different from working in Luminar Neo. I tested it on the same images, but it became obvious almost immediately that the software is focused purely on image quality improvement, not on creative editing or scene transformation.
I tested what Autopilot in Topaz Photo AI could do with a flat landscape photo. It applied Remove Noise and Sharpen, making the image cleaner and clearer, but the overall scene stayed the same as the original. There were no tools for changing the lighting, replacing the sky, or removing distracting objects from the frame.
Even when the image had obvious visual problems like a flat gray sky or distracting objects in the background, this photo editing app for Mac and similar platforms could only improve the technical side of the photo, not the storytelling or atmosphere. The result looked cleaner and sharper, but not necessarily more engaging.
Winner: Luminar Neo (much greater creative control, more advanced AI-powered scene editing, and stronger image transformation capabilities)
For testing portraits in either Luminar Neo or Topaz Photo AI, I used a variety of real-life pictures - outdoor shots taken during golden hour, indoor ones under café lights, and a few dim, handheld photos where skin texture, brightness, and face tones were a bit uneven. These are the exact types of images that show whether portrait tools can rescue a picture or reveal their weaknesses.
The main goal here wasn't just about making someone look prettier. It was a more down‑to‑earth question: can this software handle an entire portrait editing process - from fixing the lighting to polishing the skin and facial details - without needing to open another program?
Luminar Neo made portrait editing feel like one complete workflow, not just a bunch of separate buttons. I started with Face AI, which let me gently brighten the eyes, tweak facial structure, and soften skin just a bit. What really stood out was how natural everything looked - no plastic, fake skin, especially when I kept the adjustments mild.
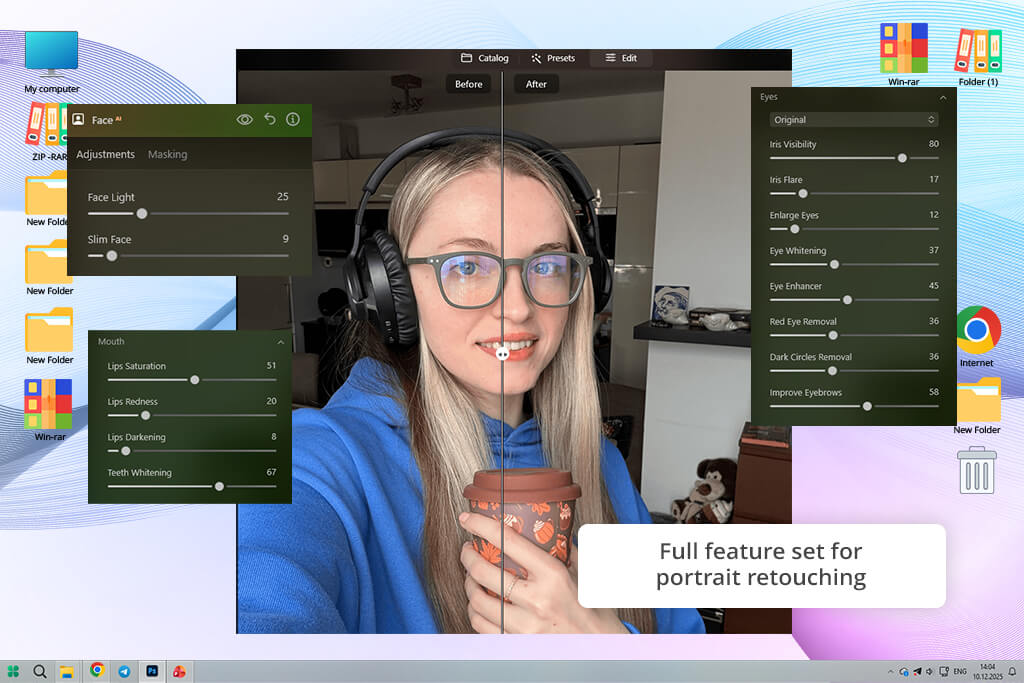
Take an outdoor portrait that was a bit too dark, for instance. Face AI in this app for photographers helped brighten the person's face without losing skin detail. The eyes looked more noticeable, and the lighter parts of the face came back without making the whole picture look flat.
After that, I used it along with Light Depth, which made the overall lighting way better. In one photo where the sun was behind the person, their face came out much darker than the background. Light Depth made a smart adjustment based on depth, so I could lighten just the person while keeping the nice warm sunset in the back. Together, these two tools turned a tricky lighting situation into a solid final picture - without having to open Lightroom or Photoshop.

At the end, I tried Body AI for small changes to body shape. It did a nice job for tiny touch‑ups, but I was careful with it - it's clearly made for light adjustments, not big changes.
“Portraits come out looking polished and social-media-ready. Skin appears smoother, lighting looks cleaner, and the overall result has a more enhanced, beauty-focused style - sometimes a bit overprocessed depending on the settings.”

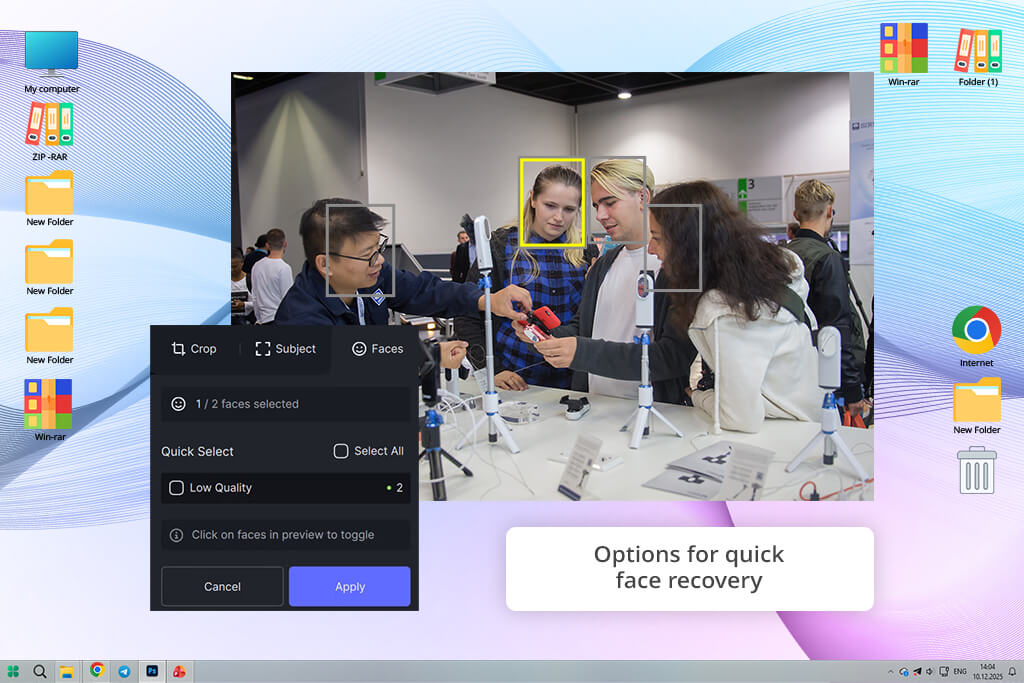
Working with Topaz Photo AI felt much more limited for portrait editing. The main feature related to portraits is Face Recovery, which is mostly intended for poor-quality or heavily blurred faces.
I tried it on some portraits that were a little blurry, plus one shot of a person far away in dim light. In the toughest cases - where you could hardly make out their face at all - Face Recovery was able to rebuild clear eyes, a nose, and a mouth. That's pretty amazing when you're working with pictures that would otherwise be useless.
But for everyday portrait editing, the tool runs into a ceiling pretty fast. On regular photos that just need a little skin softening, small lighting fixes, or light touch‑ups, this AI app doesn't have any focused features for portraits. You won't find controls for skin tone, sliders for face adjustments, or built‑in lighting fixes.
“What stood out to me was how natural the faces looked. Topaz Photo AI doesn’t over-smooth skin, which is nice, but it focuses more on restoring portraits than making them look polished or beautified.”

Winner: Luminar Neo (a full portrait editing workflow with lighting, face adjustments, and creative tools vs a specialized tool focused only on image recovery)

I also wanted to see how each tool acts when I try to speed up a real editing process using automation - on a small batch of travel photos with different kinds of lighting (bright sun, dark indoor spots, and a few soft sunset shots). The goal was to find out if presets or automatic features could truly save time without taking away my ability to make manual tweaks when needed.
I wasn't hoping for a single button to do everything perfectly. Instead, I wanted something more useful: can the software give me a reliable starting spot that I can quickly turn into a finished picture with just a few small tweaks?
First, I tried out the Luminar presets (Templates) system on a whole batch of travel pictures. I used the same preset on several photos from the same trip to see how steady the results would be across various kinds of lighting.
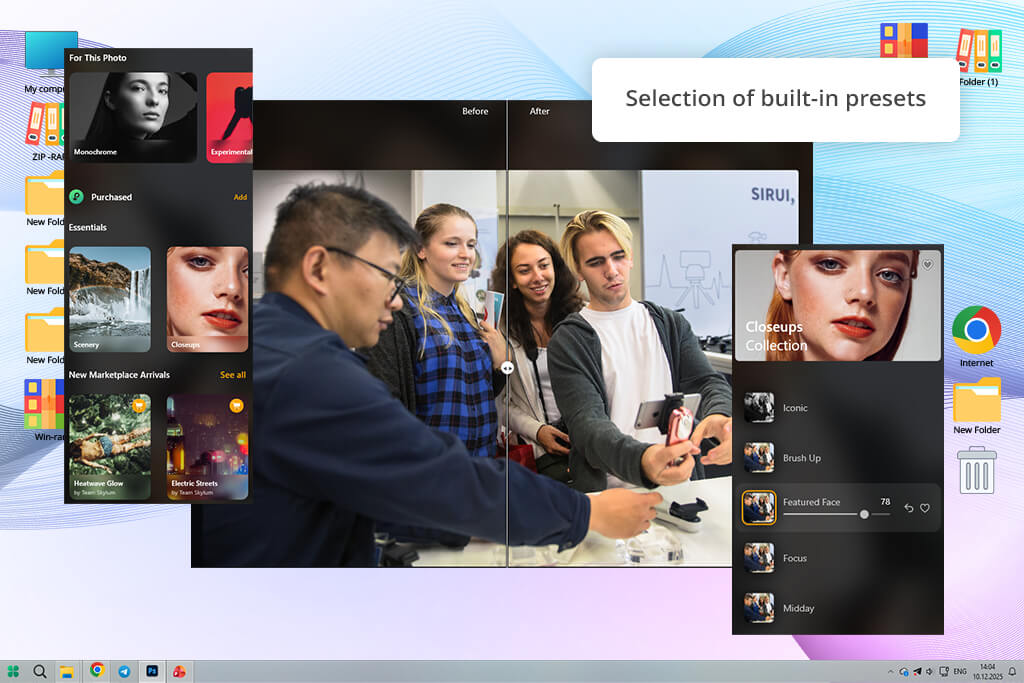
The results were actually super helpful for real editing. Even though Luminar presets don't adjust to each photo automatically, they gave all my pictures a a consistent visual style to start with. For example, a "cinematic travel" preset made the contrast stronger, changed the tones, and added a slight color style, which instantly made the whole set of photos feel like they went together.
After using the preset, I still had to adjust each photo a little - especially the brightness and color in indoor shots - but the good part was that I didn't have to start from nothing. Every picture already had a feel: warmer colors, stronger contrast, and a more styled look to build on.
With Topaz Photo AI, presets aren't really a thing like they are in other programs. Instead, the software automates everything through Autopilot, which looks at each photo one by one and adds technical fixes such as Remove Noise AI, Sharpen AI, and sometimes Face Recovery.
I tried this on the same group of travel photos, and the way it worked stayed very steady, though only in a technical sense. Each picture was examined by itself and then fixed based on whatever problems the software found. For instance, a dark indoor shot with lots of grain got heavy noise smoothing, while a slightly blurry outdoor picture received sharpening instead.
Winner: Luminar Neo (more practical for real editing workflows thanks to stylistic presets that help speed up editing and keep the overall look consistent)
For the Luminar Neo vs Topaz Photo AI performance test, I focused not only on how fast each tool processes a single image, but also on how they behave during real editing sessions with multiple adjustments in a row - especially when working with large RAW files (24 to 45 megapixels). I tried both tools on a mid‑level laptop to mimic a normal working setup, not some super powerful computer.
The main question was: which program stays smooth and quick when you're working on real projects, not just fixing one photo here and there?
Luminar Neo generally felt smooth when I worked on one photo at a time. Simple changes like brightness, contrast, and color tweaks happened right away. Even the heavier AI tools like Sky AI and Light Depth ran fairly quickly, given how much work the software is doing behind the scenes.
Take Sky AI, for instance. When I used it on a landscape photo with trees and small edge details, it took a few seconds to work, but the result showed up without any annoying delay. In the same way, Light Depth handled depth mapping and separating the subject from the background without trouble, even on portraits that were a bit too dark.
But things started to slow down when I piled several heavy AI tools onto one edit. In one test, I used Enhance AI, Light Depth, Structure AI, and Atmosphere AI all on the same picture. The preview updates got noticeably laggy. The program didn't shut down or get stuck, but it wasn't as quick to respond, especially when I moved sliders back and forth.
Topaz Photo AI behaved very differently. Each photo goes through its own separate AI analysis, so every action, especially Remove Noise AI and Sharpen AI, demands a lot of computing power.
On just one high ISO photo, the noise reduction step alone took much longer than I thought it would, especially with the stronger AI settings. Adding sharpening or face recovery made the processing time even longer. The software also had to fully redraw the picture after every single change, which really slowed things down.
When you work with lots of photos at once, the problems show up more clearly. Processing images one after another can really slow you down, especially when each file needs a full round of noise reduction and sharpening checks. So it's not great as a dedicated batch photo editor. On computers with weaker graphics cards, the software can feel less helpful for bigger jobs.
Winner: Luminar Neo (more stable performance in real editing workflows, especially when using multiple tools and working through longer editing sessions)
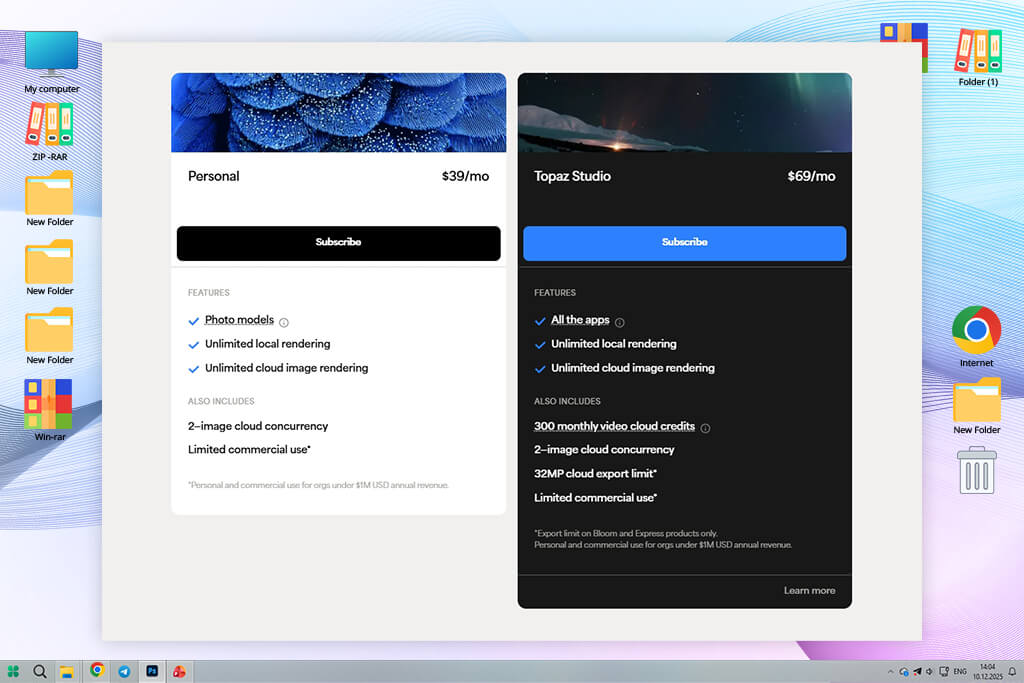
Luminar Neo has a hybrid payment system, offering both lifetime access and optional subscription plans. Below are the main buying choices you can get this year.

| Plan | Price |
|---|---|
|
Lifetime Desktop License
|
$99 (one-time)
|
|
Cross-Device License
|
$139 (one-time)
|
|
Max License
|
$159 (one-time)
|
|
Subscription Plan
|
From $49/year (~$4.08/month)
|
|
Upgrade / Extension Pass
|
From $59–$79 (promo upgrades)
|
Topaz Photo AI uses a more straightforward, high‑end pricing setup based mainly on a yearly license. It's built for people who want steady access to the newest AI tools and software improvements.
After trying both Luminar Neo and Topaz Photo AI on real photos like noisy night street shots, soft portraits, and creative travel edits, the difference isn't about which one is better. It's about what each one is made for. They're not really competitors. They're built for different parts of editing.
Topaz Photo AI is the better pick when your main issue is technical picture quality. If you're dealing with grainy shots from high ISO settings, blur from movement, or small files that need rebuilding, Topaz does a great job. It works best as a "rescue tool" - something you turn to fix tricky photos that would otherwise be useless. But that's where it ends. It doesn't give you creative editing, color styling, or full photo development features.
For professionals, Luminar Neo feels more like a complete photo editing workspace. It blends technical fixes with creative freedom, letting you not only improve your pictures but also turn them into polished, stylish final versions. Whether you're smoothing skin, fixing light, swapping skies, or making generative changes, it acts like a complete editing workspace instead of a one‑trick tool.


![5 Best EML File Converters to PST in {{%year}} [Windows & Mac]](/placeholder-450x300.svg)


