
The basic knowledge of interior photography will be useful not only for photographers but also for people from other industries, such as design, architecture, real estate photography, etc. The main objects of this genre are the rooms and furniture pieces.
If you are just stepping into this field, expert advice and tips will come in handy to achieve the desired results faster. Read my guide below and learn how to beat your competitors!
If you want to learn how to get into real estate photography, you need to improve your skills first. In the beginning, it may seem too difficult for you to get the same luxury images that famous magazines publish.
Study my guides carefully to avoid taking bad real estate photos. I'll tell you all about equipment, composition, camera settings, and other crucial things to take awesome interior pictures.

Before you start photographing interiors, you need to think carefully and plan each step. A visit to a property is an important part of preparing for a photo session. You can explore the space yourself and identify the best objects and parts to focus on while photographing. Being on the site, you will also get more accurate light information and understand how to take better pictures.
Experts also recommend finding out the orientation of the building. With such information, you can avoid taking overexposed pictures. It will be easier for you to think about how to capture this or that part of the interior. Moreover, by exploring the area before shooting, you can prepare the right real estate photography equipment.

While this may seem like a small thing, cleaning the room before shooting is critical for high end real estate photography. You don't need to do it yourself. Just ask clients to prepare the site. Dust and unnecessary items can ruin the impression of even the most luxurious interior. For example, if you are planning a kitchen photography project, make sure that the countertop and other pieces of furniture are free of greasy stains, small things, smudges, etc.
Thanks to uncluttered surfaces, the interior looks cozy and inviting. Make sure clients hide all cords, toys, random papers, and other items. Before you start taking photos, check if everything is clean and accurate.
Don’t hesitate to ask the client to clear surfaces, as this may affect the final result. If necessary, specify this point in your real estate photography contract.

If you specialize in commercial real estate photography, then you need to arrange furniture and style items properly. Check how the room looks in the frame. If you see some distracting objects in the background, think about how to fix this issue.
When setting up a shot, make sure that your gaze falls on the area where you want to focus the attention of a viewer. If you want to highlight something in the middle ground, remove all distracting objects from the foreground. Too many subjects in focus, bright colors, or something else can prevent you from taking a perfect interiors photo.

To make your photos look professional and polished, you need to edit them in real estate photography software. During photo post-processing, you shouldn't be limited to color correction. You also need to straighten vertical and horizontal lines. The wrong white balance can ruin your photos too, so you need to fix it as well. Additionally, virtual staging services can be employed to enhance the visual appeal of empty spaces and help potential buyers envision the full potential of the property.
If at any stage of image enhancement, you encounter difficulties, remember that you can always contact our professional service. In a short time, we’ll deliver a photo that will meet all the standards of the real estate industry.
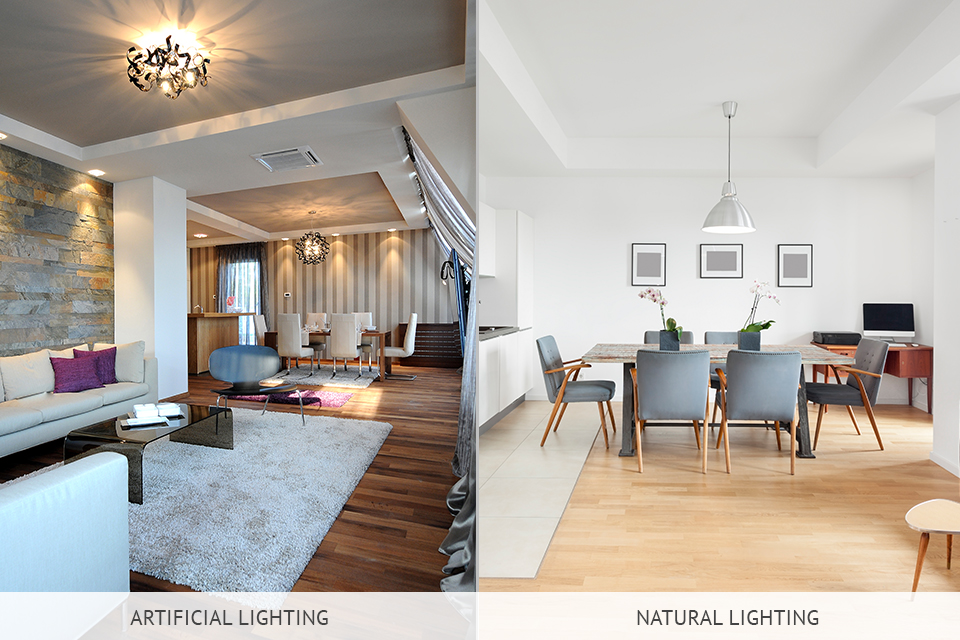
Try to use as much natural light as possible. Artificial lighting might make your photos less attractive. You should be very careful even when using the best photography light bulbs as they can add distracting shadows, destroy the white balance, and make your interior look dull and uninteresting.
To get more natural light for your interior designing photo, you should keep windows, curtains, and doors open. If necessary, you can use the flash as supplemental lighting. In most cases, you don't need to turn on artificial lighting. However, if the interior contains interesting or unique lighting elements, you can leave them on to show them in the best possible way.
Of course, winning angles can vary depending on the specifics of the interiors, but there are some universal shots that you should take anyway.
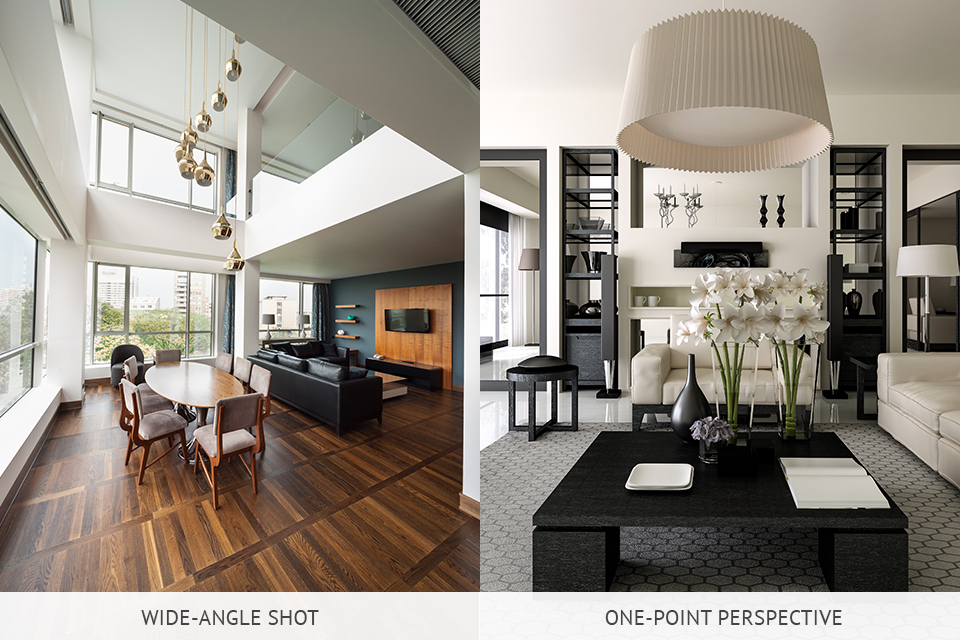
Wide-angle. It is the best shot to capture the whole space.
One-point perspectives. Use any décor element, artwork, fireplace, or whatever as a single vanishing point to take a straight-on shot.
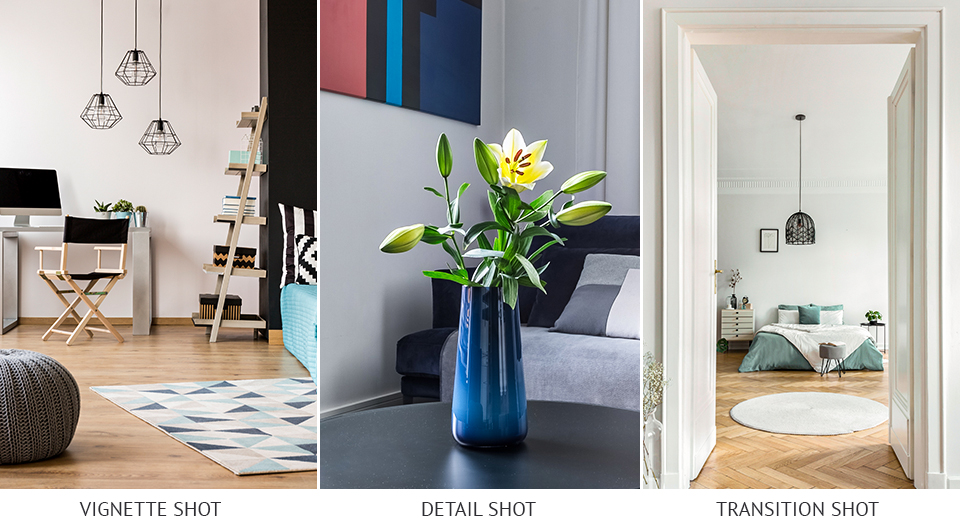
Vignettes. Such pictures appear tighter than one-point perspective or wide images. I recommend using them to showcase furnishings with some décor items.
Detail shots. This type is ideal for capturing small decorative items, textures, materials, etc.
Transition shots. These shots come in handy when you need to show how different spaces are connected. For example, you can capture an open door through which the viewer will see the next room or the path to the garden. With such interior photography images, you can demonstrate the way from one room to another.

Capturing indoor spaces, you deal with a wide range of light. You have to photograph rooms with dark corners and very bright areas at the same time. Remember that, unlike our eyes, cameras cannot naturally balance out dark and light spots. If you know the nuances of HDR photography, you can take stunning images.
Bracketing 3-4 exposures for any image is one of the most popular HDR real estate photography techniques. To get a balanced picture, you need to take a 2-stop underexposed shot, a normal exposure shot, and a 2-stop overexposed shot.
Then, you need to merge these pictures in Photoshop or suitable free HDR software. If you prefer the first option, then I recommend checking out the HDR Photoshop tutorial to quickly figure out what you need to do.

Learning compositional approaches is one of the important stages of preparation for photographing interiors. Knowledge of color, balance, depth, white space and other aspects is critical when applying basic photography composition techniques.
The proper composition will help show your subject at its best. The rule of thirds in photography is important for photographers of all genres. Once you've mastered this technique, you can try other approaches, such as leading lines photography.
When choosing a camera for real estate photography, you should consider several factors. It should have decent bracketing features and a flash hotshoe, besides, it should allow you to take high-quality RAW photos. Modern digital cameras, like DSLRs and mirrorless models, allow you to use a variety of lenses and have a wide range of manual settings. You can adjust shutter speed, exposure, ISO, and other parameters depending on your needs.
Newcomers to interior photography can use the automatic shooting modes to avoid mistakes with manual settings. If you are a fan of the Canon cameras, the Canon EOS Rebel T6i would be a great choice for you. Nikon also offers decent equipment for interior shooting such as the Nikon D750.

You need to have a great lens for real estate photography to make the most of your camera's potential. Experts recommend starting with wide angle lenses. This type of lens allows you to capture an entire room.
For the imperceptible concave view, you should think of buying the Canon EF 17-40mm f/4L. Such a lens will allow you to show each side of the room. Besides, you may also need prime lenses like the Canon 50mm f/1.8. They work great for vignette and detail shots.
Typically, photographers rarely have perfect lighting when shooting inside. Fortunately, a good tripod for real estate photography will help solve some of the problems related to poor lighting conditions. If you specialize in long exposure photography and want to take a cool interior designing photo, then a tripod is a must. If you don't know which tripod brand is better, a Neewer 77-inch tripod will allow you to use the shutter speed you want without any problems.
If you're using bracketing for interior photos, then you can't do without a tripod. Wide shots also require this piece of equipment. With the viewfinder, you need to check the vertical lines as well as the horizontals if you are taking a one-point perspective image.
You should use flashes and strobe lights for photography to deal with shadows. One primary reason to diffuse artificial light is to achieve even lighting across the space. Direct, unfiltered light can create harsh contrasts and overexposed areas, which can be unappealing and make it difficult to capture the true essence of the room. Diffusion helps distribute the light more evenly, reducing harsh shadows and creating a natural, flattering look.
Moreover, diffused light can help highlight the details and textures within the interior. It brings out the depth and richness of colors, materials, and architectural elements, allowing viewers to appreciate the finer aspects of the space.
Diffusing the light source also contributes to a more comfortable and inviting ambiance. It helps mimic the soft, diffused lighting typically found in natural settings, making the space feel cozy and welcoming. This is especially important in real estate photography as it aims to evoke emotions and entice potential buyers.
You must direct light at the ceiling or wall behind you to bounce it. Umbrellas and softboxes come in handy when you need to diffuse the light. You should also consider the color of the walls as it can add some tints to your light.
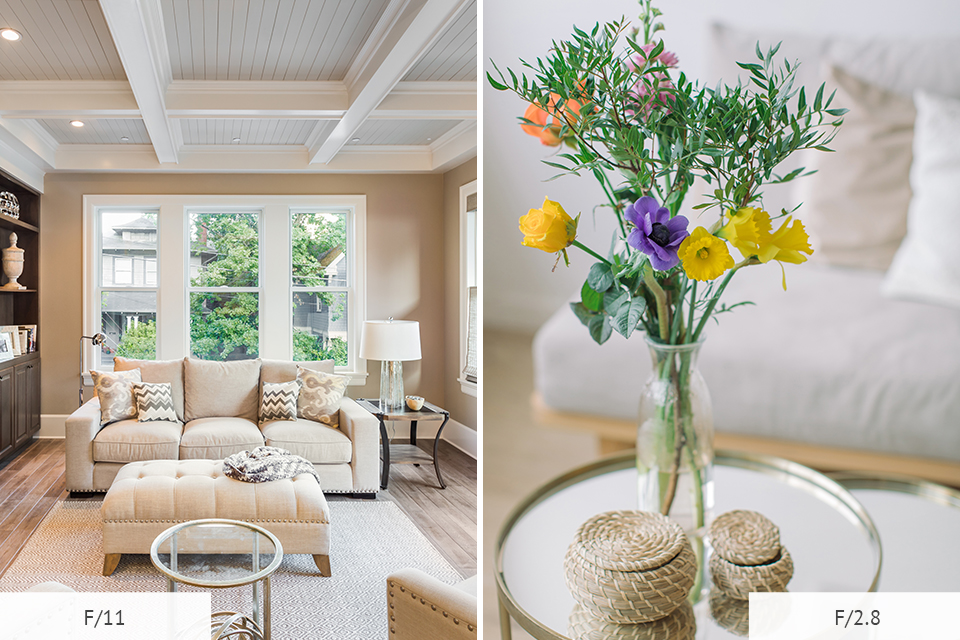
An f/8-11 aperture is the most optimal for interior photography. For most scenes, you will be using an f/8 aperture. However, to focus the viewer's attention on a particular feature in a room (such as a door handle or ceiling decoration), you should choose a narrower or wider aperture.
To make the details clearer and more visible, you should set a small f-number (e.g. f/2). As a result, you will get focus on a specific element and a more blurred background. A great depth of field is essential if you are photographing an interior with a lot of details.
An aperture at f/16 is a good solution in such cases. Remember these nuances if you need to capture objects located close to the camera in the foreground.
ISO is one of the most critical real estate photography camera settings. You should use higher ISO values to get more light onto the sensor. Most modern cameras have an ISO range of 100 to 4000.
While increasing the ISO allows more light to pass to the sensor, it has its drawbacks. Pictures contain noise and look grainy if you use too high values. To keep the sharpness you want, you should start at 200 ISO. You can increase this value, but make sure not to cross the 400 ISO line.
The acceptable Aperture and ISO values are quite standard. However, you can choose any shutter speed for interior design photography. There are some important tips to keep in mind when adjusting your shutter speed. For example, you should use a tripod to prevent your photos from looking blurry if you shoot at a shutter speed of 1/100 of a second or lower.
Moreover, a long shutter speed will not be a problem if you are shooting from a tripod. However, if the shutter is open for too long, you might notice unnatural tints in the image. In some cases, your pictures may look compressed if you set your shutter speed to more than 1/2000 of a second.
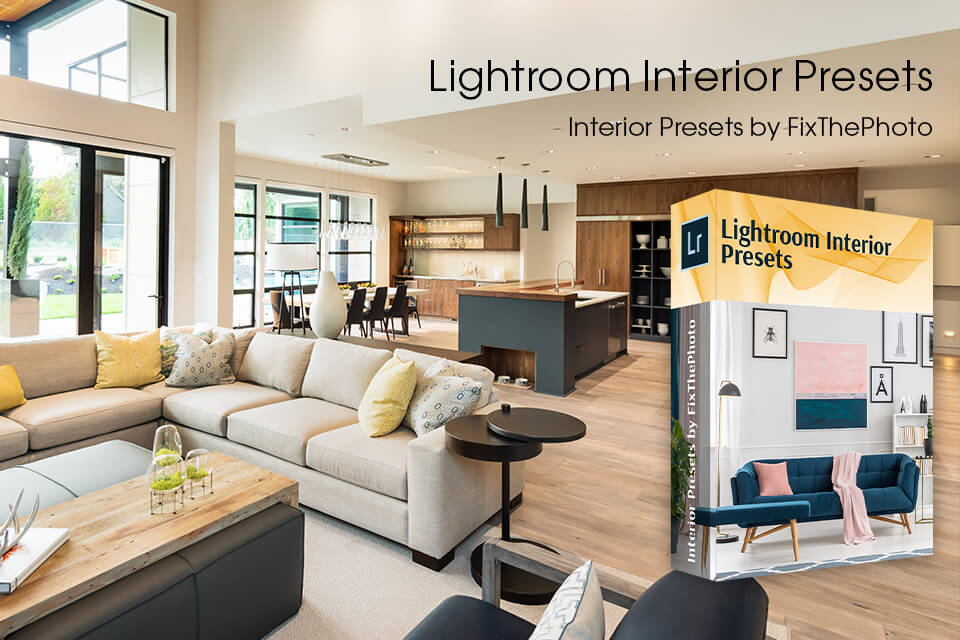
Apply these interior photography Lr filters to speed up image enhancement. In a few clicks, you can fix problems caused by poor lighting, perform color correction, tweak shadows, and make surfaces and textures more attractive. Boost your sales of homes, apartments, cafes, and other real estate properties by enhancing your images with these professional presets.


