The iPhone camera comes with a bunch of incredible functions and capabilities that, with proper handling, can produce compelling visual content for social media.
Read my detailed guide dedicated to the best iPhone camera settings to find out how to boost the quality of your shots in a matter of seconds.
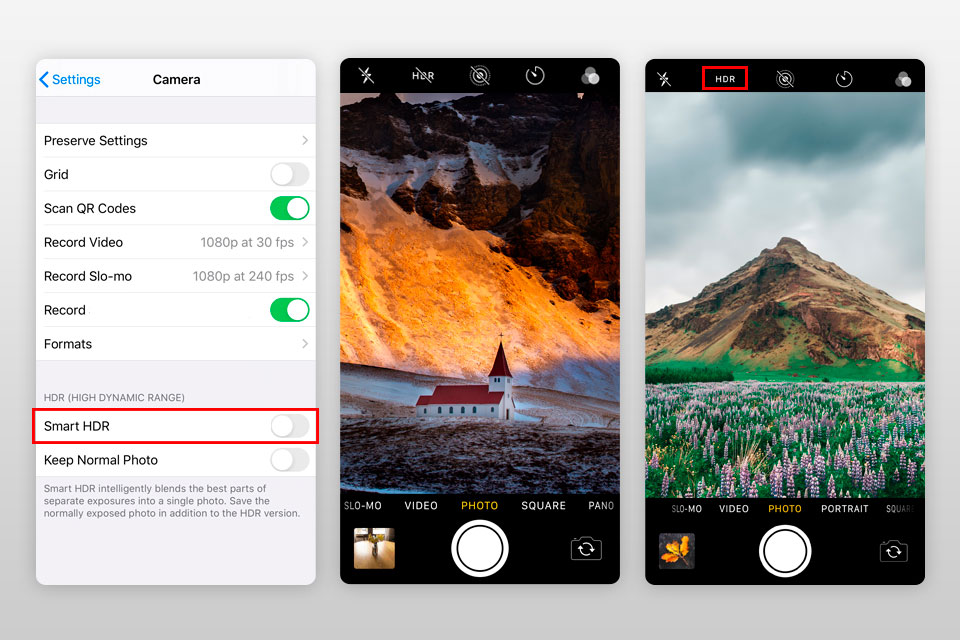
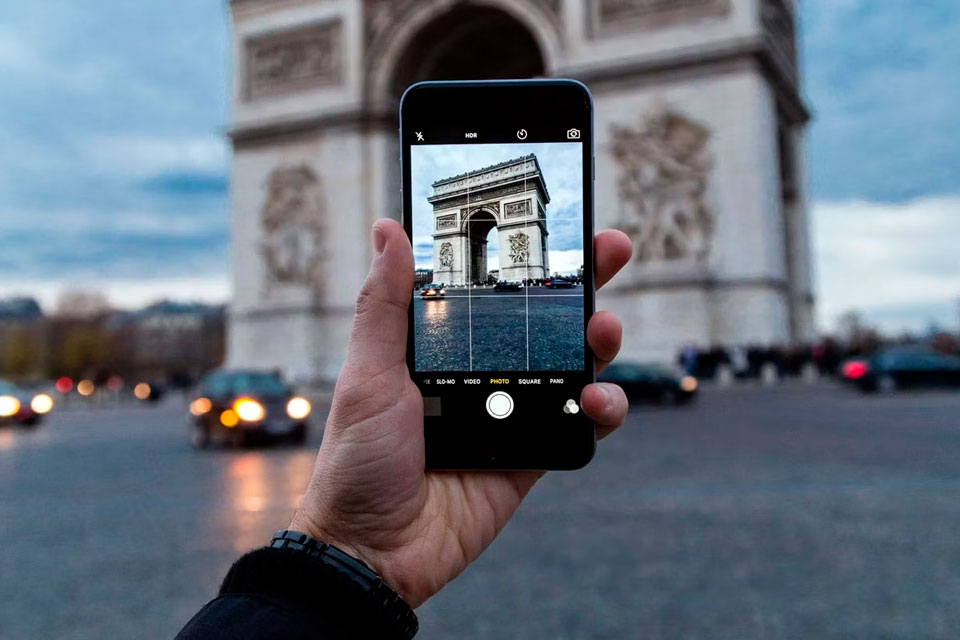
Simply put, HDR in the smartphone camera is capturing of three shots with different exposure values with the subsequent combination of their best parts in one photo. This is one of the most useful iPhone photo settings when shooting in complex lighting conditions, be it excessively dark or vice versa very bright.
If you don’t like HDR photography, then this function can always be turned off in the camera. However, I recommend leaving it in auto mode, in which the camera determines when it is better to use it.
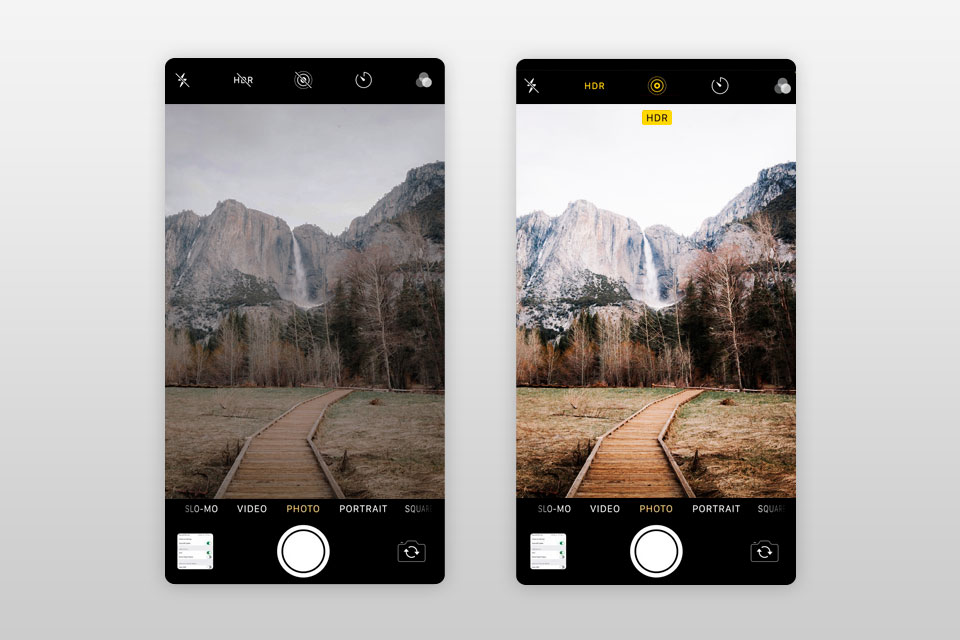
By default, the iPhone shoots both in HDR and not in HDR. Looking through the photo in the gallery, pay attention to the left corner of the picture, where the HDR badge will be indicated or not.
If you don’t want to hold both versions that are often almost the same, then turn off this function by going to Settings > Camera and turning off the Keep Normal Photo toggle.

The object misfocused in the frame will always be a sign of an amateur photographer and there is no reason to hope for an impressive effect of viewing such a photo.
However, the iPhone Camera App comes with decent and easy focusing, making iPhone product photography an exciting activity.
The focusing process on the iPhone is a no-brainer task. Stage the frame, put the smartphone camera on the scene, and click on the screen on the part of the frame where you want to focus. You will see a yellow frame that indicates a focus point. This part will be clear and sharp in the resulting photo.
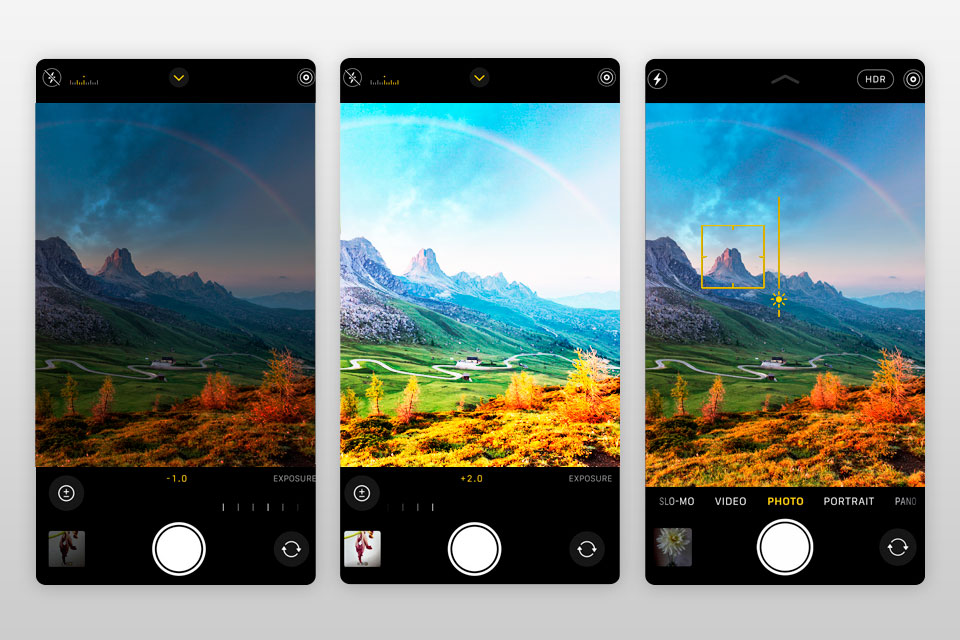
All camera phones shoot with automatic exposure, however, this is not always the case as your photo runs the risk of being too dark (underexposed) or too bright (overexposed).
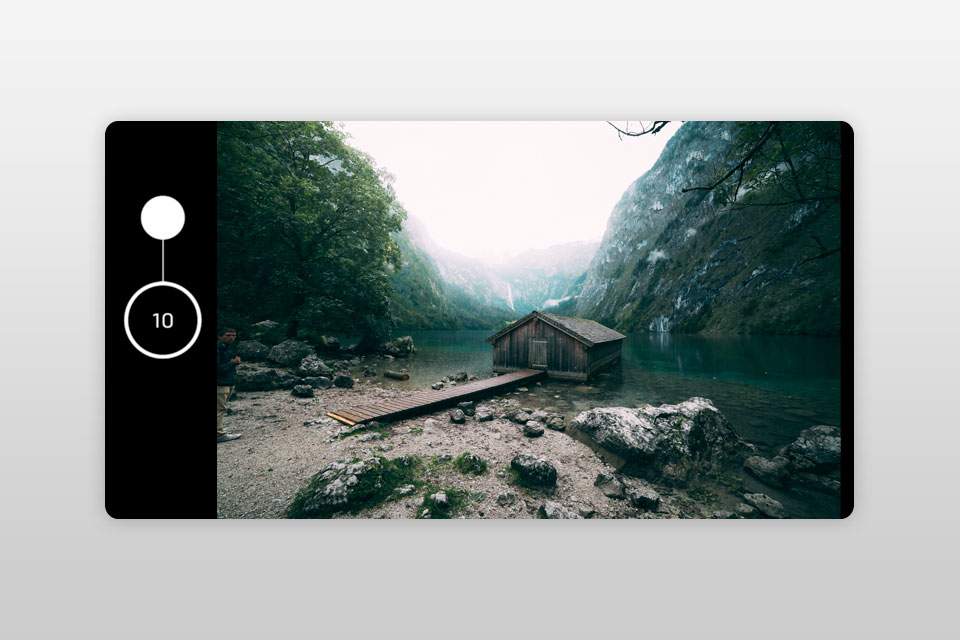
You can easily fix this problem by adhering to the appropriate iPhone camera settings, namely by using the Exposure Slider. It allows you to change your smartphone’s exposure settings and set the ones you want manually.
As soon as you touch the screen while in the camera app, you will see the aforementioned yellow square with which you focus. This is a prerequisite for setting the exposure.
If you look at this yellow square, you will see the icon of the sun near it. As you drag your finger up or down, you will see how the exposure changes.
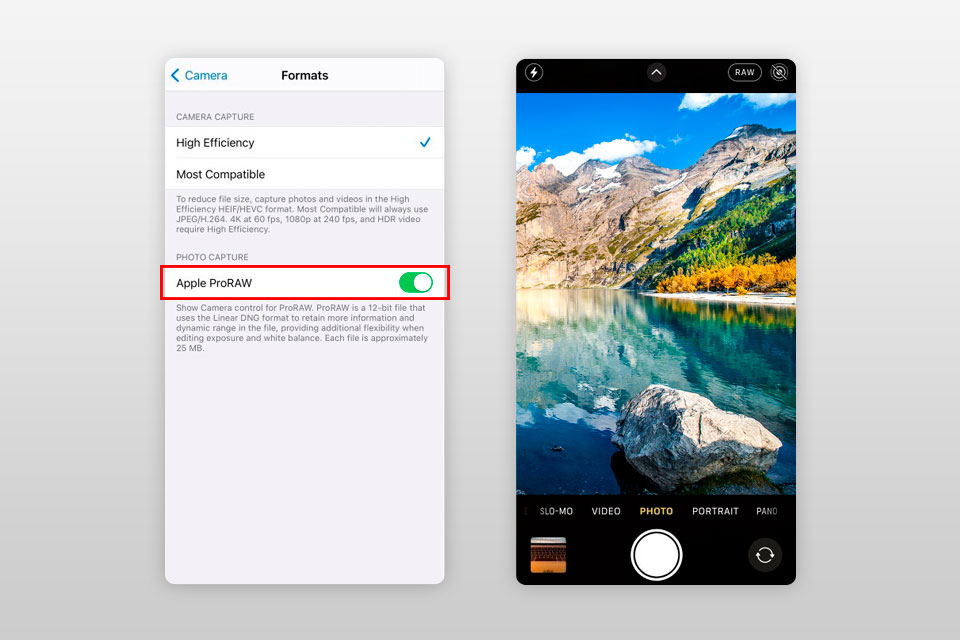
iPhone 12 Pro and later models come with the ability to shoot in ProRAW right in your camera. The RAW photo format is an indispensable thing for those who are seriously involved in photography, as it preserves the original data received from the sensor, with no or very little post-processing.
Such a photo carries complete data about brightness, shadows, and colors. This allows you to get more out of your photo when improving it in Adobe Lightroom or other photo editing software.
iPhone 13 Pro delighted video fans with the newly introduced ProRes codec, which compresses content minimally so that you can benefit from better video quality when post-processing.
If you want to use these iPhone settings for pictures and videos, you need to go to Camera app settings, then the Formats menu, and select ProRAW and/or ProRes there. If you own an iPhone 14 Pro, then ProRAW is available for you in 12 or 48 megapixels for even more fine-tuning of your photos.

Everyone used to dream of moving photos, and now it’s possible with the Live Photo option. You won’t notice the difference between taking a Live photo and a normal one, but when shooting Live, the camera will start capturing a few seconds before and after you press the button.
When viewing such a photo in the gallery, you just need to hold your finger on the screen to see the moving photo.
To change iPhone picture settings from normal to Live, go to the Camera app and click on the round icon at the top of the screen. If the circle has become yellow, then you did it. Shoot further as usual.
The same is worth doing if you want to stop shooting Live. Touch the circle, and when you see that it has become white and crossed out, you can be sure that you turned off Live. If you want to turn video into live photo refer to third-party tools like intoLive – Live Wallpapers app.
If you are just gaining experience in photography, then you may suffer from a lack of understanding of the concept of composition. However, there are many composition tutorials and guides that can help you master it, such as the rule of thirds.
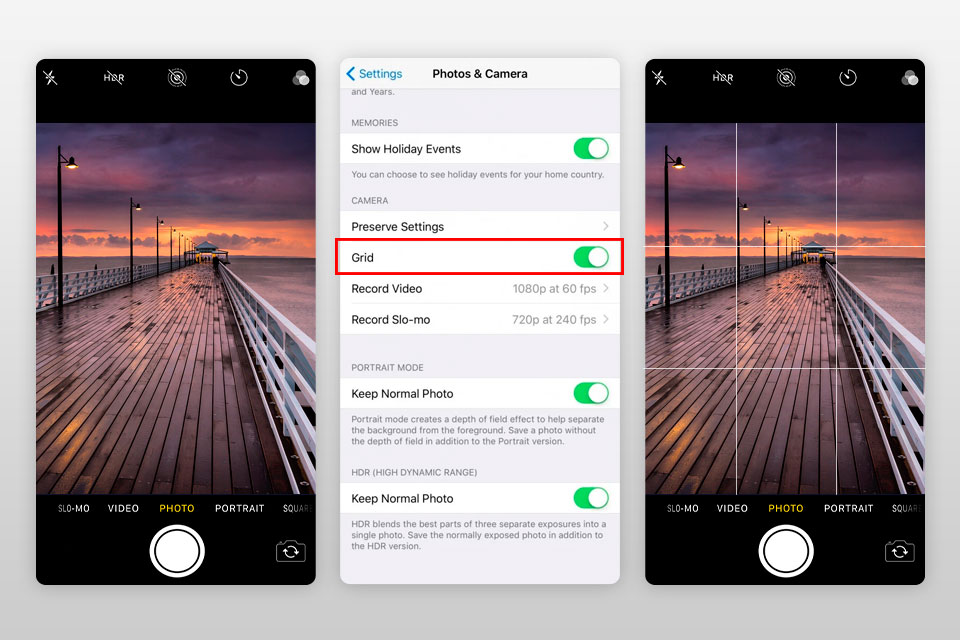
Divide the frame in your mind into a 3 x 3 grid and follow the above rule to place the subject so that it looks harmonious and compelling. Sounds simple, but imagining an even grid in your head can be tricky.
To enable it, go to Settings > Camera tab > Grid feature and activate it. Now the grid will always be in front of you in the camera, making it easier to frame the shot.
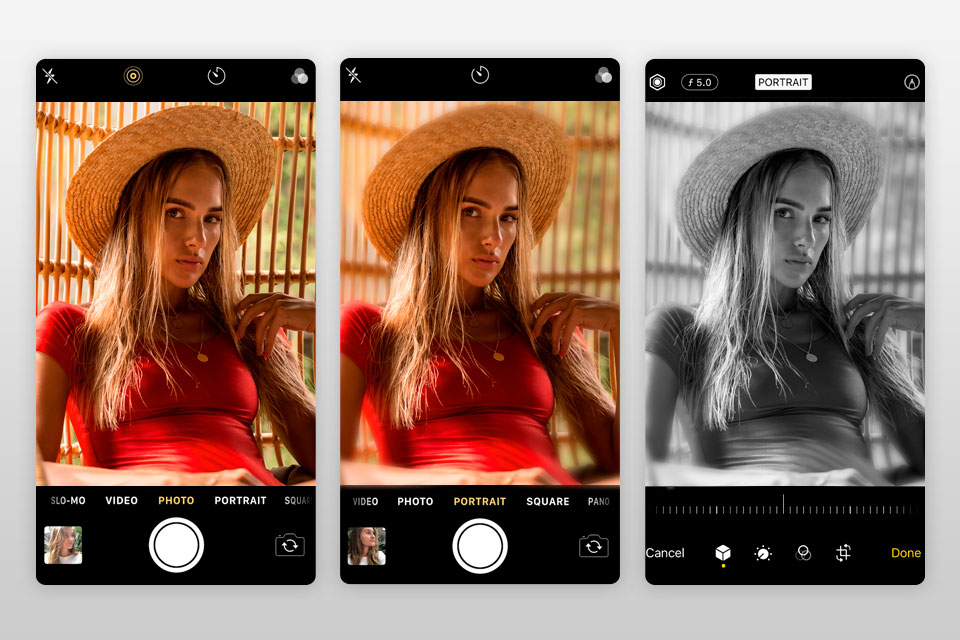
If you want to mimic a DSLR camera photo by focusing on a model or subject and blurring the background behind it, portrait mode is the way to go. It makes the subject crisp and sharp, while the background is softly blurred for a stunning effect.
Switching to portrait mode is as easy as switching to video mode or slow motion. Swipe the slider until you see portrait mode and select it.
After switching to the mode, carefully read what the smartphone tells you. It will indicate what you need to do, whether it is to approach or move away from the object, and perhaps improve the lighting.
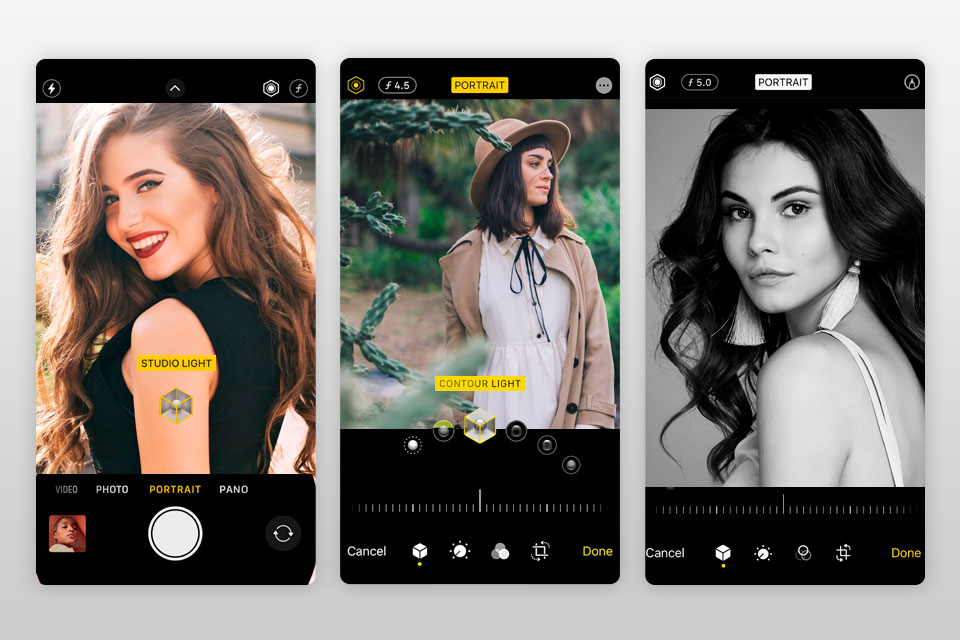
In Portrait Mode, you also get to change the lighting in your smartphone photography
When taking smartphone photography in portrait mode, changing the lighting is available to you using Portrait Lighting. These iPhone photo settings will help you simulate a stage or studio effect with just a couple of taps on your screen.
To start experimenting with Portrait Lighting, you need to switch to Portrait Mode. Look down the screen and try different options – natural light, studio light, contour light, stage light, and stage light mono.
To turn off the setting, switch back to the iPhone’s default Natural Light option. Contour Light is great for adding drama to your darkened portraits, while Stage and Studio Light add a touch of professionalism to your photos. To master these options deeply you can visit one of these online iPhone photography classes.
Using this camera mode does not require any changes to your iPhone camera settings, just pressing and holding the shutter button.
If you have an iPhone 11 and later models, all you need to do is press the shutter button and slide it to the left or drag it up at the same time. The difference between these two actions is that you need to choose the first one if you want portrait orientation, and the second one for landscape orientation, respectively.

As long as you keep your finger on the screen, the iPhone will take pictures. What’s more, in this mode you get about 10 frames per second.
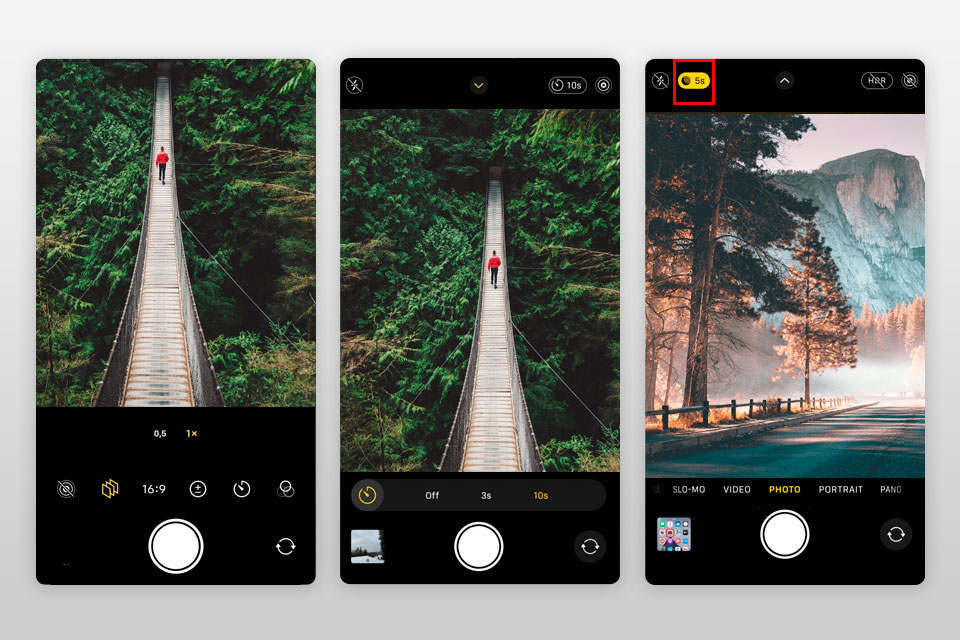
To activate the self-timer, tap the up arrow if you have an iPhone 11 or later, otherwise look for its icon at the top right of the screen. By clicking on it, you will see two options to choose from – 3 or 10 seconds.
If you want to capture yourself or take a photo with friends, then 10 seconds is optimal, giving you the time you need to arrange your shot before the seconds run out. For nature photography or nighttime shots, opt for 3 seconds.
Pro Tip: These iPhone picture settings work best when paired with a tripod. If you don’t have one, just find a suitable hard and level surface so that your smartphone is stable when shooting.
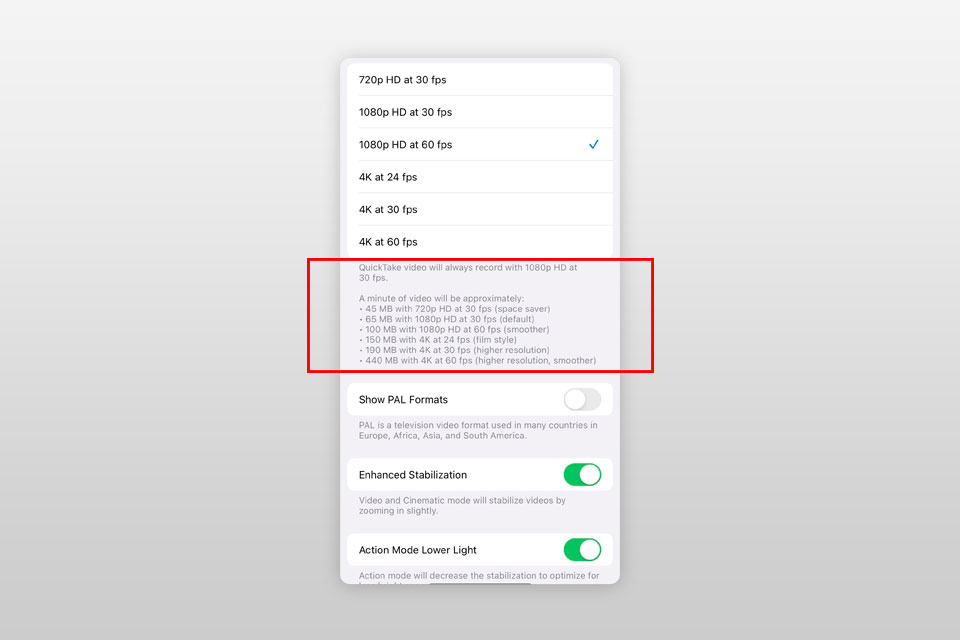
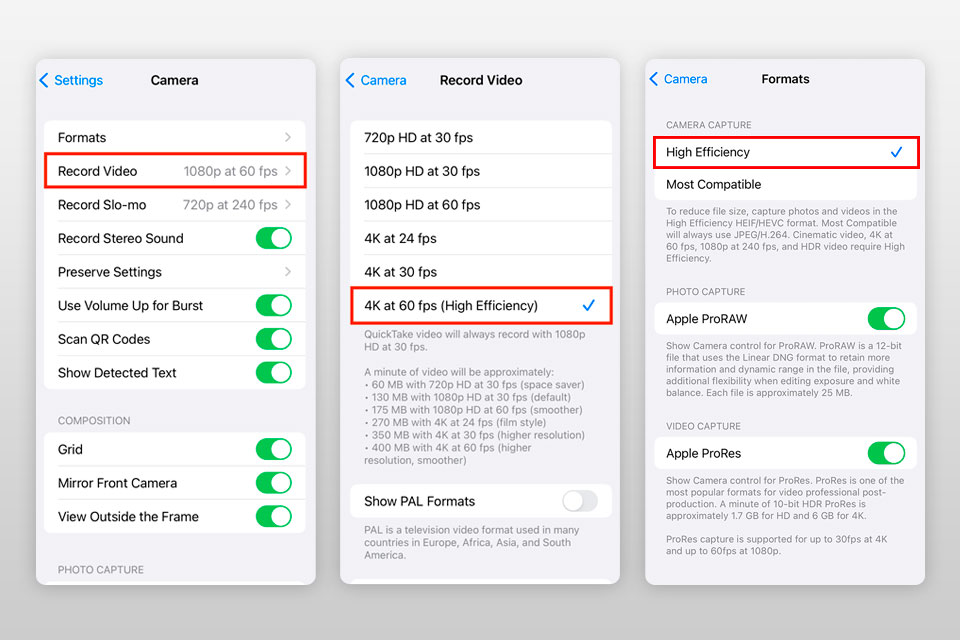
Almost all of the footage you see on TV shows is recorded at 30 frames per second. This value is not suitable if you are going to slow down the video while editing it. In this case, 60 frames per second will work better.
I like that iPhones can now record slow-motion clips in 1080p HD at 120 or 240 fps. Go to the main camera settings and click “Record Slo-mo” to enable these iPhone camera settings for best quality videos.
One of my favorite filmmaking techniques is shooting at 24 frames per second, which gives viewers a head-spinning cinema-like experience.
Pro Tip: Select the “4K at 24 fps” by setting your smartphone to record at cinematic resolution and frame rate. Keep in mind that each minute of footage will take up nearly 150 MB of space on your device.

Also, one of the best iPhone camera settings is “Macro Control”, which is excellent for capturing objects close to the camera. This is one of the most creative and trendy YouTube video ideas, and a useful feature for product videographers.
When you activate this mode, you will have a toggle at your disposal. With it, you will be more comfortable managing the shooting process than with auto-switching to macro mode when the smartphone approaches the subject.
Unfortunately, this mode is only available on iPhone 13 Pro and newer.

These Lightroom Desktop and Lightroom Mobile presets will make your photos look professional in no time. They were created by expert photographers so that every user can enjoy compelling pictures without much effort.
Some iPhone camera settings are available directly in the Camera app, while others can only be changed in iOS Settings. To access them, go to Settings and then to the Camera menu.
The main reasons for the deterioration in the quality of photos taken with a smartphone are poor lighting conditions, low-quality phone camera lenses, aging of the smartphone, and so on. To get the best out of your camera, try to shoot in good lighting only.
Usually, the iPhone blurs photos when the camera switches between lenses at the wrong time. You can fix this by enabling Macro Control and disabling Lens Correction in Settings.
Disabling HDR is a smart choice when shooting fast-moving subjects and action scenes to avoid blackouts and blurring, and when shooting portraits with intense shadows. If you leave HDR enabled, you will be able to capture details in the shadows.