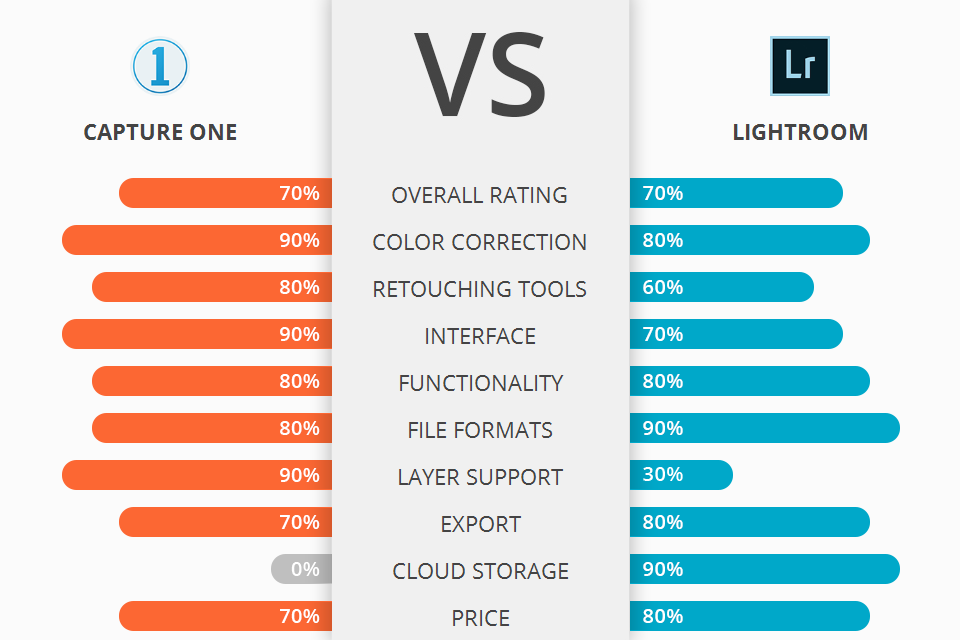
What are the main differences between Capture One Pro and Lightroom or these software are the same?
Capture One Pro is software for professional color correction and editing. Capture One has more advanced tools for editing, producing smooth and sharp RAW conversions. Local adjustments in this program are done with layers and masks, which, together with other tools, make the process more efficient.
Lightroom is a convenient RAW converter for batch post-processing, including color correction, cropping and minor editing. Lightroom CC has a convenient cataloging system with an option of instant batch photo editing of several hundreds of photographs at the same time.
Capture One made me confused - there were so many tools that you can use. This is a powerful editor, but I'm sure that not everyone needs so many functions. Capture One Pro lets you fully set up/correct your panels, like Photoshop does. You can add the settings you need, and delete unnecessary ones. It also allows you switch between prepared tool settings for any desired task fast and easy.
If I'm editing pics and do not use an Exposure window, I can just take away it. If I want to have 3 diverse level settings on one tab for the individual red, yellow and blue channel controls, I can do it easily. This may also be a drawback. If you are a user of the hardware that is afraid of spoiling something in the program, Capture One may be uncomfortable for you.
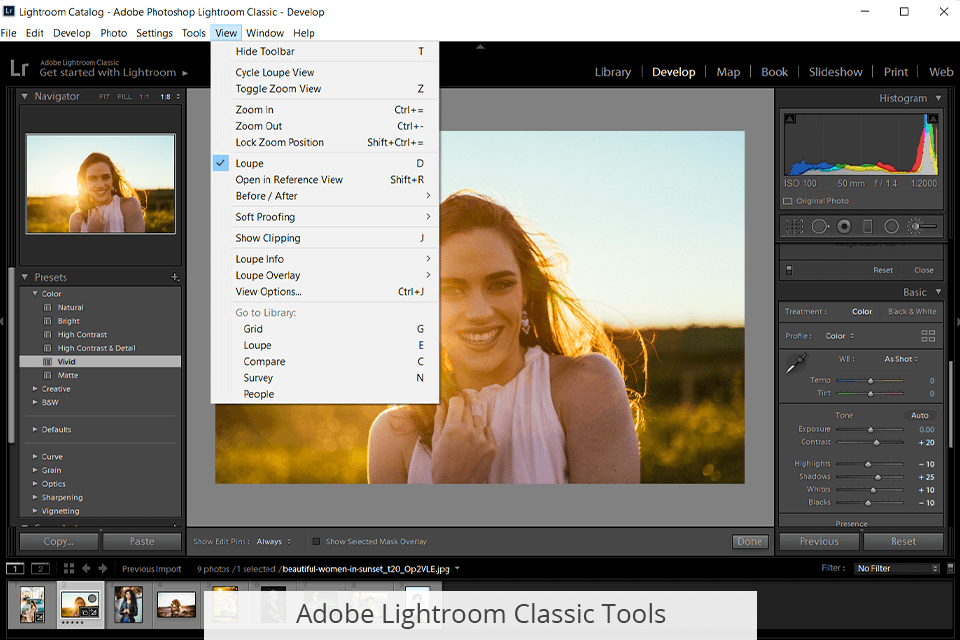
In Lightroom you have everything in front of you - there are presets to the left, working tools to the right. You can immediately start Lightroom portrait editing by working with sliders.
Lightroom does not have interface adjustment feature. All you can do is hide the left or the right side of the interface, but you cannot remove them. Just like you cannot remove the tools you do not need from the right panel.
In Lightroom, the image quality is higher. The background of my photo was initially almost the same as displayed by Lightroom, but it certainly was not orange! Lightroom certainly does not support all RAW files, but any support updates come sooner.
The image in Capture One looks less voluminous, unnaturally red, skin tones differ much from reality. This is due to incorrect reading of the white balance settings. It's not difficult to fix, but still not nice.
Most bloggers praise Capture One for having a picture on it that looks better and more saturated than in Lightroom, but in fact it's its main disadvantage.
Lightroom opens 150 photos in about 4 minutes. I also selected the extra photos by rating. I didn’t used the smart photo sorting. The preview of the photos was downloaded quickly and I did not have to wait long.
Capture One coped with it faster, but about 5 photos were without preview, even when reloaded. The speed is good, but the quality of the photos in the Capture One previews was excellent, while in the Lightroom the sharpness was greatly reduced, which created additional problems.
Lightroom became much faster than the classic version, it took a couple of seconds. The formats to save are just enough. In Lightroom, the export occurs in the background and does not interfere. This is a small problem when you have one or two photos, but if you have 100-200 photos, it will take you enough time to wait.
When exporting photos from Capture One, the export setting occurs in a tab that seems small, but it's not a big problem. A much bigger fault is when you export, a window appears and does not allow you continue editing while the needed files are saved.
If you're struggling to choose between these two excellent software programs and want to use both for their distinct features, there’s a solution. A Peakto photo management software compatible with both Lightroom and Capture One will streamline your organization as a photographer, allowing you to enjoy the best of both worlds.
Capture One is aimed at detailed work with images, similar to Photoshop, but here the process is organized in a more convenient way. You can't view batches of photos and filter them out quickly like in Lightroom. You can view them in the column on the right and assign labels to them.
Lightroom CC has such a useful feature as Smart Search, which gives it an additional point in Capture One vs Lightroom stand-off. One of the main differences between Lightroom CC and Lightroom Classic is the ability to search for images based on content, without using keywords or labels. The software will automatically divide the photos of people, water and buildings into different groups.
Automatic selection of the "best" and rejection of the "worst" shots among the downloaded saves a lot of time. This is especially good for wedding or big event shooters.
Both programs are initially created to work with color, but they also contain tools for photo retouching. They have a really huge number of instruments for correcting light, color, applying effects to your photos or improving them in one click.

In Capture One determines the exact color tones that you select, and then allows you to adjust them. Although the control elements may seem similar to Lightroom, the degree of control over colors is amazing. I mean, you can change any particular color in the unedited image you see very precisely.
Capture One have a nonstandard approach to Curves of Luma. This channel is a new one in the curve tool for Luminance. The brightness curve corrects the contrast another way than using only the RGB channel, which often changes the overall saturation with increasing contrast. In addition, users can do all existing curve changes on the local adjustment layers for even more precise set up.

Lightroom offers less control over color, but it does have all the basic color correction functions. Moreover, Lightroom has an indisputable advantage in Lightroom vs Capture One battle, providing users with presets. There is a huge plus of Lightroom's popularity - more people share ideas with each other.
To find and buy a package of presets for weddings, portrait or landscape is simple, and numerous companies provide them for free. You may always create Lightroom presets on your own - it’s easy.
These Lightroom plugins simplify your work and give the photos a new life in 1 click. Capture One Pro have their own presets, here they are called “recipes” or “styles”. But since this editor is less popular than Lightroom, in turn, and the amount of styles is much smaller.
If in Lightroom you can choose 3-4 favorite presets from 300 filters and remove the others, do not expect such luxury from the second software, it’s difficult to find Capture One free styles.
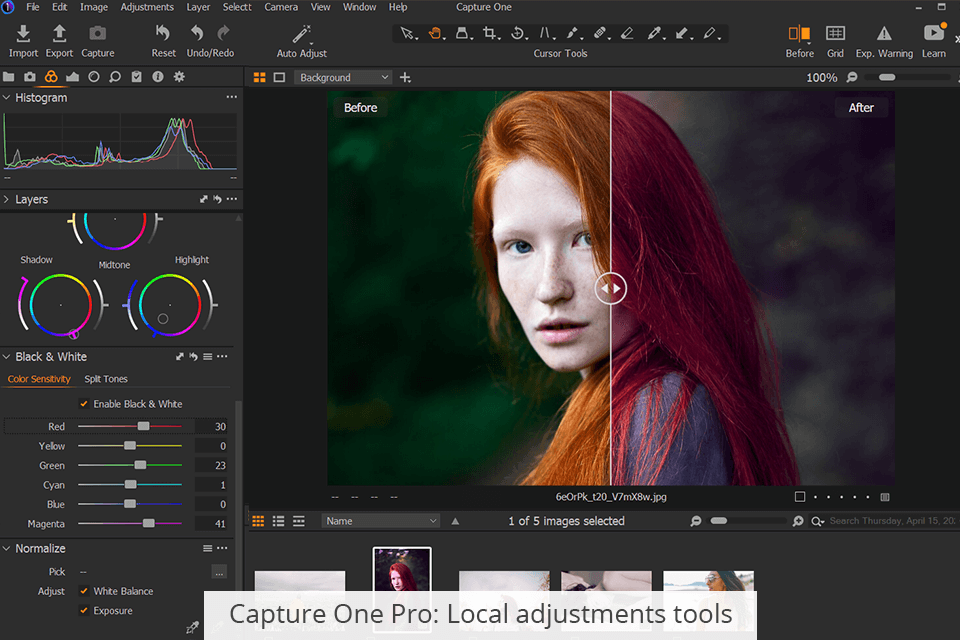
Capture One comes with a set of more advanced tools for high-quality retouching. It supports layers, which is why you can use any photo-editing techniques that you've acquired when working in Photoshop or GIMP.
Unlike its rival, Lightroom can’t brag about advanced local adjustments. Image retouching in Lightroom comes with a rather strange editing mechanics. All you can do is to make basic Lightroom video editing and color grading.
You will find ways and instruments for adjusting colors and tones selectively. You can use corrective brushes, radial or gradient filters to create a coarse mask, and then fine-tune the mask with new parameters. This works great when you whiten teeth in Lightroom.
Capture One have fast camera binding. Most photographers working with the C1 camera binding system share good feedback about it. Indeed, unlike Lightroom, it is more stable and quality. But the camera support is still small.
Both programs offer tethered capture, but Lightroom supports more cameras, however, the processing speed is rather low. This is a real inconvenience if you are pressed for time and want photos to appear as quickly as possible.
Capture One Pro doesn't have cloud storage. As for me, a significant drawback of Capture One Pro is the absence of cloud storage. If you need to store numerous photos that were taken 10 years ago, you will have to spend money on a regular hard drive or pay separately for it.
Lightroom comes with the bundled Creative Cloud Storage, which you can use right after signing up. This means you can access your work wherever you are. Thus, you can continue unfinished work even if you are not at home. Just use the web version from any computer, or finish the photo editing on your Lightroom Mobile App. With an Adobe subscription, you are offered 1TB of cloud storage, which is enough for everyone.
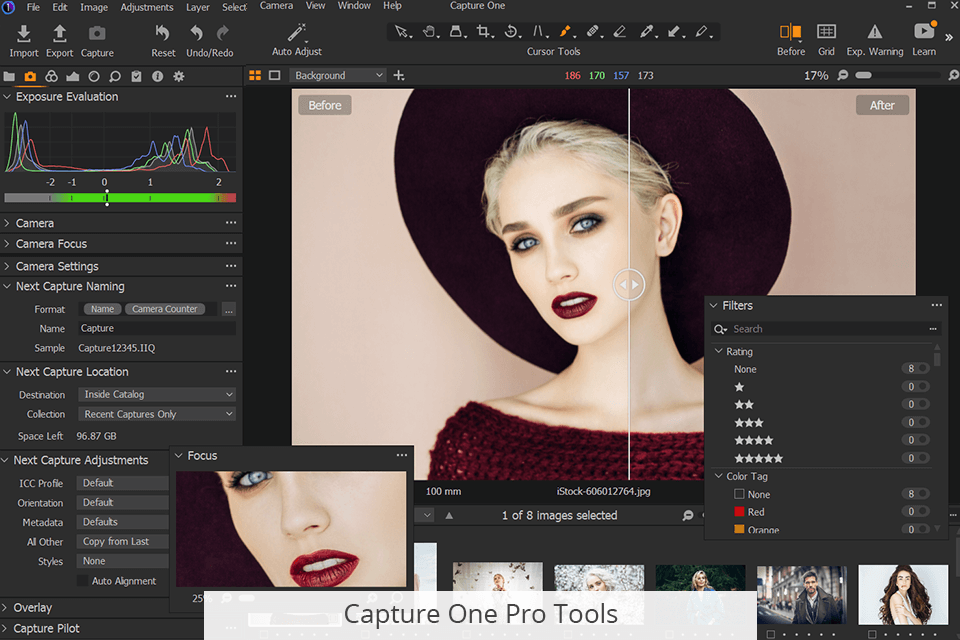
Capture One made me confused - there were so many tools that you can use. This is a powerful editor, but I'm sure that not everyone needs so many functions.
On the one hand, this is a zone for experiments, because you can try everything that is here and see what happens. On the other hand, simple color correction takes you longer, since C1, unlike Lightroom, does not offer you a set of the most frequently used actions, they will have to be searched.
Lightroom is easy to learn even on your own, but if you need help, there are 1000+ free Lightroom tutorials on the web. The popularity of the Adobe product also affects the number of free Lightroom tutorials, YouTube videos, classes, courses. Yes, there are many of them about C1, but Lightroom as well as Photoshop has terabytes of lessons, both paid and free about everything you can think of.
Therefore, even if you are amateur in editing and color correction, you will find thousands of lessons for any taste.
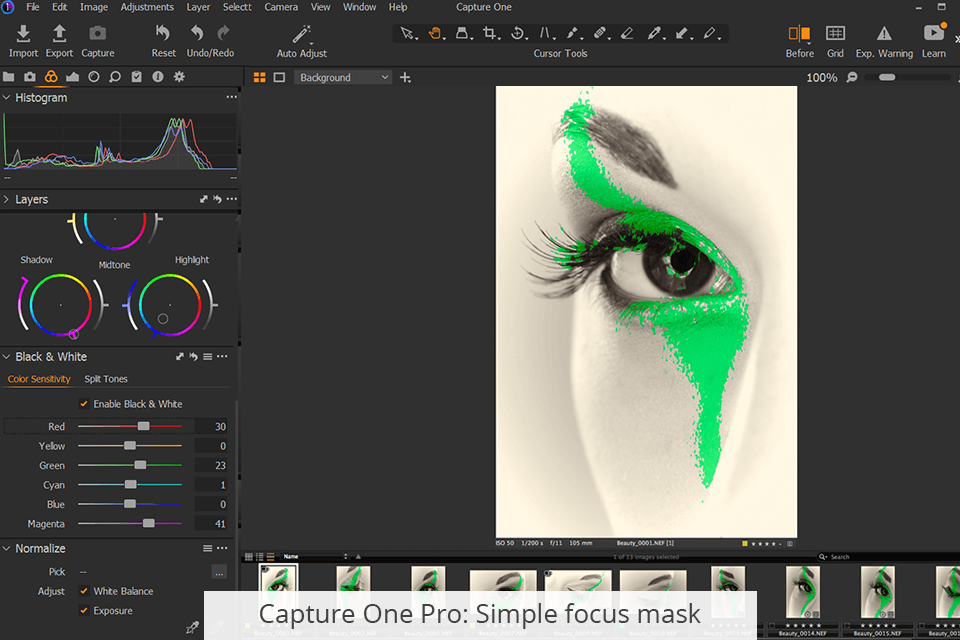
Developers try to make their programs as efficient as possible, so they constantly add unconventional functions, that can simplify your workflow.
Capture One has:
Unique Lens Cast Correction tool. This is a really cool feature that is available only in Capture One. It aims at removing dust from your sensor in an instant. No need to perform complex manipulations, the program has you covered.
Simple Focus Mask. Use this instrument to find out whether your images are in focus. This is especially helpful for portrait processing. Activate the focus mask and it will meticulously scan every inch of a photo to determine the sharpest areas. Once the analysis is finished, the highlighted parts are superimposed with a color mask. If none areas were selected, there will be no overlap.
HEIC Support. Thanks to this feature, editing photos (8-bit files) from Apple devices has become a breeze.
Skin Tone Editing. Skin editing is well-organized in Capture One. There are 3 Uniformity sliders you can use to alter hue, saturation, and lightness. They are suitable for performing local adjustments.
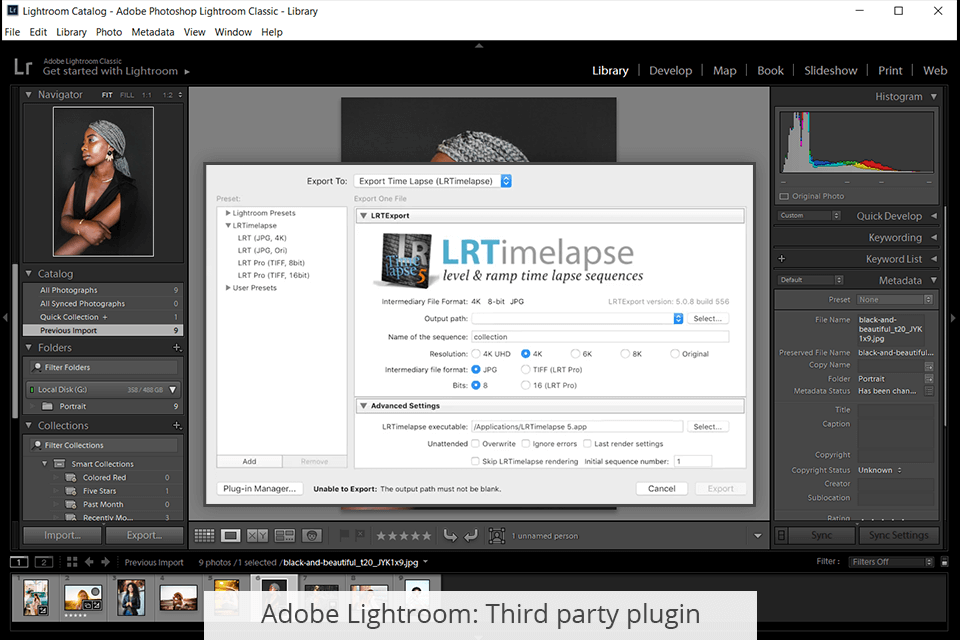
Lightroom has:
Easy transfer adjustment settings. If you have several images that require identical processing, you can adjust one photo and then transfer the settings to another shot. This is a really time-saving option, allowing you to edit batches of images with a single click.
Simple photo cropping. Comparing Capture One vs Lightroom, I was amazed by how accurately the Crop Tool in Adobe software works. You can crop photos to any ratio, which is really amazing. Besides, you can use the Straighten Tool and drag vertical & horizontal lines to adjust the size of your image.
Third-party plugin support. What makes Adobe Lightroom Classic so popular is the possibility to extend its capabilities using third-party plugins. You can find a needed plugin and easily import it to Lightroom for more customized adjustments.
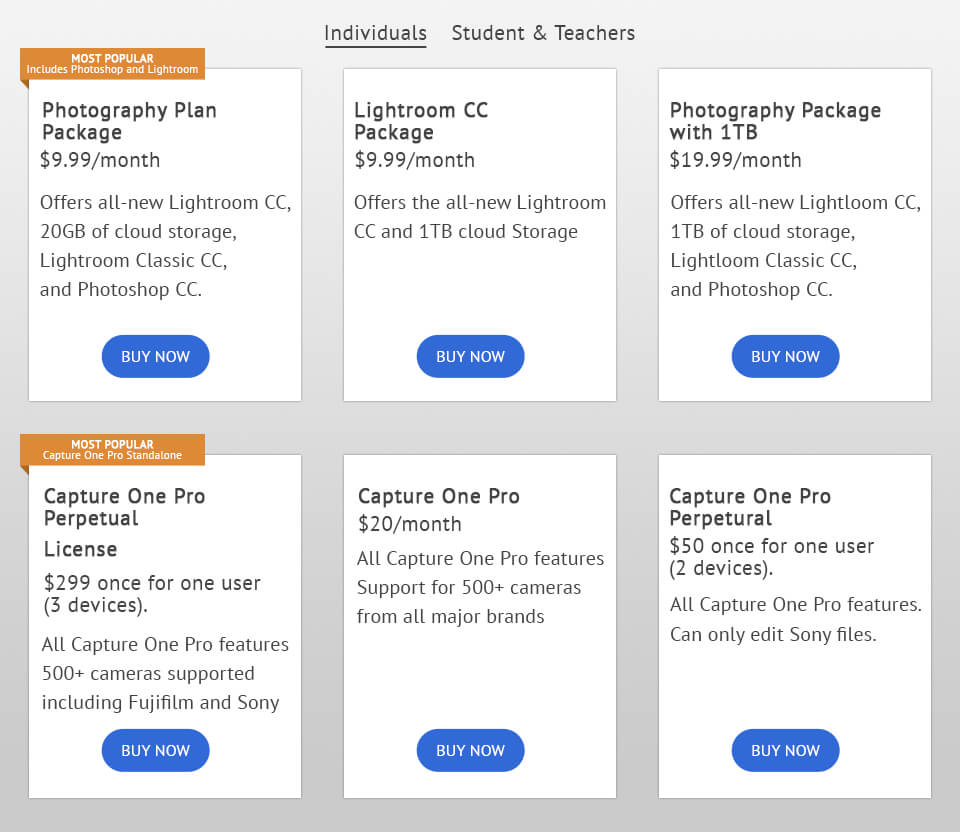
The price of the programs is significantly different, especially considering the end of selling stand-alone versions of Adobe Lightroom.
For a basic set of Capture One ($299) features and functions, you will pay as you would for a 2.5-year subscription to Lightroom and Photoshop. You can also get a subscription ($19/month) but it is twice as expensive than Adobe’s. Moreover, there are not as many good Capture One free tutorials as there are for Adobe software, and that could be added to the price as well.
You can’t get Lightroom spending money once, as it is distributed on a subscription basis. Although you can still find Lightroom 6 Standalone free, it will soon become outdated (this is already happening). In about a year, you will not be able to use Lightroom without a minimum payment of $9.99/month. This is the most affordable way of buying Lightroom.
I think the Adobe’s subscription is the best option, because you get Photoshop as a bonus. You may use Lightroom discounts and get the package even cheaper. Even if you get Capture One, you probably still need Photoshop for deeper photo retouching. If Lightroom is not right for you, you still have the option to use Bridge and Adobe Camera Raw.
I like this software. Comparing Capture One vs Lightroom, I want to say, that C1 is an excellent program with a big number of available tools. It makes your editing more detailed.
But Lightroom is simpler and more convenient. You have access to millions of Lightroom presets and practical Lightroom editing tutorials, video guides, as well as a chance to retouch your photos in Photoshop.
Adobe is the first to launch compatibility with RAW-files from the last new cameras on the photography market. I’d like Lightroom to take some features from Capture One, while remaining as simple and convenient as it is now. Then we would get a perfect program for photo modification.

Both programs will allow you to import ready-made color correction plugins known as ‘presets’ in Lightroom and ‘styles’ in Capture One. Here are some tools for you from our retouchers for each program.