How To Whiten Teeth In Lightroom
How to whiten teeth in Lightroom and make a real Hollywood smile? This is important for a natural looking portrait, wedding image or headshot, because often after color correction, a natural white shade of the teeth becomes yellowish and this spoils the appearance of the image.
Let’s find out how to whiten teeth in Lightroom at the fastest way.
Method #1 Classical Lightroom Teeth Whitening Technique
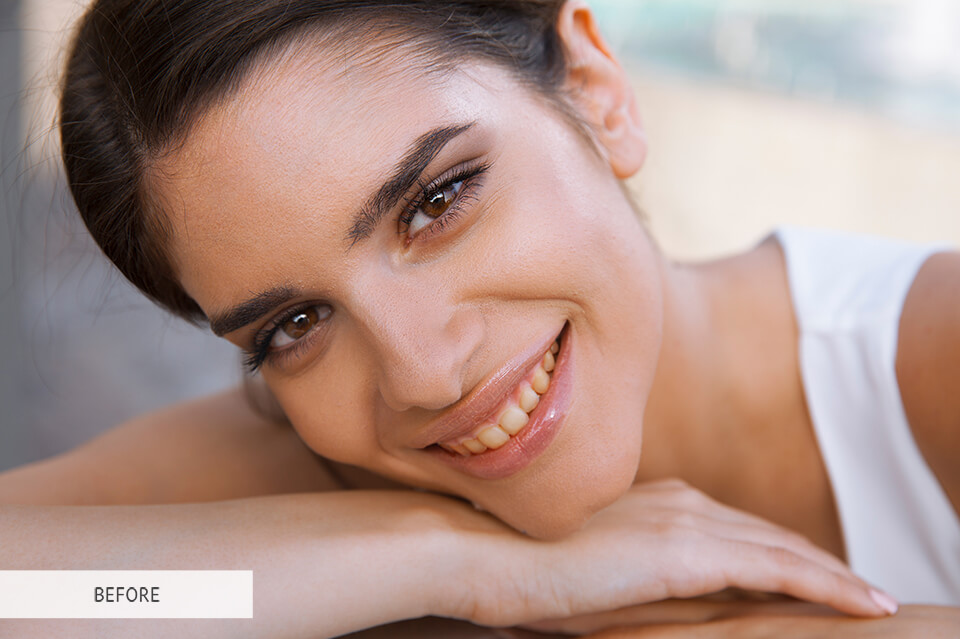
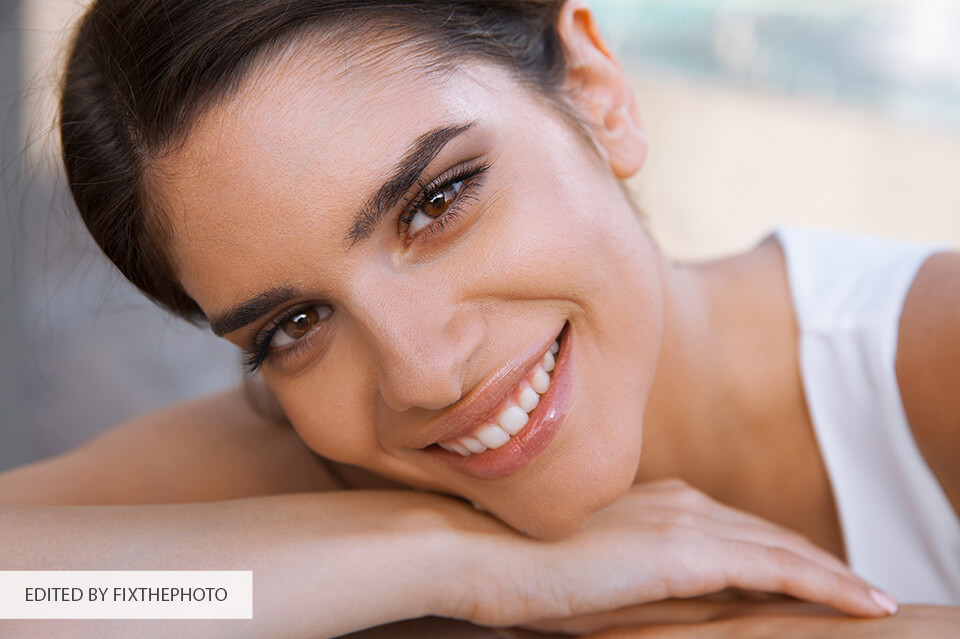

Follow these 2 easy steps to turn yellow teeth into white and sparkling ones even having no experience in Lightroom image editing.
Step 1: Select the Adjustment Brush Tool
Open Lightroom and load the picture that you want to edit. Then switch to the Develop module.
Click on the brush icon that is located in the right corner below the histogram in the upper right part of the Develop screen. You can also use the “K” shortcut.
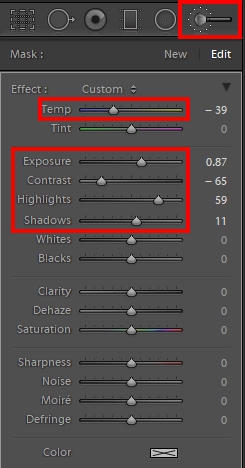
Adjustment Brush Tool: Temperature: -39 • Exposure: 0.87 • Contrast: -65 • Highlights: 59 • Shadows: 11
Be sure to click an arrow of the drop-down menu to the right of the brush menu. This way, you will have more options on the screen. Adjust brush parameters such as size, feather and flow. If you want to achieve the greatest result, select the size of the brush so that it fits the size of the teeth in the photo.
Step 2: Paint Over the Teeth
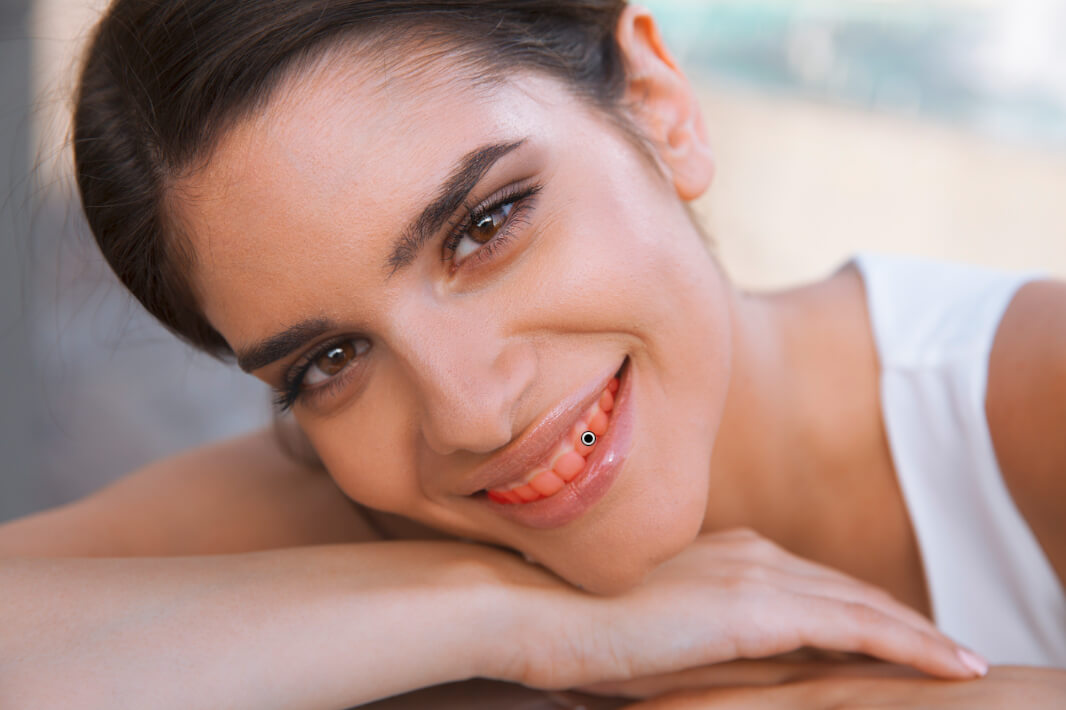
If you have the overlay mask on, the brushed parts will be red. If the teeth turned out to be too white, lower the effect intensity by moving the amount slider down. Besides, you can adjust the brush by clicking the arrow, which is located near the effect drop-down menu, and tweak the exposure and saturation.
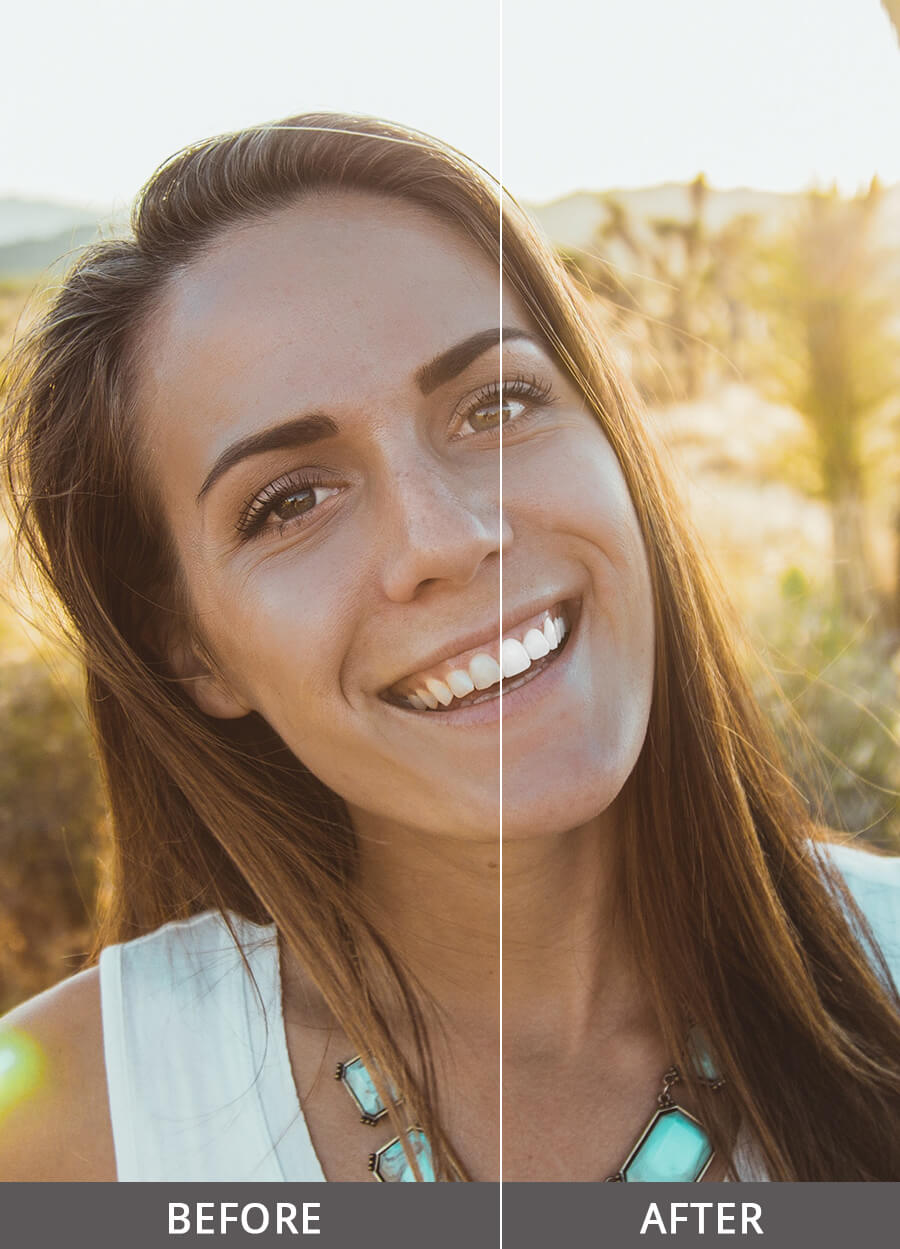
Step 3: Done! Evaluate the Result
This is how to whiten teeth in Lightroom in 2 easy steps Teeth are a very important facial feature, so don’t overdo whitening them in order not to create a wrong impression about the person in the photo. The whitening has to look natural and not noticeable.


If you understand that you have made a mistake in the process of Lightroom teeth whitening, use the undo function.
There are many online teeth whitening photo editors. You can apply this effect and get a finished edited photo in a moment. Mind that this is not the way out for the photos in a high resolution.
That’s why you need to know how to whiten teeth in Lightroom and be able to understand the settings to get the perfect shot. Here is a tutorial that will help you.
Method #2 Lightroom Teeth Whitening Through Adjustment Brush Tool
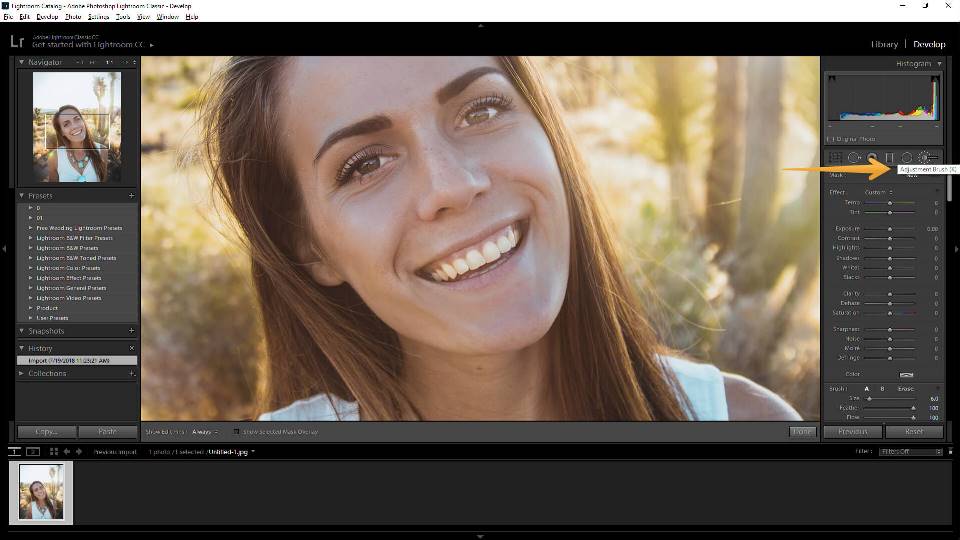
STEP 1. So, to learn how to whiten teeth in Lightroom Classic, first of all, you need to choose the Adjustment Brush in Lightroom. The brush is located in the software brush panel. It will be the beginning of your work in Lightroom. Short-cut K will help you work more effectively.
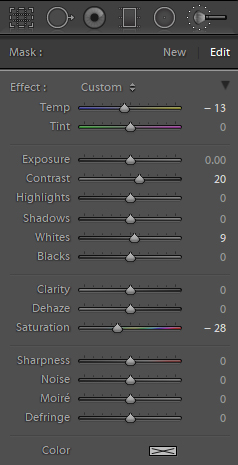
STEP 2. The next step is to set up the corrective brush from Master Workflow Lightroom Presets. There is another option - it's a built-in brush that will help you in Lightroom CC teeth whitening, and you must correctly configure it. We recommend the following settings:
Temp -13, Contrast +20, Whites +9 and Saturation -28.
These settings will successfully whiten the teeth on your pictures.
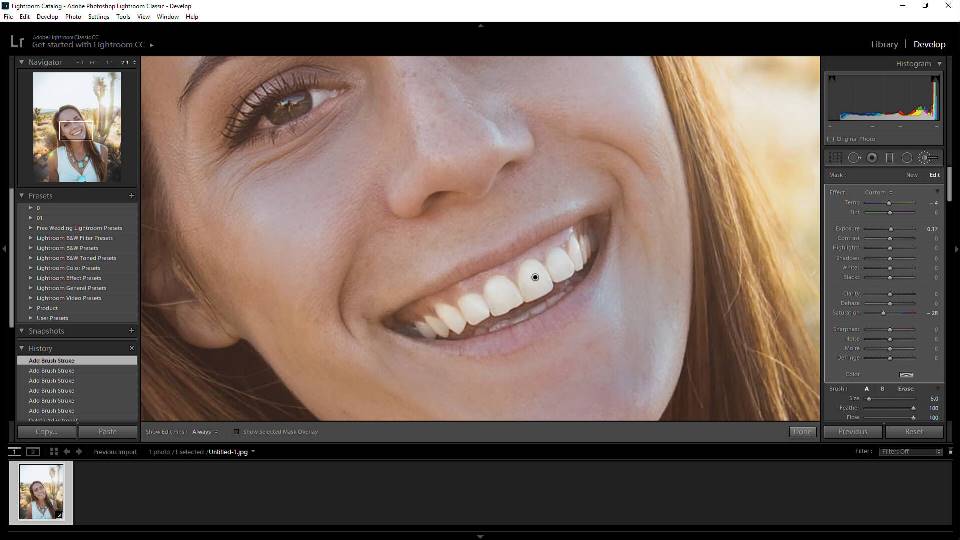
STEP 3. To have a planned result, you need to select the correct brush size. If you choose a large brush size, then, of course, you will finish the whiten teeth in the Lightroom much faster. However, the quality of photo retouching will be much worse than if you used a small brush size. Therefore, if you need a quality result and a spectacular photo, then it is better to select a small one.
STEP 4. How to whiten teeth in Lightroom 2018 fast and efficiently? You can use the Auto Mask. It is an integrated Lightroom option, which perfectly works on teeth whitening. However, Auto mask has some nuances. It uses the edges of the photo elements as a border. Therefore, you get a quality correction. However, if the sides do not have a clear boundary, then it is better not to use this option. In most cases, you will have to work with uneven teeth, which means you need using the Brush Tool by hand for whiten teeth in Lightroom.
STEP 5. The next stage is the process of brush drawing on teeth. Teeth will be whitened in the place where you draw. You can control and regulate this process. You can choose and control the intensity of the color. If you make a mistake when brushing your teeth, you may undo the last action, thanks to the cancel function.
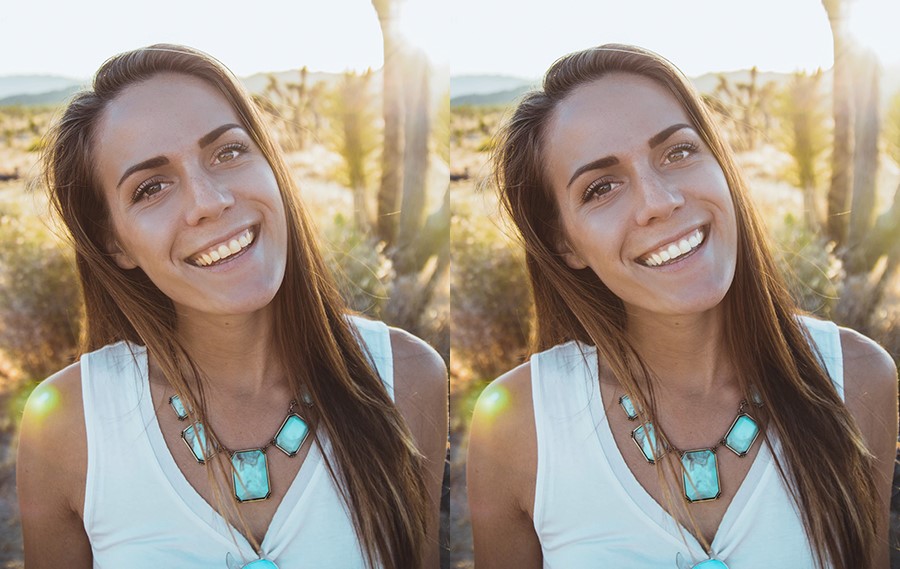
It is the best way that shows how to whiten teeth in Lightroom 2018 and get a great photo in several clicks.
Watch this short video to see how professionals whiten teeth in Lightroom CC.
How to Whiten Teeth in Lightroom and Make Them Natural?
The main feature with whiten teeth in Lightroom is compliance with the balance. On the one hand, if the Lightroom CC teeth whitening is not enough, the teeth can have a yellow or gray tinge. Then your photo will not look good. However, if you use a lot of white, then it may seem unnatural, and the teeth will attract a lot of attention. The picture, in this case, will also be spoiled.
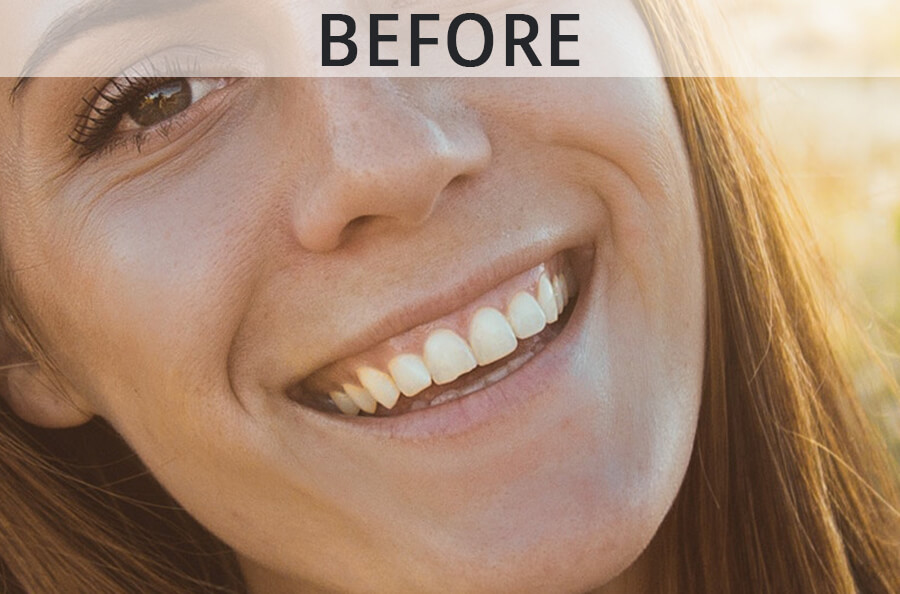
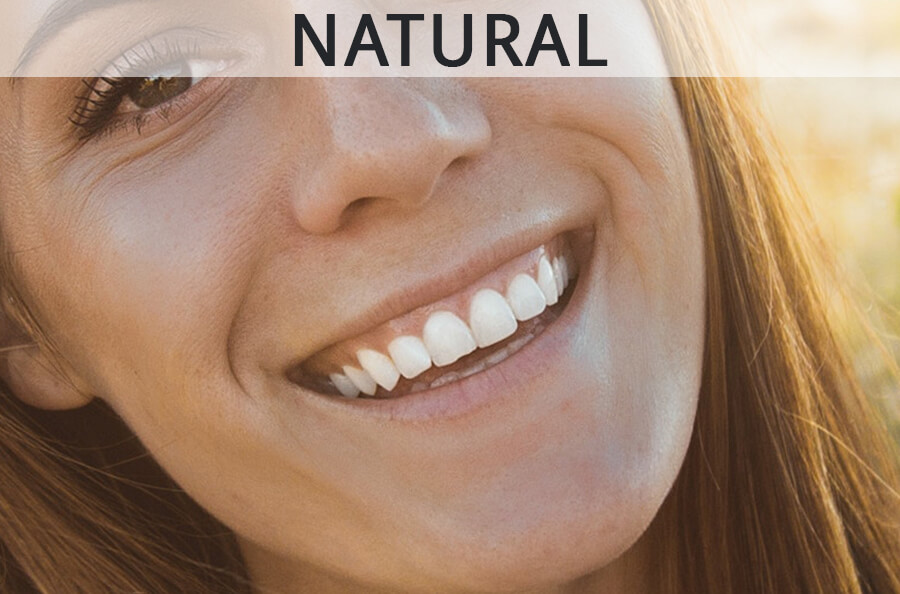
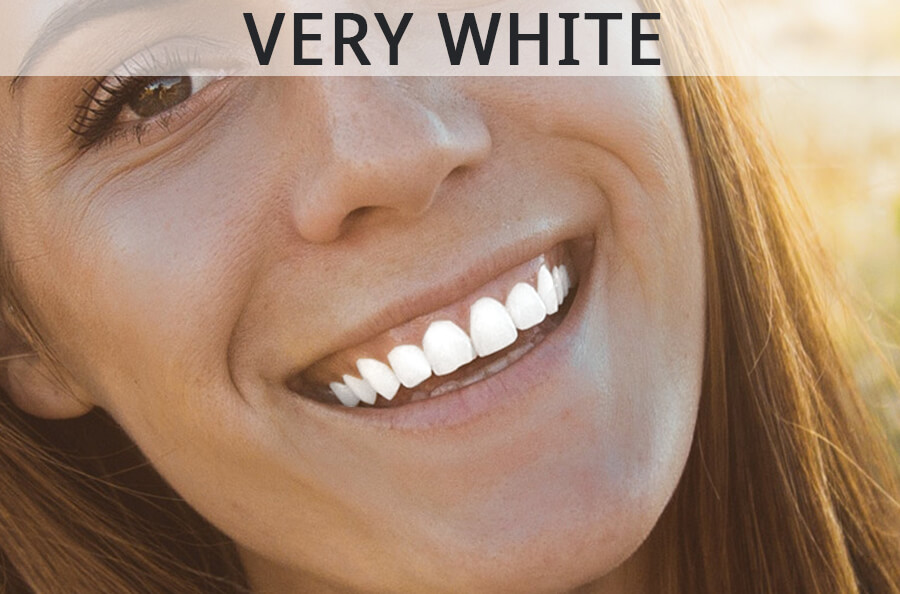
Therefore, it is essential to find the perfect balance. A sense of balance comes with experience. Teeth should not shine and stand out, and also look dull and lifeless. You should leave a little yellow shade or add ivory colors. Otherwise, they will not look unnatural.
To make the smile of different people on a wedding photo look natural, you will need to adjust the smile of each person individually. If you apply the filter, then the smiles of all the people in the photo will look different. As a result, the picture will be inharmonious.
One smile will sparkle, the other will be dim. In addition, if you separately will whiten teeth in Lightroom of every person, it will take certainly much longer, but you will get a clear and high-quality photo.
If the customer is satisfied, you will get good feedback and enhance your reputation, which will help develop your business and increase the number of customers.
Free Lightroom Brushes for Teeth Whitening
Not always in order to whiten teeth in Lightroom it is necessary to do the same actions from time to time, because this can be very tiring, especially for a photographer who is constantly engaged in retouching portraits. We want to give you these free Lightroom brushes in order to make this photo editing process more enjoyable.
Whitening Teeth - Brush #1
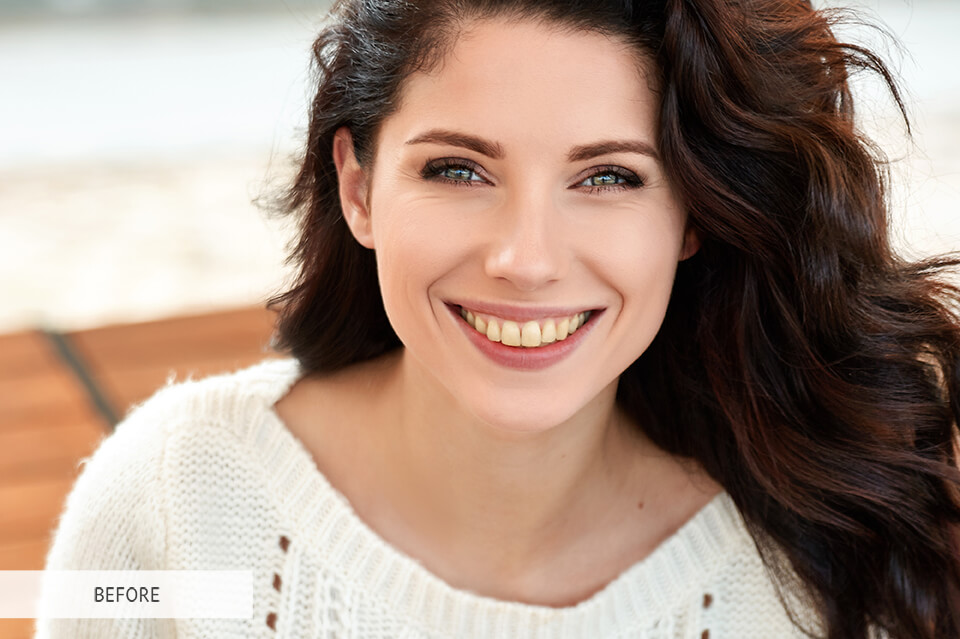
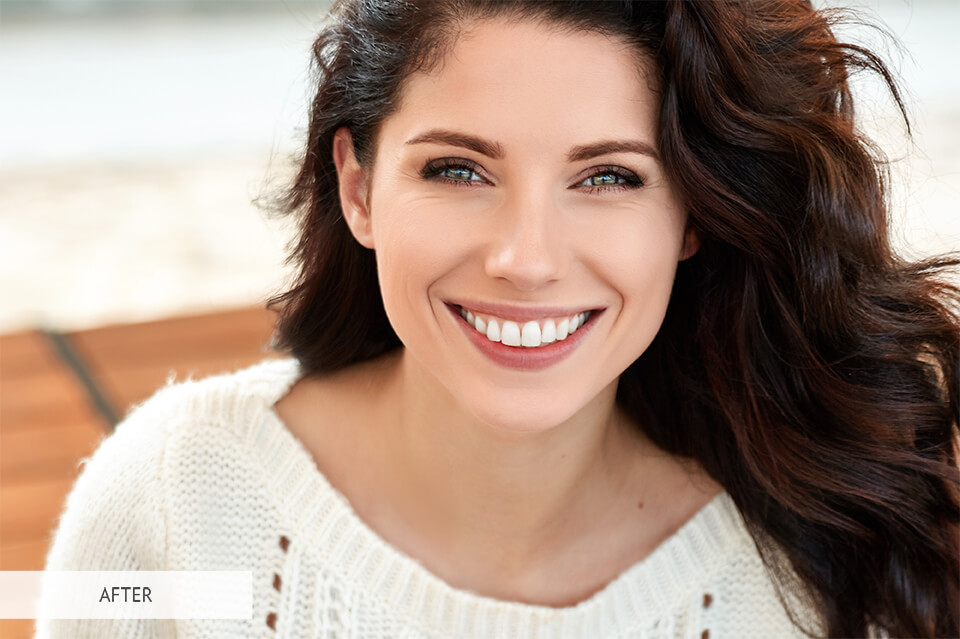
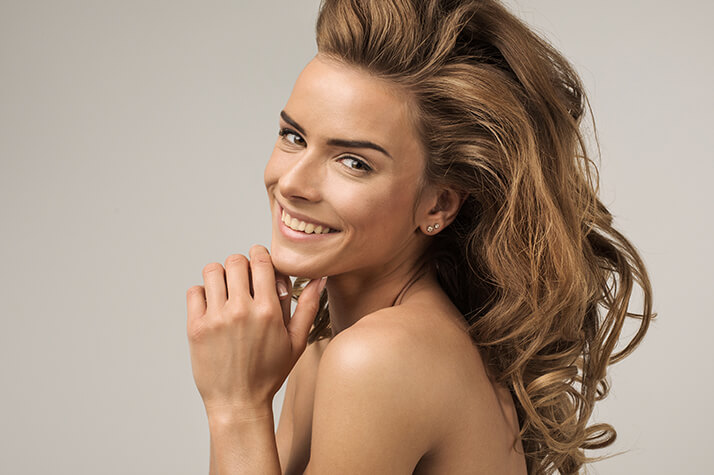
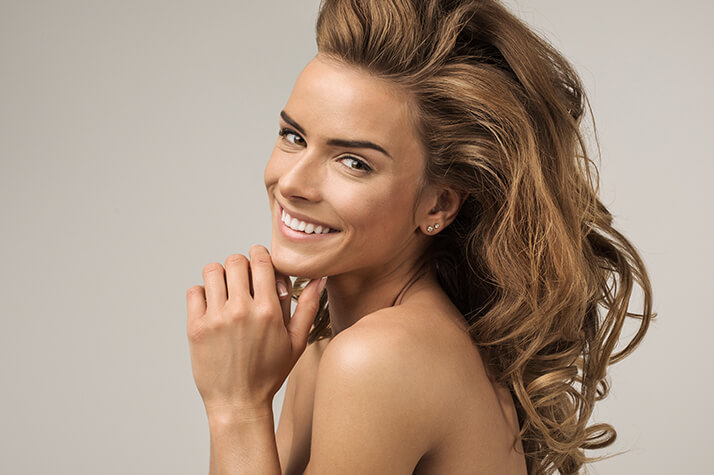
This brush will add a white tone, while giving teeth a natural look. They will not look overdone or too shiny. This brush will make them brighter and more beautiful.
- Check out my guide on how to edit portraits in Lightroom.
Whitening Teeth - Brush #2
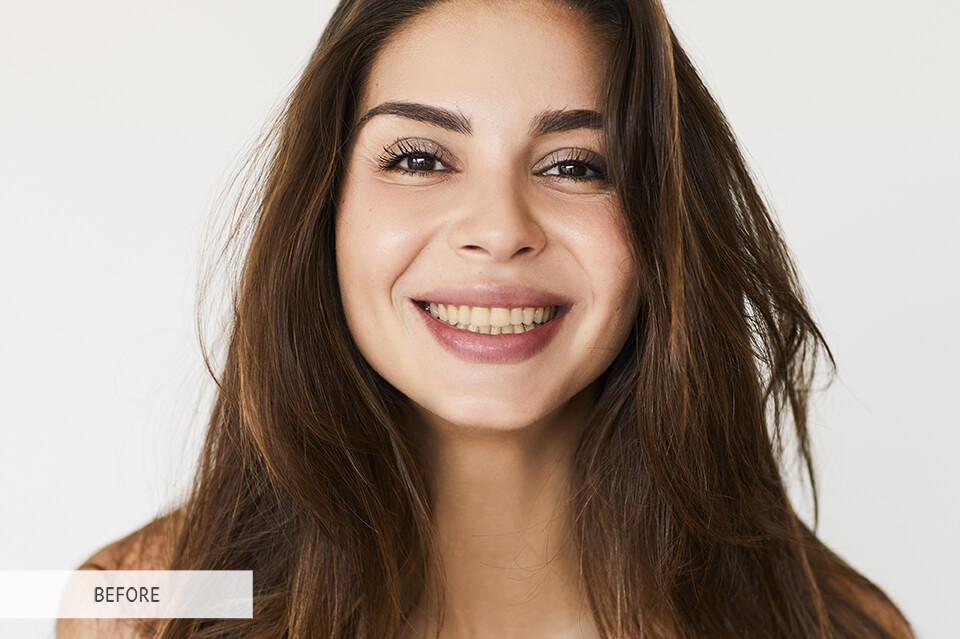
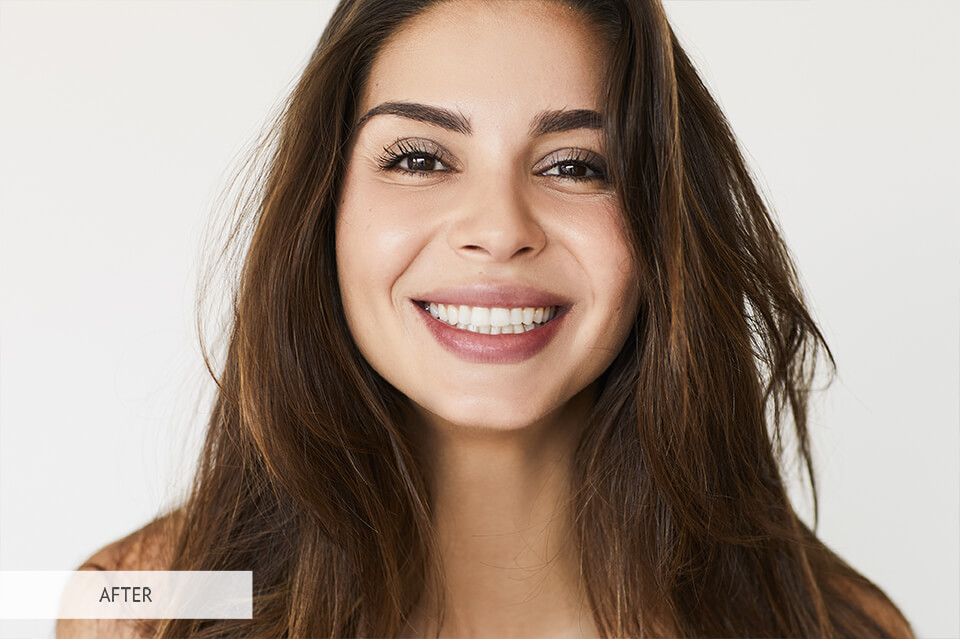
It will add a white tint to an unattractive color of the teeth by eliminating almost all yellow saturation and making teeth lighter. They will look very clean and accurate.
Whitening Teeth - Brush #3
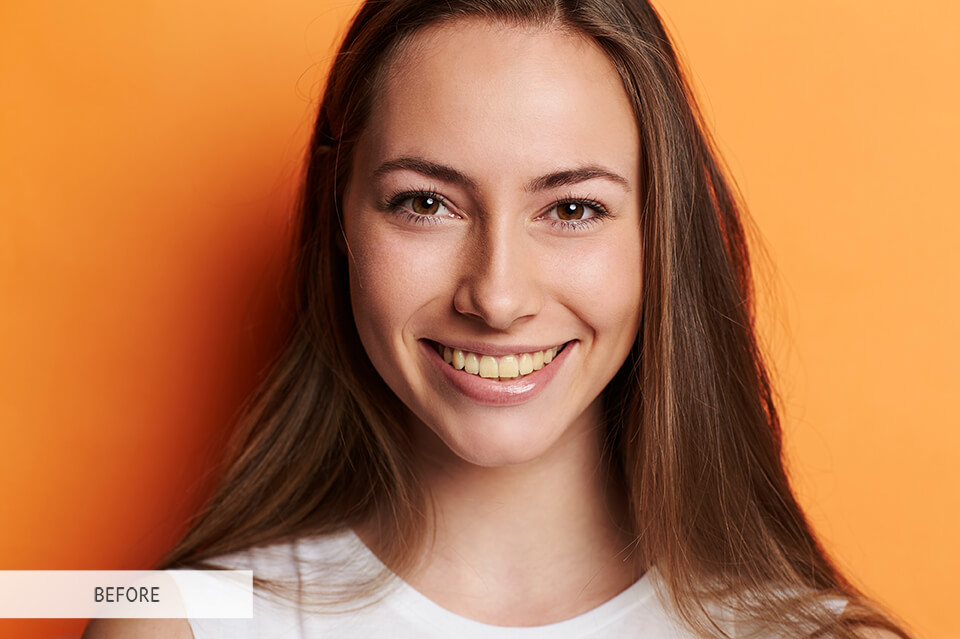
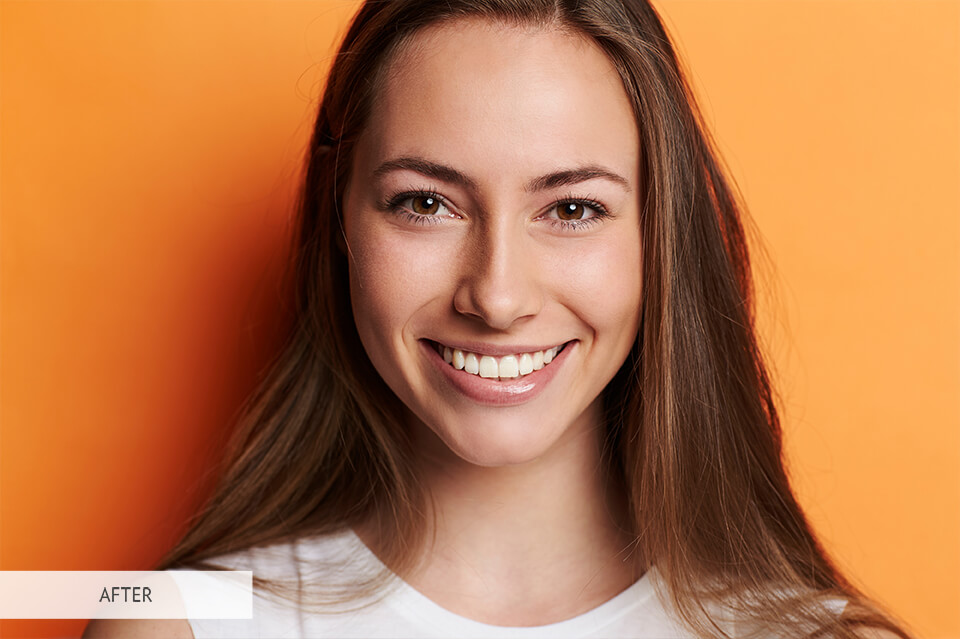
This free brush will give the teeth a snow-white look. It won’t desaturate but increase a white tone in the teeth. This brush will make a smile shiny white and natural.
Whitening Teeth - Brush #4


Whitening Teeth - Brush #5


Whitening Teeth - Brush #6


Whitening Teeth - Brush #7


Whitening Teeth - Brush #8
Whitening Teeth - Brush #9


Beauty Tips You Must Know in Addition to Whiten Teeth in Lightroom
Color Correction
Lightroom is a real godsend for photographers. Amateur photo editors can use free Lightroom presets that can quickly change the skin tone in a portrait photo. You can emphasize the eyes or even change their color, remove stains and adjust the brush size in the "Develop" module.
Lightroom has several interesting secrets, with which you can qualitatively edit a portrait photo. If you want your picture to have a prestigious look and you want to present it in your portfolio, then we recommend you paying attention not only to Lightroom CC teeth whitening. Here are some recommendations:

Remove Skin Blemishes
Many customers ask to remove skin defects on the face. Basically, they are scars, birthmarks, and acne. Sometimes clients ask to remove freckles. You can do this with a brush to remove stains. The brush is to the right of the trimming tool. This option has different applications for Clone and Heal. In the first variant, you duplicate the chosen area and transfer it to the right place. If you select the "Heal" option, the selected area will blend in with the pixels around it. Therefore, you can remove additional areas on the face and preserve the naturalness of the photo. Option "Clone" creates a smoother blending of colors. Using of these tools as simple as the whiten teeth in Lightroom.
If you want to make the skin attractive, select soften skin effect. You will get a soft skin tone. This function is located in the ruled menu with the effect option. Be attentive to this option and do not overdo it. Otherwise, you will get the unnatural skin.
How To Smooth Skin in Adobe Lightroom CC:
Eyes
If you want the person in the photo to have expressive eyes, use the Sharpen Eyes option. Expressive eyes attract attention and make the picture vivid. You can edit the sharpness of the eyes with the help of the brush adjustment and moving the sliders of sharpness. Therefore, you can get the effect you want. Dodge & Burn effect will help whiten your eyes. The quality of the image will depend on photo retouching, so it's best to use a small brush size.
How to Make The Eyes Pop in Lightroom:
Lips
The answer to the question of how to whiten teeth in Lightroom you already know. The closest thing to the teeth are the lips, the color of which sometimes can spoil the overall picture of the portrait. For example, you have already done a color correction of the image and now lipstick looks completely unnatural. There is a way out! You can use Adjustment Brush with the color you need. Another tip is once the area that needs color is selected, simply start moving the “Temp” and “Tint” sliders until the color is adjusted to the condition you needed.
How to Change Lip Color in Lightroom:
Hair
Lightroom is not designed to fully retouch such complex parts of the portrait as hair. Most often photographers use Photoshop for retouching the hairstyles, as it has great functionality and was created especially for such manipulations. However, if you want to correct minor blemishes of the hair along with whiten teeth in Lightroom, you can use the Adjustment tool. Another interesting technique is to give volume and details to the hair, for this purpose, you can use the combination of different settings for Exposure.
How to Retouch Hair in Lightroom:
Beard and Mustache
Applying and retouching facial hair is a more complex process than whiten teeth in Lightroom. That is why more often retouchers use for this process Photoshop. However, if you need to quickly fix the general view of the portrait, you can use the saturation settings to add color to the beard and mustache.
Spot Removal With Color Retouch Tutorial:
Makeup
What do you say, if you learn that you can even impose a fake make-up and not just whiten teeth in Lightroom? You can beautify the eyes of your model with shadows or add an eyeliner, this is nothing complicated, just choose the Brush Tool, draw the necessary color solutions and play with the transparency settings. In the same way, you can correct the existing makeup.
Lightroom Quick Tips:
When you are dealing with photo retouching, many of the effects and filters that you apply can darken the teeth. Teeth may look unnatural due to improper bleaching. You must learn how to whiten teeth in Lightroom even if your client will not order this service. Then the photos will look natural and harmonious.
How to Whiten Teeth in Photoshop?
Many photographers like to retouch the photos in Photoshop, and prefer making color correction in Lightroom. You can find many interesting lessons on how to whiten teeth in Photoshop, but we present to you one of the best on YouTube.
How to Whiten Teeth in Photoshop:
In this video Aaron Nace, the creator of the famous brand PHLEARN, will show you a really simply way of whitening teeth in Photoshop. This process has couple of steps. First, you are going to learn how to fix the color of the teeth and than how to change underline brightness of the teeth. As well, you will find out how to use Liquify Tool to fix the imperfections of the teeth. This is one of the most detailed and simple tutorials on how to whiten your teeth in Photoshop.
Free Photoshop Actions to Whiten Teeth in Photoshop
It is not necessary to repeat monotonous actions from time to time, because there is a special function in Photoshop that allows to remember all the changes that were made with the image in order to apply this mechanism again and again and simplify the editing for future images. This function is called Actions and you can download 5 free actions that will make you never look for the answer to the question "How to whiten teeth in Photoshop?".
How to Whiten Teeth in Capture One?
For those photographers who are not accustomed to using other software besides Capture One, we also picked up a video tutorial on how to whiten teeth in Capture One.
Whiten Teeth in Capture One:
Daniel Jester will show you how easy and quick you can whiten teeth in Capture One using the local white balance adjustment. You can use this technique on photos that have already been edited or not. This is a wonderful and fast method of retouching teeth in group photos. If you use this software, this video will be very useful for you to learn how to whiten teeth in Capture One.
Hope, this article about Lightroom CC teeth whitening was useful for you. Anyway, you can always outsource photo retouching to enhance your portrait photos efficiently, fast, and easy.


