Top-Down Photography Made Easy: Gear, Lighting, Setup

When you purchase through affiliate links on our site, we may earn a commission. Here’s how it works.
Top-Down Photography Frequently Asked Questions

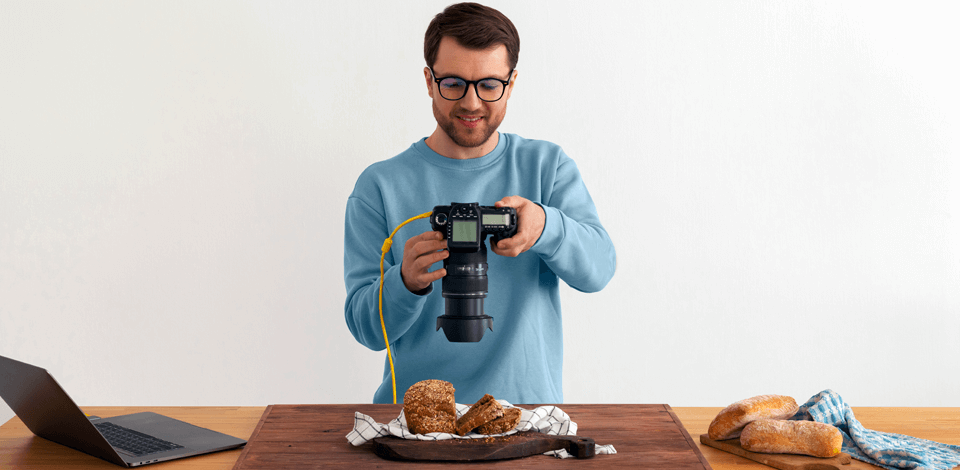
As someone who does photography for FixThePhoto when it comes to commercial purposes, I’m constantly juggling a wide variety of projects, many of which require being an expert in top-down photography – a technique that seems basic but demands diligent planning and well-developed composition skills.

Whether you’re working with food, fashion, or various accessories, you need to keep an eye on the tiniest details: the angle, lights, and composition to ensure everything looks right.

When preparing for a top-down photoshoot, you need to figure out how you’re going to deal with rough shadows, poor light distribution, or unbalanced visual elements.

With practice, I learned how to place the light sources to receive a soft glow, which lenses to pick, and how to transform a regular flat surface into a captivating scene.

What Is Top Down Photography?

top-down dishware photography

Before you learn how to do top-down photography, you first need to learn what it is. It’s a common technique that involves taking photos while having the camera angled at 90 degrees above the subject to ensure you capture its top surface.

Such photos are especially widely taken for social media platforms, be it Instagram, Facebook, or Pinterest since they provide a unique perspective and are very pleasing to the eye.

Overhead vs. Flat Lay vs. Top Down

Even though many people mean the same thing when they say overhead, flat lay and top-down photography are often used interchangeably, each type has distinct features.
Type Angle of view Use cases
Top-down
Taken at a 90-degree angle from above; focuses on symmetry and a balanced composition
Commercial, like presenting eCommerce products, food produce, and other situations that benefit from a top view
Flat-lay
Taken from above, but you can pick other angles to achieve more creative results
Presenting artistic arrangements and creative compositions, often with a narrative purpose
Overhead
Taken from a bird’s-eye view with a wider perspective, can also be an angled picture instead of adhering to a strict top-down view
Provides additional context to the subject, helpful for large-scale storytelling (often used at weddings or outdoor events)

Why Top-Down Pictures Are So Popular?

top down photography social media

Top-down photography is extremely popular right now across all social networks. The distinct view provided by this technique allows you to look at various subjects from the most flattering angle.

I’ve been asked to organize such photoshoots by all kinds of makeup brands, tech companies, and food businesses who wanted to use top-down images for their marketing campaigns, all because:

  • Products instantly catch the eye of potential customers as they remain the center focal point in such photos.
  • This technique helps present a broad range of products while maintaining a tidy, clean look.
  • This is a distinct perspective we rarely get to enjoy in everyday life. As such, top-down photos are more eye-catching and likelier to attract buyers.
  • Props and various accessories can be used freely to strengthen the message behind the image. Top-down photos often have impeccable visual storytelling that entices customers and makes the products more relatable.
  • Professional top-down photos present products in the most accurate way possible. This helps making the customers more trusting and motivated to get your products.
top down photography commercial

Top Down Photography: Use Cases

That said, top-down photographs aren’t just involved with products, as this technique has a variety of other applications as well.

Food & Dishware Photos

food photography top down

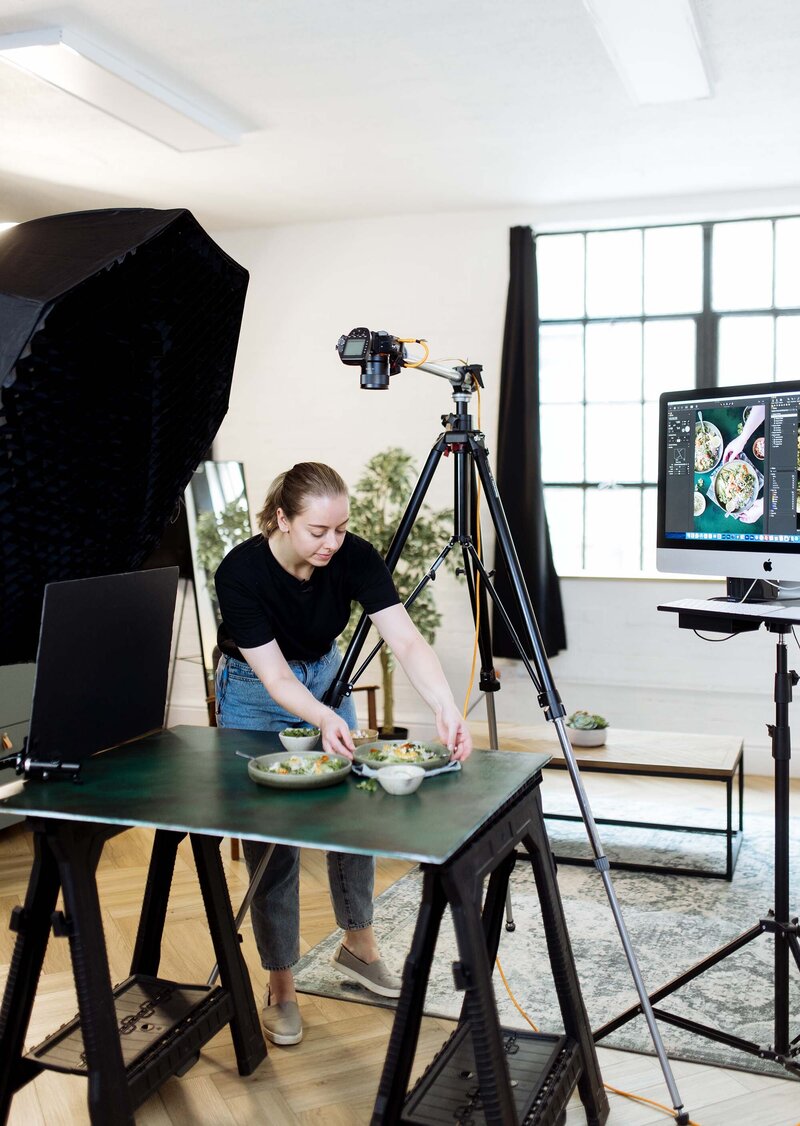
Top-down food photography is a classic at this point and there are multiple reasons why that is the case.

Other than the rare exceptions where the food is “closed” when viewed from above (like a sandwich, or a hamburger with the bun on) the top surface of dishes like pizza, soup, pasta, cakes, ice-cream, cupcakes, cookies, and many others look the most mouth-watering and aesthetically pleasing to the viewer.

dishware photography top-down

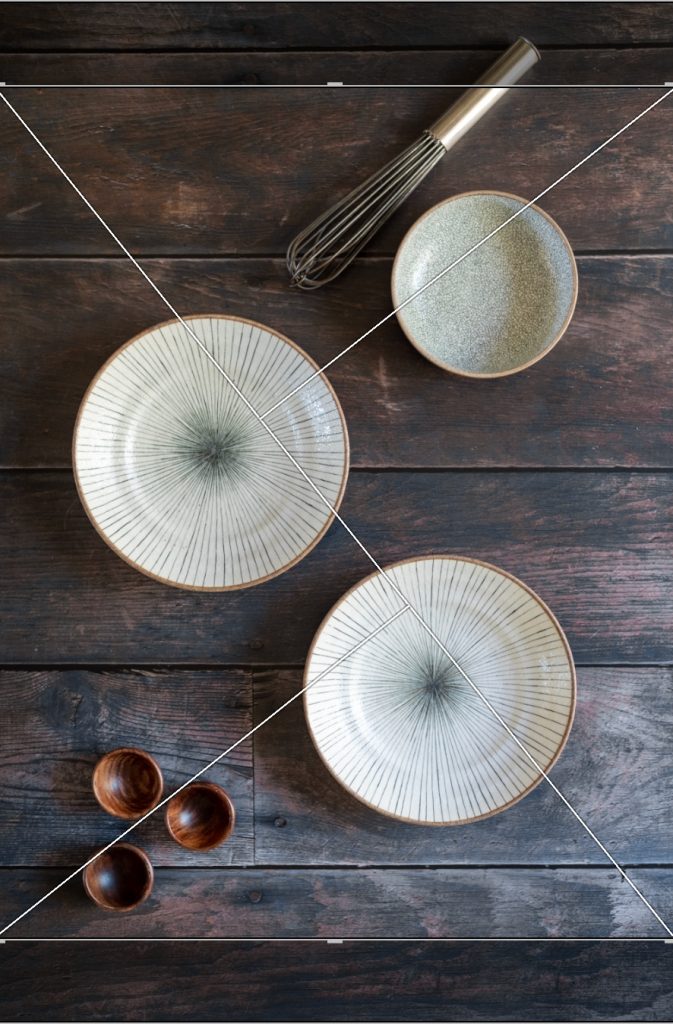
Food photography includes top-down dishware pictures that feature beautiful arrangements of food, drinks, and tableware on large tables. Such compositions can be great for telling a story.

That’s why food vloggers, restaurants, and home cooks use this angle to showcase the beauty of a dish or tableware while highlighting their designs, colors, and textures.

Lens tip: When it comes to the best lens for food photography, the choice comes down to my goals. I pick a wide-angel model with a narrower aperture (f/5.6 upwards), when I want to take a photo of a wider scene, but if I want to snap a close-up photo, I prefer to use a long focal length macro lens.

It’s also important to keep the aperture in check whenever you’re taking top-down photos. To the ensure the entire scene is in focus, I begin with an f-stop of around f/4 - f/5.6 for a test picture and then tweak it if needed.

food photography top down backdrop

I also recommend sticking to basic backgrounds for top-down photography to ensure the viewer’s attention is centered on the subject. I usually pick light product photography backdrops as they help emphasize the subjects and brighten the overall scene:

Light colors: White, beige, or pastel tones (paper, fabric, or cardboard)
Textured surfaces: Wooden, marble, or matte finishes for subtle patterns
Bright tones or glossy surfaces – they attract too much attention to themselves
Messy patterns can clash with the subject

Pro tip: I prefer contrasting tones to ensure the subject is popping but I also make sure the shot still looks harmonious. When during commercial photoshoots, I pick backgrounds and props that match the brand’s identity and the message they want to convey.

top down food photography with props

I suggest giving a lot of thought to what props you’re going to use since they can allow you to add color, depth, texture, and a more balanced composition. Properly chosen food photography props allow me to tell the story I need while catching the viewer’s eye and focusing their attention on the subject.

Prop tip: Consider using ingredients like herbs, spices, utensils, or cutting boards to make the photo more immersive. Add some napkins layered dishes to add fitting complexity to the shot or make the composition cozier.

Product Images

product photography top down

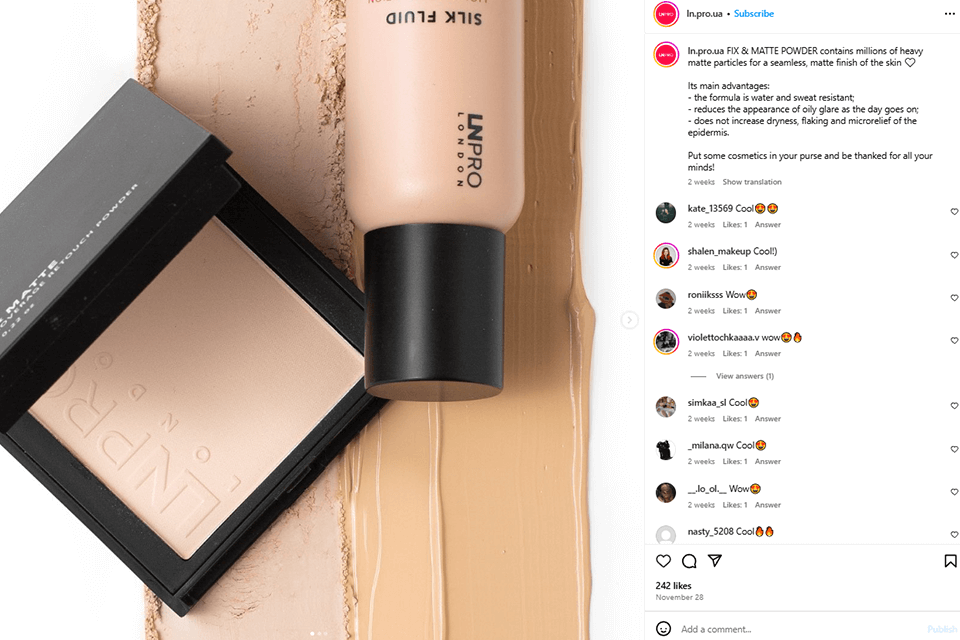
Beautiful product photography with top-down shots is one of the cornerstones of most eCommerce and retail businesses who want to entice customers with their products in the digital space.

Jewelry, makeup, skincare products, clothing, accessories, all kinds of other items can look extremely appealing in a top-down photo.

You can present the product in a clean, nicely-organized manner to present it in the best possible light on Instagram, Pinterest, Facebook, or your website.

product dishware photography top down composition

How to arrange?

A central composition and the rule of thirds are the main techniques you can use, but there’s a variety of other layout options you can try out as well. That said, I prefer to use the golden triangle rule and the rule of odds when dealing with food items or smaller product photography top downs since they’re perfect for ensuring the subject gets most of the viewer’s attention.

  • Central composition. Have the subject lay on the surface in the center for a tidy, balanced arrangement.
  • Rule of thirds. Split the shot into a 3x3 grid and place the subject in the left or right third to add visual weight to it. I always turn on the grid lines in my camera, to divide the viewfinder into nine evenly spaced squares to help with this technique.
  • Golden triangle. Employ diagonal lines to navigate the viewer’s glance to the focal point. This is the optimal choice for food and various smaller items.
  • Rule of odds. Ensure you only pick subjects in odd numbers (3, 5, etc.) to enjoy a natural and dynamic arrangement.
fixthephoto product retouching fixthephoto product retouching

Want to Enhance Your Product Photos?

FixThePhoto's experienced retouchers can improve the look of your product images by performing color correction, basic edits, getting rid of rough shadows, or tackling more elaborate manipulations like creating a ghost mannequin, adding shadows and reflections, recoloring different items, deleting the background, making clipping path edits, etc.

Clothing Ads

top down clothing photography

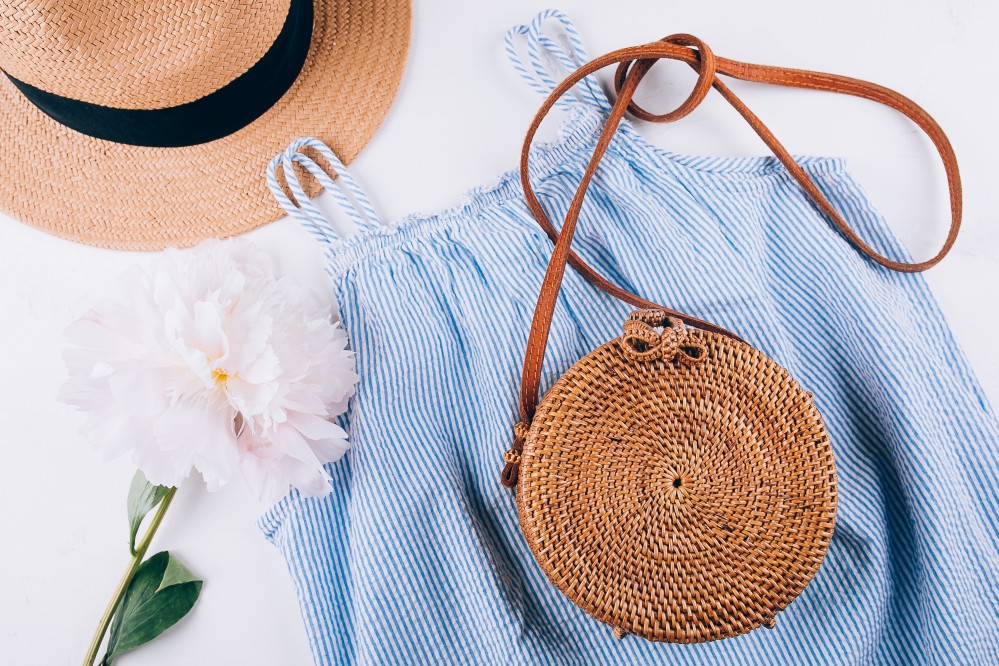
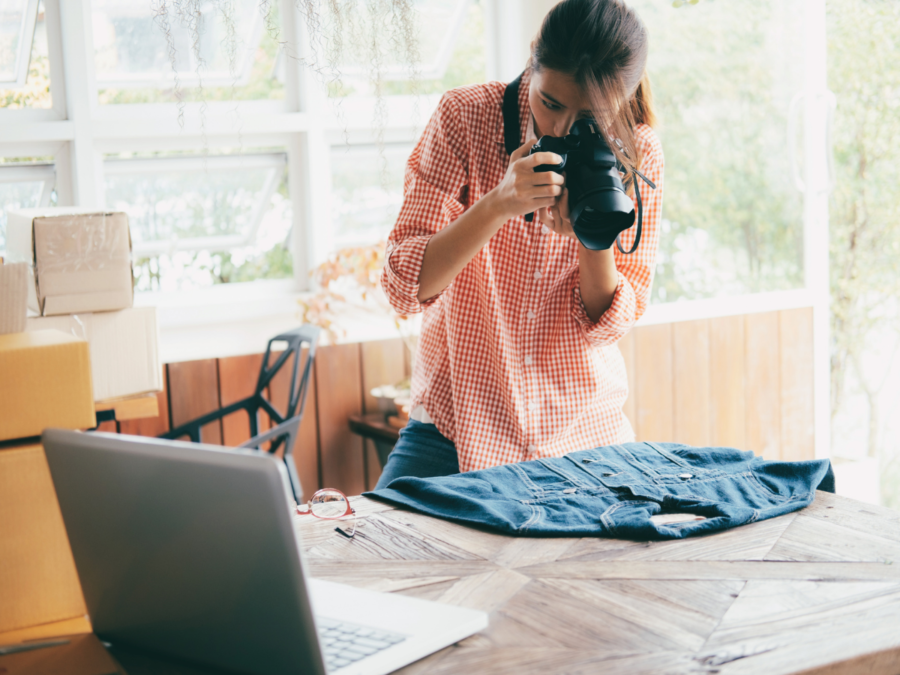
Top-down clothing photography is all the rage in the eCommerce sphere. If you’re still in the process of getting your fashion brand off the ground, this type of clothing photography can do wonders for attracting more attention to your products without breaking the bank. It doesn’t require professional photography skills, a spacy studio, premium-grade gear, or hiring a model, which makes top-down photos extremely budget-friendly.

top down clothing photography props

You can try out various props, backgrounds, and arrangements to take aesthetically pleasing photos. In contrast to other techniques, top-down pictures don’t demand a lot of setup or preparation. It’s very time-efficient and allows you to receive a lot of high-quality photos quickly.

Lens tip: To take beautiful top-down clothing pictures, you can stick to two basic lenses for fashion photography which should help you out in any situation. If I want to achieve a sharp focus, I use my 50mm prime lens. Meanwhile, my 100mm macro 2.8L lens lets me focus on the smaller details, like the textures of different clothing items, with minimum effort.

top down clothing photography composition

To receive the best results when taking top-down clothing photos, I suggest using these camera parameters:

  • Aperture. Pick a bigger value between f/4 and F/11 to ensure all items are in focus and you can examine them in detail.
  • Shutter speed. Set a higher speed of about 1/125th or 1/250th of a second to prevent blur and camera shake.
  • ISO. Stick to as low of a value as you can, starting at ISO 100, to reduce the amount of noise in the photo.
  • White balance. Tweak it according to the lighting to receive natural colors. Try out a couple of settings until you find the optimal one.
  • Focus. I always use manual focusing to ensure the shot looks exactly how I want it to.

Prop tip: I always accompany outfits with suitable accessories that often include handbags, hats, and jewelry to create a more finished look.

Top-Down Portraits

top down camera photography portrait

Top-down portrait photography is a distinct technique that provides a unique view of the model, allowing you to receive interesting, unconventional results.

Top-down camera photography for portraits is widely popular among clothing, lifestyle, and editorial photographers who are interested in finding new compositions and presenting their subjects in a new way.

Gear tip: A DSLR or mirrorless camera is perfect for high-resolution photography. I always use full-frame cameras since they offer a higher level of detail and superior results in challenging lighting conditions.

As for lenses, I recommend a prime lens (like a 50mm) to enjoy high sharpness and minimal distortion. If you need to encompass a larger scene in the shot, use a wide-angle lens.

top down camera photography portrait negative space

As for compositional advice, I sometimes use negative space for top-down portraits, even though it’s mostly reserved for product and food photography. You might be inclined to fill the space with accessories or by placing subjects closer to each other, but that can make the overall photo feel cluttered and unprofessional.

Meanwhile, negative space offers a wide range of benefits, including:

Adds a sense of neat tidiness to the composition
Has a soothing effect on the viewer
Focuses attention on the subject
top down photography portrait negative space

Pro tip: I often use this technique for overlaying text, logos, or branding when editing my images.

Street Pictures

street photography top down

If you do street photography in a top-down style, you’ll allow viewers to see the city from a new perspective, examining familiar urban spaces in an original manner.

Whether you’re taking photos from a roof, or a balcony, or flying a drone, this technique lets you create breathtaking compositions that can tell a captivating story.

Lens tip: I suggest using a wide-angle lens (e.g., 16-35mm) to capture vast urban scenery. It’s particularly relevant when standing on a rooftop or balcony and trying to include as much of the street as possible.

For a closer, more intricate photo, I go back to my regular lens (e.g., 24-70mm) since it allows me to isolate subjects while still including the necessary context.

top down street photography

Urban photography grants a lot of room for experimentation with natural lighting, which is why I always account for the weather and the time of day when planning my photoshoots.

  • Golden hour. Scheduling the shoot for early morning or late afternoon allows you to enjoy soft, diffused lighting and long, strong shadows that emphasize the textures and patterns in the photo.
street photography top down midday light

Midday light. Even though I try not to take photos in rough noon lighting for traditional photography, these conditions are well-suited for top-down pictures since they produce striking contrasts and powerful shadows of people, structures, and vehicles.

Watch for shadow play. When it comes to city streets, top-down photography lighting is all about the shadows. Examine what kind of shadows are cast by objects and people and use them to create leading lines, silhouettes, and symmetrical patterns.

Overcast days. Cloudy weather can serve as the perfect light diffuser, making the shadows softer and ensuring your photos aren’t overexposed. Such conditions are perfect for more minimalistic compositions.

Pro tip: I love relying on Google Maps, Google Earth, Sun Surveyor, and other apps for photographers to plan out how I can approach elevated shooting points and figure out how the lighting will affect the scene during specific times of the day.

Drone Sessions

aerial top-down drone photography of japan nature

Top-down drone photography provides a fascinating perspective that allows you to explore patterns, symmetry in architecture and nature, and different landscapes like never before. I especially enjoyed doing aerial top-down drone photography of Japan’s nature.

This photography style is widely used for landscape and real estate photography as well as abstract art and city photography.

Top-down drone photography emphasizes symmetry and geometry. When using your drone, look for:

  • Farming fields
  • City streets or rooftops
  • Beaches with footprints or wave patterns
  • Forest canopies or sand dunes
I also love to create panoramic images using my drone photos. It’s very simple and the final photos look incredible:
top down beach aerial photography

Step 1. Prepare your drone camera. Aim the camera down to receive a flat, top-down perspective. Tweak the exposure parameters until you get the lighting right (e.g., shutter speed, aperture, and ISO).

Step 2. Plan the shot and take it. Align the camera with a reference point or pattern (for example, a path, house, or court) to receive consistent results. Fly the drone side to side in rows, taking several overlapping photos (strive for 50%+ overlap per photo). After one row is done, fly the drone forward and start working on the next row, securing proper coverage.

top down drone photography panorama stitching in lightroom

Step 3. Combine photos. Open the photos in your go-to image editing software like Lightroom. Pick all the overlapping pictures and utilize the Photo Merge → Panorama feature to merge them seamlessly.

adobe lightroom top down photography editing tool

Need Tools for Editing Top-Down Pics?

Try out Lightroom with its simple, intuitive features that deliver a top-tier result. Whether you’re a beginner or a professional, it allows you to create high-quality photos and panoramic images while also being suitable for organizing and sharing your files on both Windows and Mac as well as mobile devices.

Safety tips:

  • Read regulations. Make sure to study your area’s drone laws and get any permissions that might be required, particularly for commercial drone photography.
  • Prioritize safety. Don’t use the drone in crowded places, near wild animals, or in tight airspaces. Always keep your drone in sight.
  • Practice accurate navigation. Improve your mastery over the drone’s controls to move it properly and take properly aligned top-down photos.
  • Employ GPS functionality. Most drones come with GPS-based positioning and automated flight paths, which allows for preserving a consistent angle and altitude, which is important for taking high-quality photos.

Top-Down Landscapes

top down landscape photography

If you don't have a drone, creating beautiful top-down landscape photography seems like a daunting task, but you can still do it if you pick the right approach:

Step 1. Climb high. Choose an elevated area like a cliff, hills, or mountain to gain the necessary bird’s eye view.

Gear tip: Use a DSLR or mirrorless camera with a telephoto lens (70-300mm works best) to have the necessary zoom functionality.

Step 2. Strategic composition. Envision the photo before taking it. Prioritize flatter environments that are easier to shoot in this perspective, as you can create top-down beach aerial photography or take photos of vast fields or large bodies of water that don’t have distracting elements (trees, people, houses).

top down landscape photography transform in lightroom

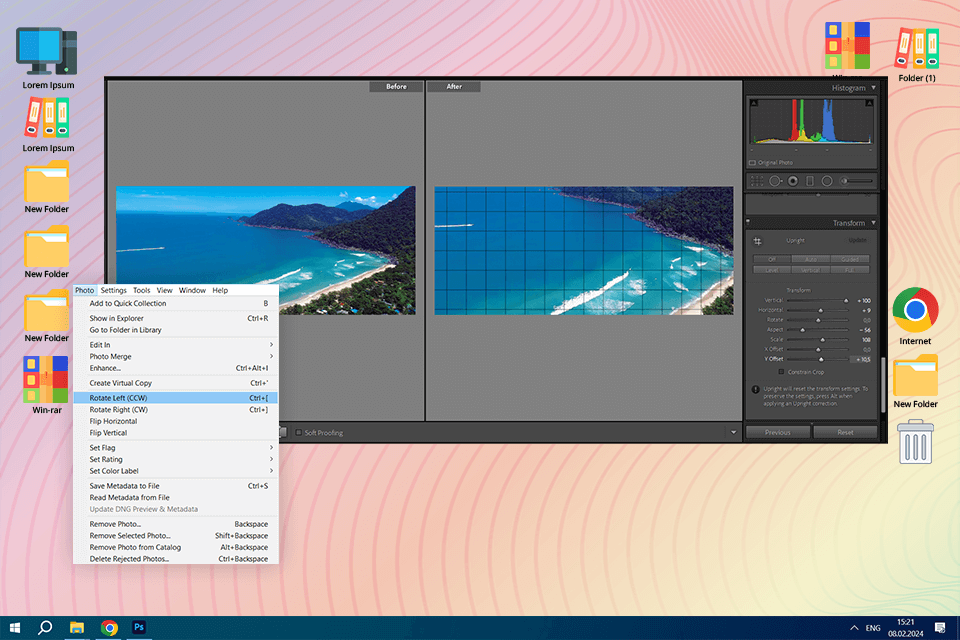
Step 3. Post-processing trickery. Employ Lightroom’s Transform feature to change the horizontal and vertical perspectives to emulate a drone-shot top-down image. Crop and refine the picture until it properly showcases your subject. Perform color correction in Lightroom and use Photoshop to tidy up the image and perform any necessary manipulations.

Recommended Gear

top down photography setup

📸Camera: DSLR or mirrorless?

For top-down photography, it’s highly recommended to use a DSLR or mirrorless model, with full-frame cameras providing the best results. Full-frame cameras deliver:

  • Superior resolution. Ensure your photos include even the smallest details, which is important when doing product or fashion photography.
  • Improved low-light results. Bigger sensor pixels produce clearer photos even in soft or dimmed lighting.

📸Lenses: Choosing the optimal focal length

My top-down photography setup is determined by the subject and intended look.

macro top down photography

Macro lenses (100mm). Ideal for taking close-up top-down photos of smaller subjects like jewelry or intricate fabric textures. I prefer Sony FE 90mm f/2.8 Macro G OSS.

Lighting: natural or artificial?

I employ both natural and artificial light sources for my photos.

top down photography natural lighting
☀️Natural lighting setup

  • Arrange your gear and subject close to a window with diffused light entering at a 45° angle.
  • Employ a white reflector (or foam board) to bounce light and get rid of harsh shadows.
  • Stay away from rough direct sunlight to avoid dealing with unappealing highlights or shadows.

Pro tip: To soften the light, I frequently employ curtains or a white sheet as a makeshift diffuser.

💡Artificial lighting setup

top down photography lighting

If the natural light you have access to isn’t enough to illuminate the subject properly, you can create a setup for top-down photography with lightboxes softboxes, or LED lights:

  • Aim the LED lights diagonally to achieve a uniform glow. Godox SL60W LED Video Light is perfect for producing, controlled lighting.
  • Employ diffusers or softbox covers to diffuse rough lighting. Neewer 2-Pack Softbox Lighting Kit is relatively cheap and is great at evenly distributing light.
  • Reflectors allow getting rid of shadows and brightening dark areas
set up for top down photography with a light box
  • A foldable lightbox (e.g., Travor Photo Lightbox) is the optimal solution for product and small subject photography.

Pro tip: When doing professional clothing photography, I prefer to employ a backlit table with customizable side lighting and a mounting solution.

fix the photo body editor tune fix the photo body editor tune

Want to Receive Fast Pro-Quality Enhancements?

Download Fix The Photo Body Editor & Tune onto your smartphone to delegate your photos to an experienced team of retouchers. They can improve the colors, replace the background, and perform any other manipulations you ask for with a quick turnaround, which is perfect for making fixes on the fly when preparing content for social media.

Tripods: stability is crucial

top down photography tripod

A tripod can play an essential role when taking top-down pictures. It adds stability to your setup and allows capturing a crisp, detailed photo. Additionally, it makes it easier to maintain a 90-degree camera angle.

Recommended options:

Camera mount or C-stand: as a tripod replacement?

The biggest benefit to using one of these tools is that they can also serve as a light stand. I employ them to mount my camera and prepare extra light sources whenever the situation calls for it. A great example would be the Kupo 40” C-Stand Kit.


how to do top down photography

Remote shutter release: prevent camera shake

When doing top-down photography indoors, not even a tripod can save you from a minor degree of blur caused by you pressing the shutter. A camera remote control deals with this issue by allowing you to snap photos hands-free.

Products to look at:

Alternatively, you can employ you’re camera’s timer feature.

📋 Gear checklist for top-down photography:

✔️ Camera: Full-frame DSLR or mirrorless
✔️ Lens: Wide-angle, standard, or macro depending on subject
✔️ Lighting: Natural light setup, LED panels, or softboxes
✔️ Tripod: Firm tripod with a boom arm
✔️ Mount: C-Stand or mounting arm for overhead setups
✔️ Lightbox: For product photos
✔️ Remote shutter release: Prevents camera shake
✔️ Reflectors and diffusers: For soft, shadow-free lighting

FAQ

  • • How can I take overhead/top-down pictures without shadows?

The optimal method is to position the light source below the camera level. Alternatively, you can employ a reflector to shed light on darker spots of the shot to soften harsh shadows. You can also take photos facing the light to prevent the appearance of shadows.

  • • Is a phone camera good enough for top-down photography?

Yes, a smartphone is a solid replacement for a professional camera. Even though your photos might lack some of the detail captured by mirrorless or DSLR cameras, they can still look stunning as long as you get the composition and lighting right.

  • • What are the typical mistakes most people make when doing top-down photography?

Typical errors include snapping top-down photos without maintaining the right camera angle, poorly arranging items so that they end up looking cluttered, and choosing a clashing backdrop. If you don’t get these three aspects right, your photos will lose most of their aesthetic appeal.

  • • Is editing important for top-down photos?

Yes, editing is a crucial step for this photography technique. The original photo might have problems with exposure, shadows, or color balance and you can deal with all of those issues and many others using image editing software.

Tata Rossi

Tech Trends Journalist

Tata Rossi is a photographer-advisor, key contributor at FixThePhoto, sharing her expertise about photography and 55% of photos you see at our blog are taken by her. She is a Bachelor of Fine Arts in Photography from the Massachusetts College of Art and Design. She is the main so-called teacher in our team, conducting courses on photography and editing for beginners and anyone interested.

Read Tata's full bio

Tetiana Kostylieva

Photo & Video Insights Blogger

Tetiana Kostylieva is the content creator, who takes photos and videos for almost all FixThePhoto blog articles. Her career started in 2013 as a caricature artist at events. Now, she leads our editorial team, testing new ideas and ensuring the content is helpful and engaging. She likes vintage cameras and, in all articles, she always compares them with modern ones showing that it isn’t obligatory to invest in brand-new equipment to produce amazing results.

Read Tetiana's full bio

adobe special offer adobe special offer