
I work with thousands of photos every year. Foreshortening is one of the things that pop up more often than you’d think. Sometimes a portrait looks amazing. It has great lighting, a stylish outfit, and a confident pose.
But one arm suddenly looks way too big, a leg appears oddly short, or the subject’s nose takes almost the whole picture. Usually, the problem isn’t related to the model or even the pose. The main issue is foreshortening in photography.
Fortunately, foreshortening doesn’t always distort the look of your images. You just need to understand how good foreshortening photos should look and add depth, energy, and motion to your shots, sticking to this approach.
In this article, I’ll show you what foreshortening is, how to avoid it when it doesn’t work, and how to use it intentionally to create eye-catching, memorable pictures.
Foreshortening is a trick of perspective. When you turn a 3D subject into a 2D image, parts of it can suddenly look out of proportion. For instance, a hand reaching toward your camera may seem huge, while the rest of the body shrinks into the background.
This effect has deep roots in art. Renaissance masters, e.g., Michelangelo, used it in paintings and frescoes to add drama and a sense of depth. In photography, the same principle shows up when you use wide-angle lenses or shoot from unusual angles for full body pictures. Sometimes the results look playful, but they always draw the viewer’s eye.
In simple words, foreshortening is when parts of your subject appear larger simply because they’re closer to the camera. For instance, when someone reaches out their arm, the hand looks oversized while the rest of the body seems small and distant. This effect may yield stunning results, but can also look unnatural if you’re not prepared for it.
It’s easy to confuse foreshortening with perspective. Still, they refer to different concepts.
When talking about perspective, we imply that the entire scene acquires a sense of distance and size. Foreshortening in photography changes the way specific parts of the subject appear. It can create striking distortions, like an oversized hand or foot. You can use this method for creative experiments. When it happens by accident, your picture will look strangely unbalanced.
At first, I thought foreshortening was just one simple trick. But once I started applying it with intention, I realized there are many variations. Each option shapes the mood of the photo in its own way.

Low-angle foreshortening. By shooting from a lower position, like near the feet, you make the legs appear larger and more dominant. The upper body part looks smaller. Such foreshortened photos look powerful. This effect works perfectly when you want to exaggerate strength or create a dramatic mood, especially in portraits or edgy fashion shots.
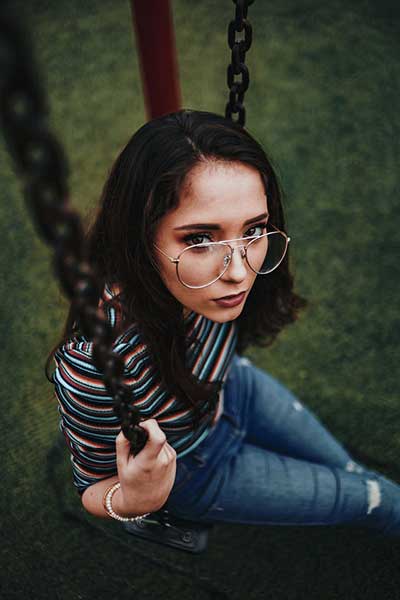
High-angle foreshortening occurs when the camera looks down at the subject. This makes the head and shoulders look huge in the frame while the rest of the body appears smaller. It’s a common mistake when photographing someone who’s sitting, as a steep downward angle can impact proportions.

Distance-based foreshortening affects the space between different elements. Anything close looks oversized, while what’s farther away appears tiny. That’s why we get fun illusions like someone “pinching” a landmark in travel photos, or why an outstretched hand can look huge compared to the rest of the body.
When you understand the essence of foreshortened photography, you can transform a flat image into a dynamic and expressive one. Let’s explore how it works across different types of photography. Besides, I’ve prepared some helpful tips for you.
When it comes to portrait photography, foreshortening depends heavily on posing, perspective, and lens choice.

Ask your subject to reach forward. They can stretch out a hand or arm toward the lens. Your image will become lovelier. This foreshortening pose works best for fashion and athletic images.

Kick-out pose. Have your subject push one leg toward the camera, especially from a low angle. The effect creates drama and makes the photo pop with action.

Bring your hands forward into the frame. Have the subject sit or recline, holding their hands near the lens so they gently outline the face. The hands look a little bigger than normal, but the result feels tender and intimate.

Lying-down poses. When someone lies back and cups their face, the hands are automatically closer to the lens. The photo acquires a delicate foreshortened look.
Tips I’ve learned through practice:
Foreshortening can be effectively used even in landscape photography.

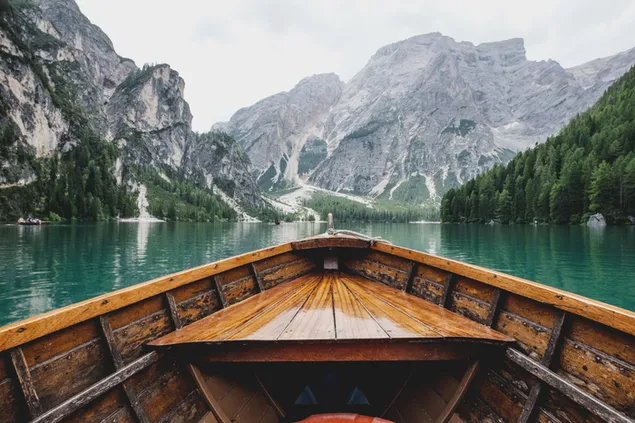
Concentrate on the foreground. To get the most out of this technique, focus on an object right in front of you. Move close, and frame your shot so that this item appears big, while the scenery behind it seems smaller. This trick makes your photo feel more three-dimensional.

Look for leading lines in the scene. It can be paths, rivers, or fences that lead toward the distance. They help make your picture deeper.
Shoot from a low point. When you are close to the ground, the foreground will appear bigger. This way, a picture becomes more dynamic. The result is worth your effort.
Include at least three layers in your photo. These are typically the foreground, mid-ground, and background. Such layers can be visually represented by trees, people, or buildings.
My personal workflow:

Foreshortening is a clever trick that helps your product photography grab attention. The idea is simple:
Angle the item. Don’t photograph your product directly from the front. Instead, tilt it so a key detail like the dial of a watch or the rim of a mug leans toward the camera. Thus, your photo will stand out in a busy feed.
Move in close. Close-up shots let you display little textures and details of a product, but you’ll need to manage focus carefully, especially if your depth of field is narrow.
Use props to your advantage. Place your subject in a setting or add background pieces, such as sunglasses paired with a beach towel or a drink bottle surrounded by flowers. These extras help you tell a more engaging story in your pictures.
In practice, I use two techniques that really boost the foreshortening effect:
Together with my FixThePhoto teammates, I’ve spent lots of time fixing various distortions in Photoshop. I know that foreshortening can be very tricky.


Foreshortening in photography can be challenging to master, but I’ve tried it in portraits, landscapes, and product photos. Sometimes I achieve amazing, eye-catching results. Other times, I got images that looked odd.
Still, if you are patient and think outside the box, you can take foreshortening pictures that tell unique visual stories. If the perspective isn’t ideal, you can always apply correction in Photoshop and Lightroom.
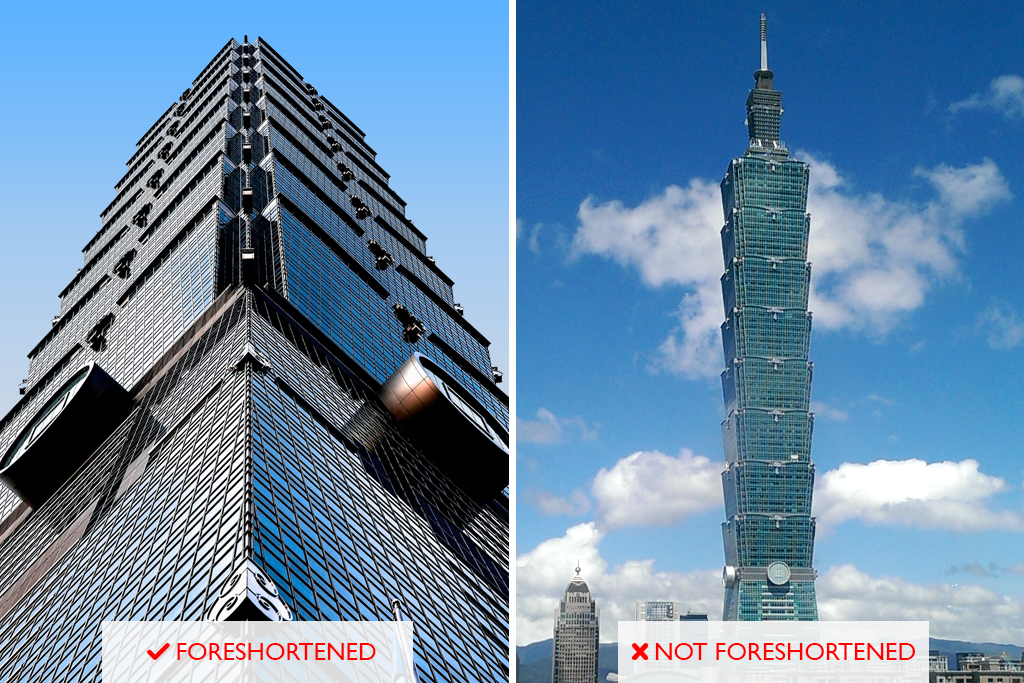
This foreshortening idea is great for urban photography. Get close to the base of a building, tilt your camera up, and watch the perspective exaggerate the height.

The bottom looks large and occupies most of the frame, while the top fades into the sky, adding drama.
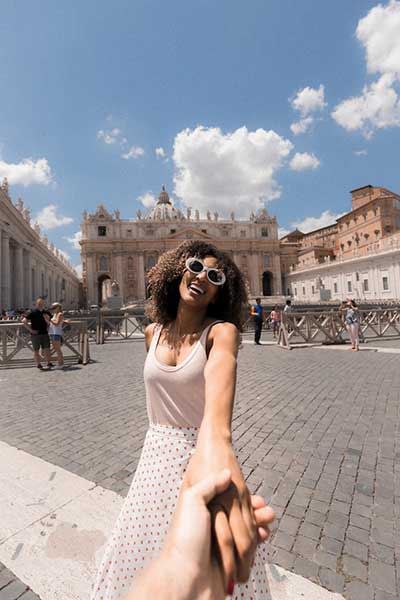
I often use foreshortening in couple photo sessions. One person should reach toward the camera, e.g., holding hands or pointing at something. Viewers will immediately notice the hand and pay attention to the rest of the frame a second later.
You can create striking foreshortening effects by combining it with aperture and depth of field. Bring an object close to your camera. It may be a hand, a flower, or a coffee cup. Next, take images with a wide aperture, such as f/2.8.
The front object stands out sharply, the middle area stays visible, and the background melts into a soft blur.

Point your camera up from a low position to add height and power to your subject. I often use this worms eye view photography technique with dancers, athletes, or fashion shots.
When using this foreshortening portrait approach, you’ll notice that the subject’s legs stretch, arms look powerful, and the overall stance feels confident. Be attentive with your background. Open skies or cityscapes enhance the shot, while busy clutter can distract.

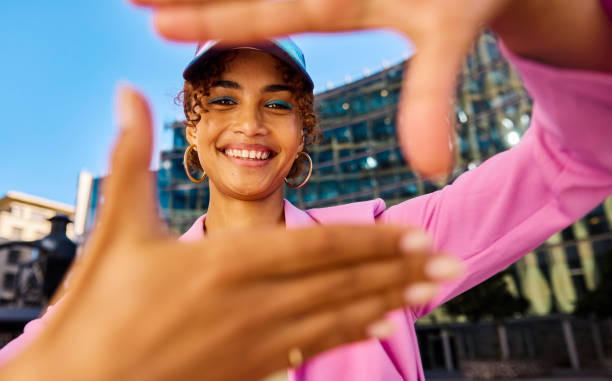
The secret of optical illusion shots is clever alignment. You can make someone look like they’re touching the sun, leaning on a distant building, or pressing a friend with their hand just by positioning them right in the frame.
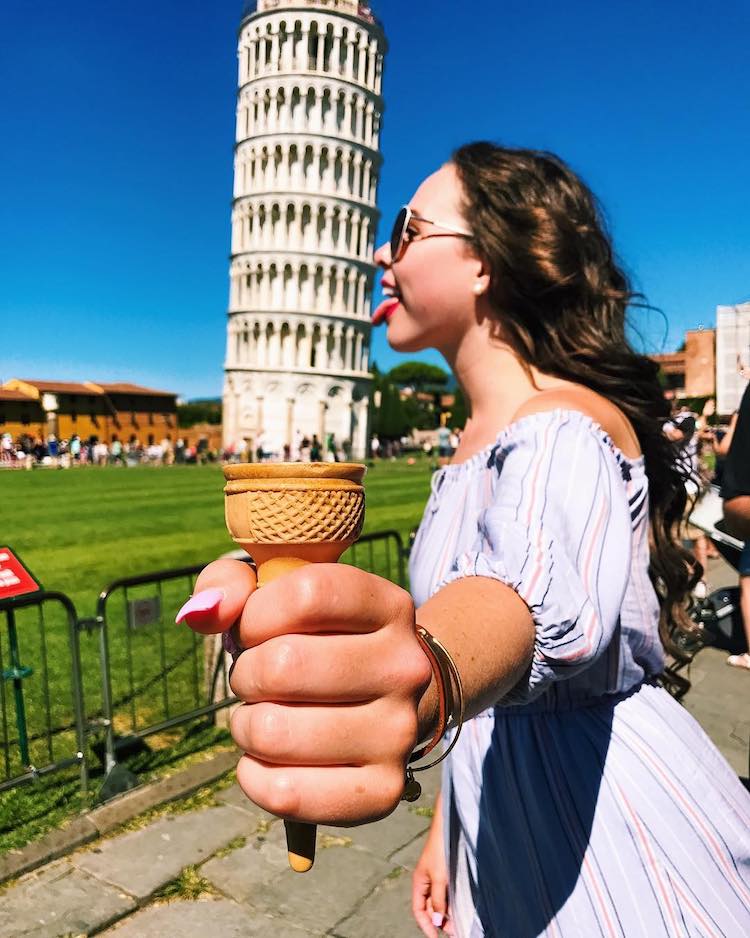
The most popular foreshortening examples of forced perspective are images with landmarks like the Eiffel Tower or the Leaning Tower of Pisa.

If you want adorable pet shots, crouch down to your pet’s eye level and grab a wide-angle lens. You’ll make their paws, nose, or tongue look huge in photo, while their body seems smaller in the back.
I’ve tried these pet photography ideas with different pets, and it never gets boring.
When taking portrait photos, you can have your subject push their hands toward the lens in a loose shape. Viewers will immediately pay attention to this shot.
If there are leaves, doorways, or other props at hand, place them close to the camera for a similar effect.
Yes, but carefully. Foreshortening can make a photo look bold and three-dimensional, but overdoing it or using it by mistake can make the image look odd.
Only if you use it accidentally. When planned, foreshortening makes pictures more interesting and guides the viewer’s eye through the photo.
No, though they look alike. Foreshortening is an optical effect that happens naturally depending on the angle you shoot from. Forced perspective is a trick, photographers use to manipulate how we see size and distance in images.
It depends on your skills. Foreshortening can exaggerate features in an unflattering way if done poorly. On the other hand, it can make your portraits more interesting and dynamic when used on purpose.
Michelangelo is famous for using foreshortening in his art. Today, many fashion and sports photographers use it to make their images more dynamic and striking.
A common example is a shot where someone stretches a hand or foot toward the camera. That part looks much bigger than the rest of the body.
This technique lets them create the illusion of depth in images. It turns a flat image into a 3D one.
You have to control angles carefully. If done incorrectly, it can produce awkward or unbalanced results.
Foreshortening happens when parts of a subject look bigger or smaller depending on the angle you shoot from. This trick makes a flat image appear three-dimensional.
Use longer lenses and shoot from straight-on angles. Thus, the subject’s proportions are more natural, and you won't have to deal with distortion.


![What Is Editorial Design? [Everything You Need to Know]](/placeholder-450x300.svg)


