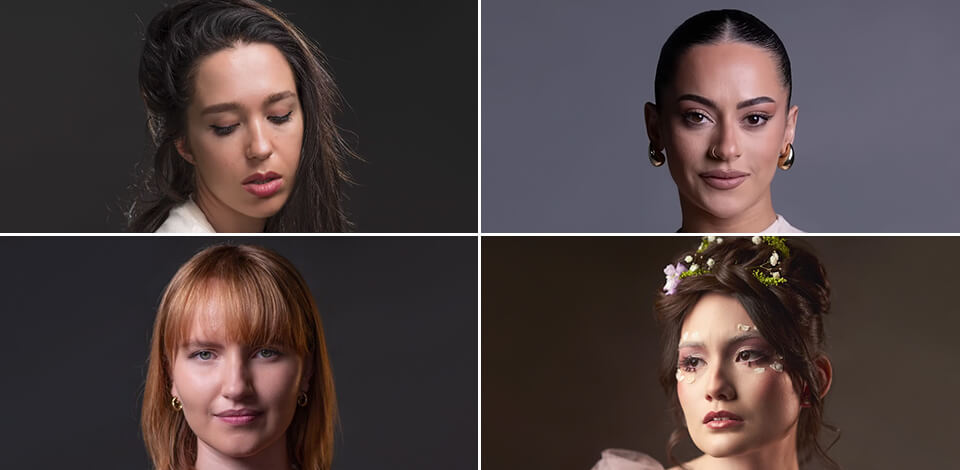
Loop lighting photography can completely change the look and feel of a portrait. If you’re going after a classic, flattering look, you can’t go wrong with loop lighting. It adds definition without being harsh, being suitable for professional headshots and everyday selfies alike.
Such a setup casts a soft shadow next to the nose, creating a loop on the cheek. Such lighting empathizes the subject’s facial features while ensuring they still look natural and visually appealing without resorting to the dramatic flair of Rembrandt or split lighting.
Loop lighting examples can be found everywhere, from fashion photography to family shoots, and I love how versatile and consistent this technique is.
Even if you don’t have professional gear, this setup allows you to enjoy beautiful results while focusing on storytelling instead of elaborate compositions. Its main appeal is in its simplicity.
The moment I learned what loop lighting is, I knew it could be the perfect choice for many of my portraits. It’s a distinct pattern that adds structure to a face without making the scene look too dramatic. Its key feature is the subtle but noticeable shadow that is cast under the nose.
To cast it, I place the light source at around 45 degrees to the side of the model and just above eye level. This angle creates enough shadow on the cheek to form a “loop”. This technique is a great fit for most people since it introduces depth without shifting the mood or making the scene look artificial.
Another benefit of loop lighting is how universal it is. You can employ it for beauty portraits, lifestyle photoshoots, and professional headshots since it highlights the face while maintaining a sense of approachability. The photo looks very appealing without coming across as overly staged.
When paired with flattering headshot poses, like a subtle tilt forward or a little turn of the shoulders for confidence, loop lighting helps better convey emotions and facial expressions, ensuring the shot looks deliberate and evocative.
Short setup checklist:
“When I’m preparing a loop lighting photography setup, I pay attention to the catchlights in the subject’s eyes, ensuring they look natural and full of life instead of dimmed and bland.”

The loop lighting setup is my go-to for portraits that can benefit from more depth without suffering from rough shadows. The light source is located above the model’s eye level and a bit to the side, creating a loop-shaped shadow below the nose.
Compared to butterfly lighting, which isn’t as angled, loop lighting makes facial features more defined while preserving a soft, natural look.
For instance, when I take photos with a single key light, I can create a professional setup by simply tweaking the angle to about 30-45°. With some facial structures, 30° is optimal, while others need a bigger angle to create the right shadow. You can use a softbox or diffused light to make the scene more appealing, particularly for oval-shaped faces, which naturally emphasize the cheekbones.
I can sometimes try out other heights and directions of the light before I land on a shadow that looks right. It can take only a couple of centimeters to completely shift the mood and feel of a photo.
Moreover, since shadows are essential for any portrait, there are several tools you can use to improve them: add soft modifiers to smooth the transitions, and add reflectors to adjust shadow depth. These shadow photography tips will help add more emotional weight to the scene.
Even when shooting outside, I try to imitate loop lighting by placing a reflector or a portable light off-center, which allows me to ensure the face doesn’t look flat.
I personally love how loop light photography stands out from alternative techniques. Rembrandt lighting in photography makes the shadows more pronounced, achieving a harsh triangle of light beneath the eyes, which is perfect if you’re going for a moodier, story-heavy shot.
Meanwhile, side lighting in photography prioritizes contrast, texture, and dimension, which is ideal for fashion and editorial photography that puts a premium on underscoring specific details.
Studio portraits. Aesthetically appealing light for professional headshots and beauty shots.
Engagement and couple shoots. Makes facial features more pronounced without being too dramatic.
Fashion photography. Emphasizes bone structure while preserving smooth skin tones.
Corporate sessions. Produces flattering and professional-looking portraits for employee profiles.
Outdoor sessions. Simple to imitate with natural lighting and a reflector.
This is a straightforward but efficient setup that we constantly fall back on at the FixThePhoto team when taking portrait pictures that require both structure and elegance.

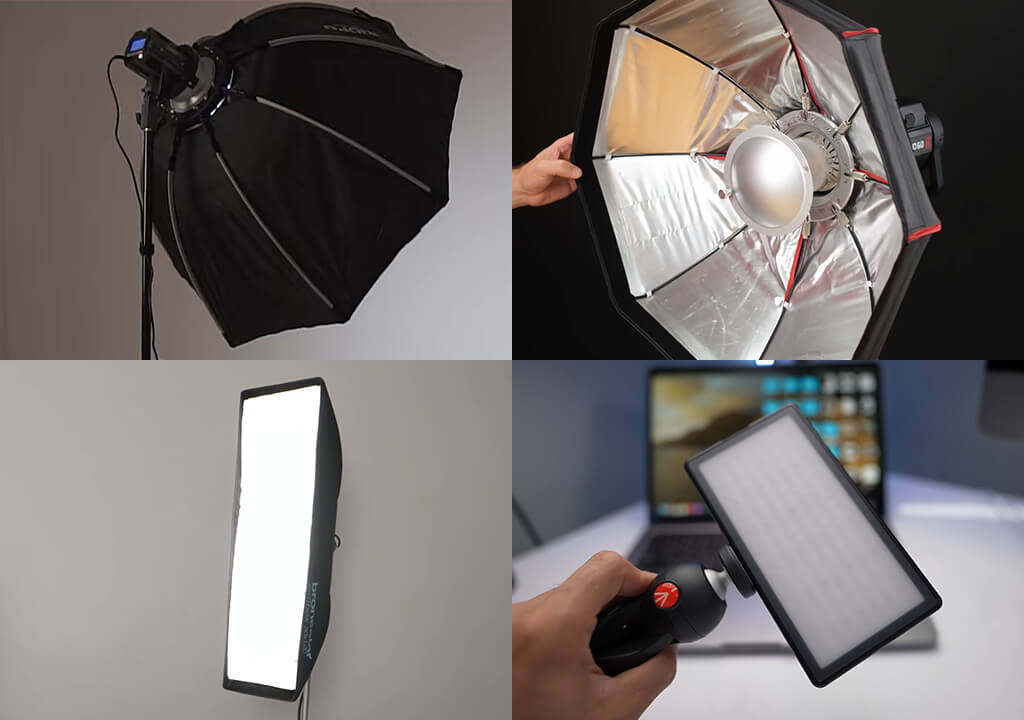
When preparing loop photography lighting, I adjust my plans based on the specific scenario I’m in. The bare minimum is to have a dedicated light source and a medium-sized modifier. I tend to bring a softbox around 20-40” (50-100cm), as it provides a soft, flattering look.
In other situations, a strip box is the optimal option. For instance, when I was shooting a fashion model, I needed to highlight the structure of her face while adding a flattering falloff along the body. It’s narrower and helps you achieve more controlled and refined lighting.
Even though most of my setups incorporate two or more light sources, I tend to encourage beginners (and myself as well) to first see how much you can get out of a single light.
That’s why picking the optimal photography gear is so important. Each piece can completely shift the mood of the scene, so learning to choose between a softbox, beauty dish, or strip box ensures you’re prepared for any situation – be it commercial fashion or professional headshots.
| Gear | Best for | Use case |
|---|---|---|
|
Softbox (20–40")
|
Soft, flattering light
|
Portrait shoot in studio
|
|
Beauty dish
|
Rich highlights, increased contrast
|
Beauty or fashion close-ups
|
|
Strip box
|
Controlled, sculpted lighting
|
Fashion/editorial with body shaping
|
|
One light setup
|
Minimal equipment, mastering control
|
Corporate photoshoot in limited spaces
|
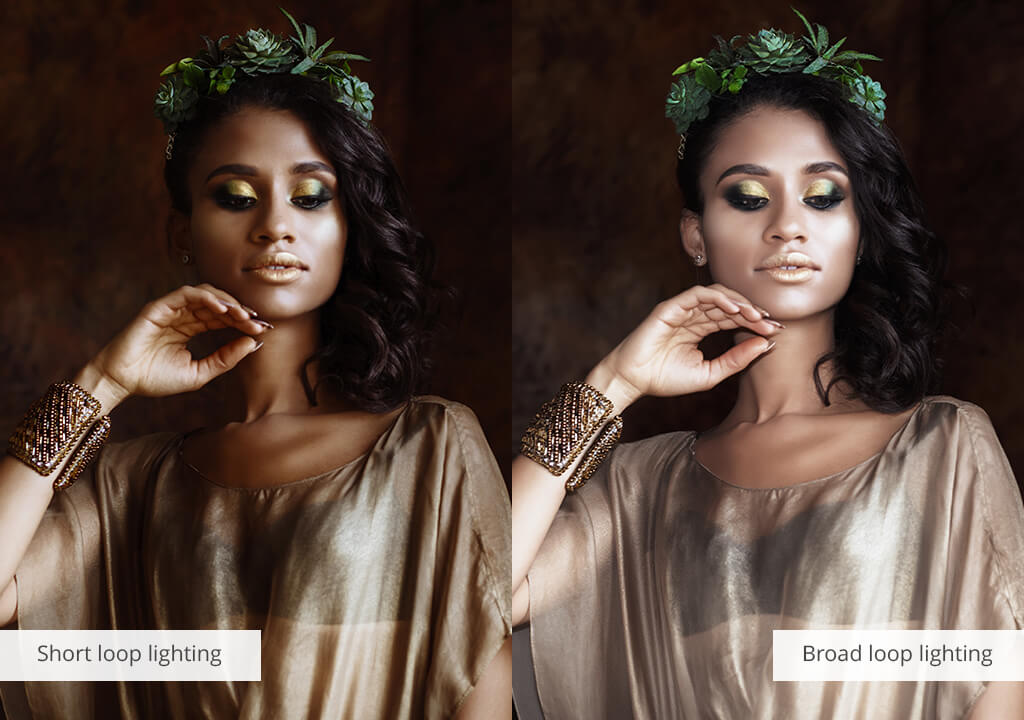
Knowing the loop lighting definition isn’t enough to use it properly. You also have to learn the difference between broad and short loop lighting and how you can utilize both types to your benefit:
Broad lighting = approachable look. I tend to employ broad lighting for business headshots or lifestyle photography. As the illuminated part of the subject is facing the camera, the face looks open, bright, and charming. Most people prefer to come across as friendly and professional.
Short lighting = dramatic vibe. By focusing more on the shadow side, I can add more depth to the shot while having more control over the shadow shaping. This is perfect for fashion photoshoots or formal portraits, particularly if I use a darker backdrop. Once I attached a grid to the light source, taking some stylish low-key photos that looked like they belonged in a magazine.
Versatility in one setup. One of my favorite aspects of loop lighting is that it doesn’t force me to stick to a single style. I can just move myself a bit and be able to take both soft, commercial photos and sculpted, moody portraits. We test this often at FixThePhoto, and it’s incredible how different the results can be without ever touching the light sources themselves.
When enhancing a loop lighting portrait, my priority is to keep the natural shapes created by this technique. The little nose shadow and pronounced cheekbones are the key features of this approach, so I never get rid of them. Instead, I focus on tweaking the highlights and shadows with dodge & burn in Lightroom to add more depth without sacrificing realism.
In most loop lighting photography examples, you can notice that the skin is ordinarily well-lit but can sometimes have uneven tones. I balance out the differences by smoothing out the texture while preserving details like pores and fine lines. For me, subtlety is of paramount importance since excessive retouching can ruin the entire photo.
When dealing with loop portrait lighting, I’m always focused on getting the eyes and catchlights right. I make the whites of the eyes and the lashes more pronounced while tidying up the under-eye shadows to make the subject look more flattering. As the light is placed off-center, I sometimes mitigate the darkest shadows a bit, but I never flatten them.
In both high-key and low-key loop lighting portrait photography, color grading is crucial. For the former, I strive for clean and soft hues, while the latter values contrast and detail. The retoucher has to accommodate the mood set by the loop lighting setup, not go against it.
“It’s important to preserve the created loop shadow during retouching, as it’s responsible for adding natural depth to the photo and increasing its appeal.”

I’ll be blunt about this: flat lighting is a death sentence for portraits. After I decided to take up loop lighting photography, I no longer only cared about taking “safe” portraits and began capturing faces with real edge.
An added shadow, a subtle angle shift, and now the subject looks eye-catching, confident, and full of life. Generic lighting leads to generic photos, while loop lighting ensures the portraits stay in your mind.
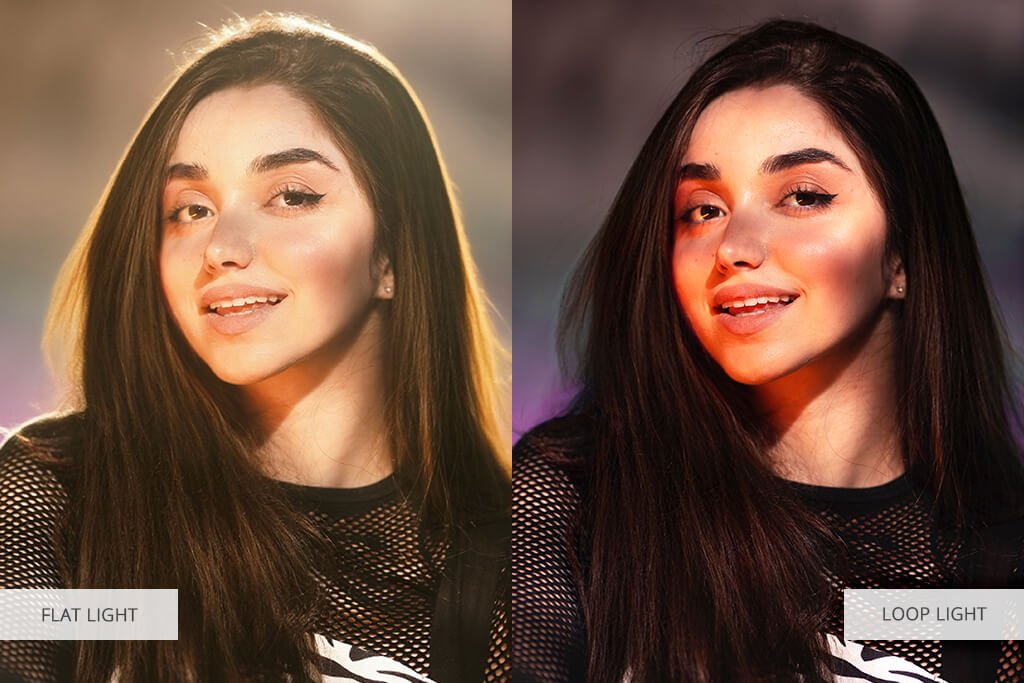
I sometimes look back at one of my beauty photoshoots. The subject has perfect skin, and with flat lighting, she looked just okay. Beautiful, stylish, but predictable. However, the moment I angled the light at 40° to the side, the added shadow increased the sharpness of her cheekbones and added depth to the face.
The image went from “basic catalog” to a photo in a high-end magazine. That’s the power of loop lighting – it dares you to see someone differently.
You can also find many loop lighting examples in my lifestyle portraits, where clients ordinarily ask for “natural-looking” photos. With flat lighting, the subjects tend to blend into the backdrop. However, once I started using loop lighting, the pictures gained a lot more depth and personality.
The most candid smile will come across as more charismatic and full of life without requiring you to make any aggressive edits.
Moreover, you don’t even have to get a lot of equipment. A single softbox, beauty dish, or even a DIY softbox – is all you need. Get the angle right, and the way you view a person through the lens completely changes.
It’s often the optimal choice for portraits that can benefit from a flattering look that preserves their natural appeal. You can use it for beauty, fashion, and headshot photography.
This technique emphasizes the beauty of the subject’s facial features while softening the flaws. It offers a great combination of refined structure and natural appeal.
Locate the primary light source a bit above the model’s eye level and around 30–45 degrees to the side. Tweak the angle a bit to ensure the nose shadow is cast softly on the cheek without reaching the lips.
You can do loop photography with a pleasantly minimalistic setup – just one strobe, softbox, or a continuous LED light. Additionally, you can add a reflector to balance the shadows on the other side of the face.
Even though both rely on angled lighting, the loop technique adds a small nose shadow, while Rembrandt creates a triangle of light beneath the eyes, which looks more dramatic and striking.
Yes. You can have the subject stand in a way that the sun or a portable light source falls at the right angle to achieve the loop shadow anywhere you want, meaning it is a viable technique for outdoor portrait photography.
The primary difficulty is preserving consistency in shadow softness and skin tones, particularly with dynamic light intensity shifts. Retouching might require a bit of dodging, burning, or color correction to ensure all the elements in the photo look balanced.


