When to Buy an FLD Filter for Your Lens

When you purchase through affiliate links on our site, we may earn a commission. Here’s how it works.
FLD Filters How We Tested Description

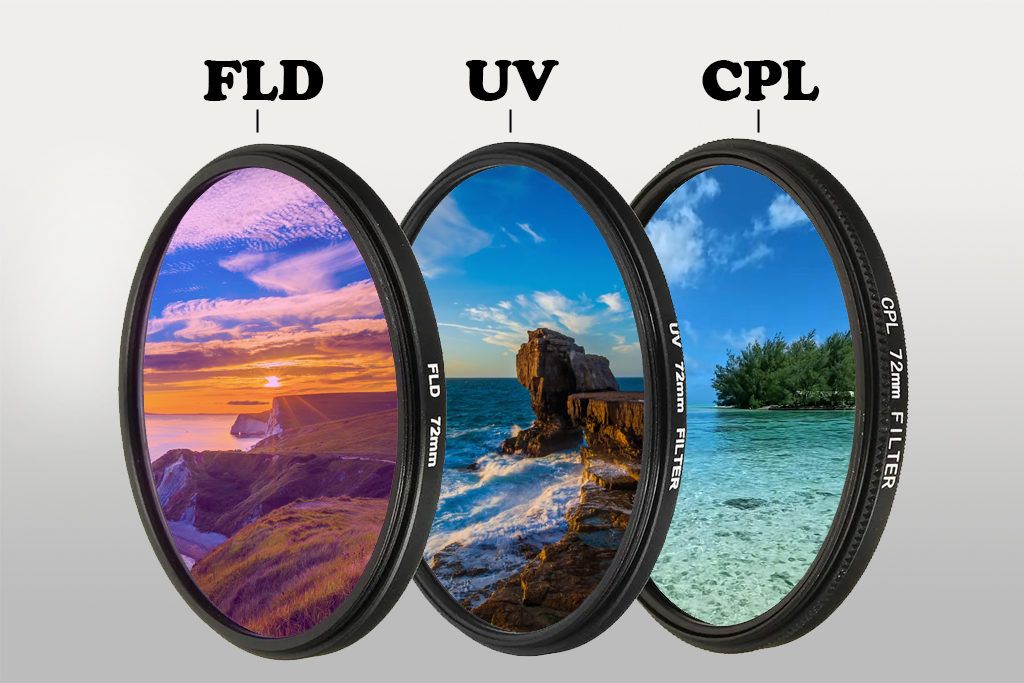
As someone who works as a photographer and retoucher for FixThePhoto, I tend to receive a lot of questions about FLD filters from our audience, as they wonder how such filters can be used to enhance image quality. If you’re still wondering what an FLD filter is in the first place, then this is also the article for you.

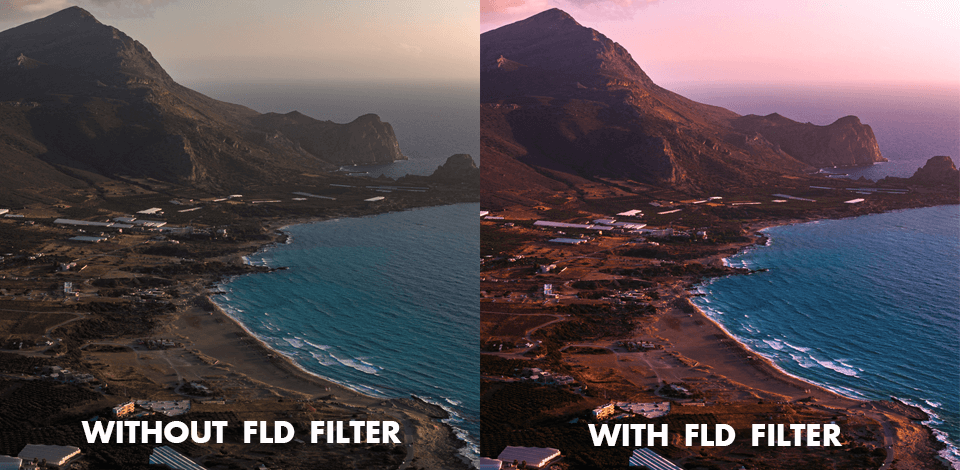
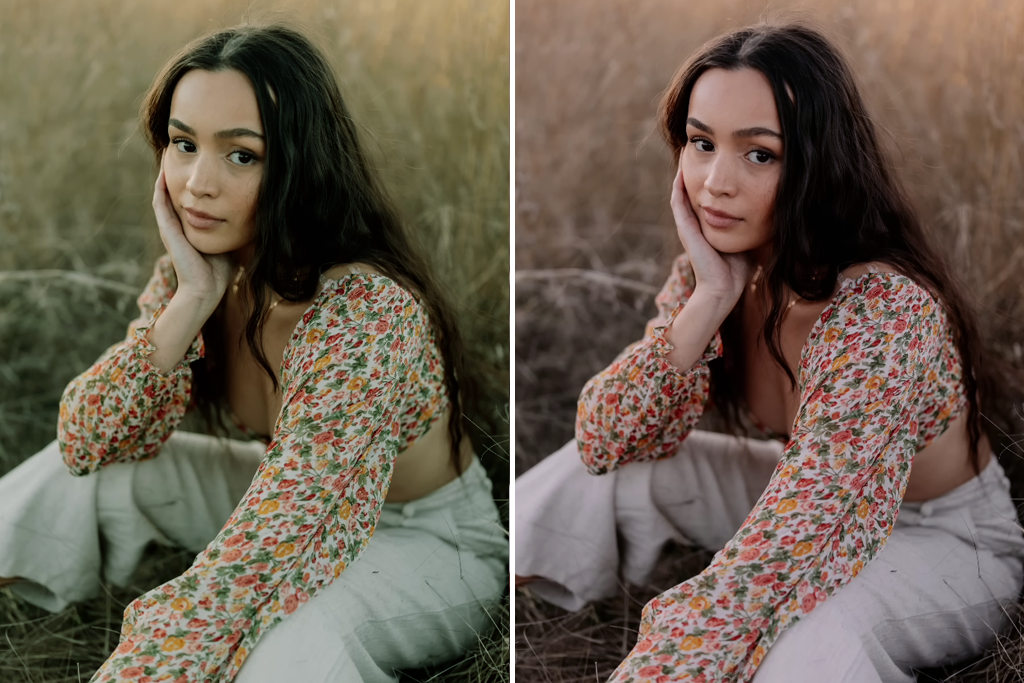
A FLD (Fluorescent Light Daylight) filter is a useful solution for fixing color casts created by fluorescent lighting. I apply it to receive natural and balanced hues, particularly when doing indoor photography that heavily relies on artificial lighting, which makes the scene look too green or cold.

As for “What does a FLD filter do?” – it’s able to recover natural tones without requiring intense manual retouching, which can significantly streamline the image editing process. That said, it isn’t perfect. Occasionally, it can lower sharpness or adjust colors incorrectly if the lighting in the shot was uneven. However, if applied with care, FLD filters offer a user-friendly and fast way to improve photo quality straight out of the camera.

The Hidden Key to Perfect Color

with and without fld filter example

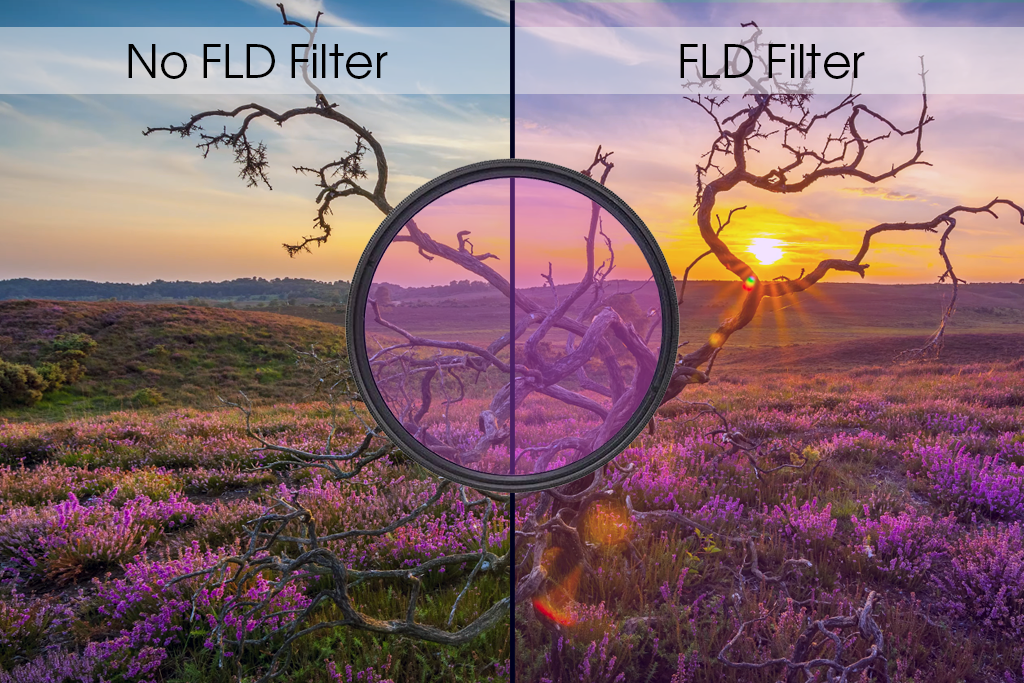
From the very first photoshoot I did using fluorescent lights, I noted that the images ended up having an unnatural greenish or bluish tint. This is why I was so happy to learn about the existence of FLD filters. They were created to fix the color cast added by fluorescent lighting by counter-balancing it with a warm tone.

Plainly speaking, the purpose of an FLD lens filter is to ensure the camera “sees” colors more accurately when working in challenging lighting conditions. Rather than having to do a lot of editing during post-processing, I can simply attach an FLD filter to the lens to ensure the RAW photo already has true-to-life colors.

“Try out the filter in a test shooting environment before an important photoshoot. Fluorescent lights can be very different, so the effect created by the filter might be unpredictable.”


ann young fixthephoto expert
Ann Young
Retouching Guides Writer

How FLD Camera Filters Balance Color

before after fld filter

An FLD lens filter can be made of a variety of materials, including glass, plastic, and metal. It’s usually covered with a magenta-hued dye that helps absorb undesired wavelengths. It serves to separate specific wavelengths of light produced by fluorescent bulbs that add an unnatural greenish or bluish color to the scene. You can view it as a color corrector attached to the lens, adjusting the light spectrum to ensure the camera sensor captures colors closer to our human perception.

If you still don’t understand the meaning of an FLD filter, imagine wearing warm-tinted glasses that compensate for the cool lighting in your shot. As such, when you take photos under fluorescent light with an attached FLD filter, skin tones look natural, and white backgrounds preserve their color without suffering from an unwanted greenish hue.

For our daily work, I and my FixThePhoto colleagues connect such a filter to my lens before taking photos under fluorescent lighting, and it instantly eliminates the color cast. Remember that, depending on the power of the fluorescent lights, your photos might still require a bit of color correction during the editing stage.

“When combining multiple light sources, be ready to dedicate time to color correction during post processing, as the filter can struggle to deal with all casts.”


tetiana kostylieva fixthephoto expert
Tetiana Kostylieva
Photo & Video Insights Blogger

Is an FLD Filter Right for Your Photography

fld filter examples collage

In my opinion, an FLD filter is highly recommended if your photoshoots are often held indoors under fluorescent lights. Such lights are often found in offices, schools, hospitals, stores, and some studios, and they can add a noticeable greenish or bluish color cast that can be very difficult to fix in post.

I think such filters are particularly relevant for the following photography types:

  • Portrait photography. Fluorescent lighting can cause skin tones to appear unnatural and unhealthy. By leveraging an FLD filter, you can receive warm, realistic skin colors when taking the photos.
  • Product photography. When taking indoor product photos, color accuracy is essential. FLD filters ensure you don’t get any unwanted green tints on white backgrounds and item surfaces.
  • Event photography. Events organized in spaces with fluorescent lights require FLD filters to preserve natural and consistent colors.
  • Interior photography. Taking photos of interiors under mixed or fluorescent lighting becomes less challenging with FLD filters, as they help regulate the color temperature.
  • Landscape photography. Even though FLD filters were made to deal with fluorescent light, I sometimes use them outside in shaded areas too to capture crispier, more balanced hues, particularly when taking photos during blue hour or close to streetlights.

That said, if you primarily work outdoors or in spaces with natural or tungsten lighting, an FLD filter might be excessive. Additionally, modern cameras for photography are a lot more efficient at tackling fluorescent lights thanks to advanced white balance parameters, but the color correction provided by such a filter can still help you save some time on image editing.

When is an FLD camera filter useful:

If you’d like to reduce the amount of time spent on post-processing while receiving accurate colors right from the camera.

If you’re dealing with strong fluorescent lights that overpower your camera’s white balance.

If you want to get consistent colors across several photos in fluorescent-lit spaces.

Pros
  • Gets rid of greenish and bluish color casts from fluorescent lights
  • Adds accurate, warm skin tones and more precise colors
  • Cuts down post-processing time
  • Perfect for indoor portraits, product, event, and interior photography
  • Easy to attach to your lens
Cons
  • Can decrease the amount of lighting entering the lens, requiring exposure adjustments
  • Might not completely fix color casts in challenging lighting conditions with different sources
  • Can create minor softness or decrease sharpness
  • Adds extra equipment you have to pack and carry
  • Not required if fluorescent lights are rare or white balance isn’t compromised
photo editing service fixthephoto before photo editing service fixthephoto after

Need Perfect Colors in Every Photo?

At FixThePhoto, we utilize both FLD filters and our Photoshop expertise to produce natural, colorful images. We perform diligent color correction and skin retouching while also making background enhancements to ensure your photos look detailed, realistic, and visually appealing.

Practical Tips for Using an FLD Camera Filter

As a photographer and retoucher who has quite a bit of experience with this type of gear, here are some FLD filter use tips I can share:

Pick the correct filter size. FLD comes in a variety of sizes, primarily ranging from 35mm to 85mm. Look at the diameter of your lens (marked with Ø) to choose the right filter. Otherwise, you’ll have to deal with vignetting or a poor fit. If you own several lenses, step-up rings can mitigate that issue.

Test before the photoshoot. Fluorescent lights can be very different, so try out the filter in the specific place you plan to shoot at. Snap sample photos with and without it to determine how much correction is required.

Tweak exposure. FLD filters decrease the amount of received light by about 1/3 to 1/2 stop. Adjust for that by increasing ISO, opening the aperture, or lowering the shutter speed to get the necessary exposure.

Pair with white balance adjustments. Even though an FLD filter gets rid of most of the color cast, tweaking the white balance on the camera can improve accuracy. Set custom white balance or fluorescent presets to match it with the filter. Take photos in RAW to enjoy more flexibility when making white balance tweaks later.

Mix with other filters when necessary. For instance, using an FLD filter with a CPL filter allows minimizing reflections on shiny surfaces while keeping the colors balanced.

Employ in consistent lighting. The filter provides the optimal results under even fluorescent lighting. Mixed light sources tend to require more color correction during editing.

“Dedicate enough time to try out different parameters and lighting angles after attaching the filter. Examine the photos on a calibrated monitor if available, to see accurate colors and make educated changes.”


nataly omelchenko fixthephoto expert
Nataly Omelchenko
Tech Innovations Tester

Handle carefully. Ensure the FLD filter is clean and stored in a protective case/bag to prevent scratches.

Post-processing can still be important. Even if you use a filter, minor adjustments in photo editing software can still do wonders for improving the quality of your images. We tested plenty of tools, but Adobe Photoshop is still the optimal solution for tweaking the contrast, saturation, and performing color corrections.

adobe photoshop logo

Need Perfect Colors from Beginning to End?

An FLD filter allows you to produce natural, eye-pleasing colors directly in-camera, particularly when dealing with fluorescent lighting. Next, open the images in Photoshop to adjust the colors more meticulously and ensure your work looks professional!

What FLD Filter to Buy

different fld filters

Now that you know what an FLD filter is, you might be thinking about getting one for your gear set. The prices for such filters range between $11 and $40, which is why it’s a reasonably priced investment if you’re frequently dealing with them. I can recommend the following FLD filters for any budget-conscious photographer:

  • Sedremm 52mm Filter Kit. A multifunctional collection that comes with UV, CPL, and FLD filters. Perfect for photographers interested in getting several filter types in a single kit. The FLD filter allows dealing with fluorescent light color casts efficiently.
  • Tiffen 62mm. Praised for its optical clarity and sturdiness, Tiffen’s FL-D filter is the go-to solution for balancing the colors when shooting in fluorescent lighting. A good choice for photographers who prefer reputable brand quality.
  • Neewer Filter Kit. This affordable set offers UV, CPL, and FLD filters. It’s optional for beginners interested in getting an FLD filter for a bargain price while still receiving solid results.
  • Pro Lens Filter Kit. A comprehensive bundle that includes a polarizer, FLD, and Neutral density filter. It’s versatile and simple to use, representing a fantastic option if you value both quality and convenience.

FAQ

  • • What is an FLD filter?

The full form of the “FLD” abbreviation is Fluorescent Light Daylight. It’s a specialized filter made for getting rid of greenish or bluish color casts created by fluorescent lights, allowing you to receive natural, warm colors indoors.

  • • Can I deal with fluorescent color casts without getting an FLD filter?

Yes, by tweaking white balance in-camera or during the image editing stage. However, using a filter is significantly more time-efficient and effective.

  • • Is an FLD filter suitable for all lighting environments?

Such filters are designed to be used in even fluorescent lighting. Mixed lighting (fluorescent plus daylight or tungsten) will probably require additional color correction in post.

  • • Does an FLD filter have an impact on exposure?

Yes, it drops exposure by about 1/3 to 1/2 stop, so you likely have to tweak ISO, aperture, or shutter speed in photography to restore proper exposure.

  • • Can I attach an FLD filter to all lenses?

Yes, but you have to pick the correct filter size for your lens diameter. Otherwise, you might suffer from vignetting.

  • • How do I clean and store an FLD filter?

Get a microfiber cloth and a lens cleaning solution. Keep the filter in a protective case to prevent scratches and ensure the coating in preserved.

  • • What materials and coatings are recommended for an FLD filter?

FLD lens filters are typically made of optical glass or high-quality resin. Prioritize models with multi-coating or anti-reflective coatings, as they help minimize glare, enhance light transmission, and ensure the filter doesn’t get smudged or dirty.

How We Tested Filters

At FixThePhoto, we make sure to try out all gear in a variety of scenarios to check how useful it actually is. I, Kate, and Vadym went through the following stages during our test:

  • Portraits under office lighting. I worked with a model in our office that was illuminated with regular fluorescent bulbs. Without a filter, the skin appeared pale and suffered from that pesky greenish tint. Once I paired the camera with an FLD filter, the colors became warmer and looked more natural. This helped cut down the time I usually spend retouching since I didn’t have to adjust the skin tone manually.
  • Product photos against a white backdrop. Kate took pictures of little accessories against a white background. Before she attached the filter, the backdrop looked dirty greenish, but afterward, the whites looked pure and clean while the product itself maintained its natural colors.
  • Event-style lighting. Vadym worked at a little indoor venue with mixed fluorescent lighting. While he appreciated how the filter minimized the green cast, the presence of other light sources forced him to make several white balance adjustments. Still, without the filter, he’d have to do even more work.
  • Interior photography. I took photos in a trendy workspace with fluorescent ceiling panels. Before I added the filter, the walls appeared bland and had a subtle tint to them. With the filter, the photos resembled real life a lot more accurately, minimizing the amount of retouching I had to do later.
  • Outdoor experiment. Kate tested the performance of an FLD filter outdoors during blue hour near city lights. The filter managed to make the overall color scheme warmer, which enhanced the vibes of the scene and made it more appealing.

FLD filters are particularly important for portrait, product, and interior photography done in consistent fluorescent lighting. If you’re dealing with mixed or unusual light sources, it can still be useful, but you’ll have to make white balance and color correction adjustments afterward.

Tata Rossi

Tech Trends Journalist

Tata Rossi is a photographer-advisor, key contributor at FixThePhoto, sharing her expertise about photography and 55% of photos you see at our blog are taken by her. She is a Bachelor of Fine Arts in Photography from the Massachusetts College of Art and Design. She is the main so-called teacher in our team, conducting courses on photography and editing for beginners and anyone interested.

Read Tata's full bio

Tetiana Kostylieva

Photo & Video Insights Blogger

Tetiana Kostylieva is the content creator, who takes photos and videos for almost all FixThePhoto blog articles. Her career started in 2013 as a caricature artist at events. Now, she leads our editorial team, testing new ideas and ensuring the content is helpful and engaging. She likes vintage cameras and, in all articles, she always compares them with modern ones showing that it isn’t obligatory to invest in brand-new equipment to produce amazing results.

Read Tetiana's full bio

Contents:
adobe special offer adobe special offer