Paramount lighting technique is a classic lighting pattern sometimes referred to as “Hollywood lighting”. It is one of my favorite ones for portrait photography, when I want my images to appear both professional and deeply emotional.
I first came across this technique during one of my early photoshoots when I decided to experiment with light positioning to enhance the model’s facial definition and contours. I love the paramount lighting technique because it allows me to achieve a perfect balance between light and shadow, enhancing natural features and giving the image a striking, expressive feel.
After trying this approach several times, I understood that it gives me a whole new way to work with light. It’s an amazing setup for creating eye-catching portraits because it helps highlight strength, elegance, and even a touch of drama in a single shot. I keep improving my skills because I know that even tiny changes in lighting placement can completely change the mood of the photo.
In my work, I combine paramount lighting arrangements with other techniques depending on the mood I want to convey. Still, this particular setup remains my constant favorite. By sticking to this lighting technique, I can not only create a beautiful image but also add depth and emotional intensity to every photo.
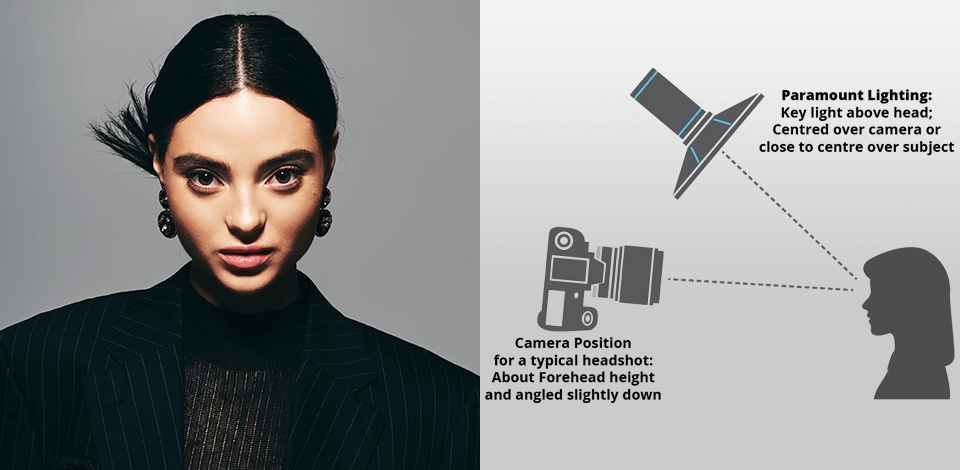
Paramount lighting is one of the most popular approaches in studio photography. The main idea of this lighting technique is to sculpt faces with precision.
Unlike rim lighting, where the light hits from the side or back, here the main light is directed straight ahead - just above eye level and angled downward. Thus, you can receive a well-defined, cinematic look, complete with a signature “inverted triangle” shadow under the nose.
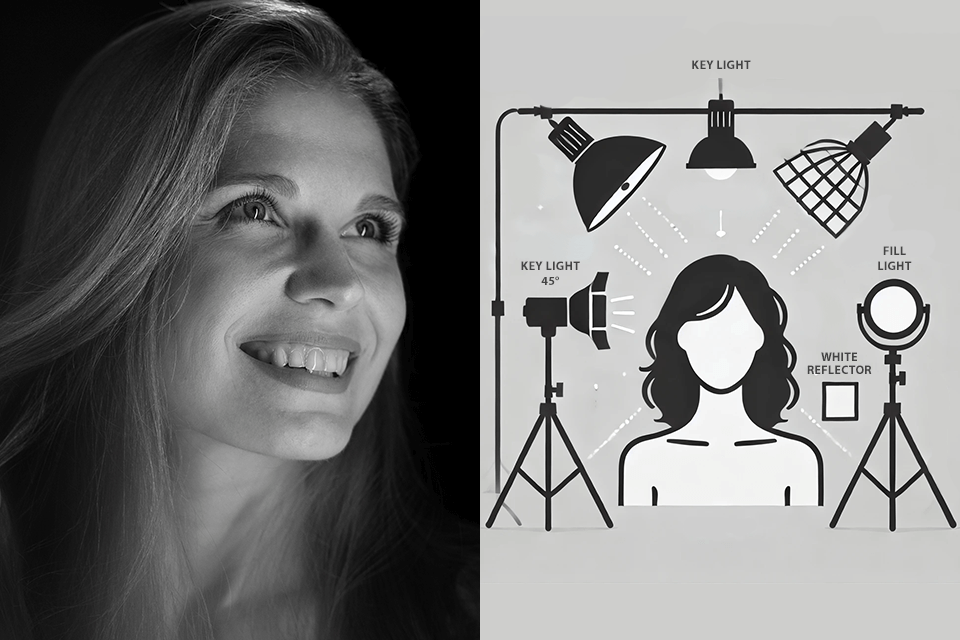
When doing portrait photography, it is crucial to adjust all elements of the lighting setup correctly. This refers both to major light sources and additional items like fill lights or reflectors.
Main features of paramount lighting are:
Paramount lighting configuration is one of the most effective ways to add depth and drama to a portrait. After years of experimenting with various lighting setups, I still favor it in many situations. Here I’d like to share some of my findings, along with advice from FixThePhoto experts, to help you achieve flawless results.
I use such equipment and settings:
Camera: Canon EOS 5D Mark IV
Lens: 85mm f/1.8
ISO: 200
Aperture: f/4
Shutter Speed: 1/160s
Paramount lighting setup: key light (positioned above and in front of the model at a 45-degree angle), fill light (optional, below the face to soften shadows), background (lighted separately if needed for contrast)
Additional: White reflector below the face to soften shadows
Arrange your light source correctly. Place your key light about 2-3 feet in front of your model slightly above their eye level. Tilt it downward at a 45-degree angle. You’ll see an “inverted triangle” shadow under the nose and chin.
“Adjust the height of the light if the shadow under the nose is too harsh or too soft. Take your time to get the proper setup.”

Keep tabs on the light intensity. When you have too harsh light, the shadows in the image will appear extremely sharp. To prevent this effect, you can use a softbox or an umbrella. Thus, it is possible to diffuse light, soften shadows, and make the skin look naturally beautiful.
“If you want soft, flattering light for face close-ups, go for a bigger softbox. For wider shots, where you want a bit more ‘pop’ and sharpness, a smaller softbox is your best bet.”

Take advantage of a fill light. During our testing process, we noticed that strong shadows can look stunning, but they can also be distracting, especially around the eyes and face contours. That’s where a subtle fill light comes to the rescue.
For example, a low-intensity fill light can gently lift the shadows without competing with the key light. The main thing is to position it opposite the main light, roughly at the model’s head level, but keep it dim to maintain the dramatic depth.
“To avoid harsh shadows and get a smooth blend between light and dark, use a reflector. This is a neat trick for low-light situations, because it fills in the shadows without adding more light.”

Be mindful of the reflector placement. Reflectors play a crucial role in mitigating shadows on your model’s face. You can choose a standard white reflector to redirect light and minimize deep shadows beneath the chin or cheekbones while using the paramount lighting scheme.
For optimal results, I place the reflector at a 45-degree angle relative to the model, aligning it with the camera lens height.
“To get a natural, warm look on skin, especially when the lighting is tricky, opt for a gold reflector. Your skin will acquire a subtle warm look, and the shadows will appear natural.”

Get the spacing right. If your light is too close, you’ll end up with some seriously harsh shadows. If your light is too far from the subject, you may lose the dramatic punch you’re going for. Typically, I start with my light about 3 feet away from my model and then tweak it based on how the shadows are falling. Don’t be afraid to play around with the distance until you find that sweet spot where the light and shadows are just perfect.
“Use the lights on your own face first. Thus, you can figure out how different light positions affect the shadows and will be able to set up the lighting correctly for your model.”
Create a perfect backdrop. Based on years of experience, I can say that the backdrop greatly influences the perception of your lighting setup. A solid, dark product photo backdrop, such as black or dark gray, typically accentuates shadows cast by the primary light source. So, your images become more dramatic.
Conversely, a lighter backdrop, like white or light gray, tends to diffuse shadows, resulting in a softer, more subtle appearance.
“To add a wow-effect to your lighting, choose a background that’s a different color from the light you’re using. Thus, the person you’re photographing will “pop” visually, and the shadows on their face will become more noticeable.”

Remember the model’s posing. To optimize the effect of your primary lighting, have your model turn their face just a bit towards the light. Thus, shadows under the cheekbones and nose will become more defined, and your portrait will acquire a beautiful sculpted feel.
“Work with your model to find the best head angle. A tiny shift can make a big difference in how the light creates shadows and highlights. Try different ideas.”
It is important to balance lights and shadows properly. For starters, I place my subject with the sun behind them, letting it create a lovely halo effect. Then, I use a reflector to bounce light back onto their face for a soft, luminous glow.
By doing so, I can take a beautiful image while still highlighting the natural textures and depth of the environment. Sometimes, I experiment with side lighting when the sun is at a 90-degree angle to my subject. This way, I can get dynamic shadows, add texture and dimension to my photo.
Taking photos with direct sunlight can be challenging, so I usually move my subjects into shaded areas, like under trees or buildings. Thus, I can achieve a gentler, more uniform light ideal for portraiture.
If I want a more dramatic and classic feel, I turn to Rembrandt lighting. I make sure the light is at a 45-degree angle above and to the side of the subject. Thus, there appears a distinct triangle of light on the subject’s cheek, and the entire image looks more interesting.
Creating ideal paramount lighting design can be a significant hurdle for photographers, whether working in a studio or natural environments. Mastering light direction, intensity, and diffusion required substantial expertise. But now, photographers can benefit from the power of AI. Some tools let you build your lighting setup faster, no matter the location.
AI can instantly analyze your scene’s light, allowing for on-the-fly camera adjustments, positioning tweaks, and even lighting setup suggestions. This is particularly powerful outdoors, where light can shift in a heartbeat.
With AI tools, photographers can dynamically adapt to changing shooting conditions. For example, you can detect the ideal angle for your subject relative to the sun or choose the perfect reflector to achieve balanced lighting.
When taking photos in a studio, it can mimic different lighting situations, so that you instantly adjust your lighting setup to those conditions. This is a really time-saving approach that many photographers appreciate.
AI software can automate many of the time-consuming processes, allowing photographers to work more efficiently. However, it’s crucial to remember that technology is just a tool. People with their creativity, gut feeling, the artistic vision are the heart of photography. Surely, you can use AI for its strengths, but don’t rely on it too much.


