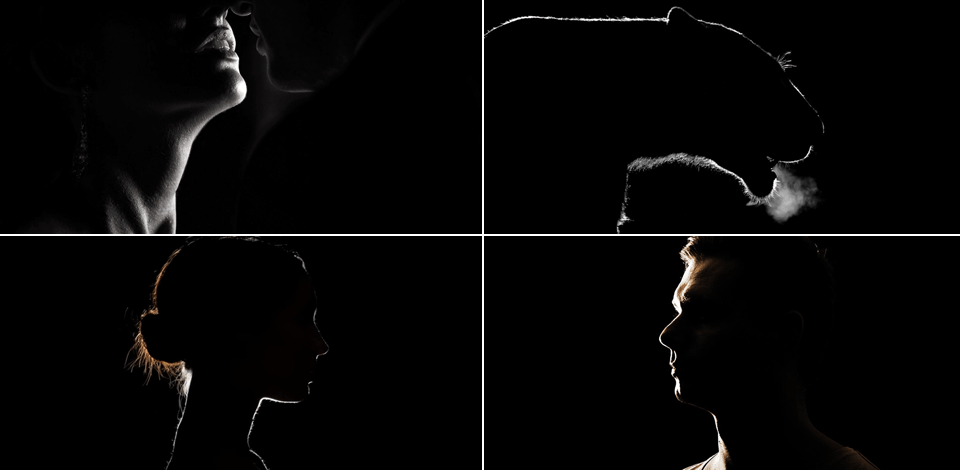
To use rim lighting technique, set the light behind a person you are going to shoot to illuminate their silhouette. By contouring the rim of the subject with light you can produce a stunning effect. Try to combine various lighting setups to get a more appealing result. This type of light is also often called “hair lights” or “halo lighting.”
The first thing you need to be aware of is that the rim light does not require using specific gear. You can create such illumination by placing any light source behind the model. Both natural light and camera flash can be used for this purpose. It is a specific form of backlighting that will come in handy for many shooters.

Unlike Rembrandt lighting, it creates a lighting contour around the subject. To achieve such an effect, you need to place a powerful source of illumination behind the model. The illumination can be produced by one or several sources. Typically, they are not in the camera’s field of view as it is blocked by the model.
Another way to direct the light properly is to put it above the model or to the side. You can create a magical atmosphere when shooting against a dark background when there isn’t much light on the front of your model.
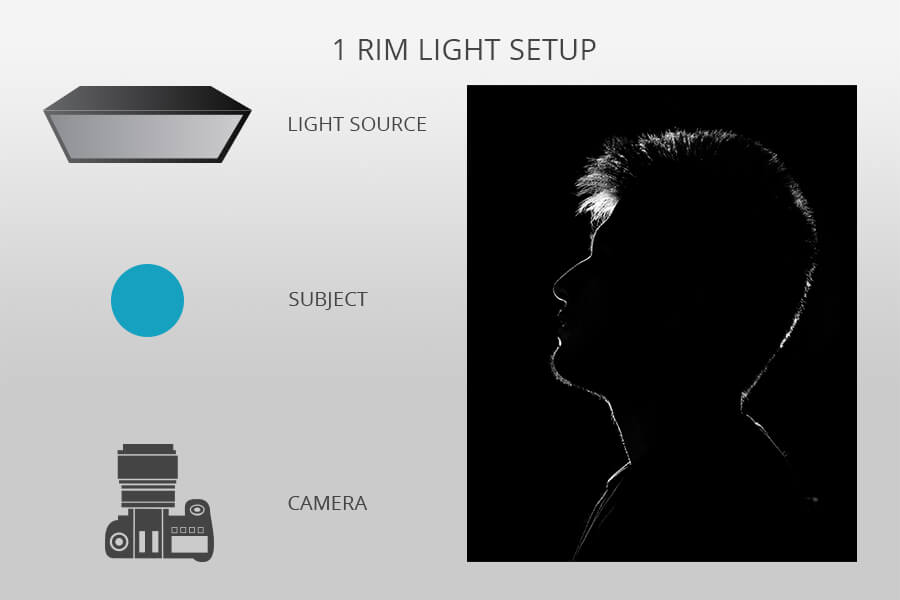
To create stunning rim light photography, you do not need to have some special skills or much experience: position the flash behind the model and point it back. In such a way, you can create an outline of the person you are shooting and hide the lighting gear behind them.
A single light setup has a considerable drawback: you’ll not manage to conceal all extraneous features. However, you can try to solve this problem by changing the position of the light.
Pro Tip: To illuminate facial contours without revealing unnecessary details, place the lighting gear behind the model and to the side of their face. Point the light to the subject. If it is possible, diffuse the glare with silk or softbox.
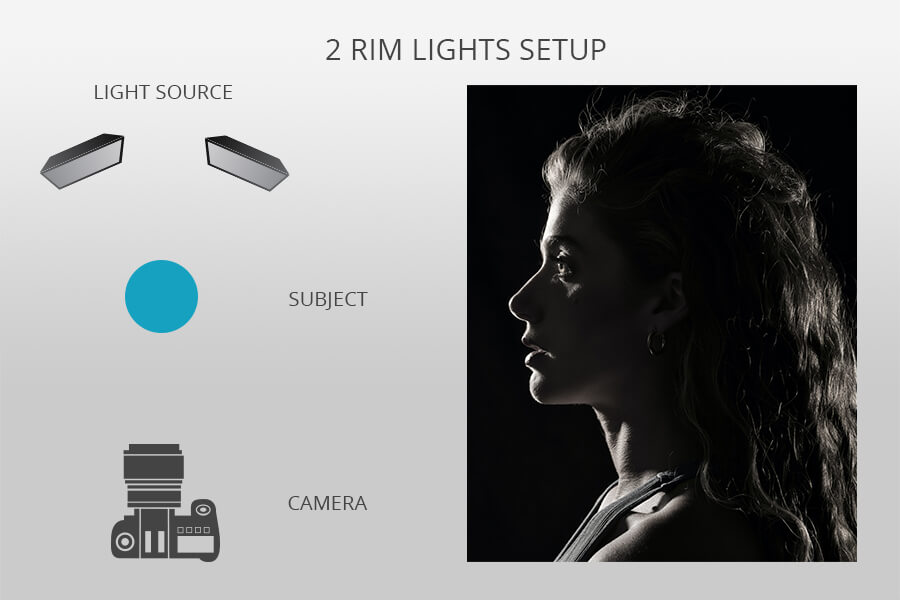
Position the other lighting equipment opposite side of the first one. Direct it to the back of the poorly lit side of a person to contour their back that has not been visible before. Such a technique allows creating a finished composition that is especially beneficial for profile portraits.
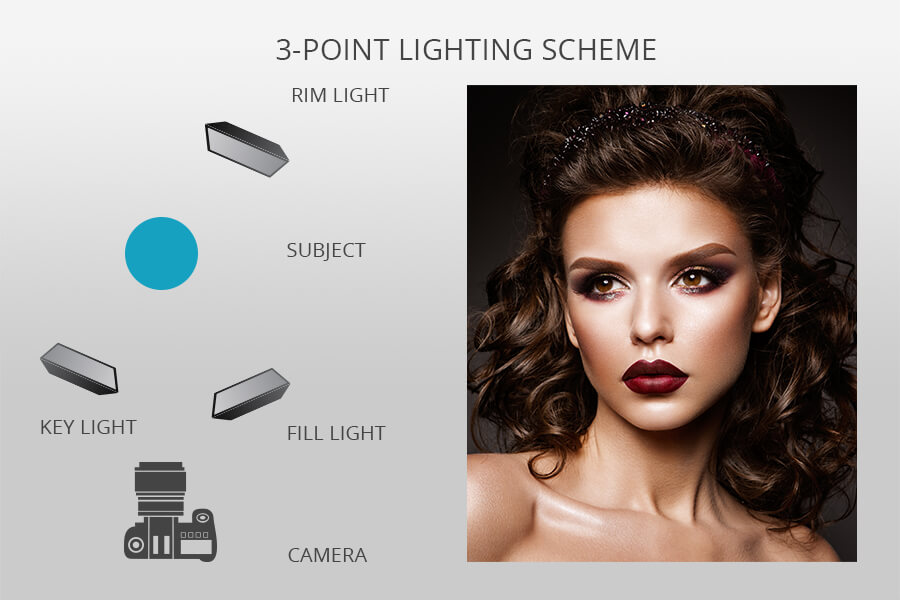
To shoot captivating images, you need to employ a rim lighting technique that involves creating three-point lighting. By arranging three light sources around the model, you can illuminate them from all sides. These are key light, a fill light to eliminate shadows, and a backlight (or a rim light in our case) to make the picture deeper. 3-point lighting is quite widespread in photography and other types of media.

To make this explanation clearer, let's consider all three types of light separately. The key light is the main source of illumination. The lighting scheme of an image greatly depends on the strength, color, and angle of the key light. When shooting indoors, choose a professional lamp or a camera’s flash as the main source of illumination. When taking pictures outdoors, you may use the sunshine as the key light.
Make certain that you’ve positioned the light behind your subject on the same side as your key light. Usually, the directions of the fill light and a key light coincide. Besides, we recommend positioning the lighting equipment on a stand to adjust its position fast and easily. In such a way, you can achieve a stunning “halo lighting” effect creating a dimensional composition with a subject standing out against the background.
The fill light illuminates the subject from the side angle in relation to the main light. Photographers usually place this type of equipment lower than the key light but higher than the model’s face. This illumination allows achieving a perfect balance, brightening a shaded area, and minimizing chiaroscuro effects, like a shadow from the model’s nose that covers the rest of facial features. The fill light is softer and not so bright as the main illumination source.
The backlight (the rim light in our case) casts the light on a person from behind, and, in many cases, on one of the sides. It illuminates the contour of a model, making them stand out against the dark background.
Rim lighting serves various purposes and can become in handy in various shooting situations. If you are eager to create beautiful, rim-only portrait photography, this type of illumination is what you are looking for. The second source of background light is necessary for adding some depth to a portrait. It can help the subject stand out against the backdrop thus achieving a natural-looking picture. This and other areas of usage will be further discussed in our guide.

Rim light will come in handy when you need to add more depth to your portrait photography. By employing this light, you can make the subject stand out against the backdrop and produce lifelike pictures. Since the rim light draws a light outline on the model's hair that contrasts with the head and background, this technique also helps create an angelic look, which results in a romantic image.

Rim light photography uses different areas of brightness or darkness within a scene to produce impressive and emotional pictures. This lighting technique creates a magical atmosphere and accentuates the subject’s mysterious nature.
You can achieve such an effect by concealing the model’s facial features in the darkness and contouring their shape. If you are in search of an easy and quick way to add some drama and mystery to your composition, choose this extraordinary type of photography.
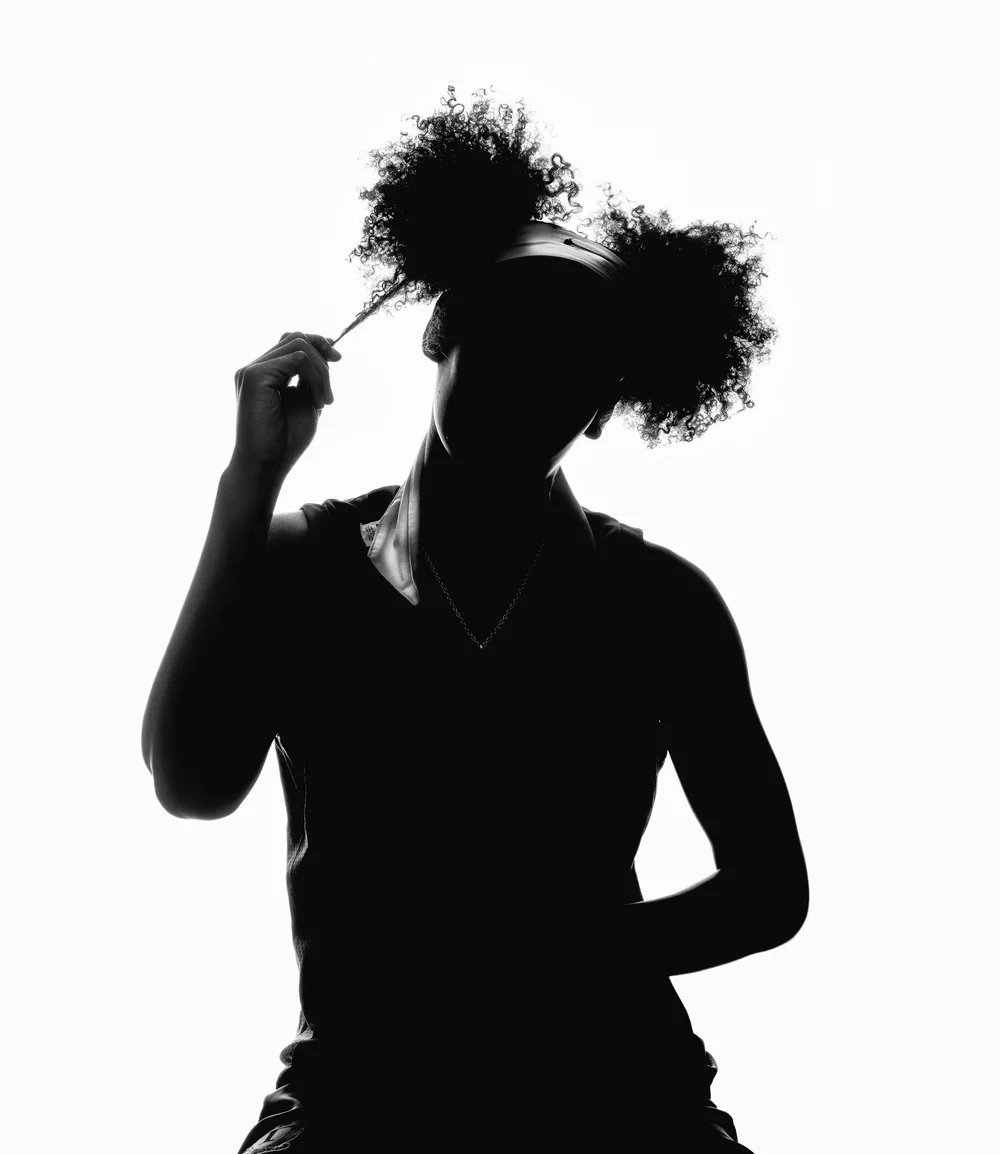
By redirecting the rim right at the background you can produce sophisticated high-key silhouettes. When conducting a photo session against the white background that is not far from the light equipment, block the light from hitting the front of your model. By doing so your subject will be utterly black and the backdrop utterly white.

Rim lighting is very helpful for shooting backlight portraits and landscape photos. When the sunlight shines directly to the lens, the environment gets a magical look. You can get the most original images when the sun rays go through the clouds.
This technique allows shooting the model’s silhouette as well as objects of nature. In this case, this very object will be darkened to the maximum extent and surrounded by a luminous halo. By producing such landscape photography, you will achieve a magical effect.
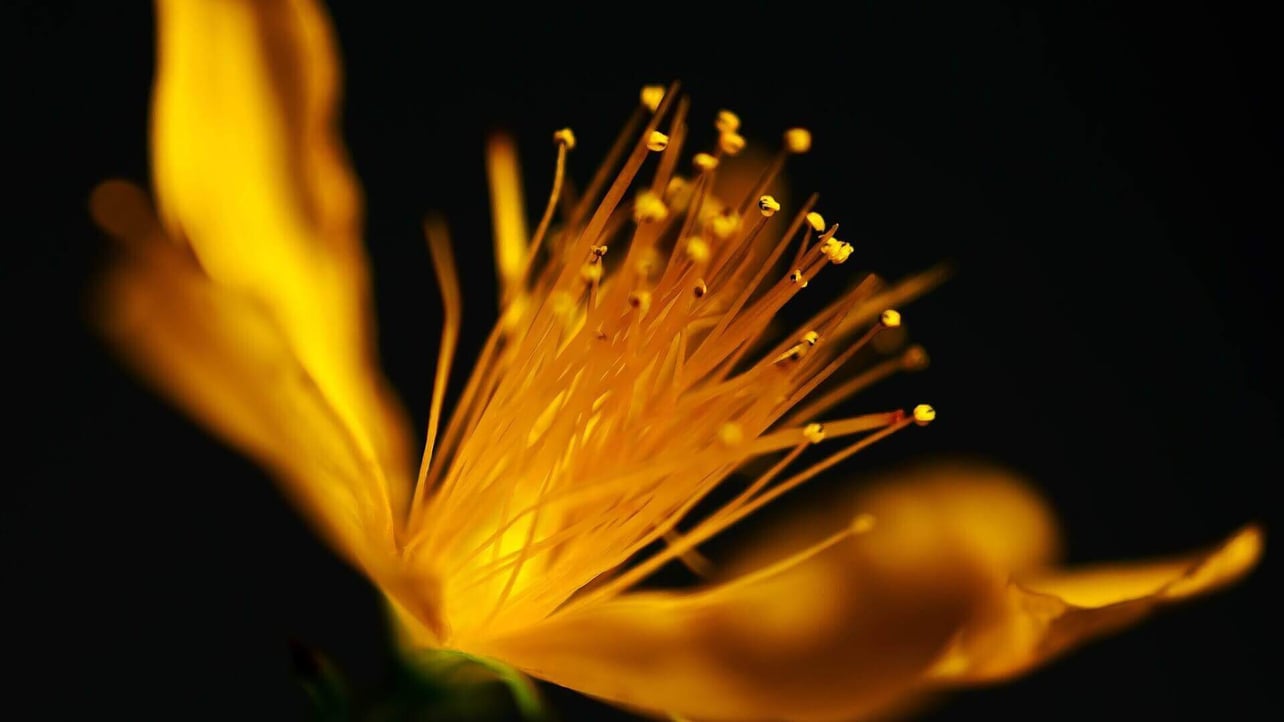
Macro mode is perfect for creating stunning rim light photography. Backlit grass, leaves, flowers will look great in the frame. If natural light is not available, you can use rim light to implement the most daring macro photography ideas. You need to place an external flash behind the object of a photoshoot and manage its settings using your camera for photography.

Sunlight is one of the greatest sources of rim lighting that can provide you with a stunning color scheme for golden hour photography. The sunset light is not so bright as the afternoon light. Therefore, even the weakest flash can neutralize it without problems. By shooting at sunset, you can perfectly highlight the details and objects that are in the foreground of the picture.
There is one more option that is more complicated than the first one. It consists in giving the model's face the same shade that the sky has at sunset. To create such an effect, you will need an external flash, which should be controlled via the camera.
Position this flash as close as possible to the model, attach flash diffuser light, and configure a light filter to get the necessary shade and take a series of photos.
When a photographer uses rim lighting, the object between a shooter and the light source is backlit and the edges seem to glow from within. This type of illumination can help you produce mysterious and dramatic images. Use these standard tips to improve the quality of your photos and make them more unique.

The edges of the objects illuminated with rim lighting might get overexposed. It will cause the loss of details. Make sure to avoid overexposure. If you cannot do this, configure the exposure so that the important semitones will have sufficient detail.

To refine your images, you need to use the most advanced photo editing software. My recommendations are Lightroom and Photoshop, as they have the most expensive sets of editing options. In some cases, you need to alter colors, adjust the exposure, correct contrast. Besides, one of your most important tasks is to configure the lighting scheme of all images from the series so that they look consistent.
If you want to speed up your image editing workflow, make sure to contact a professional agency that specializes in image processing. Such services will come in handy for photographers whose priorities are fast turnaround and high-quality results. If you do not have time for correcting shadows, adjusting tones, or altering other image specifications, FixThePhoto will perform color correction quickly and at a professional level.
If you do not have a reflector, you will need to use some natural reflectors like pavement, water, surf on the beach, or any light surface to throw the light back on the object of a photoshoot. During my career as a photographer, I’ve even used buildings for reflecting light on my models. You can also wear white clothes to become a reflector yourself.
On a big lawn, look for the areas that can serve as a beautiful backdrop for shooting your models. It’s important to select a location where the space behind you is clear. When standing in shadow, I know that there is no light for throwing it back on my subjects. So it is necessary to find the right place for your model.

Backlit objects look better if they are put against the dark background (usually this is the part of the scene that is shadow). If you manage to find the backdrop that is a bit darker than the object, you will achieve the necessary contrast. The trees with green leaves and shadows, a dark wall, or the shady side of the building (if we are talking about an outdoor photoshoot) can serve as such a background.
When taking photos using the rim lighting, make certain that you won’t face two serious problems: lens flare, when the light produces haze effect, and the undesired light spillover when the light illuminates the object from each side and the front instead of creating the subject outline.
To reduce flare, make certain that the subject blocks the light or the light source is out of the frame. Employ a lens hood and take test images to ensure that no sunbeam enters the field of view of your lens.
To prevent spillover, you need to achieve a great concentration of light. Instead of an umbrella, try using snoots or softboxes fitted with grids.
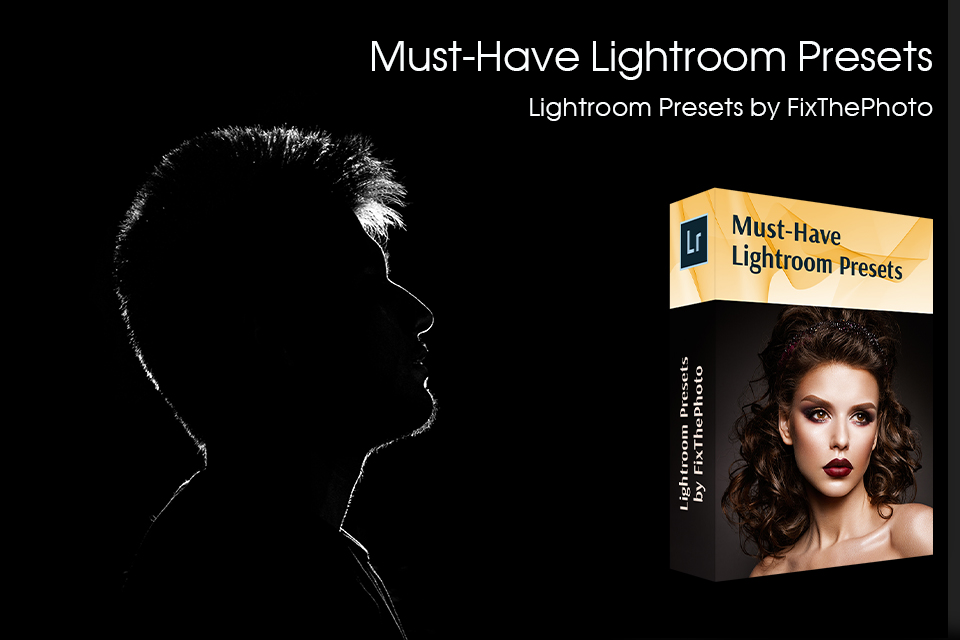
Rim lighting photography is not impatient shooters. After a photo session, you can process pictures with these Lightroom presets, which are great for all types of photography and allow editing pictures with ease. This bundle works with Lightroom CC, Lr 4, 5, 6. Moreover, with the help of these presets, you can process RAW and JPEG images on both Windows and macOS devices.


