What Is Lens Flare and How to Achieve It
When you purchase through affiliate links on our site, we may earn a commission. Here’s how it works.

Lens flare is produced when non-image forming light gets in the lens and then makes it to the camera’s digital or film sensor. It reduces the contrast of the shot. Some photographers try to stay away from lens flare while others create such an effect on purpose for creative compositions.
Lens Flare Definition
Lens flare is phenomenon when light is scattered in lens creating bright light spot. All the professional cameras, except the most primitive ones, feature lenses that, in fact, consist of a number of “lens elements”.
How exactly does lens flare appear? Non-image light doesn’t keep (refract) its planned track but reflects from the inside on lens elements multiple times (back and forth) until it eventually reaches the digital or film sensor.
Technical Side of the Process
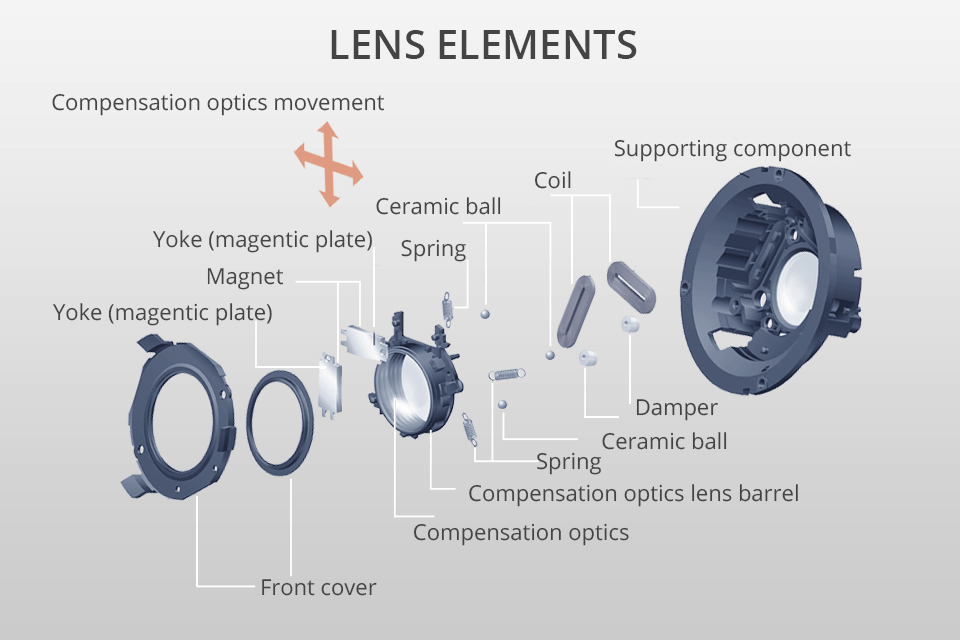
Lens elements tend to feature a kind of anti-reflective coating that is aimed at minimizing lens flares. But neither of the existing multi-element lenses can fully neutralize them.
Light sources will resume reflecting a certain amount of light. You will notice this reflected light in the form of flare in areas where it turns out to be almost as intense as the refracted light (produced by the actual image).
The reason why flare appears in the form of polygonal shapes is light that reflects off the inner edges of the lens aperture.
Overabundance of Lighting
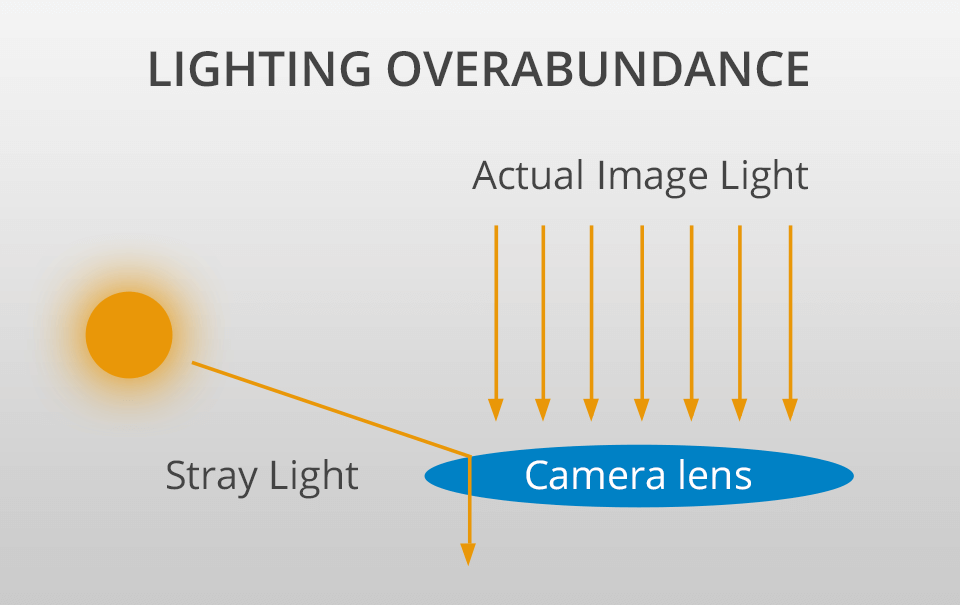
Although flash is technically caused by internal reflections, it often requires very intense light sources to become prominent (compared to refracted light). Flashes of light may include the sun, artificial lighting and even the full moon. Even if there are no intense light sources in the shot itself, scattered light can still get into the lens in case it makes it to the front element.
Normally, the light that is out of the angle of view doesn’t contribute to the final image. But if this light reflects, it can travel an unintended path and reach the film/sensor. In the visual example with colors, the sun wasn’t actually in the frame itself, but it still caused prominent lens flare.
- View the best lens for family portraits.
How to Create Lens Flare: Beginner’s Guide
A tasteful lens flare effect is an excellent way to make your shots more eye-catching. The following guide for beginners will help you with that.
Step 1. Remove Your Lens Hood
The developers of the lenses include a lens hood in order to protect your future photographs from undesired light flares. Thankfully, the lens hood may be removed without any difficulties.
Step 2. Pick a Proper Lens

Have a wide-angle or an ultra-wide-angle lens at the ready in case you are after lens flare shots with light streaks, tear-shaped blobs and orbs. Clean up the glass if necessary. A surface with dirt specks might make the shot blurry or even ruin it entirely.
Meter with the sun in the image and tweak the focal length – the advisable values are f/11 or f/16 for more intensity. The lens’s diaphragm and a number of blades will influence the sun rays. When there are enough blades, for instance, nine, nicer results are guaranteed.
- Discover the best Canon wide angle lenses.
Step 3. Switch to Spot Metering

The subject you are shooting may acquire a nice but often unneeded silhouetting effect. To avoid that, choose a spot metering mode and take a reading off of the subject’s face prior to photographing. If the subject is located not strictly in the center of the shot, take advantage of exposure lock to fix that meter reading in place before recomposing and making the exposure.
Bracketing is important as well in such challenging lighting conditions since the meter may not behave in the same way as you expect it to. I recommend taking three pictures on the whole: one according to the camera’s suggestion, the second one – a stop underexposed and the third one – a stop overexposed.
- View info about camera modes.
Step 4. Shoot During the Golden Hour

You may snap a gorgeous lens flare photo if you decide to shoot at dusk or dawn when the light is naturally soft. The time around dusk and dawn is referred to as golden hour in photography. When shooting early in the morning or later in the evening, the position of the sun will help you get that sought-after lens flare, with prominent light orbs and streaks.
- Read more about the golden hour photography.
Step 5. Position Your Subject Back to the Sun

Place the subject back to the sun and you will welcome diffused light that reflects on inner lens elements. If you play around with the scene metering, you may even transform the subject into a silhouette for an awesome effect.
Here is one more effective way how you can achieve fascinating pictures with catchy flares in Luminar 4. Your only task is to blend two separate pictures into one using the texture overlay technique. Just apply one picture with flares to another and see how stunning it will look like. Remember that you can try different blend modes or tweak the opacity of the texture effect.

Step 6. Adjust the Camera Angle

We all want different things when it comes to adding lens flare to photo. Someone is after a dramatic effect with lowered contrast and faded colors. Other shooters wish to add only several polygonal sunbursts placed intentionally in the corner of the shot or a few streaks for an “out of heaven” effect.
To bring your ideas to life, you need to move the subjects in such a way that only a certain amount or all the light is behind them. Or you may try to move yourself to have the sun behind a building or a tree.
Step 7. Partially Block the Light Source

To produce optical lens flares, photograph straight into the sun or some other lighting source. For a more unusual effect, try blocking a certain part of the natural light source. In this case, the sun as the main lighting source will work in your favor. When photographing indoors, block a certain part of the light emanating from the window to achieve an identical result.
Step 8. Take More Than One Shot

The same as any object in motion, lens flare is constantly changing. Once you have arranged the composition, take a number of shots while moving the camera’s angle a bit. In this way, you will get shots with a varied placement and intensity of lens flare and be able to pick truly the best one.
Step 9. Use Reflector to Ensure Image Quality
A reflector is a necessary item for reflecting light back onto the subject. Reflectors are typically fabricated of silver, gold or white fabric. You may use a reflector as a hand-held item, put it on a stable surface or hang it on a standalone base. It will come in handy in cases when the subject remains in the shade. A reflector will make the subject’s face brighter and the overall shot more appealing.
- View these reflector boards.
Step 10. Enhance Your Lens Flare Images

Many shooters are actively using professional photo post-production services to enhance their lens flare photography. One of such services is FixThePhoto. With the help of the skilled and experienced team, you can get a beautiful lens flare photo almost for free.
Lens Flare: FAQ
- Why does lens flare appear?
A bright light source is the main reason why the lens flare appears. The result of lens flare depends on the position of the light source in the shot. In case the light source is rather intense, like the sun, its rays may hit the front of the lens and produce lens flare, even when the light source isn’t featured in the shot.
- How harmful is lens flare?
Lens flare may ruin the entire shot, in particular, when they occupy a large area of the shot. But if you look at some lens flare examples, you will see that photographers and videographers produce such an effect on purpose, in order to achieve that cinema-like look of their masterpieces.
- How to avoid lens flare at night?
If you notice that there is too much lens flare during the nighttime shooting, it means that you probably have a small aperture set. This can make the lens flare more intense. Another thing that may help you decrease the lens flare is a qualitative prime lens with a decent coating. Besides, all the lens filters are supposed to be removed.
- Should I leave a lens hood on at night to avoid lens flare?
A lens hood prevents sun rays from hitting the front of the lens. During the nighttime shooting, when there are extra light sources, like bright streetlamps or a moon, it is better to leave a lens hood on.
- How to neutralize lens flare?
You need to remove bright light sources from the shot and don’t let the light rays hit the lens. Photographing in daylight, leave the lens hood on to prevent sun rays from making it to the front of the lens.
Lens Flare Freebies
I have prepared free materials to help you achieve a shot with the lens flare effect quickly and effectively in Photoshop or Lightroom. Download and use them!
Sunlight

Add sun flare to photo by applying this Ps overlay. The flare looks stunning but gentle and will make the overall picture more vivid.
Light
Use this light flare overlay to enhance the initial beauty of the picture, increase the saturation and vibrancy of colors. A gorgeous lens flare effect is guaranteed!
Bright Glare
This lens flare overlay Photoshop is perfect for adding a visual appeal to the pictures. It improves the skin tones, makes the pictures more vibrant with the help of bright glare. The overlay is rather universal but will be suitable mostly for beach, landscape and wedding photography.


