
The neon effect in Photoshop allows professionals to add rich colors to their pictures and create a retro, modern, or futuristic atmosphere. Neon signs with their glowing edges attract a viewer’s attention and make visuals more unique.
Professional designers apply this effect when working on posters, social media content, logos, ads, and digital artworks. It allows them to achieve the same intensity that real neon signs have without installing real light tubes.
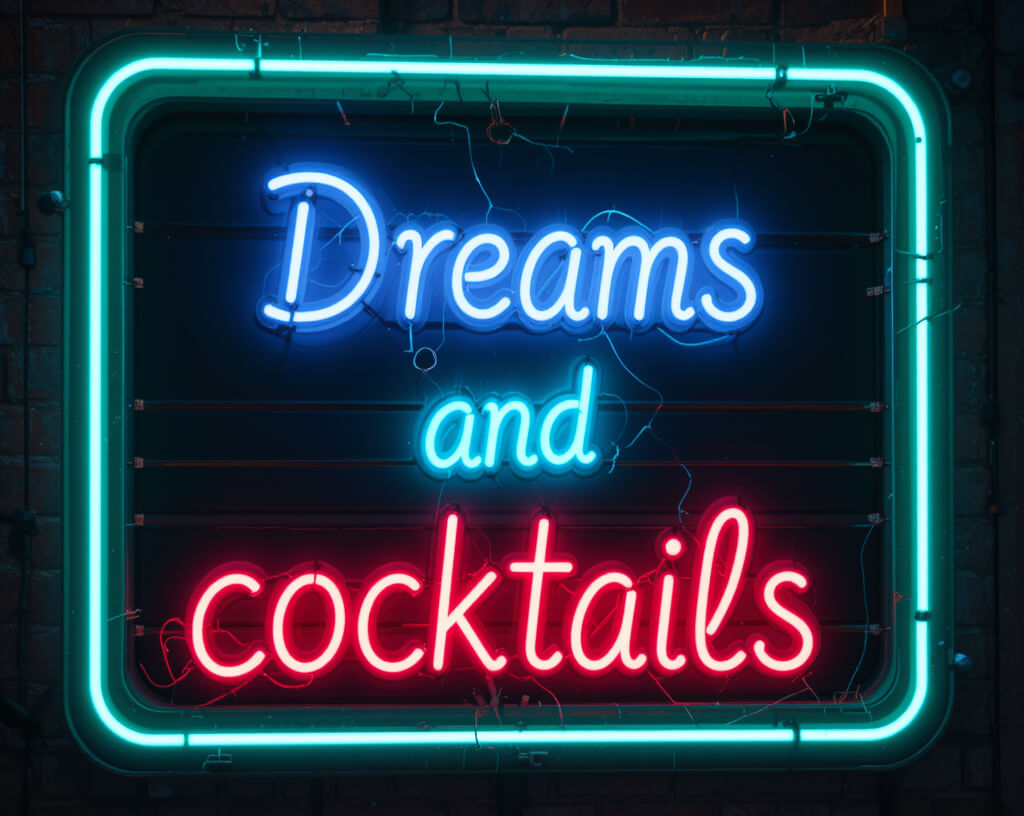
The neon effect allows you to recreate the look of glowing neon tubes. When using Photoshop, you can achieve this effect using various layer styles, including Outer Glow, Inner Glow, and Stroke. It’s important to use bright colors and dark backgrounds to achieve the right contrast.
The Photoshop neon effect has a variety of uses. You can apply it to your text to make it brighter, add it to various shapes, or enhance portraits and objects to add a cinematic feel to your pics. It allows you to design eye-catching branding visuals to promote tech gadgets, fashion, games, or nightlife establishments.
The best thing about this effect is that you don’t need to have advanced Photoshop skills to apply it. You can combine layers in different styles, add glow effects, and experiment with blending models. In this guide, our FixThePhoto team will explain what the neon sign effect is used for and how to apply it in Photoshop.
The neon effect remains quite popular, as everyone can apply it using the free Adobe software. The neon effect has a high contrast and allows for adding a luminous feel to photos. Professionals often use it when they need to make some objects more noticeable or transform the atmosphere in their photos.
Common uses of the neon effect:
Advertising & marketing. You can add neon text in Photoshop to posters, billboards, and online ads, making them more eye-catching. The glow effect draws attention to the main message, making it best suited for promotions, event announcements, or product releases.
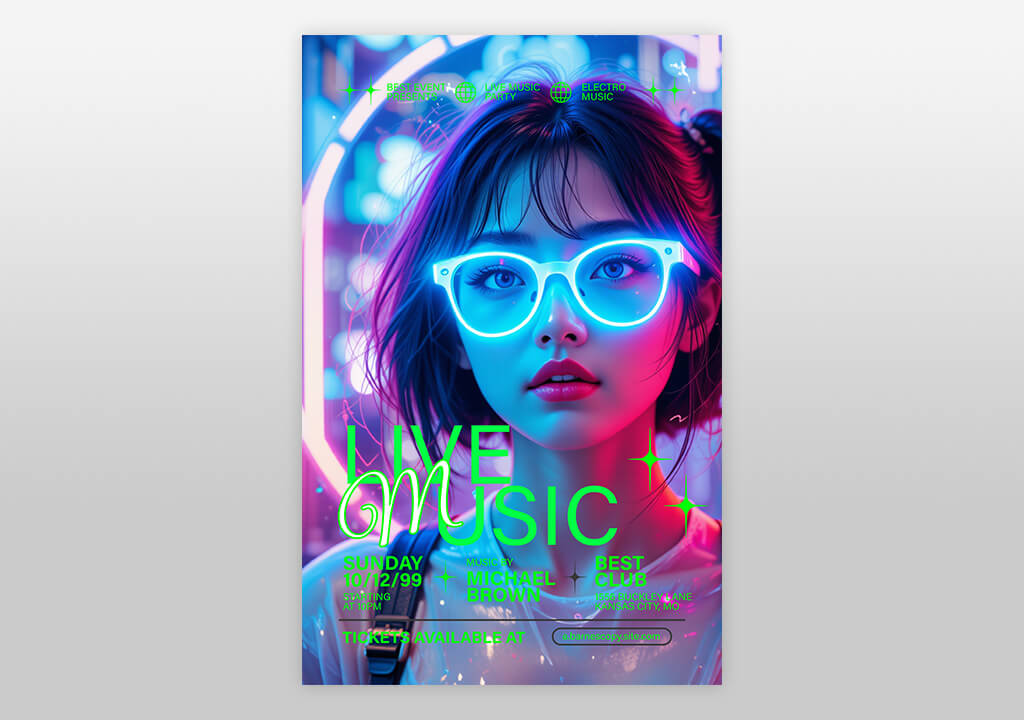
Event posters & nightlife promotions. When creating advertising materials promoting concerts, clubs, festivals, and nightlife events, designers often use neon photography effects. They allow them to create a party or urban effect. A neon glow effect reminds people of a nightlife scene and modern music.

Social media content. Neon text or effects make posts easier to notice in the neon feed. Designers use it when creating Instagram stories, YouTube thumbnails, and TikTok graphics.
Branding & logos. Some brands, especially companies from the tech, gaming, music, or entertainment industries, use neon in their logos or branding images to convey a modern feel. The glow is suitable for brands that focus on innovation, energy, or creativity.

Digital art & creative projects. Many digital artists add the neon light effect when they want to design materials in cyberpunk, sci-fi, or futuristic aesthetics. They combine glowing text with cityscapes, dark tones, or metallic textures. The neon effect allows them to create a cinematic mood and make their visuals look otherworldly.

UI/UX and gaming graphics. When designing video games and apps, professionals often use neon to emphasize interactive elements, buttons, or menus. This effect is often used in gaming or futuristic interfaces, as it allows one to add a dynamic feel to their scenes and achieve an immersive feel.

Main purposes of the neon effect:

1. Netflix (Stranger Things campaigns). Netflix uses a simple brand logo without any embellishments. However, when developing its campaigns for Stranger Things, the brand decided to use retro neon typography.
It used glowing red and blue signs to recreate the atmosphere of the 1980s. This approach allowed the designers to create a feeling of nostalgia and evoke a sense of supernatural mystery.
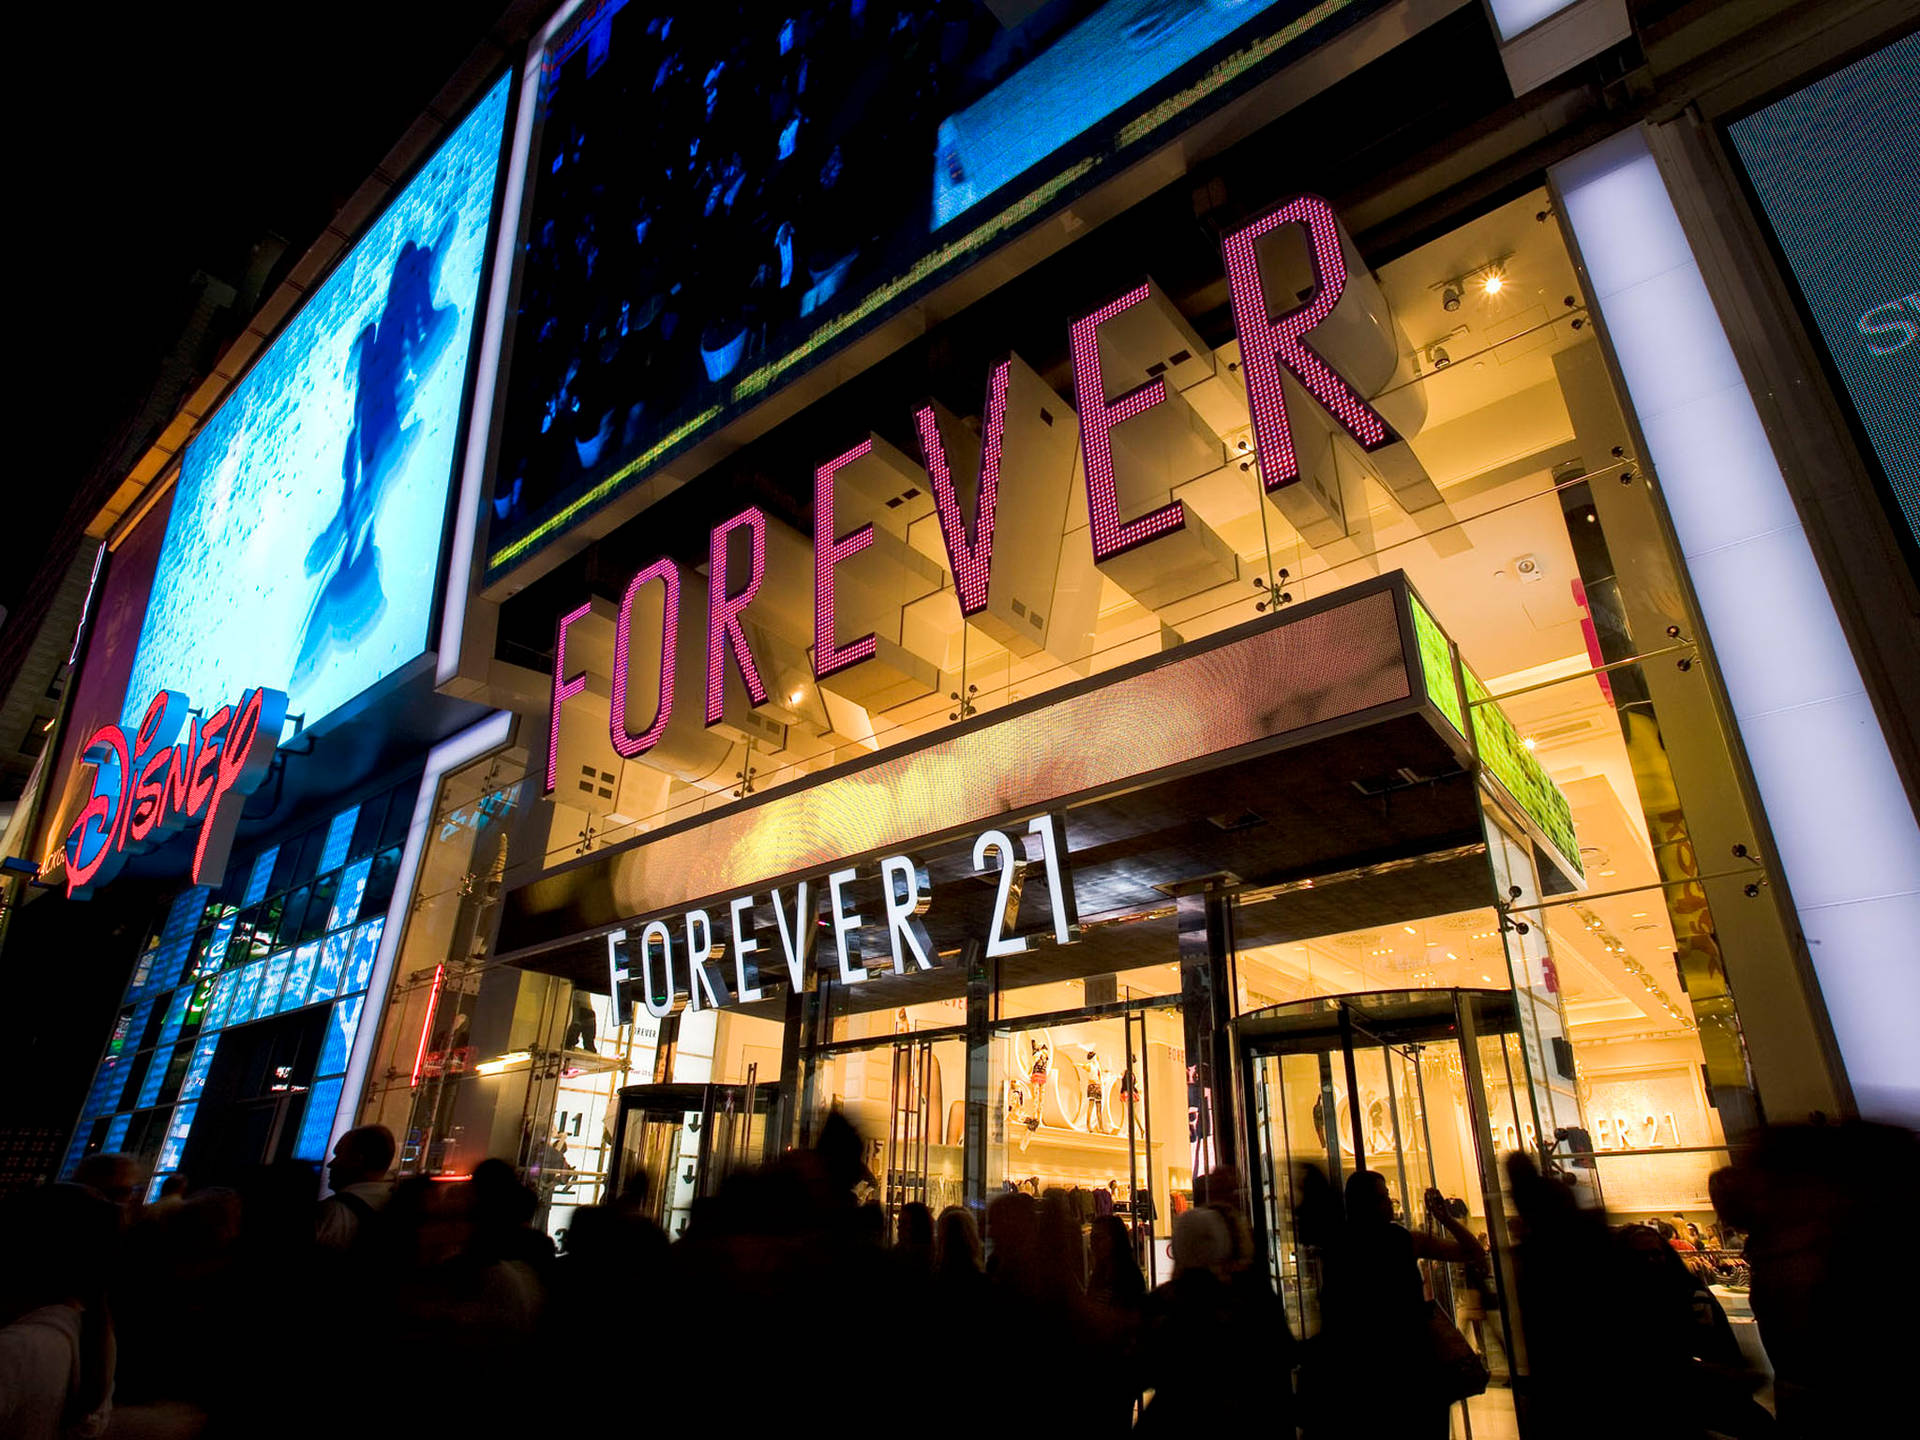
2. Synthwave & vaporwave-inspired brands. Fashion labels and popular streetwear brands, like H&M or Forever 21, often use the neon in Photoshop when designing their capsule collections in the style that was popular in the 80s. They use neon lights, glowing text, and cyberpunk palettes to create lookbooks and digital campaigns.
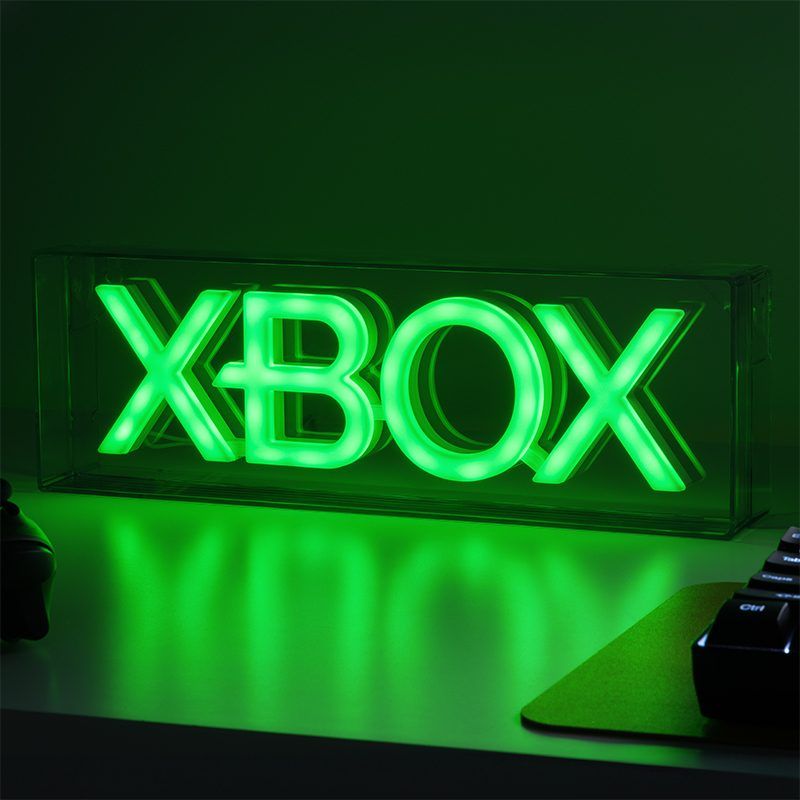
3. Gaming & eSports brands (Razer, PlayStation, Xbox campaigns). Gaming brands often add neon effects when creating logos, hardware designs, and promotional visuals. For instance, Razer often uses neon green. PlayStation and Xbox use neon lighting when promoting their games.

4. Nightlife & entertainment (clubs, festivals, DJs). Ministry of Sound, Ultra Music Festival, and many other brands use neon to make their branding more memorable. Nightclubs also often use posters and logos with neon elements.

5. Cyberpunk & futuristic brands (movies & tech). The Blade Runner 2049 campaign became highly effective due to neon visuals. Many tech brands adopted the same approach and started to utilize this style when advertising their products. Businesses that use VR/AR and AI technologies also utilize glowing branding elements.
6. Fashion & luxury (Balenciaga, Gucci Campaigns). High-fashion houses sometimes use neon to advertise their collections of clothes. Balenciaga famously organized a runway show and decorated the venue with neon elements. Gucci utilized neon-inspired window displays to give its products an edgy feel.

7. Beverage & lifestyle brands (Pepsi, Red Bull, Absolut). Beverage brands use neon to advertise products consumed by those who are into the club scene and have an active nightlife. They use the neon effect in Photoshop to make their limited-edition campaigns more attention-grabbing.
When Absolut Vodka launched its “Absolut Nights” campaign, it used neon elements. Pepsi sometimes utilizes neon-like typography elements when creating ads for younger generations.
Follow this simple Photoshop tutorial to make your designs more vibrant and catchy.
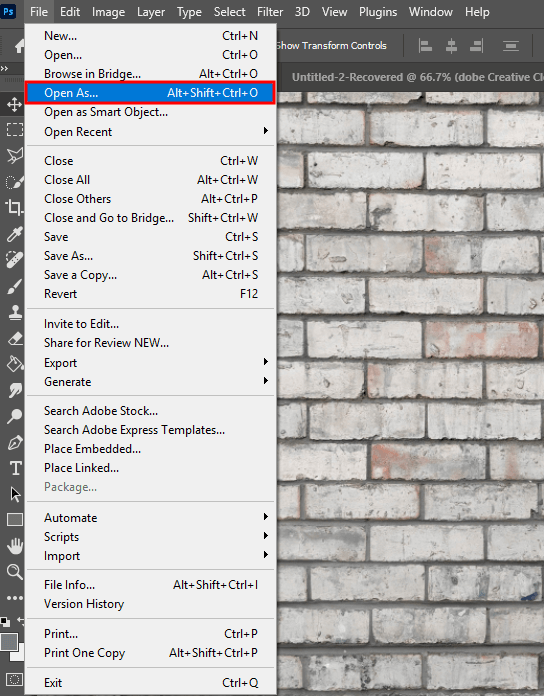
Step 1. Create a new document. Go to File > Place Embedded to add the background. It’s better to use a gray brick wall texture.
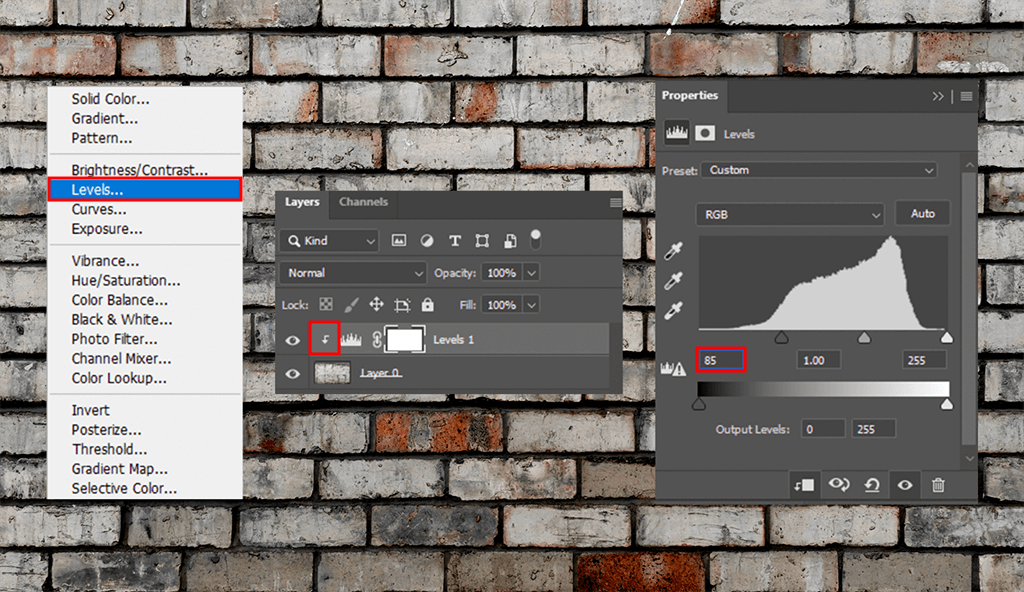
Step 2. Find the Create new fill or adjustment layer icon in the Layers panel. You will see it at the bottom. Select Levels, check Clip Adjustment to Layer at the bottom of the Properties panel, and adjust Shadows, so that its value is 85.
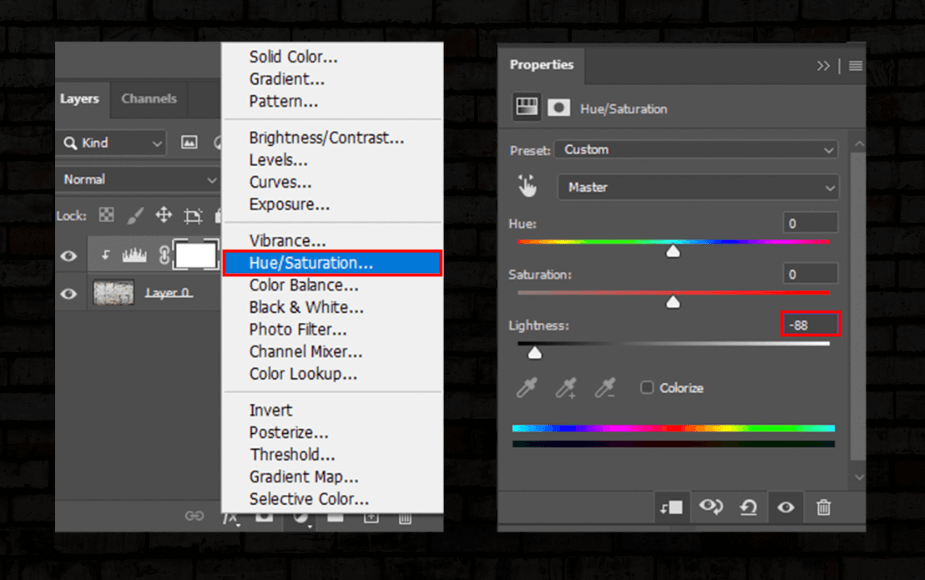
Step 3. Then, click the Create new fill or adjustment layer icon and click Hue/Saturation. Go to the Properties panel, click the Clip to Layer icon, and adjust Lightness to –88.
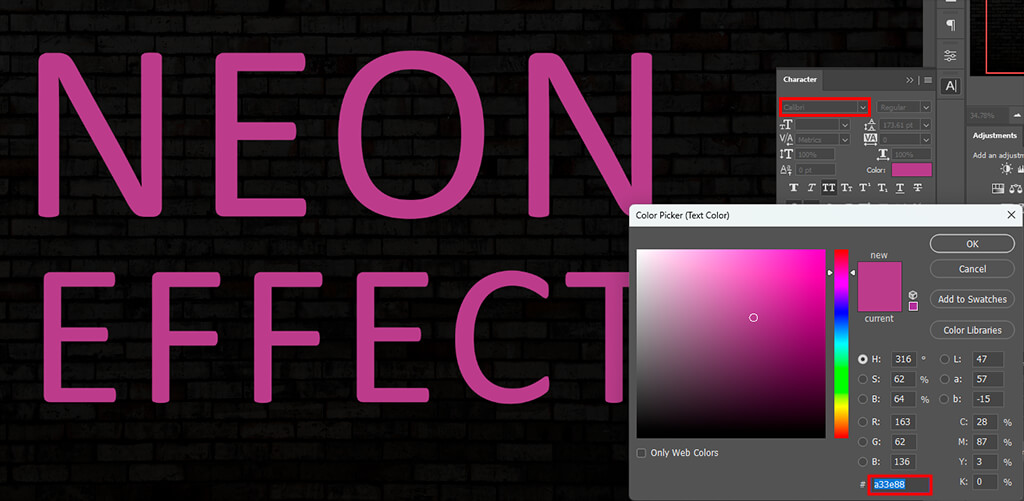
Step 4. Follow this Photoshop manipulation tutorial to create uppercase text. Choose the Meragen or Calibri font and set the color to #a33e88.
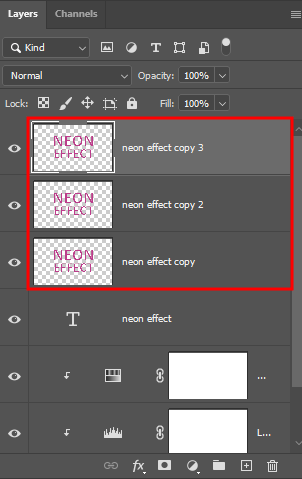
Step 5. To make neon letters in Photoshop, create a copy of the text layer and hide the duplicate by clicking the eye icon next to it. Then right-click on the copy and choose Rasterize Type. Create two more duplicates of this rasterized text layer.
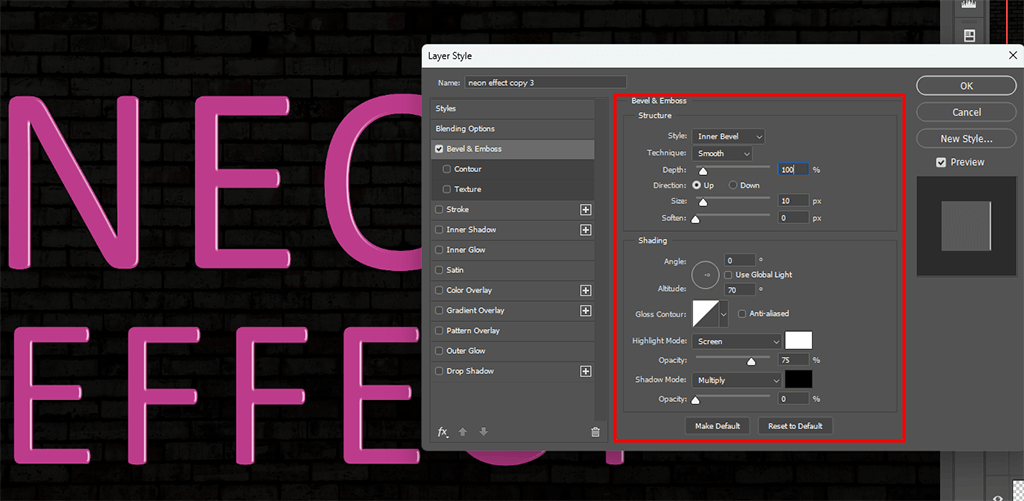
Step 6. Add Bevel & Emboss to the first text layer. Use the following settings:
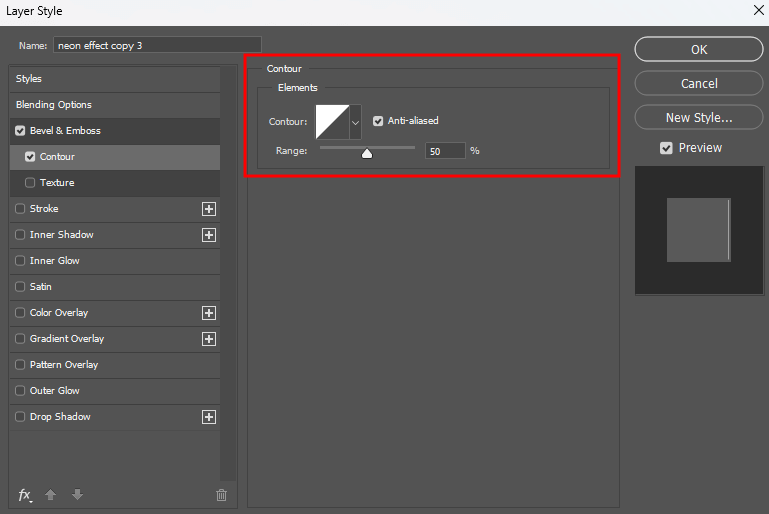
Step 7. At the next stage of this photo manipulation Photoshop technique, add a Contour and check Anti-aliased.
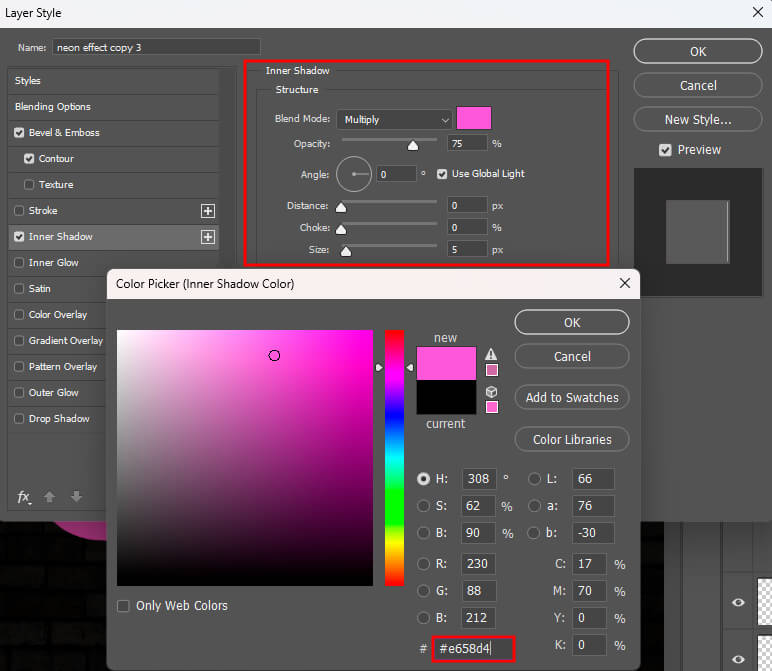
Step 8. Add Inner Shadow with such settings:
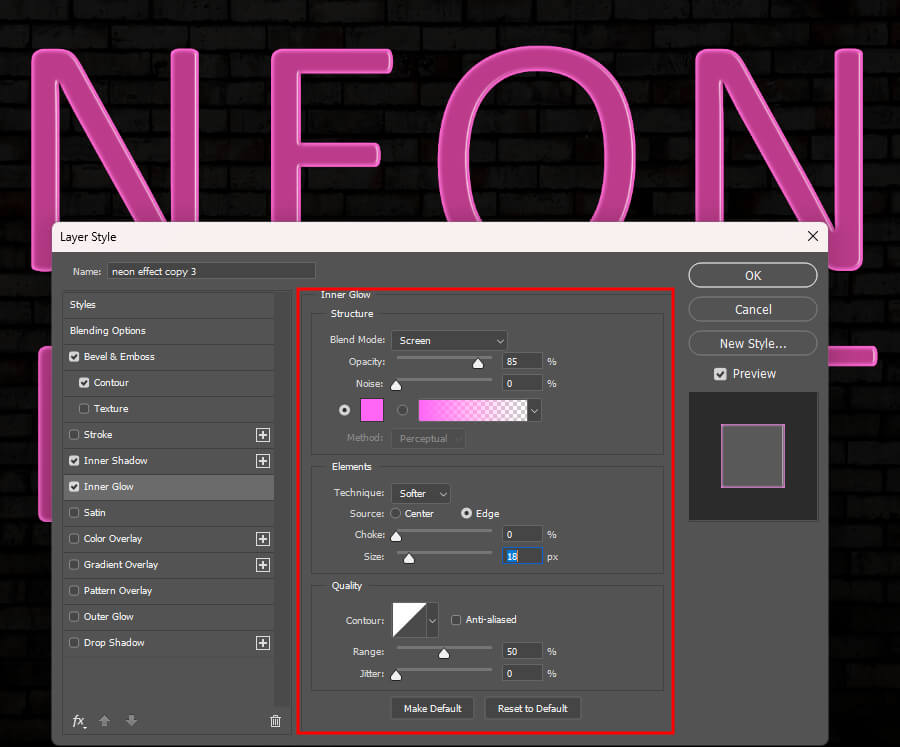
Step 9. Add Inner Glow to the neon text and use these settings:
Step 10. Add Drop Shadow with these settings:
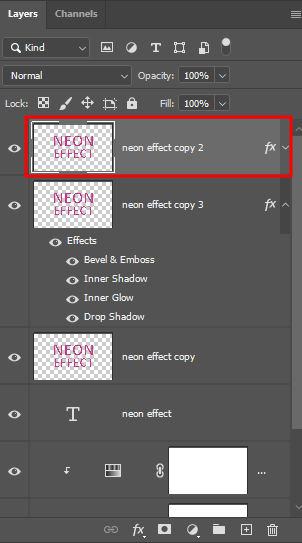
Step 11. Select the second text layer.
Step 12. Add Bevel & Emboss, using these settings:
Step 13. Add a Contour with these settings:
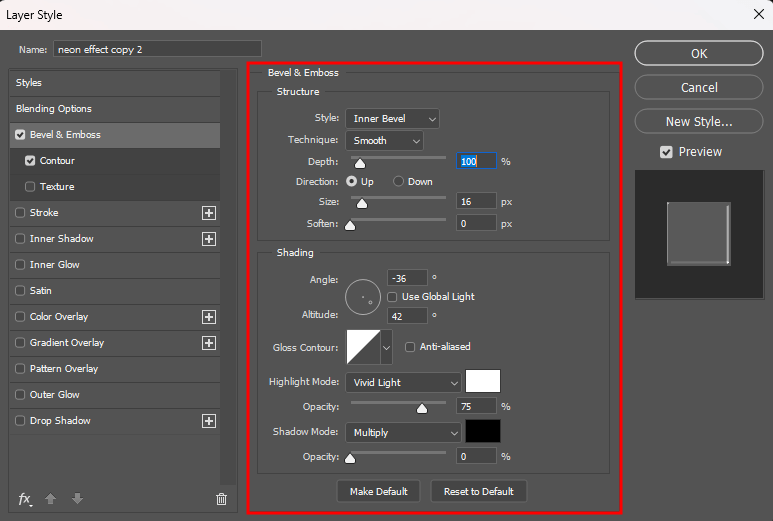
Step 14. Go to the top text layer and add Bevel & Emboss with these settings:
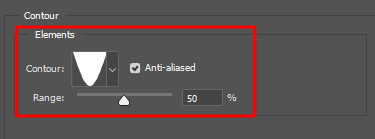
Step 15. Then add a Contour with these settings:
Step 16. Add Inner Glow with these settings:
Step 17. Add Outer Glow with these settings:
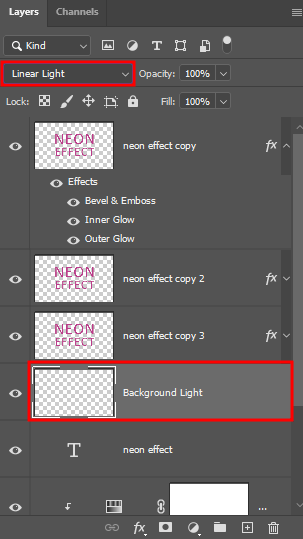
Step 18. Create a layer under the hidden text layer, rename it as Background Light, and change its Blend Mode to Linear Light.
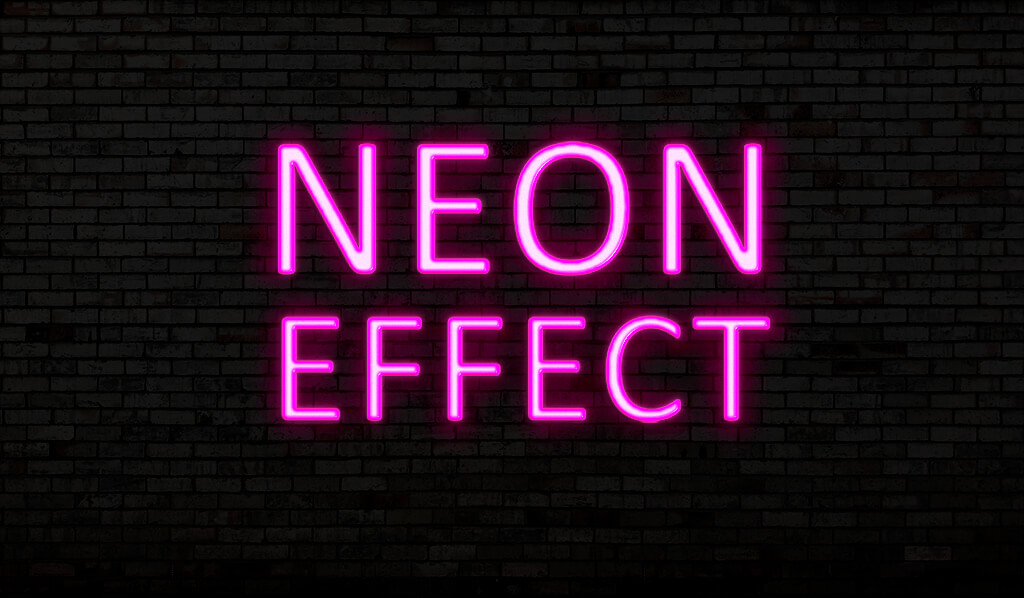
Step 19. To make the neon text effect more realistic, set the Foreground Color to #98338b, select the Brush Tool, and select a very large, soft, round brush tip. Click once to add some color behind the text. Do not drag the brush. Tap once to add some glow.
Use a dark background. The neon effect will be especially noticeable against the dark background. When adding glow in Photoshop, create a solid black layer, use a dark gradient, or import a nighttime photo background.
It’s better to add a subtle texture like concrete, brick, or grunge. It will allow you to achieve a more realistic effect and make your neon sign look as if it were mounted on a wall. You may also use a neon sign Photoshop template to save time.
Choose the right colors. To create a neon sign, use rich, saturated colors: electric blue, cyan, magenta, neon green, hot pink, or bright orange. If you want to add some contrast, use complementary color pairs like cyan and magenta or purple and green. You can also add multiple glowing colors and combine different layers to recreate the effect of real neon signage.
Use layer styles (glow & stroke). You can apply the Outer Glow and Inner Glow effects even if you use the Photoshop free version.
Use a thin Stroke to achieve the effect that will look similar to the glowing neon “tube.” Add multiple layers of glow. One should be sharp and close (small size, high opacity), and another soft and diffused (larger size, low opacity). It will allow you to add some depth to your image and make it look more realistic.
Add a Gaussian blur for extra glow. Create a copy layer of your text or shape, then apply Gaussian Blur to create a subtle halo effect. Reduce the opacity of this blurred layer and use different blend modes (Screen, Linear Dodge, and Overlay) to achieve the desired glow intensity.
Use layer masks for realism. Natural glow might look uneven and inconsistent. Create layer masks with a soft brush to diminish the glow intensity in some areas to make it more realistic. If you want to achieve a more natural effect, fade the glow near corners or overlaps. It will allow you to make your sign look like real neon bent at joints.
Add environmental lighting. If you want to add the neon effect to the scene, add some light spilling to the surfaces. Create a new layer, switch the settings to Soft Light or Overlay, and add some neon’s color on walls, floors, or surrounding objects. It will allow you to create a more immersive effect and make it look as if the neon was actually lighting up the space.
Experiment with fonts and shapes. Only some fonts are suitable for creating the neon effect. Use bold, rounded, or sans-serif fonts, as they look similar to neon tubing. You may also create custom paths using the Pen Tool to recreate neon-like shapes like signs, arrows, or outlines.


![Most Wanted Photography Editing Styles [Fixthephoto’s Version]](/placeholder-450x300.svg)


