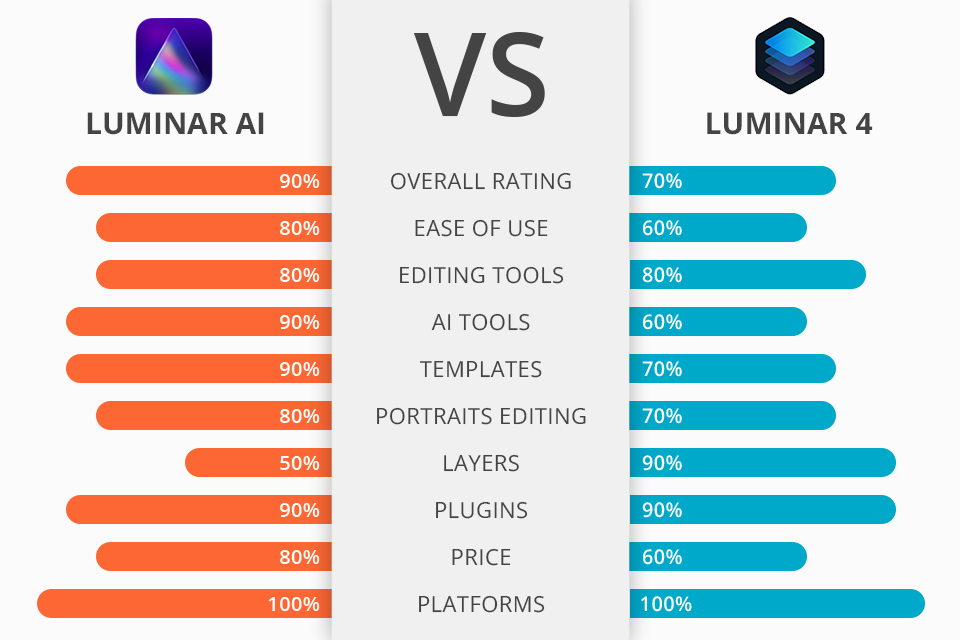
If you are interested in getting an efficient program from Skylum, you are likely to end up with the choice between Luminar AI and Luminar 4. However, selecting one option isn’t that simple considering that they were developed with similar tasks in mind – portrait improving and removal of needless objects with AI tools.
Luminar AI stands out with its simplicity. With the help of AI-based instruments, even novice users can achieve fantastic photo enhancement results. For instance, you can easily replace the original sky, change weather in pictures, get rid of skin defects, improve color balance, and perform selective sharpening to direct viewers’ attention to specific details.
Luminar 4 is a more feature-rich program being initially aimed at professional users. Here you can perform layer-based editing, take advantage of more organization options and enjoy better manual control. Though the program was immensely popular among experts, the developers decided to merge it with Luminar AI, thus creating a program featuring the best of 2 software.
The thing that allows Luminar AI to get a point in the Luminar AI vs Luminar 4 battle is its simplicity. Users no longer need to learn the intricacies of manual masking, selection, and image blending. This AI photo editor takes care of all those processes. It will perform AI-powered skin enhancing, sky replacement, contrast and exposure adjustment after you make a single click.
Luminar 4 is best suited for those users who are looking for a complex editing program that can also serve as a decent Lightroom alternative. The software has a rich photo library and all the needed editing tools gathered in one place. If you usually deal with hundreds of images after a photo session, you will definitely appreciate profound culling features available in the program.
In general, the interfaces of these programs are very similar. All photo improving processes are divided into several categories with corresponding sections on the UI. You will see such tabs as Essentials, Creative, Portrait, and Professional. Choosing any section, you will see a slider, dragging which, you can change a specific parameter.
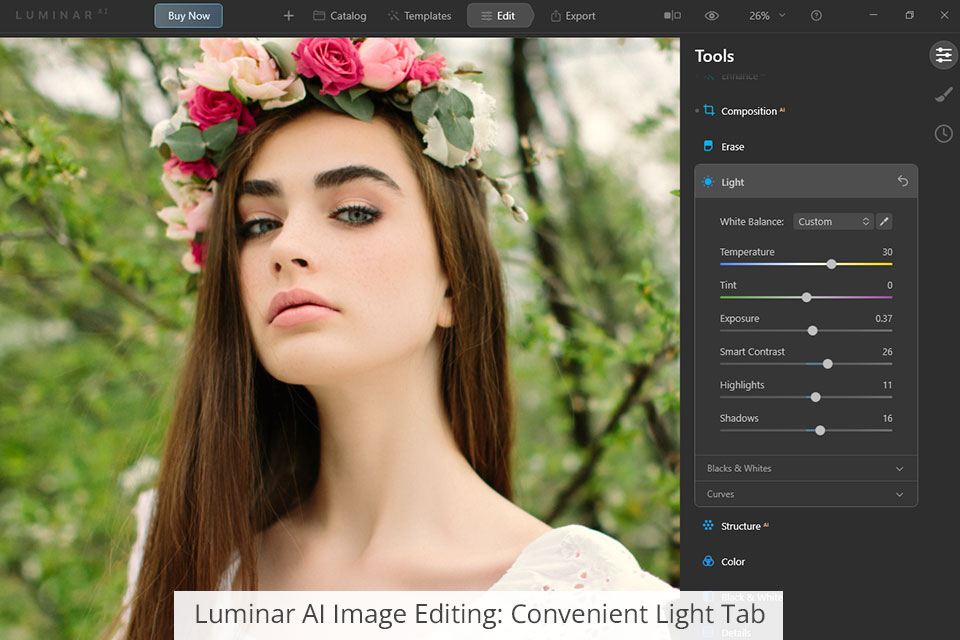
Comparing Luminar AI vs Luminar 4 in terms of image enhancing is rather simple, as their capabilities in this regard are on par. The primary exposure adjustments are located in the “Light” tab, which is almost identical in Luminar 4 and Luminar AI. Here you can change exposure, contrast, blacks & whites, shadows, highlights, and tone.
To correct colors in Luminar 4, you need to go to the “Color” tab on the Essentials Module and the “Split Toning” tab on the Professional Module. The first section provides access to saturation and vibrance sliders, as well as the HSL options.
The “Color” tab in Luminar 4 is well-thought-out. It contains masking options and allows users to add brush, radial, and linear gradient masks for quick color tweaks.
Luminar AI, namely, its color correction section, is developed in the same manner with saturation and vibrance sliders followed by the HSL adjustments. However, this photo editing software for PC and Mac appeals to users with manual corrections.

Luminar 4 offers a wonderful mix of auto (AI-powered) and manual (traditional) editing options. The range of AI tools is sufficient for trouble-free work without hampering manual processing.
Luminar AI abounds with AI features. In fact, it is designed specifically as an automatic photo editor, which means most of the operations are performed without user’s manual intervention. For instance, if you need to improve portrait photos, you can fully rely on such instruments as Body AI, Skin AI, Iris AI, Face AI, and Portrait Bokeh AI.
You can also use Composition AI if there is something wrong with photo framing, or automatically fix alignment and perspective to get rid of tilt and distortion. What’s more, the toolset includes the Atmospheric AI, which excels at simulating different atmospheric phenomena.
Thus, you can give your images mystic touches by adding mist or fog, and mimic other effects with ease. Thanks to a unique 3D depth mapping technology, the tool works very precisely and provides very realistic results.
Skylum’s programs do wonders when it comes to replacing sky and creating composite images. Of course, if you have ever compared Luminar vs Photoshop, you probably noticed that the latter offers more advanced features, but those available in Luminar are sufficient for convenient work. Thanks to AI instruments integrated both in Luminar 4 and AI, you can totally alter the look of your pictures in an instant.
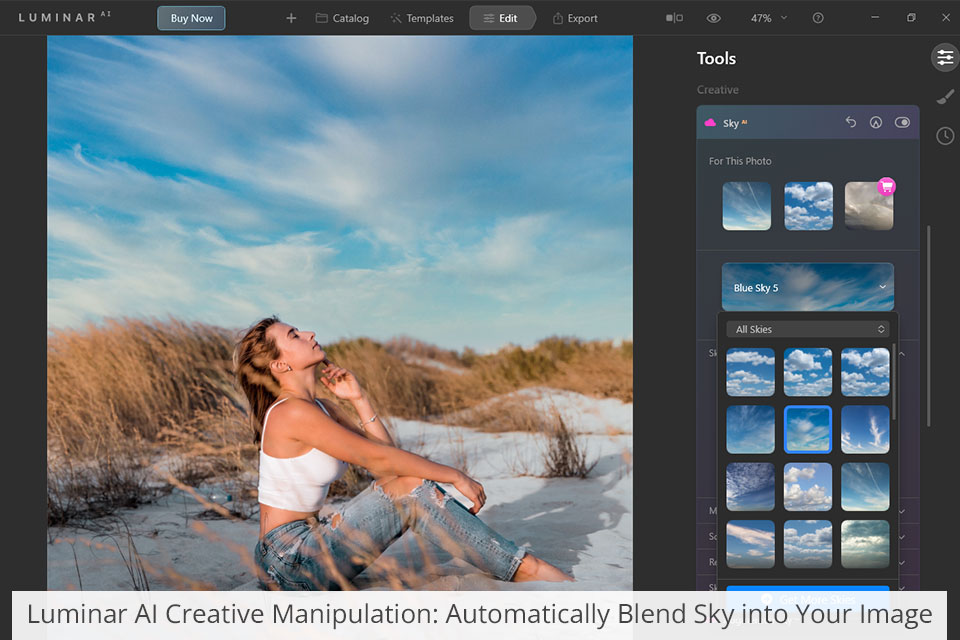
Both programs have AI Sky Replacement and AI Augmented Sky for meticulous work with this area of an image. The former allows picking a suitable sky template and then the software will automatically blend it with the rest of a shot. If you think that the outcome doesn’t look very lifelike, you can correct colors and lighting additionally for a perfect blend. Such options are present in Luminar AI and 4.
AI Augmented Sky comes in handy if you want to add different objects to the sky. These can be birds, planes, etc.
The feature that deserves special examination in the Luminar AI vs Luminar 4 comparison is the Templates tab. In Luminar AI, there are lots of smart “presets” that provide auto-suggestions for the best corrections. The recommendations don’t boil down to changing a tone of an image but involve more complex tweaks. Using a template, you can embellish your photos with light flares, replace the sky, and more.
Luminar 4 doesn’t offer regular templates but has Looks, which operate on the same principle. Such Luminar presets adjust colors and exposure but are useless if you want to add creative elements.
Both programs have tools specifically aimed at correcting portraits. Using SkinAI and FaceAI, you can remove skin defects, improve textures, and make particular facial features more defined.
Luminar AI accurately defines facial features and applies the needed corrections to make them flawless. It is possible to affect specific areas, keeping the rest of the face intact. For instance, with the help of the skin blemish remover available in this photo editing software for beginners, you can make slight changes.
If you lack time to improve packs of images, delegate the task to professional retouchers.
Luminar 4 has a special Eye Enhancer tool that beautifies eyes by adding some sparks to them. Luminar AI comes with a similar instrument called Iris AI, which makes the entire process significantly faster. In fact, it can not only enhance iris visibility and shine, but change its appearance. Though you are unlikely to make such manipulations very often, it is nice to know that there is a tool, which will perfectly cope with such a task.
Another function that makes the AI version more advantageous in the Luminar AI vs Luminar 4 stand-off is Portrait Bokeh AI. Now, you can add eye-catching bokeh to images in several clicks.
Landscape photographers may have a hard time trying to define their favorite between these 2 Skylum’s products, as they both allow transforming images of nature into masterpieces. You can correct exposure, make colors livelier, add fog, etc., in any of these software.
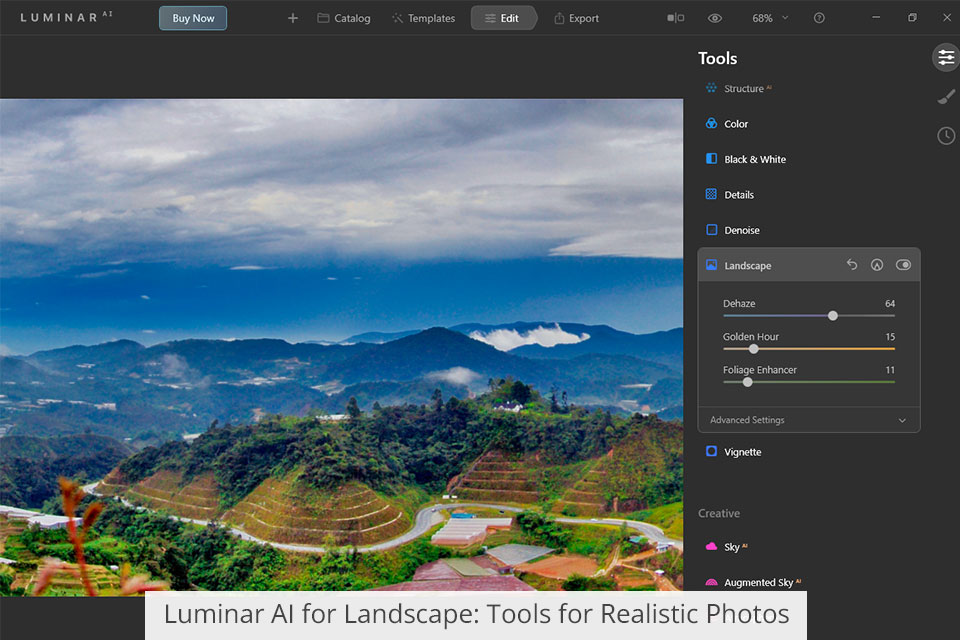
Luminar AI has the Landscape Enhancer toolset, where every instrument is controlled with sliders, so you only need to drag them to the left/right to accentuate the charm of your landscapes. There is also the Dehaze feature useful for restoring depth and color, the Golden Hour option that allows imbuing the frame with warm sunlight, as well as the Foliage Enhancer that is indispensable for delicate work with trees, bushes, and flowers.
Luminar 4 and AI have the Sunrays tool, using which, you can add a light source to your pictures. The best part is that the light appearing in your photos looks realistic and follows a natural trajectory while penetrating leaves, and other elements.
Besides, there is the content-aware AI Structure that detects living and non-living objects in pictures and applies corrections accordingly. This is especially great for architecture, cityscape, and urban photos where much attention is paid to proper textures and accurate details.
Another praiseworthy feature is the possibility to add contrast to highlights, midtones, and shadows individually. If you take landscape photos but don’t use an ND filter for exposure control, you should definitely try this option.
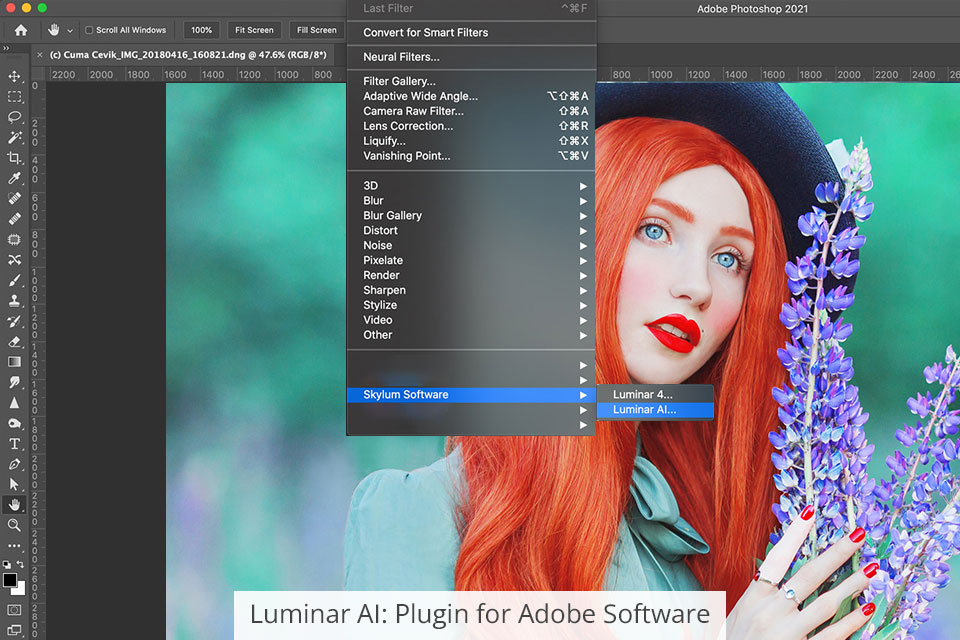
If you frequently transfer your editing workflow from one environment to another, you’ll be pleased to learn that both programs can function as plugins for Adobe Lightroom and Photoshop, as well as some Apple software. Luminar AI can be used together with macOS Photos, while the 4 version makes a great complement for Apple Aperture.
No matter what program you choose in the Luminar AI vs Luminar 4 competition, it won’t disappoint you being a plugin for another software. Thus, you can diversify your workflow and cope with repeating tasks in a quicker way. Besides, you can use the Luminar panel for simple edits and then return to more advanced manipulations.
When you use any Luminar version as a plugin for another software, you get more possibilities for creativity. You can perform several operations without sacrificing speed thanks to auto settings.
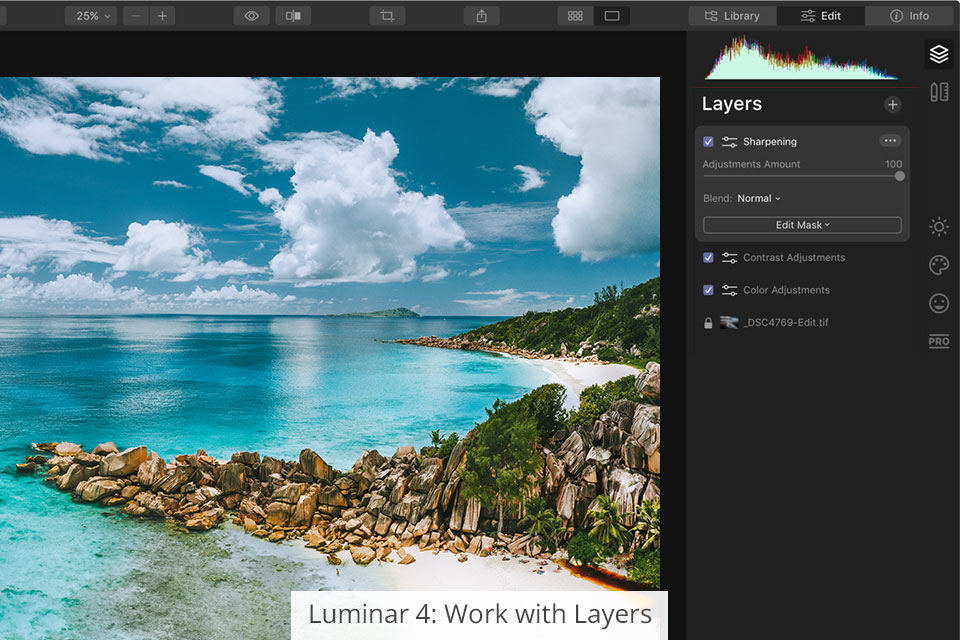
The bragging point of Luminar 4 is well-developed layers. They make manual editing extremely convenient and diversified. In Luminar AI layers call for improvement, so I didn’t really use them.
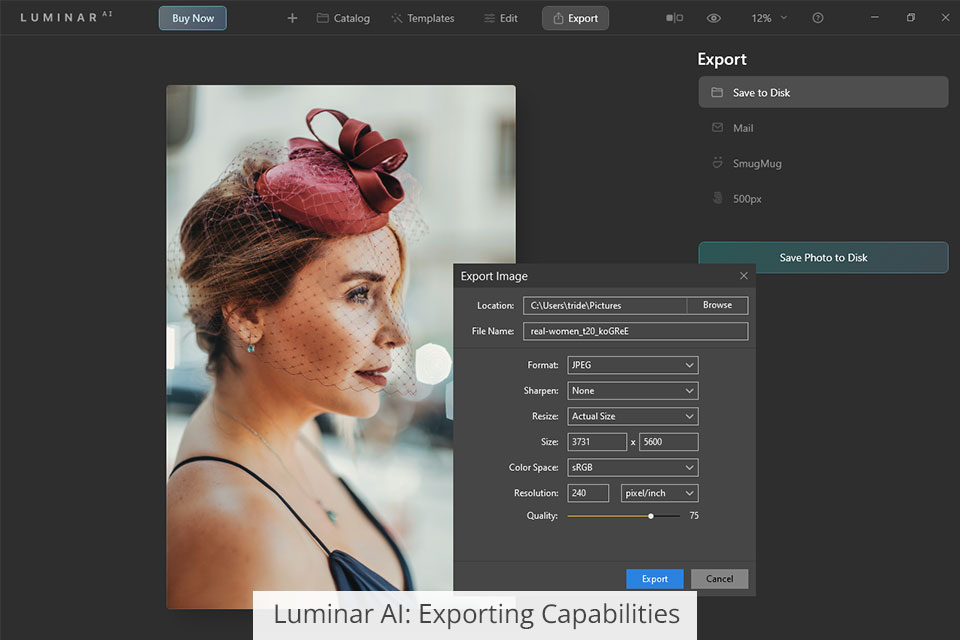
Luminar AI or Luminar 4 – this question is difficult to answer if we are talking about export options, as they are identical. The export window has no differences in Luminar 4 and Luminar AI, so you will instantly grasp the process. After you’ve made all the needed changes, you can output your photos directly to social media platforms, e.g., 500px, or portfolio websites, e.g., SmugMug.
Talking about Luminar vs Lightroom, I should admit that the latter has more extensive export capabilities. Unfortunately, both Luminar versions make editing impossible after you export pictures. So, if you perform batch image processing, you need to make sure all photos look the way you like, and only then start exporting them.
Operating speed can be a decisive factor for those comparing Luminar AI vs Luminar 4. I tested Luminar 4 on a powerful computer but I experienced occasional freezes and lags. I had to wait while importing photos and applying changes.
Luminar AI works strikingly fast. Photo importing, editing, and openings take virtually no time. Besides, while switching between Catalog, Editing, and Templates, you will enjoy an immediate response.

New users can’t purchase Luminar 4. This version has been replaced with Luminar AI. You can buy this program for $47.
You can also purchase the Luminar AI + Aurora HDR software package for $67 or try all Skylum products - Luminar AI, Aurora HDR and Luminar NEO for $108.
Luminar 4 is no longer available on the official website, so if you are a new user, you have to purchase Luminar AI. Those thinking about switching from Luminar 4 to AI will surely like a streamlined workflow and simplified image enhancing routine offered by the latter.
Luminar AI or Luminar 4 – everything depends on your personal demands. If you are on the lookout for more advanced editing software, Luminar 4 is likely to suit you. It provides you with more possibilities to hone your skills growing from a beginning to a pro level.
However, if you want to get an AI-based program that can be used in conjunction with other software, opt for Luminar AI. Here you will find all the needed tools and features for pro-level edits.


