Many guys want to make their muscles more defined in pictures. If you are wondering how to make your muscles look bigger in Photoshop, use this simple method. Even inexperienced retouchers can cope with this task without problems. This step-by-step tutorial will tell you about the most effective ways for getting an attractive, physically fit body in just a few clicks.
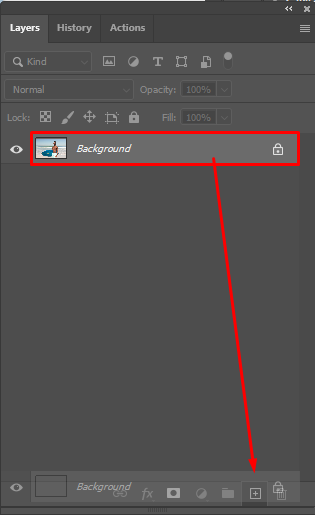
Open the source picture in Photoshop. Then, go to File –> Open. Find your picture and double-click on it. You can also drag and drop the image directly to the workspace. In the Layers menu, duplicate the main layer. You can also practice working with layers in other layering photo apps.
If you find it difficult to perform professional retouching, we advise you to address the professional retouchers from the FixThePhoto team. They will easily make your portrait perfect, get rid of visible defects, even out the skin tones, whiten the teeth, etc.
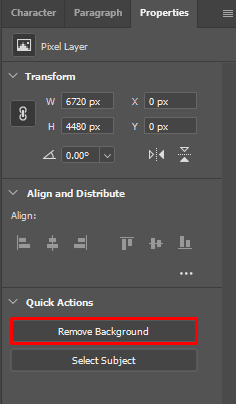
Open the Properties panel and click on the Remove Background option. A layer with a mask will be created there. Check out the detailed tutorial that shows how to remove the background of a picture in Photoshop in several clicks.
The tone of the skin shouldn’t blend with the background. If it happens, the program might remove the backdrop incorrectly. In this case, you will need to remove or add some pixels or edit the area that has not been outlined correctly when the object was automatically selected.
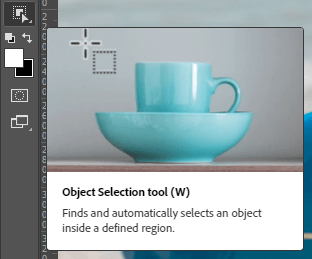
If you do not have a tool described in the second step, then you can try to make muscles look bigger in Photoshop with the help of the Object selection tool or use other background removal software. You can find this option on the left side of the toolbar or open it with the hotkey by pressing W.
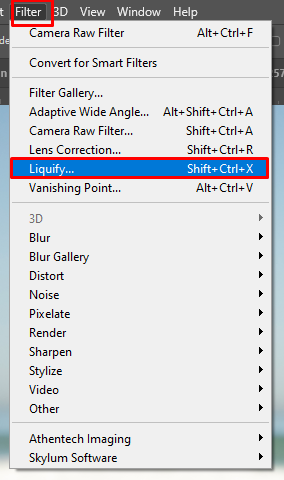
Open the «Filter» menu and choose the «Liquify» filter.
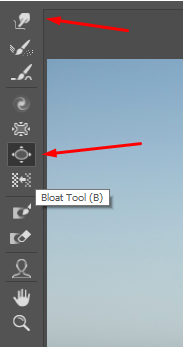
To make muscles look bigger in Photoshop, you can use the «Forward Wrap Tool» or «Bloat Tool». The former allows you to extend the area under your brush. The latter functions like a magnifying glass in a sphere/ball.
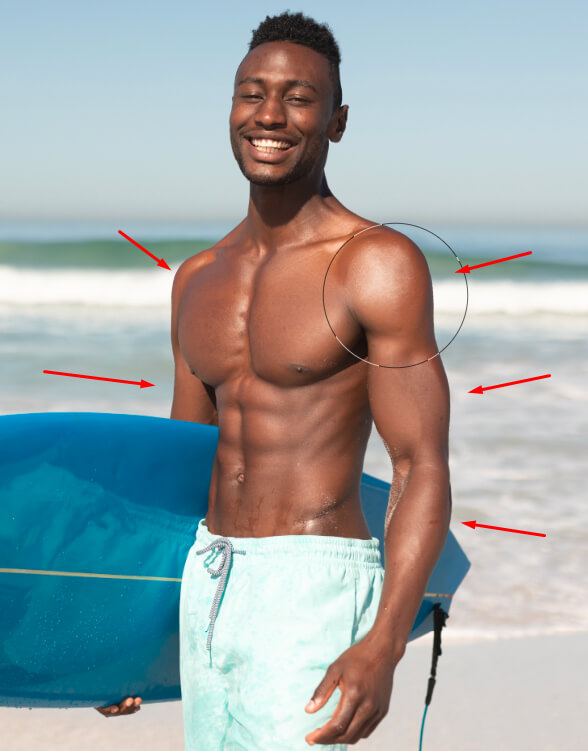
When making the muscles bigger, you should try to keep the proportions natural. If you are increasing the biceps, then you need to increase the shoulders and forearm too (as shown in the photo above).

If you need to get a bright and high-quality photo with a perfect body or want to hide some flaws, address the professionals from the FixThePhoto team. They can make the figure slimmer, change the curves of the body, apply body correction techniques, achieve the effect of plastic surgery, make your waist and face thinner, remove cellulite, lengthen the legs, get rid of spots and shadows quickly for an affordable price.
Now that you know how to make your muscles look bigger in Photoshop, you can get a beautiful and sculpted body that will amaze your followers and friends on social networks. You can also learn more about other handy options to get professional-quality photos by checking out Photoshop tutorials on YouTube.
Create the duplicate of your top layer and go to Filter -> Liquify. Use the Forward Warp Tool in the upper left corner of the dialog box to push and pull the image. This feature allows lifting the model’s arms and hips a little.
From the menu bar, choose Image > Adjustments > Brightness/Contrast. Move the Brightness slider to change the overall brightness of a photo. Drag the Contrast slider to increase or decrease the image contrast. Click OK. The adjustments will only affect the selected layer.
Open your image in Photoshop. Choose Image › Image Size. Uncheck Resample. This will automatically fix the current width/height ratio. To customize the resolution, adjust the values. To adjust the size of the file, adjust the "Height" and "Width" values.
The higher the resolution the printer has, the finer the details and the smoother the transitions between color tones will be. Anything with a resolution of 1440 dpi or higher is fine. Some printers allow you to select the appropriate dpi setting to suit your needs, such as 300 dpi for a draft image or 1200 dpi for a finished print.
The Ctrl + E (Merge Layers) key combination merges the selected layer and a layer under it. If multiple layers are selected, only they will be merged. The Ctrl + Shift + E (Merge Visible) key combination merges all visible layers into one.
Lightroom is the best choice for professionals who need to manage and process multiple images stored on their devices. Photoshop offers a more extensive range of editing tools and allows you to refine multiple pictures.