Comparing Lightroom vs Elements, I paid attention to their photo management features, major drawbacks and usability. What are they capable of and who may use them: professionals or amateurs?
In this post, you will discover the main differences between Photoshop Elements and Lightroom and also get an answer to one of the main questions “What software to use and when do I need it”.

Lightroom is an advanced RAW file converter aimed at fast and easy post-processing of hundreds of shots. Its most prominent feature is non-destructive picture editing. No matter what changes you make, they don’t alter the original picture and you can easily go back to it at any time.
Adobe Lightroom CC will be the best choice for all color settings adjustment: white balance, HSL, exposure, gradients, histograms, tone curves, point filters, black and white conversion, vignetting and more.
Due to the fact that Lightroom is on the market for more than a decade, there is a fairly extensive base of both paid and free Lightroom tutorials, books, forums, videos and even courses. This makes it suitable for professionals and beginners.
Comparing Photoshop Elements versus Lightroom, the latter, as all other software belonging to Creative Cloud, has several privileges over its opponent. I am talking about cloud storage up to 10TB, stock photos, Adobe Portfolio and close integration with other products.

Photoshop Elements is a simple image sorting and editing program. It positions itself as a lighter version of Photoshop with layers, picture organizer, catalog and print tools. For more convenient use, the program provides 2 separate interfaces: picture organization and picture editor.
Speaking of the picture editor, you will get 3 modes – Quick, Guided and Expert. If the Quick mode generally offers the most common tools with the ability to adjust the intensity (resembling a mobile application), the Expert mode is already an advanced version of the picture editor. Here you will find almost everything that is present in the older version of Photoshop, including actions, combo layers, customizable stamps and more.

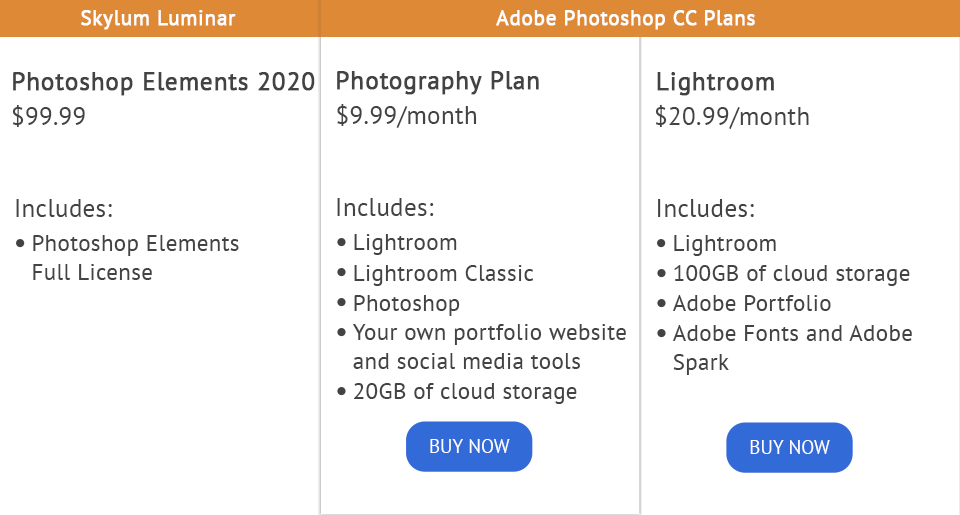
Comparing Adobe Lightroom vs Elements in the price category, I would like to immediately note the leader is PS Elements. In fact, you can’t buy Lightroom once and for all, as it is possible with Elements. The minimum monthly payment for Lightroom will be $9.99, while Photoshop Elements 2026 is available for $69.99 and is updated once a year or two.
Take advantage of Lightroom trial and get Photoshop Elements Free without breaking the law.
It is true that Lightroom is meant for professionals, and Elements is better suited for newbies and hobbyists, who don’t make a living from photography. Photoshop Elements or Lightroom has the same basic functions: organization, system catalogs, tools for printing and demonstrating works. Although PS Elements does all this at a basic level.
If you are a person, who takes or processes hundreds to thousands of pictures, particularly in RAW format, Lightroom is exactly what you need. When editing images in Lightroom, you go through all the processes: organizing, processing, preparing for printing or online demonstrations. You may also want to compare Lightroom Classic vs Lightroom since the former comes with several interesting features missed in Lightroom.
Batch editing of RAW files with the ability to apply advanced user settings, non-destructive editing that helps return to any stage of the process, even a hundred steps back – these are some of the strengths of the picture editor, which are absent in PS.
As for Photoshop Elements, it offers many features similar to Lightroom ones, Camera RAW, which helps perform advanced color correction and even an organizer for basic file management. In addition, you can prepare files for printing, create photo books, slideshows. For more advanced picture editing, you will find layers that are borrowed from Photoshop.
But once you start working more deeply with the files, you will find yourself thinking about the lack of more serious tools for managing and sorting images. That’s why I recommend using PS Elements for novice photographers and retouchers.
No matter which program you choose: Photoshop Elements or Lightroom, these freebies will significantly reduce the time spent on improving pictures.
This preset will remove faded green and yellow tones from the shot, giving it contrast and coolness, leaving the colors natural. I recommend applying this preset only to studio shots of any genre.
Fashion shots are always in trend, so our retouchers have created this free matte preset. It will pull the shot out of the shadows, add a light matte shade, without losing the natural look of the colors.
This free action will be especially helpful for winter photos. Apply it to shots taken on a clear day to simulate and add falling snow. Besides, the action adds a halo to the background, so I wouldn’t recommend using it for portrait shots.
Not only fashion but landscape photos as well always attract people’s attention, so I have added this free colorful action. It increases contrast, making colors more vivid and saturated. For a more accurate effect, it is recommended to apply the action to shots taken in not too bright daylight.
Add this free overlay in the form of frosty drawings to the shot to make it more appealing and achieve the “coolness” effect. I recommend applying the overlay to street and portrait photography taken in daylight.
The Magic Forest preset balances the shadows and highlights, giving your images a dynamic range and a touch of drama. The interplay of light and shadows contributes to the magical vibe of the scene.