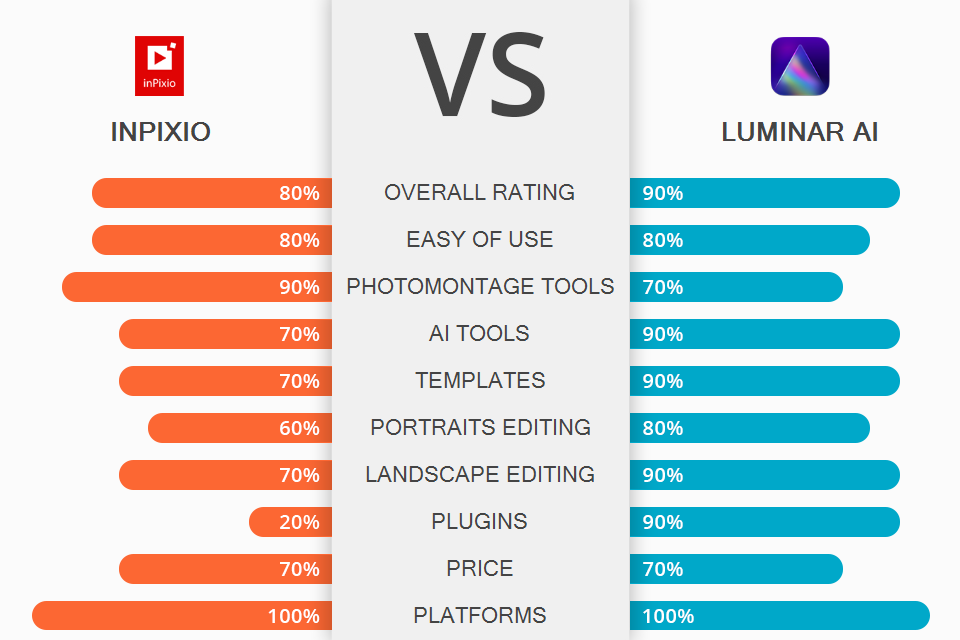
After comparing InPixio vs Luminar, you will see that both programs are suitable for basic edits. They have simple functionality and can be mastered even by beginners. However, while the former is more suitable for creating basic photomontages, the latter can be used for making colors more saturated, adjusting contrast, and performing quick skin and body enhancements.
InPixio has everything you may need to edit. It has a streamlined interface and comes with a set of features for replacing the sky and making the background blurry. The program supports editing RAW files and allows you to create a well-balanced composition.
Luminar is more suitable for beginners who don’t want to waste hours editing their shoots. It features advanced AI-based tools as well. They are suitable for editing portraits and landscapes in a few clicks. Using a set of extra tools, you can edit eyes, skin, faces, add highlights and give the sky a more eye-catching look.
Customizable workspace. To make it more convenient to use the software, you can switch between a basic and advanced workspace. A user can select the tabs that will be displayed, which allows you to make the UI less cluttered.
Basic adjustment tools. If you compare InPixio vs Photoshop, you will see that the former was developed for beginners. Under the Adjustments tab, you will find a basic set of tools that allow you to edit the temperature, tweak colors, change exposure, and more.
To perform more advanced adjustments, use a tone curve graph. Since all the changes will be applied quickly, you can adjust various settings to see how it affects your photo. If you don’t know what settings you can adjust with the help of a particular slider, just hover your cursor over it to see a pop-up tip.
Convenient photomontage options. Import your image and select the Photomontage tab to see a variety of tools. You can add text, stickers and cut-outs to make your projects look more attention-grabbing. Using the available tools, it’s fairly easy to cut out various objects and add them to your photos. To make your edits less noticeable, you can use the Erase the Marking option. It allows you to hide brushstrokes and create more accurate selections.
If you don’t want to spend hours deleting unwanted details from your photos, you can outsource this task to professionals. They will help you make your photo more attention-grabbing without making it look unnatural.
Use smart selection tools and zoom to delete unwanted objects more quickly. When you are satisfied with your edits, save your image. Besides, you may create a cut-out and save it to the in-built library for further use.
Quick object removal from a basic background. You just need to create a mask over your object and use the Erase tool to remove the selected area. For better precision, you can resize your brush. Besides, the program allows you to select several objects at once. This RAW photo editor also has a feature for removing a selection. This option can be used even by beginners who need to edit shoots with a basic background.
Tools for duplicating objects. When using this automatic photo editor, you can create copies of your objects with the help of the Correction Path option. It allows you to duplicate a selected part of your image. This option will be especially useful when you need to delete a large object. Besides, you may use it for duplicating people and objects.
Realistic Sky Replacement tool. Under the Sky and Background tabs, you will find handy options for deleting the background and replacing it with another one. You just need to add the sky and the program will ensure that its dynamic range matches your image. Some photographers use this feature to create a bokeh effect.
With the help of the cut-out tool, you can quickly delete the background or the sky from your pics. The Enhance edges option ensures that your cut-outs will be highly accurate, which makes it perfect for selecting hair and fur.
A limited choice of management options.
AI templates. While a set of basic Luminar presets allows applying the same edits to several images, the AI templates enable you to select the best way to enhance your photos and perform specific adjustments. When editing your pic, you will find these templates in the ‘For This Photo’ panel on the right. The software automatically selects the templates that are most suitable for enhancing your photo.
If you decide to edit a shoot of a beach, the program will suggest you use a set of specific templates. To improve a portrait, you may use Closeup, Experimental and Monochrome templates. By selecting each of the options, you will see a set of templates. When applying them, you can adjust the intensity of the effects using sliders. In addition, you may add templates to the Favorites.
Amazing AI tools for enhancing portraits. Using Face AI, you can edit the contour of the lips, delete dark circles under the eyes, make teeth whiter, make the face thinner and adjust brightness. With the Skin AI feature, you can delete imperfections without affecting the natural look of the texture. This option automatically analyzes the face and minimizes shine. In some cases, you might need to perform manual adjustments since this feature can’t make a distinction between a mole and skin defects.
The Iris AI will come in handy when you need to change the color, shape, and size of the iris. With it, you can edit the faces of multiple people. It’s also suitable for adding cat and owl eyes.
Automatic landscape enhancement. The program has tools for automatic composition improvement, sky replacement and enhancement as well as adjusting the lighting in a few clicks. Using the Sky 2.0 tool, you can delete the sky and replace it with another one as well as edit the reflections in your pic. The program will automatically adjust the angle of the sky and the depth of the scene to make your edits look more natural.
Using the Scene Relighting option, you can get rid of unwanted color casts to edit the sky and various objects. The Augmented Sky tool automatically selects the sky and allows adding various objects, including birds, clouds, etc. Thanks to the Golden Hour option, you can make it look as if your photo was taken right before sunset or after sunrise.
Allows copy/pasting AI edits. The program features a set of AI tools that make it easier to process multiple images at once. For instance, you may use Face AI tools to make faces brighter, perform eye whitening, or tweak the eye color. Then, you can copy your edits by pressing Ctrl/Command C and paste them to another photo using the Ctrl/Command V key.
Composition AI tools for easy framing. With the help of this option, you can follow the golden rules of composition to make the objects in the frame look well balanced. Using this tool, you can automatically adjust alignment, fix perspective issues by getting rid of distortion and use AI-based crop tools created with the help of pro-level photographers.
An advanced plugin for Adobe software users. While this software can hardly be considered as an alternative to Adobe Lightroom, you can use it as a plugin. It’s available for Lr, Ps and Photos for macOS. If you compare Luminar vs Lightroom, you will notice that the former doesn’t have convenient photo management features. Besides, its exporting features are quite limited. This is why you can use it as a plugin to extend its functionality.
Impossible to compare two images side by side.
If you are on a tight budget and want to learn which option, InPixio or Luminar, suits you best, keep in mind that you can test out InPixio without paying a dime. When the trial period expires, you need to select one of the paid versions of the software: Photo Studio for $49.99, Photo Studio Pro for $59.99, Photo Studio Ultimate for $99.99. You will get a wide choice of tools for removing objects from photos, creating photomontages, image enhancement, zoom and focus adjustment.
You can purchase Luminar for $59. In addition, you can pay $168 to purchase a suite that includes several programs, such as Luminar AI and Aurora HDR. If you also want to get access to step-by-step tutorials, photography courses, curated Looks and Sky packs as well as get a generous Luminar Marketplace discount, pay attention to the subscription package that costs $227.
InPixio is the best choice for those who need to create a basic photomontage, while Luminar is more suitable for retouchers looking for automated, intuitive tools for embellishing portrait, landscape pictures and other photos.
InPixio allows you to remove the background in a few clicks, replace the sky and get rid of unwanted objects. Users can create unique collages by merging several photos or use cut-outs to produce eye-catching photomontages. This software has everything you might need to quickly edit your pictures. You can use a range of effects, frames and textures to give your images a unique feel. These tools will be especially useful for beginners who need to edit their pics without wasting a lot of time.
Luminar was developed to help users with little to no experience edit their shoots like a pro without wasting a lot of time. You can use the available AI-based tools to give the skin an immaculate look, change the eye color or edit the sky. To enhance your images even further, you can apply 20+ effects and use a variety of tools.