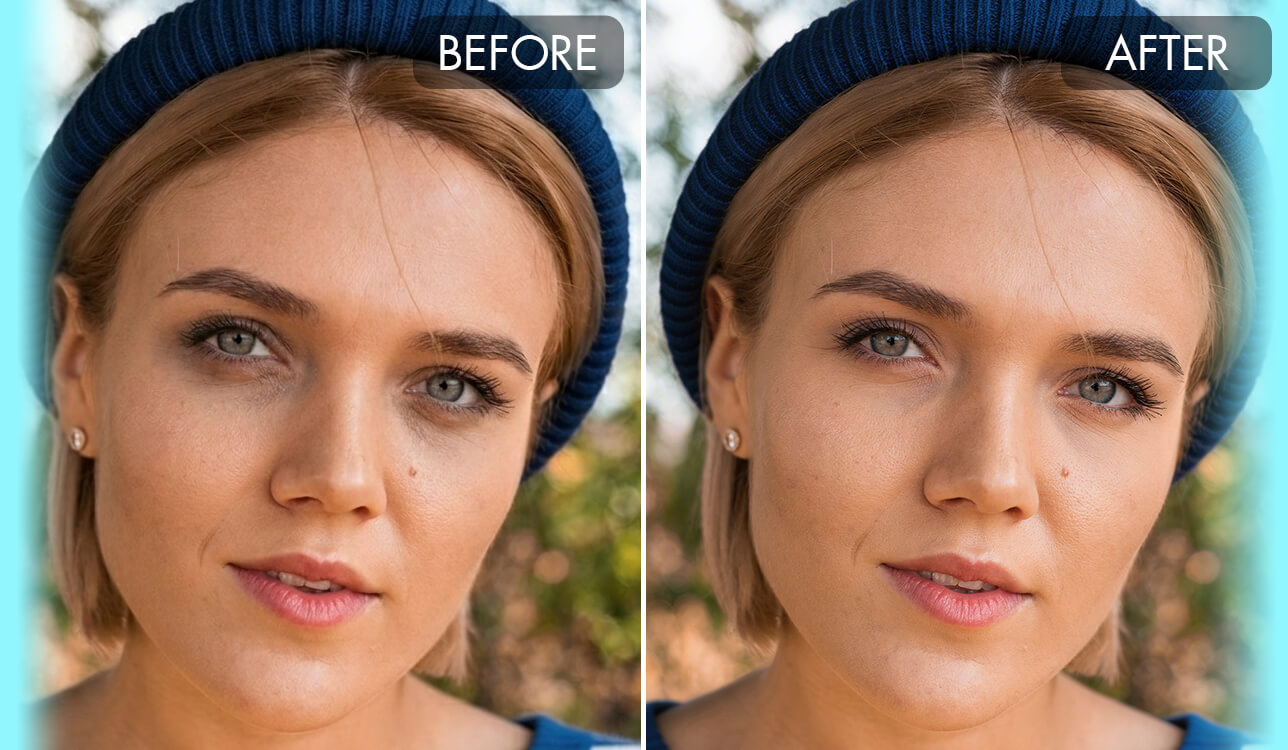
Under-eye shadows are a very common problem in portrait photos. Luckily, Luminar Neo makes them easy to reduce without needing professional editing experience. Thanks to its AI-based tools, the software can smooth and refresh the eye area naturally with only a few simple adjustments.
There are several ways to remove dark circles in Luminar Neo, whether you prefer fast AI-powered fixes or more accurate manual adjustments. The results usually stay clean and natural, without making the skin look overly blurred or fake. It also speeds up the editing process, allowing you to focus more on creativity instead of spending too much time on detailed retouching.
When removing dark circles in Luminar Neo, the best approach is usually a mix of AI-powered tools and precise manual adjustments. Depending on how visible the shadows are and the person’s skin texture, you can combine different features to create a clean and natural result.
Below is a quick overview of the main tools and Luminar Neo features available:
This is always the first tool I use in my Luminar Neo dark circles tutorial, mainly because it provides a fast and surprisingly accurate correction of the under-eye area. Within a few seconds, I can immediately see whether the portrait already looks natural enough or if it still needs more detailed retouching afterward.
Steps:
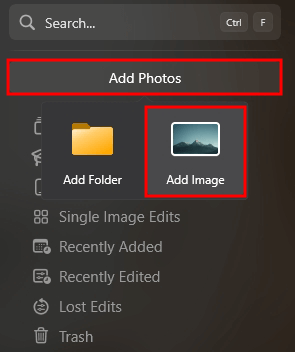
1. Import the pic in Luminar Neo
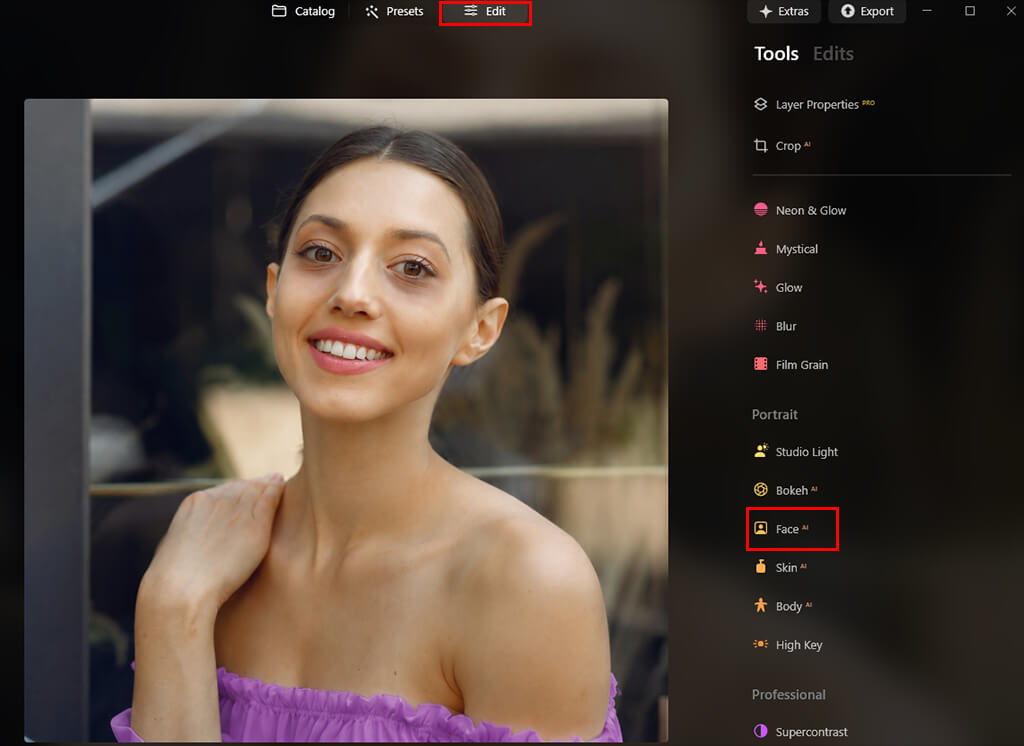
2. Go to Edit → Portrait → Face AI
3. Find the Dark Circles Removal slider
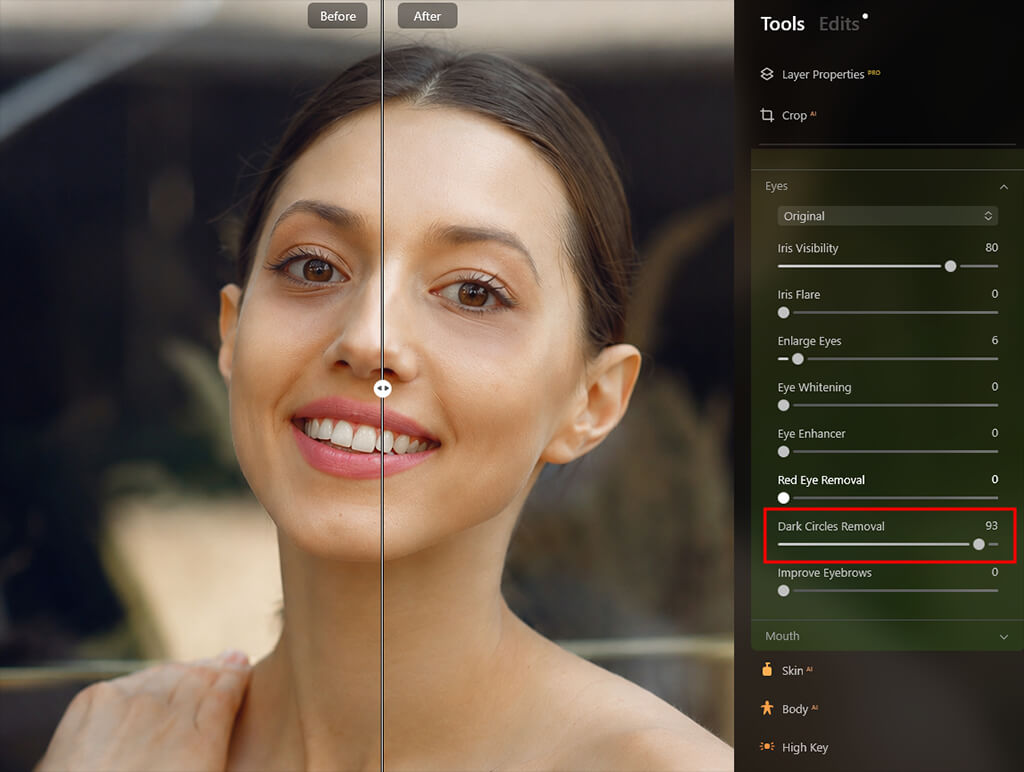
At first, I expected this slider to work like many one-click tools you see in AI photo editor apps - fast, but often too harsh or unnatural. However, after testing it on portraits taken in different lighting conditions, I realized it works much more intelligently. Instead of simply brightening the under-eye area, the tool carefully analyzes the tones and blends the shadows with the surrounding skin, creating a softer and more realistic result.
As I increased the slider to the mid-range, the results started to look much more balanced and natural. In my experience, the sweet spot is usually around 30-40. At that level, the dark circles become noticeably softer, but the face still keeps its natural shape and depth. This worked especially well on an evening portrait I edited - the subject looked fresher and less tired, while still looking completely real and not overly retouched.
What I found especially impressive is that the tool doesn’t instantly smooth everything into a flat surface. It preserves subtle shadows and fine contrast in the skin, which helps the result look much more natural. Because of that, the portrait avoids the overly soft “airbrushed” effect that aggressive retouching often creates.
However, once I pushed the slider too far, the limitations became noticeable. At stronger settings, the under-eye area begins to lose natural definition and depth. The dark shadows disappear, but some of the realistic facial contours disappear with them, making the skin look a bit too perfect. The result may look clean technically, but it feels less natural. That’s why I usually stay around the mid-range and only use higher values for heavily stylized edits.
Adding a small amount of Face Light improves the result even further. Rather than brightening the entire image, it softly lifts the tones on the face, helping the portrait look more balanced while leaving the background untouched. In many cases, this simple adjustment is enough to avoid making extra exposure changes later.
What I liked most about this process is how naturally the result develops step by step. First, the strong shadows become softer. Then the eyes start to look clearer and more refreshed. After that, the whole face appears more balanced and even. The improvements happen gradually, so the portrait never feels overly edited or artificial.
The thing that completely changed how I use this tool is realizing that Face AI doesn’t simply remove dark circles in Luminar Neo. Instead, it intelligently adjusts the light and tones in that area to make the transition look more natural. Because of this, the result looks much better than just brightening shadows manually or painting over them with a brush. The skin texture stays realistic, and the natural balance between light and shadow is preserved.
After editing several portraits, I began to notice something that changed my whole approach to dark circles. In many photos, the problem wasn’t really the skin itself - it was the lighting. Light coming from above or slightly behind the subject naturally creates shadows under the eyes. Because of that, I found it more effective to fix the lighting balance first instead of simply trying to remove the shadows during retouching.
That’s exactly where Light Depth became one of the most useful tools in my editing workflow.
Steps:
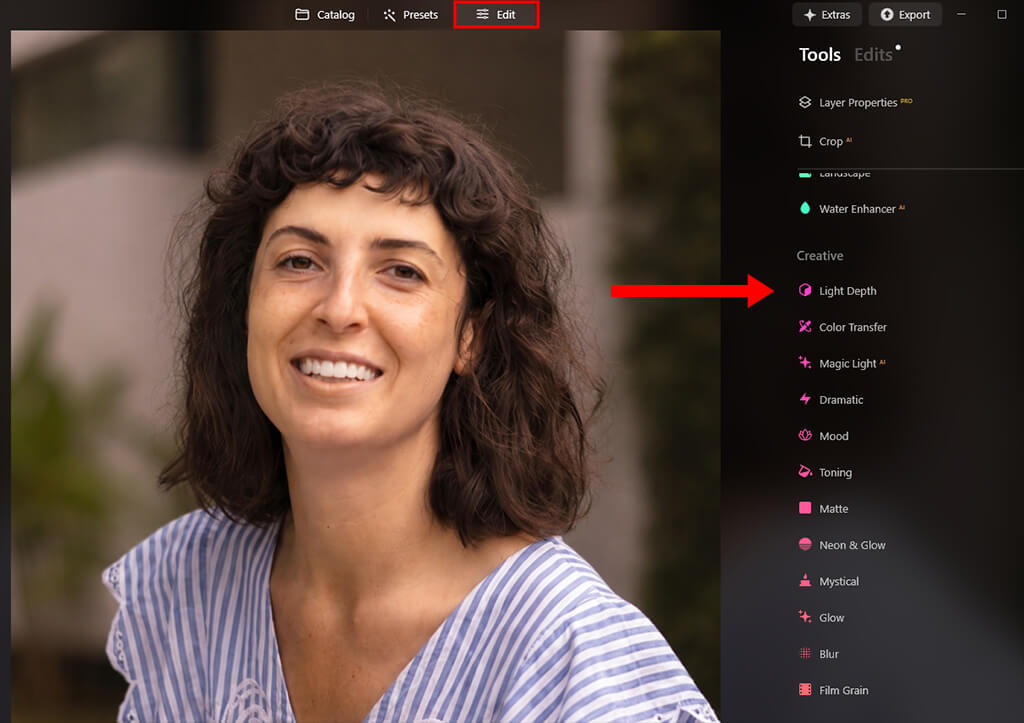
1. Open Edit → Light Depth
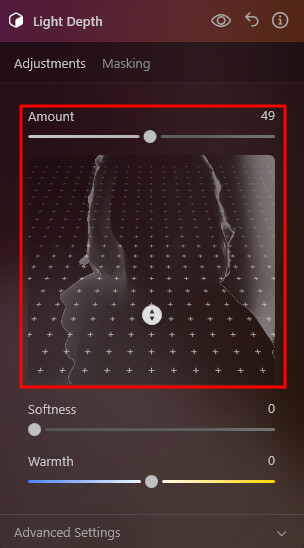
2. Increase Near Brightness (subject)
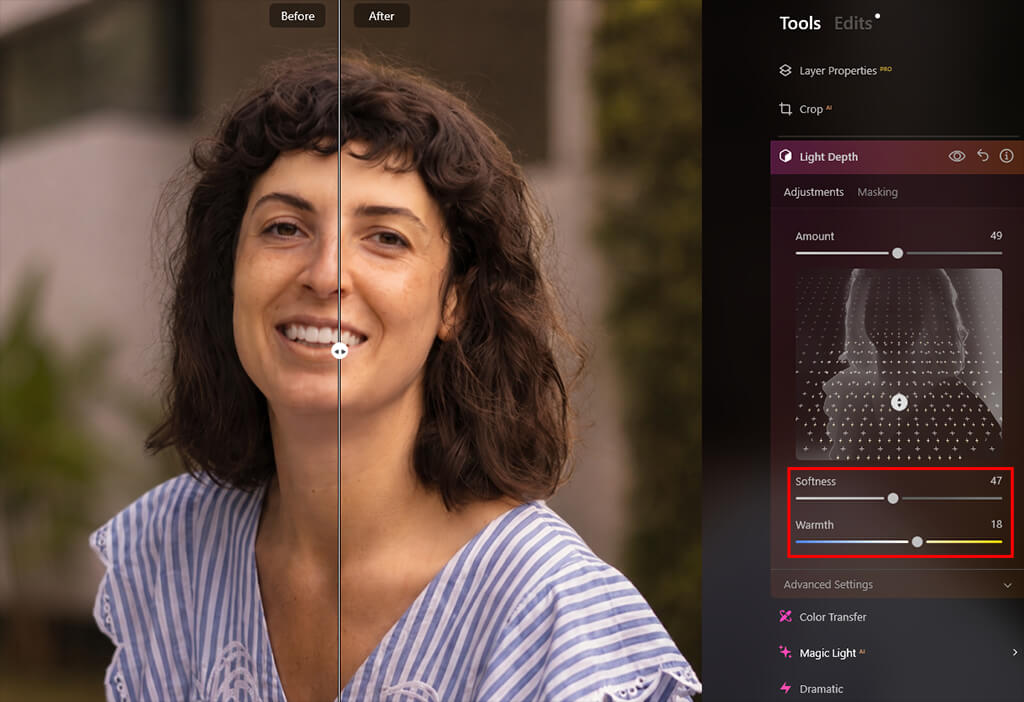
3. Modify Far Brightness (background)
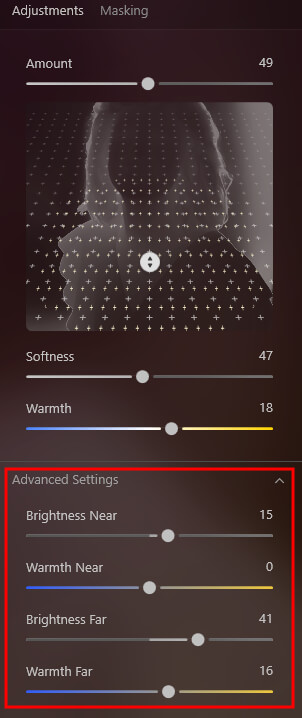
4. Optionally refine depth sliders
Unlike basic exposure adjustments that affect the entire image, this tool works much more selectively. It analyzes the depth of the scene and separates the subject from the background, making it possible to brighten the face without overexposing the background or changing the overall mood of the photo.
When I first tried it, I didn’t expect a single slider to make such a visible difference. But as I increased the Near Brightness setting, the face started to look more evenly lit. The shadows under the eyes faded gradually and naturally, almost as if the lighting had been corrected during the original photoshoot instead of during editing.
A good example was a backlit portrait where the subject’s face looked slightly too dark, making the under-eye shadows stand out much more. Rather than immediately retouching the skin, I increased Near Brightness to around +25 and slightly lowered Far Brightness. The improvement was instant: the face looked properly exposed, the shadows under the eyes became much softer, and the overall portrait felt far more balanced and natural.
What impressed me most while following this method editing photos in Luminar Neo was how realistic the result felt. The portrait didn’t look heavily edited or artificially softened. Instead, it looked as if the lighting had simply been improved during the shoot. The skin texture remained natural, the facial depth stayed intact, and the shadows became softer without losing realism.
One important thing I realized is that Light Depth and other tools editing RAWs in Luminar don’t completely replace retouching - they simply make you need much less of it. By fixing the lighting issues first, the rest of the editing process becomes lighter, faster, and far more natural-looking.
For me, the biggest benefit was how natural the result looked. Instead of feeling obviously retouched, the image simply looked like it had been photographed with better lighting from the beginning.
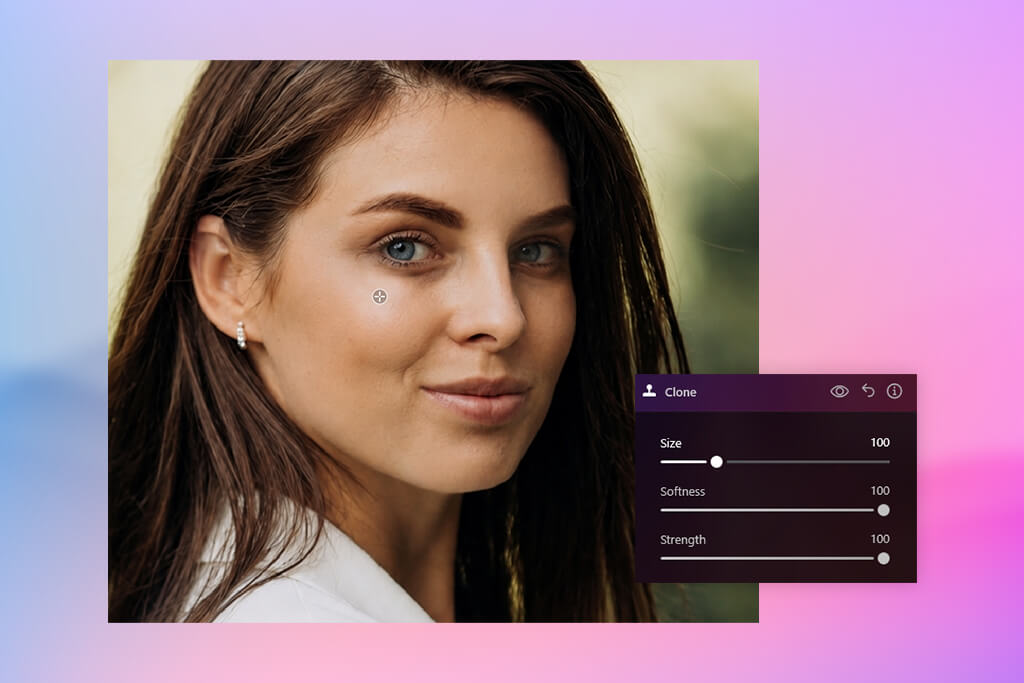
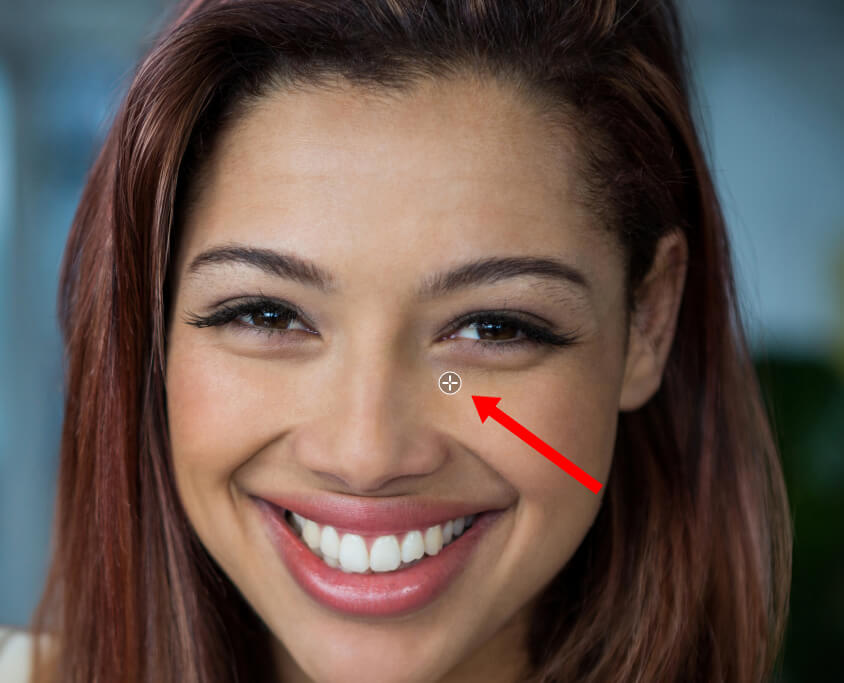
While working on this Luminar Neo portrait retouch dark circles workflow, I realized that while this automatic photo editor is excellent for fast edits, it can still have trouble with more complex and uneven lighting situations. That’s when I switched to a more manual retouching approach using the Clone Tool for better control and precision.
The main advantage of the Clone Tool is that it lets you copy the natural texture and brightness from clean areas of skin and apply them to darker or uneven spots. Unlike AI smoothing tools, which can sometimes make skin look too soft or artificial, cloning preserves real skin texture, pores, and small details. Because of that, the final portrait looks much more natural and realistic instead of overly retouched.
Steps:
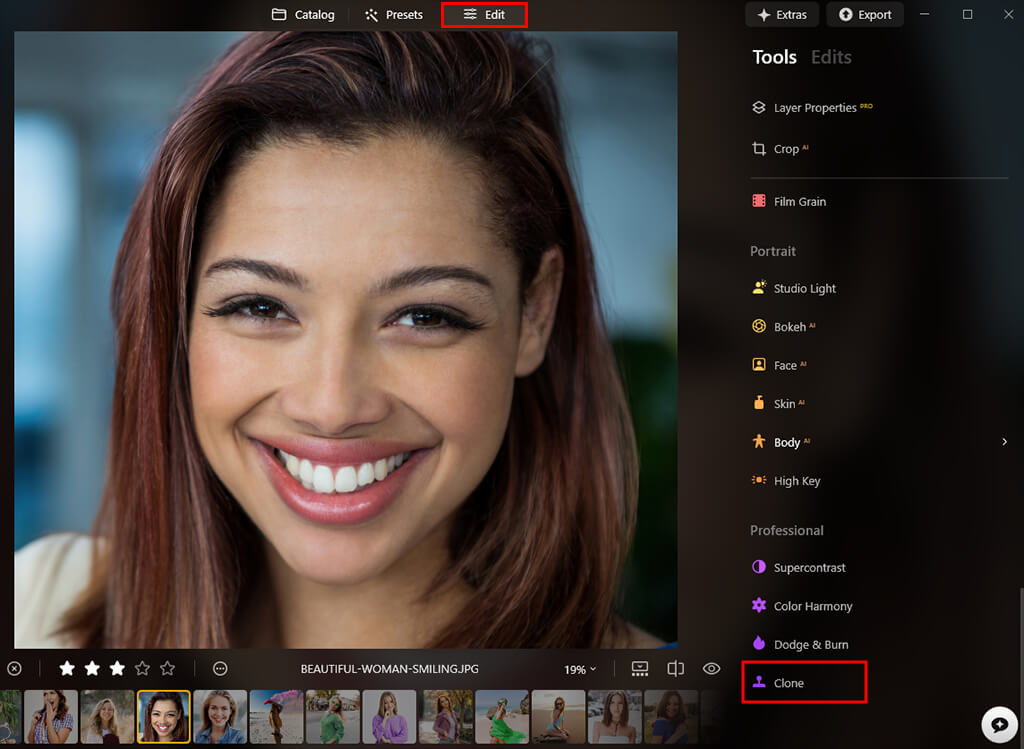
1. Open Edit → Erase → Clone
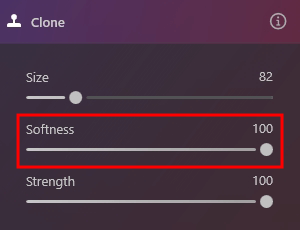
2. Choose a soft brush with low opacity (about 15–20%)
3. Sample a nearby area of clean skin with a similar texture
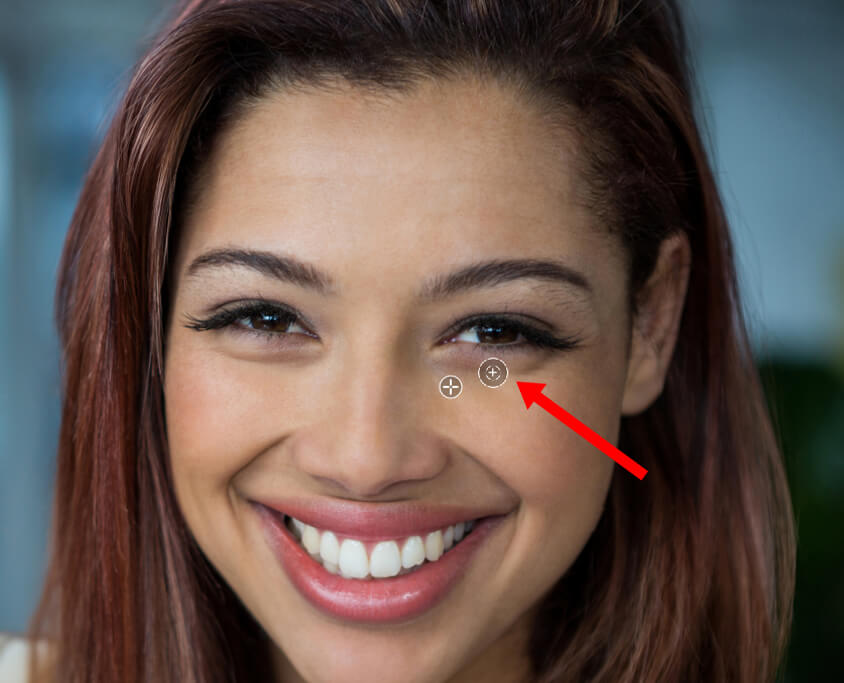
4. Carefully blend over the darkest areas using short, soft strokes
One thing I quickly learned while practicing with different Luminar tutorials is that choosing the right source point makes a huge difference. Skin doesn’t look the same across the entire face - the texture, lighting, and even the grain change from area to area.
If I copied skin from the forehead onto the cheek, the result immediately looked unnatural. To keep everything realistic, I had to constantly resample nearby areas so the texture and lighting blended smoothly with the surrounding skin.
Another important thing I realized is that completely removing under-eye shadows usually doesn’t look natural. In my first edits, I tried to erase them entirely, but the face quickly started to look flat and unrealistic. Over time, I understood that the goal is not to remove the shadows completely, but to soften them. By working with very low opacity, I could gradually build up the correction and leave a small amount of natural shadow behind. This kept the face looking three-dimensional and realistic while still getting rid of the tired, sunken appearance.
For my high-resolution close-up portraits, where every small detail matters, this method became essential. It’s definitely slower than using automatic AI sliders, but the amount of control and precision it provides is on a completely different level. The final portraits looked clean, refreshed, and natural, without obvious signs of retouching. Skin texture stayed sharp, the lighting still felt realistic, and the overall image kept that polished, professional editorial look.
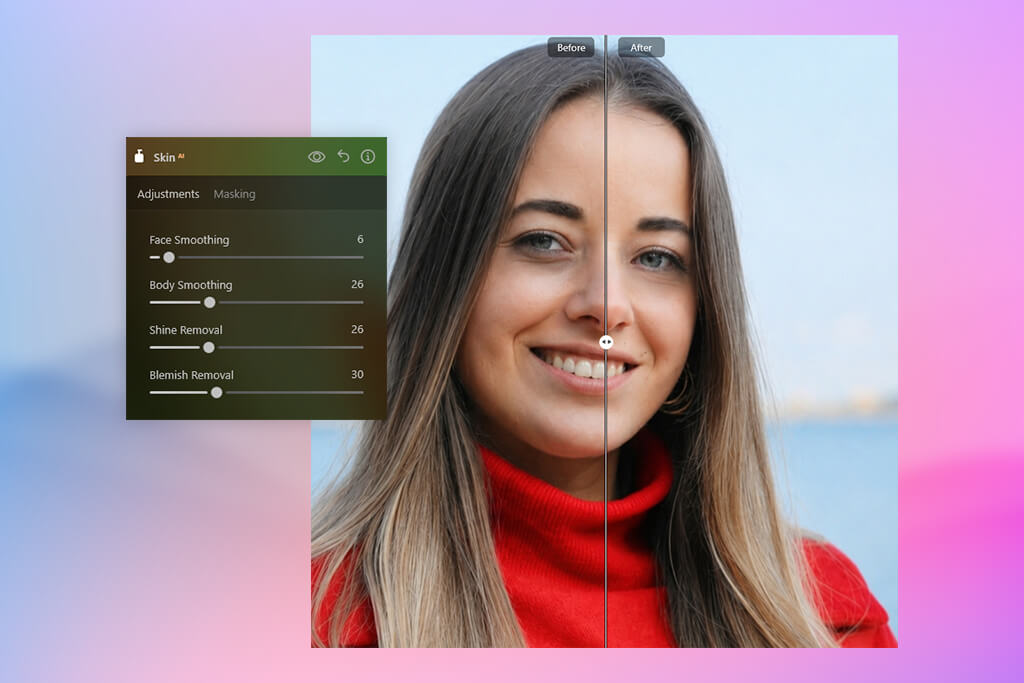
When I got better at editing photos, I realized that "dark circles" aren't usually caused by bad lighting. The real problem is the high contrast between different skin tones. The skin under the eyes often looks a little blue or purple, while the rest of the face has warmer colors like peach, olive, or pink. These color differences, plus uneven skin texture, make the under-eye area pop out more than it naturally would.
That’s where Skin AI fits naturally into my workflow. Rather than covering imperfections the way a thick concealer would, it functions more like an intelligent harmonizer. It analyzes the whole face, balancing variations in tone and surface detail automatically. The outcome is a cleaner, more consistent appearance that still feels authentic - without requiring hand-editing or complicated fine-tuning.
Steps:
1. Open Portrait → Skin AI
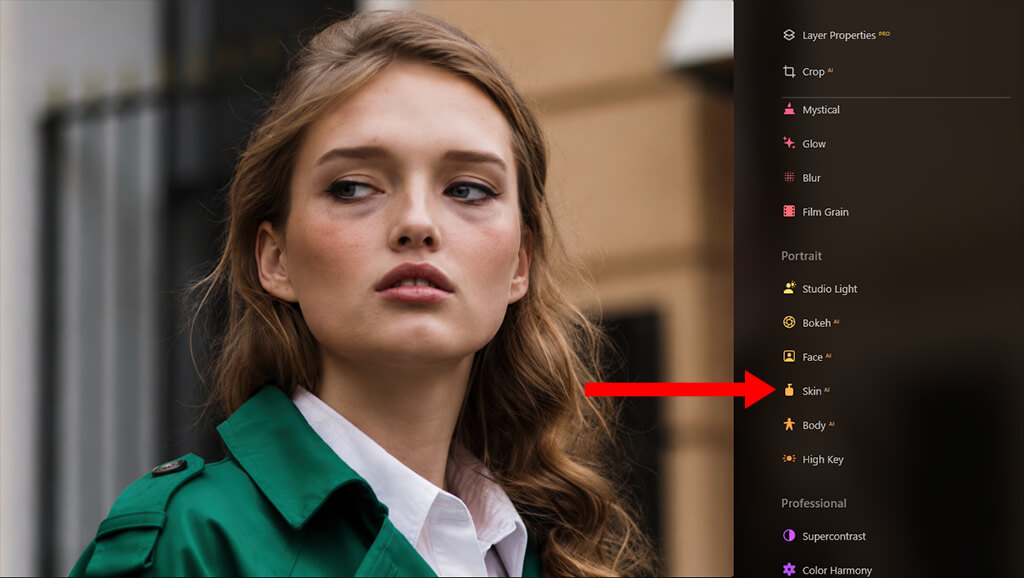
2. Increase the Amount slider (around 10–20 usually works best)
3. Optionally use the Shine Removal slider if strong lighting creates oily reflections under the eyes
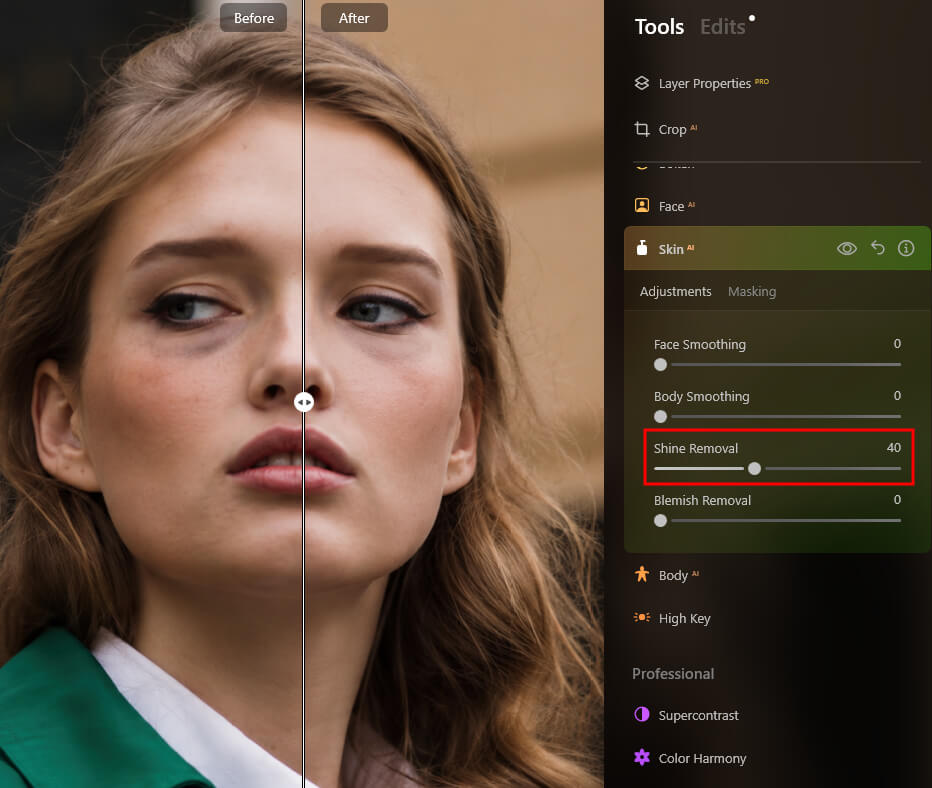
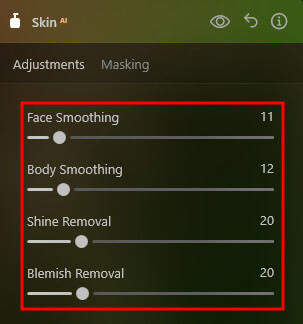
What makes Skin AI so useful is how naturally it smooths the transition between different skin tones without completely removing the real skin texture. Instead of simply applying a blur effect, the tool analyzes fine details and contrast in the skin. It detects harsh transitions like the line where dark circles meet the cheek, and softens them gradually, helping the skin look smoother while still keeping a realistic appearance.
As I raised the Amount slider, the uneven tones around the eyes started to blend much more smoothly with the surrounding skin. The slight redness and dull areas became less noticeable, creating a healthier and more balanced look. At the same time, the AI still preserves natural skin texture and small variations, which helps avoid the “mannequin” look that often happens with heavy retouching.
While testing the tool, I realized that small adjustments usually work best. On most portraits, a setting close to 15 was already enough to noticeably improve the under-eye area. The shadows blended more naturally with the rest of the face and stopped drawing too much attention. They were still slightly visible, which actually helped the portrait look more real and natural instead of heavily edited.
I barely noticed under-eye shadows when I was mostly shooting in controlled studio setups. Good lighting solved most of those problems automatically. But once I started working with real clients at weddings, outdoor sessions, and fast-paced lifestyle shoots, I realized how common and unpredictable dark circles could be in natural conditions.
One shoot especially changed the way I handle under-eye shadows. It was a couple's session during sunset with beautiful soft lighting, and everything looked great straight out of the camera. But later, when I reviewed the RAW files on my computer, I noticed the subject looked slightly tired in many of the images. The effect was subtle, but the shadows under the eyes appeared consistently throughout the entire session, making the photos feel a little less polished than I wanted.
At first, I relied on my usual editing workflow in Lightroom - adjusting exposure, lifting shadows, and using a few local brushes. But after a while, I realized those edits were affecting the entire face rather than properly correcting the under-eye area. When I increased the adjustments too much, the portrait started to look flatter and lost some of its natural depth.
That’s when I moved to Luminar Neo and began experimenting with different editing methods instead of relying on a single tool. While working through this Luminar Neo eye retouch tutorial, I realized that dark circles are rarely fixed with one slider alone. In most cases, the key is understanding what’s causing them - lighting, skin tone, shadows, or texture - and then choosing the right combination of tools for that specific image.
Below is the full workflow I ended up using, along with what worked well for me, what didn’t work as nicely, and how the results actually looked during real editing.

Along with Light Depth, the Clone Tool, and Skin AI, Luminar Neo also offers a few additional tools that are surprisingly helpful for fixing stubborn dark circles and uneven tones under the eyes.
Here are three extra techniques that can help you achieve even cleaner and more natural-looking results:
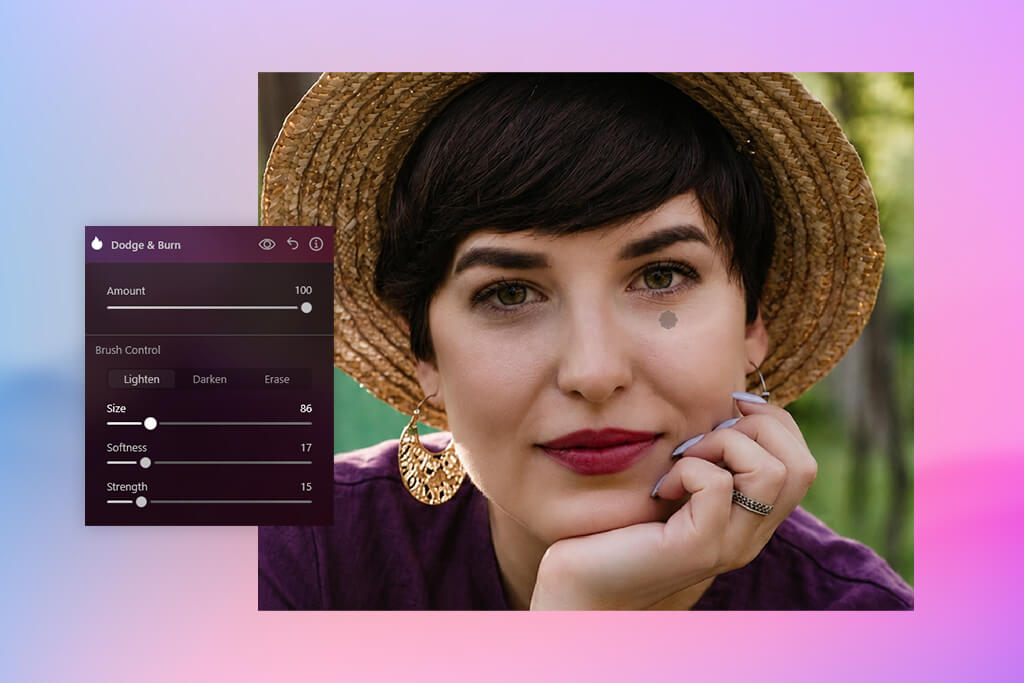
Unlike cloning, which copies and replaces parts of the skin, dodging simply lightens the natural shadows already present in the image. This makes the correction look very soft and realistic, because the original skin texture stays completely untouched while the dark areas become less noticeable.
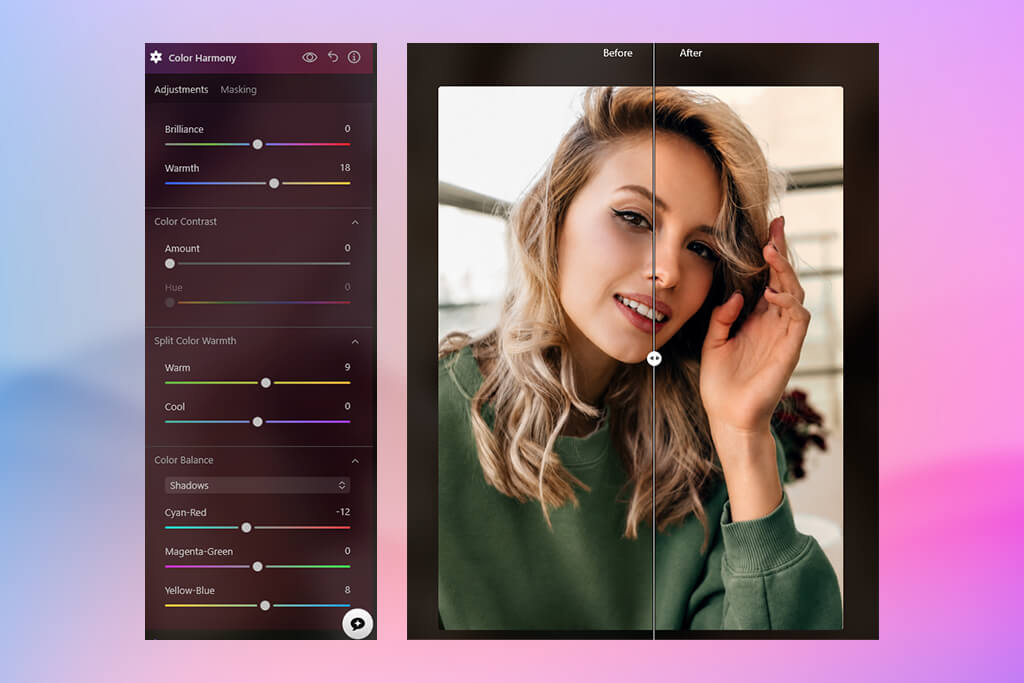
Warm tones like yellow and orange naturally balance out blue and purple shades, so adding a little warmth to the shadow areas helps the under-eye skin look healthier and more even in tone.
Use the Masking brush to apply the adjustment only to the under-eye area. Otherwise, the warm tones can affect the entire image and make the photo look too orange.
In my experience, the most natural results in this Luminar Neo skin retouching tutorial come from combining several subtle adjustments instead of relying too heavily on one effect. For example, using 3 tools at around 15-20% each usually works much better than pushing a single tool to 60% or higher. This layered method keeps the skin realistic, minimizes visible AI artifacts, and helps avoid an overly processed look.


![9 REVE Alternatives with Better Results [Free & Paid]](/placeholder-450x300.svg)


