
Seasoned photographers use specialized real estate photography equipment for taking flattering pictures of a property, however, many agents just take real estate photos with iPhone. This affordable solution allows photographers to snap excellent pics of a property.
Besides, you can take photos wherever you want. There is no need to take a heavy camera with lenses with you, which allows you to spend less time creating Zillow and Trulia listings.
When using an iPhone, you should remember that you won’t be able to adjust real estate photography camera settings, which makes this option less suitable for those who use a professional camera. However, the key advantage of recently released iPhones is that their cameras support HDR bracketing shooting mode.
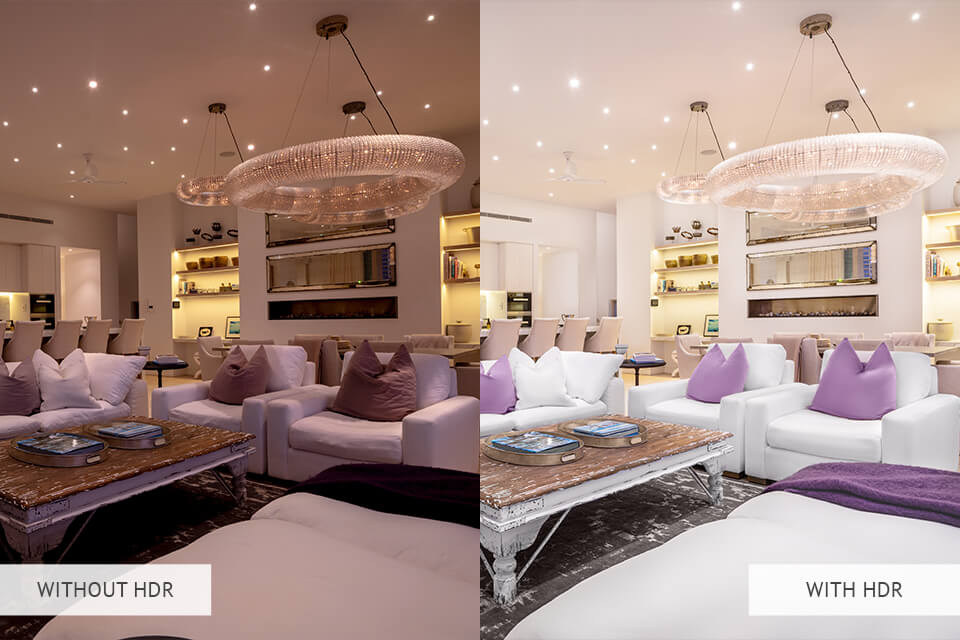
When shooting in HDR mode, you can take multiple shots with different brightness levels. Then, they will be merged together. It allows you to use a variety of HDR real estate photography techniques. Thanks to it, you will get a perfectly balanced image with the right exposure level that won’t contain any underexposed and overexposed areas.
For instance, the darkest parts of the frame, such as the shadows under furniture, will be taken from the brightest photo. As the result, your image will contain beautiful highlights and well-balanced shadows, which will allow you to achieve a better level of detail.
To turn on this mode, you just need to open the Settings menu, click on Camera, and toggle off Smart HDR. If you have an earlier version of iPhone, you might need to use the Auto HDR option. When snapping pics, check whether you can see the HDR icon. If you see it, it means that you will get HDR images after taking photos.

If you have ever heard about the rule of thirds in photography, you can try using the grid to learn how to take well-balanced pics. To see it, go to Settings and click on Camera.
Then, you need to turn on the "Grid" option. It will enable you to emphasize the most important details of the frame. Using it, you can see how your frame is divided into thirds and select the best angle for putting objects on the intersections of the lines.
The rule of thirds will come in handy for those who specialize in interior photography, as it allows you to achieve the perfect alignment of horizontal and vertical lines. By putting your objects on the intersection points, you can add extra depth to your photos. It will allow you to draw the attention of a viewer to specific parts of the frame.
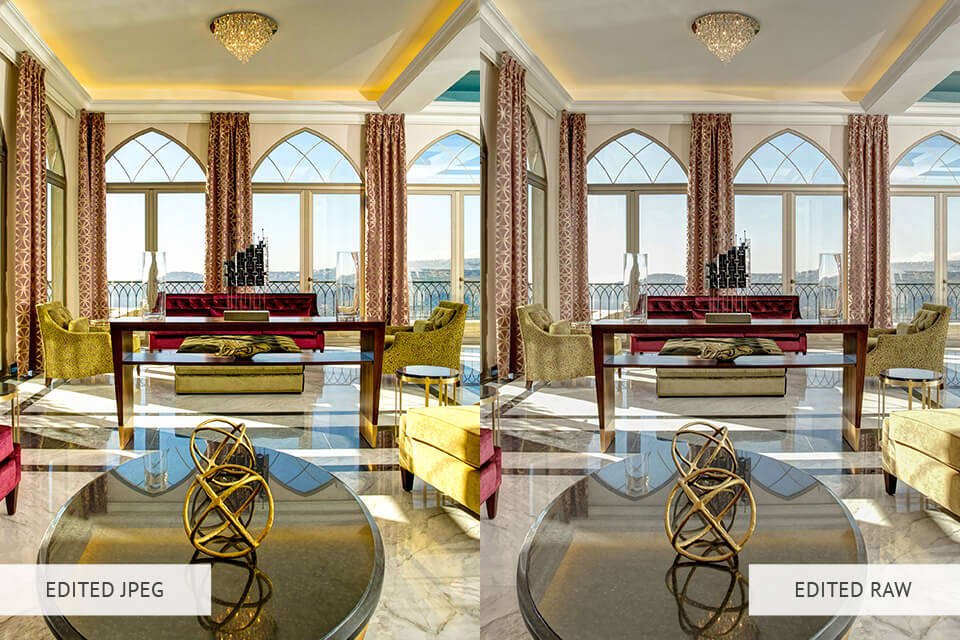
If you are wondering how to take perfectly detailed shots and use a variety of editing options, you need to take photos in RAW. When doing iPhone real estate photography, you can use this format to capture all the important details and add extra depth to your photos. The iPhone 12 and 12 Max allow you to take photos in RAW format after selecting the ProRaw option.
To activate this option, go to Settings, select Camera, tap Formats, and click on Apple ProRaw. If your iPhone doesn’t support this format, you can use third-party apps that support this option. For example, you can use Lightroom mobile app to take photos in RAW.
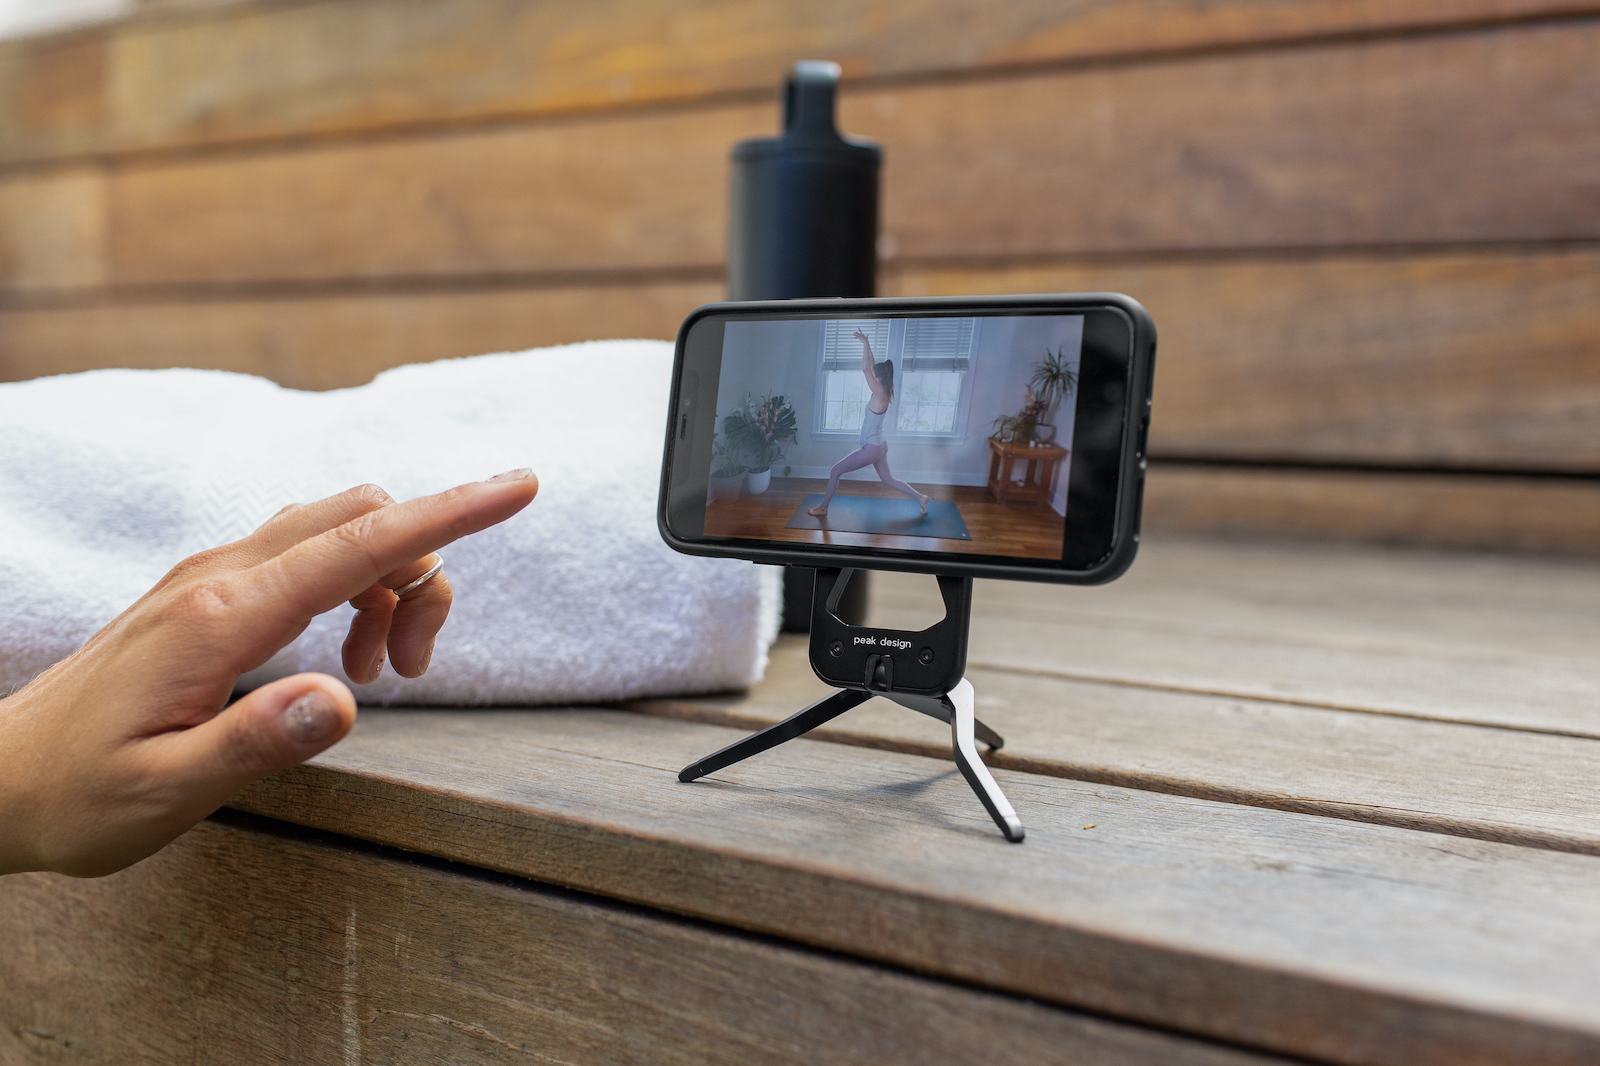
When taking real estate photos, photographers stabilize their cameras and pay attention to the level. It might be difficult to do when you are using your iPhone as you might incidentally move it and get blurry pics.
Using an iPhone tripod, you can achieve the proper image stabilization and minimize camera shake. It will also allow you to take long-exposure shots, which is important when you need to capture pics in poor-light situations.
A compact and lightweight tripod is a must for travelers and everyone who wants to improve the quality of their photos. To take dynamic real estate photos with iPhone, you can select a tripod with bendable legs that can be wrapped around various objects.
For instance, the Sensyne tripod is a perfect option for those who want to purchase their first tripod for real estate photography. However, you can stabilize your iPhone even if you don’t have a tripod at hand. You just need to put it on a stable surface or use a timer to minimize camera shake.
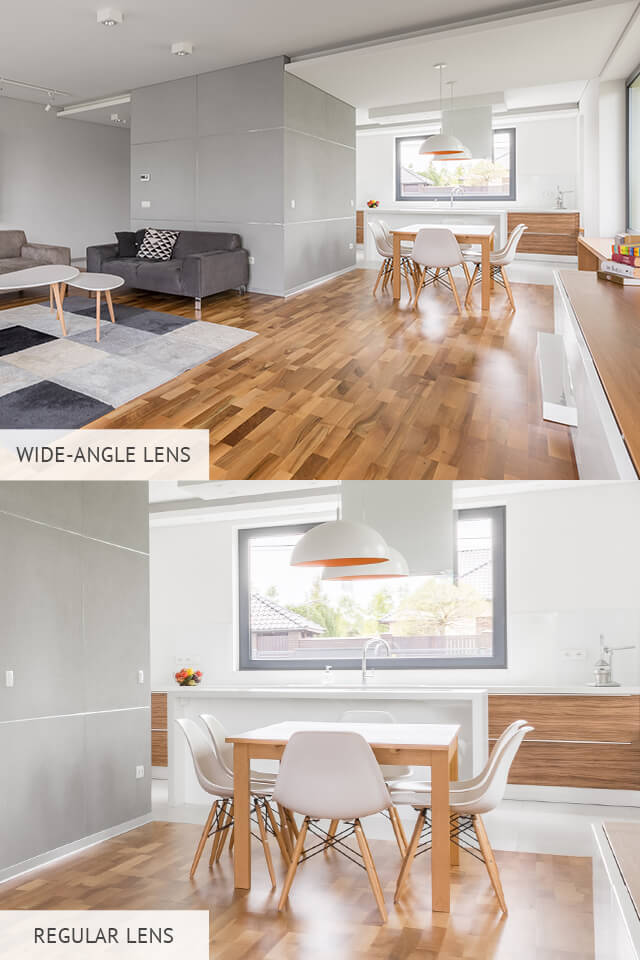
With the help of a wide-angle lens, you can easily capture the whole room, which makes it invaluable for shooting interiors and outdoor areas. Some iPhones are fitted with ultra-wide lenses. To use it, you just need to run the app and select a suitable camera.
If your iPhone doesn’t have this lens, take a closer look at wide-angle lens attachments. You can mount them over your iPhone to make the field of view wider.

Even if you take great real estate photos using your iPhone, you can still further improve them during post-processing. Your iPhone has some pre-installed editing apps that you can use to perform basic editing tasks.
Using such applications, you can fix brightness issues, improve contrast, adjust saturation, and emphasize the most important details in your photos. If you want to improve the overall composition, you can crop your photo to remove unwanted parts.
While you can use the preinstalled Photos app available on iPhone, there is also a variety of free photo editing apps that allow you to access an impressive choice of tools. For instance, Lightroom Mobile has a collection of handy features that will help you edit your photos like a pro.

Photoshop Express and SnapSeed are also good options to consider, especially if you are looking for an app with advanced functionality and streamlined interface. When editing your photos, make sure not to overdo it as it is important to win the trust of your potential clients.

Every professional who specializes in real estate wants to take a photo with straight vertical and horizontal lines. When using a budget lens, you might notice some distortion issues.
Besides, you might face this issue when you position your camera in the wrong way. To avoid this problem, you can use the Perspective Correction tool on your iPhone. It will help you ensure the right alignment of the lines.
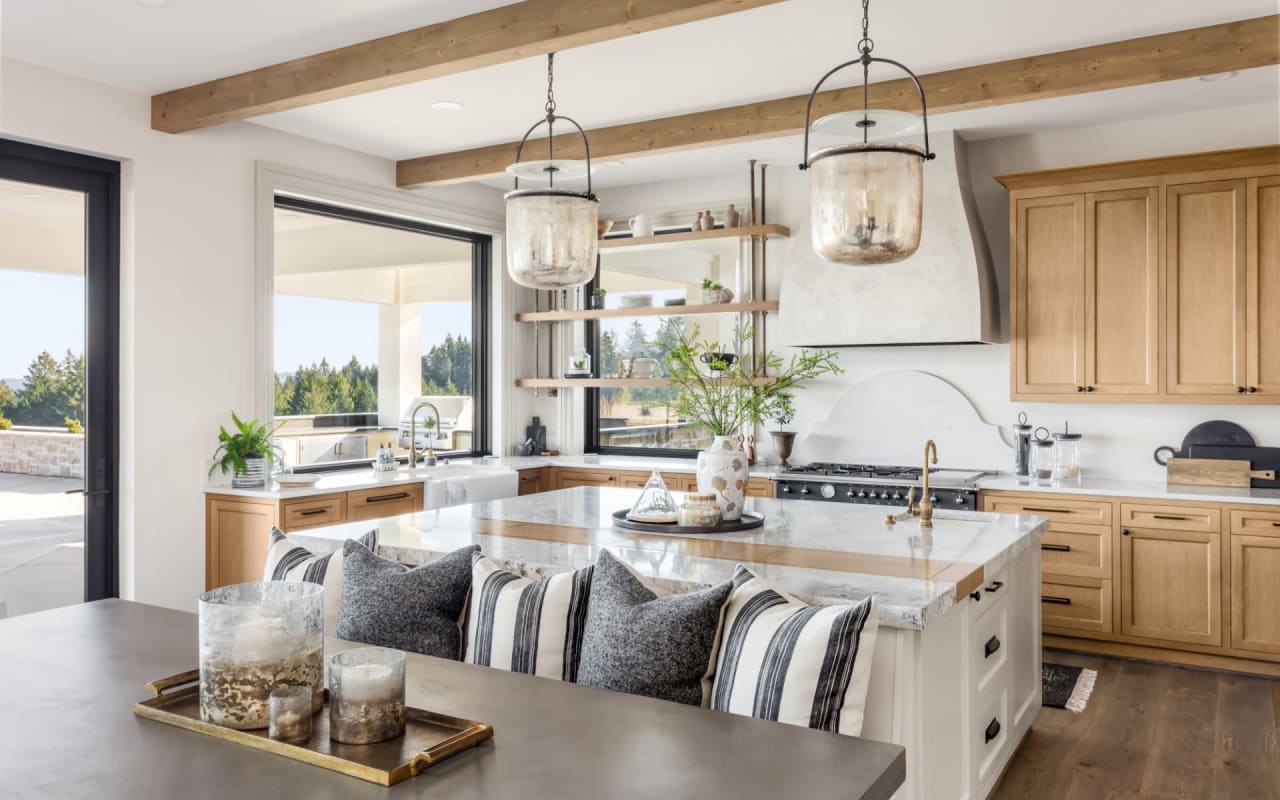
When doing real estate photography, you can use natural lighting to emphasize the best qualities of a property. You can take pictures when the sun is high above the horizon, it will help you avoid using flash.
Thanks to it, you don’t need to worry about harsh shadows and lighting issues.
To get more natural light, you can open blinds and curtains. When taking real estate photos with iPhone, put your camera opposite the light source. It will help you capture the room without any unwanted shadows.
It is better to take photos when there is plenty of light and the weather is bright and sunny. It’s crucial to pay attention to the lighting as it constantly changes. If you can’t take photos using natural light, you can use extra sources of lighting, such as Newmowa phone light.
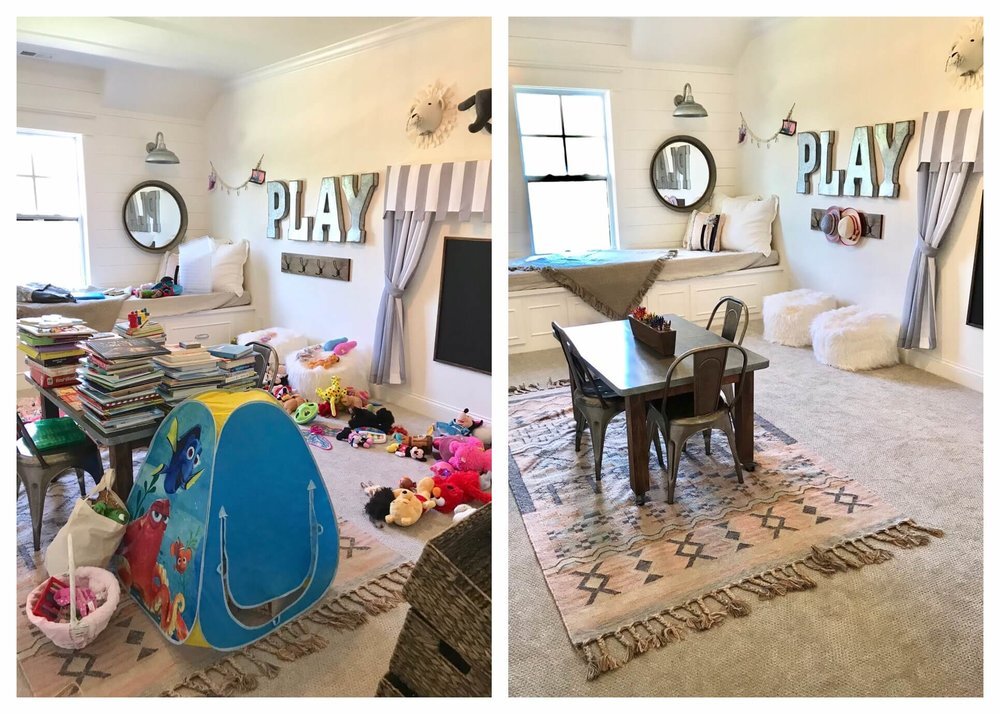
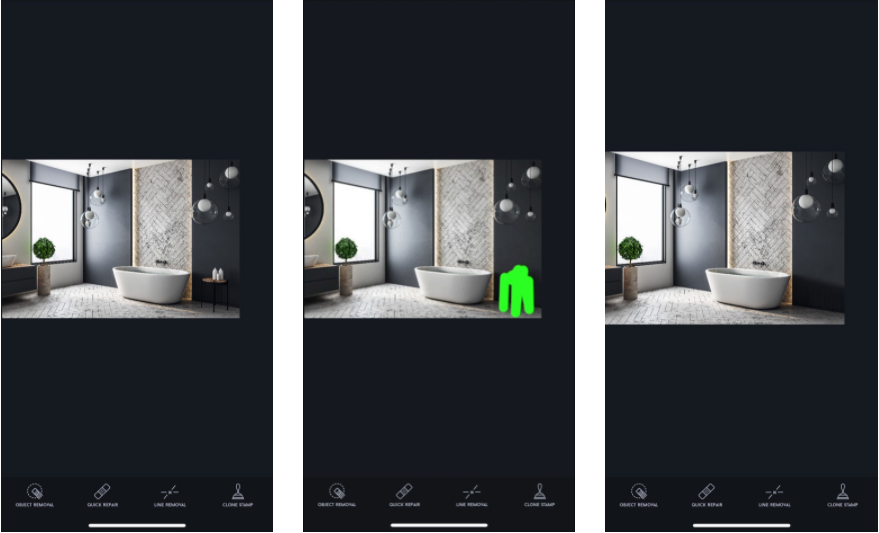
It is important to take photos of the space that looks clean and perfectly organized. It will allow you to create a welcoming atmosphere in your photos. Thanks to it, potential buyers will be able to imagine themselves living in the property that you advertise.
The first thing that you should do is remove your personal belongings from the room. It’s also important to remove personal photos and mementos. It will allow your viewers to imagine the space as theirs. Then, you can also remove other unwanted items that clutter the space.

If you decide to go for a walk, avoid snapping random pics without creating a well-balanced composition. When shooting properties, try thinking what is the best part of the room. It will allow you to select the best details that will capture the attention of your viewers.
Those who specialize in commercial real estate photography should also learn how to emphasize the best part of the room. You can highlight the important details to make your photos more attention-grabbing.

You might have seen plenty of bad real estate photos taken from unflattering angles. Try selecting different angles. It will help you add some visual interest to your photos and emphasize the main winning points of a property. It will allow you to show the property in the best possible way.
Shoot from above: By shooting from above, you can add a sense of volume to your photos and give them an unusual feel. This angle is especially suitable for taking photos of the layout and demonstrating its best properties.
Shoot from below: If you try taking photos from below, you can add a dramatic feel to your photos and allow viewers to see the whole property. This technique is often used by those who specialize in high end real estate photography, as it allows photographers to capture exteriors, the front entrance, and other areas.
By taking photos from below, you can capture unusual details as well as take photos of outdoor landscapes, and other areas. It will allow potential clients to understand how a property can be used.

If you want to spend less time editing your pictures, try installing Lightroom Mobile presets. This collection includes a variety of effects that will help you enhance your pictures in a few clicks. Using them, you can tweak colors in your photos and edit them in a uniform style.


