
If you noticed that the pictures taken by your camera are overexposed or underexposed, in the majority of cases, this is not your fault and such images can be refined with the help of exposure compensation.
In this article, you will find out how this technique works and when you should use it. The guide also contains the answers to the most frequent questions asked by amateur photographers concerning this issue.
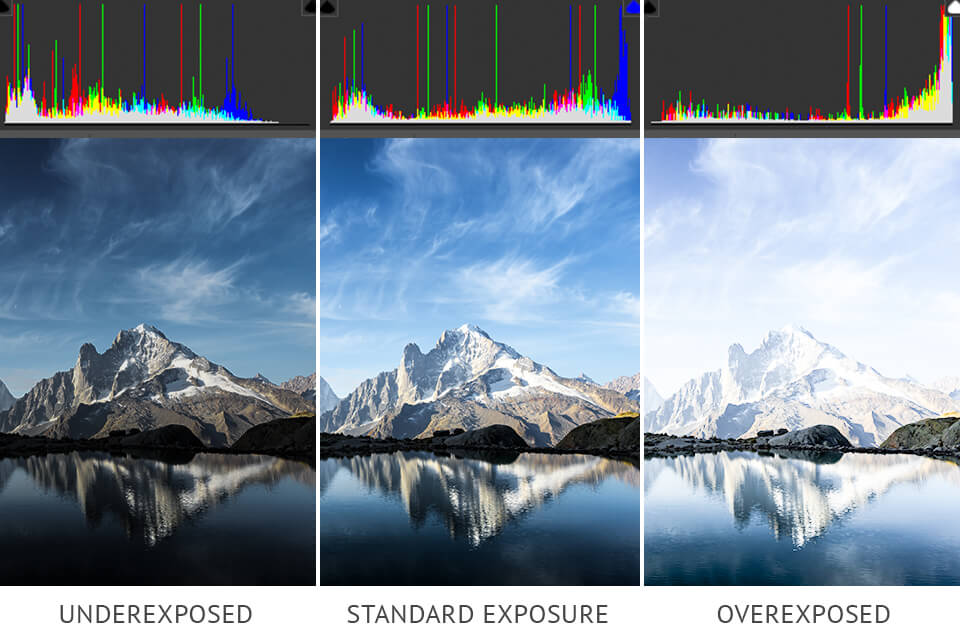
If you are wondering, “What is exposure compensation?” this technique is used by photographers for leveling the camera’s exposure specified by a photographic exposure meter. It allows making images lighter or dimmer by customizing one of the three parts of the exposure triangle, namely shutter speed, aperture, or ISO.
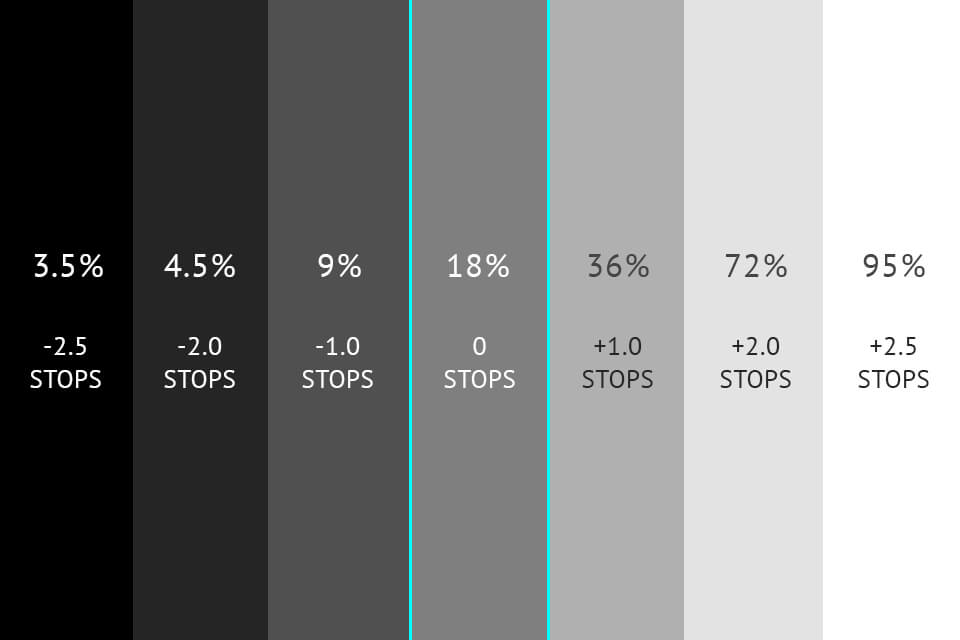
Exposure compensation is adjustable in 1/3 or 1/2 EV. Each full stop changes the amount of light caught by the sensor two times. By dragging the exposure slider one point in the right direction, you will get the brightness that is twice higher than regular settings. If you change the exposure value by -1 EV, the brightness will be decreased two times compared to the standard exposure.
How does exposure compensation work? Every camera is fitted with an internal light meter for calculating the amount of light reflected off the models. It is set to mid-tone gray by default. If the space where you conduct your photo session is poorly lit, the camera meter will try to add more light to the picture.
However, if the scene is well-illuminated, the meter will do its best to darken it to achieve a balanced composition. Bracketing photography is closely connected with exposure compensation. By using bracketing mode, you can shoot images with three different levels of exposure.
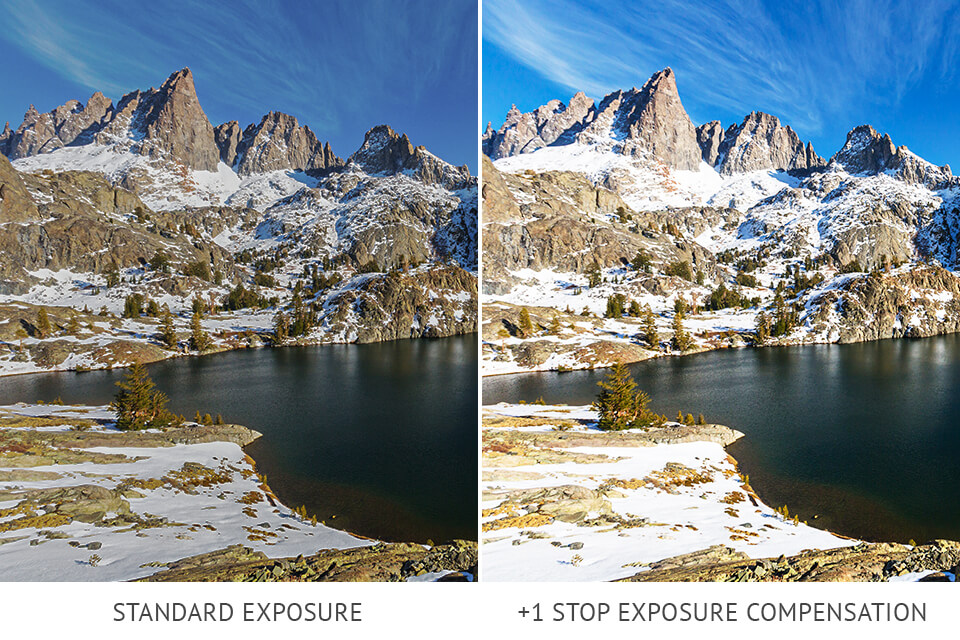
When practicing snow photography, you will see that your camera’s meter will convert a snowy-white to gray by applying the settings that underexpose the picture. In this case, the camera mistakenly thinks that the scene is too illuminated, and the shot features a great variety of tones. To fix this situation, you need to apply some positive exposure compensation to let in some light and make the white tones brighter.

If you have set the wrong exposure, and you do not have any experience in editing, address the specialists of our service to get professionally retouched images quickly. The image editors can correct the exposure, white balance, contrast, adjust the color scheme, make images more detailed, etc. The advantages of our service are low prices and quick turnaround.
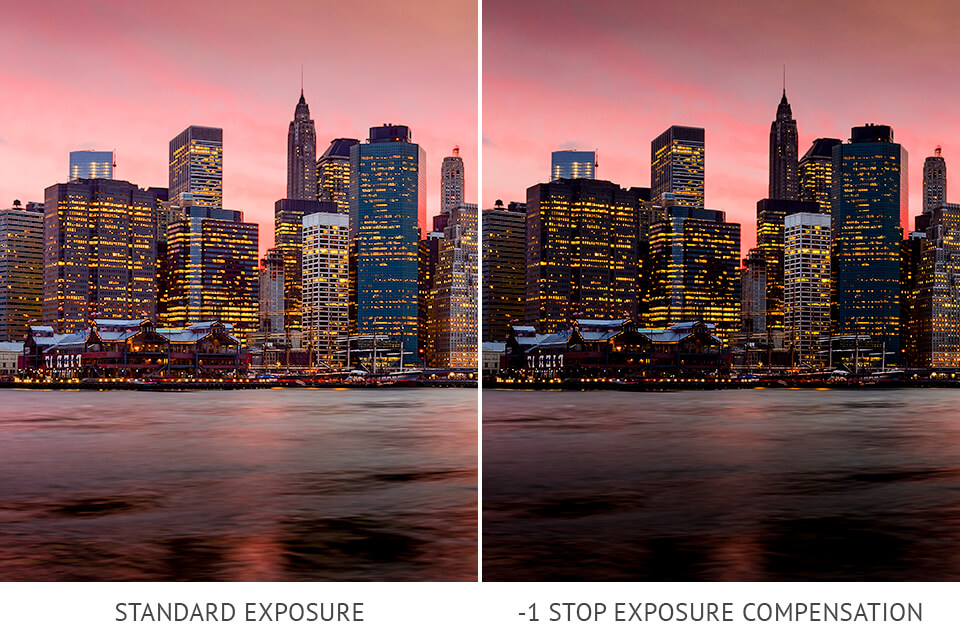
When shooting at night, you don’t need to set the shutter speed and aperture manually. It will be automatically set by the camera for rendering black color as gray. To fix overexposed photos in Lightroom, you do not need to pay much effort, but this process can be much quicker.
It will help you implement your night photography ideas. In this case, it’s better to use negative exposure compensation for dimming the setting.
When capturing a photo of a model against a well-lit backdrop, the camera may focus on the backdrop and adjust the aperture and the shutter speed to it. In this case, your picture will have a perfectly exposed backdrop and ideally outlined silhouette of the model posing against it.
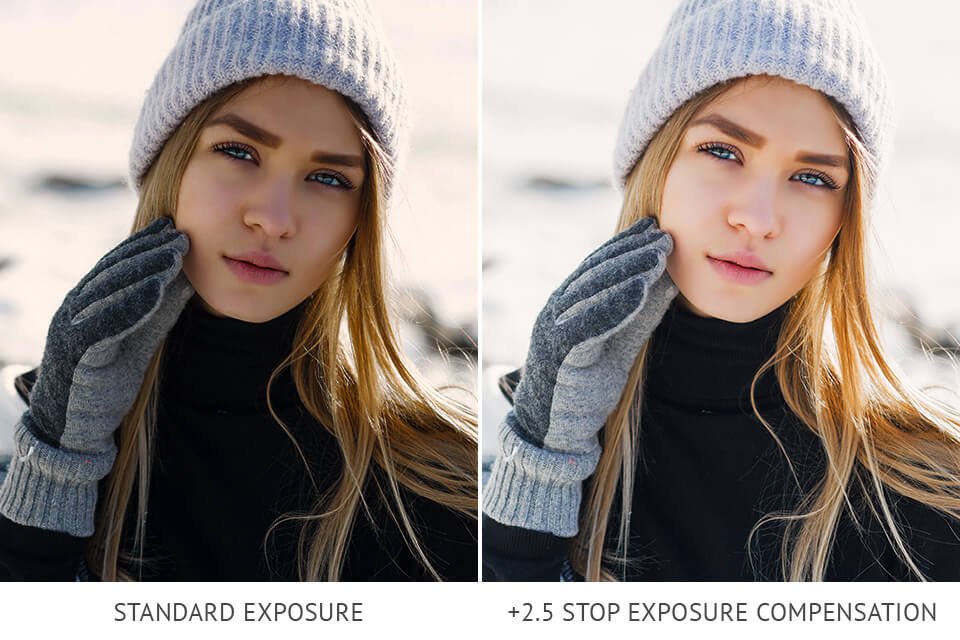
Positive exposure compensation allows getting a bright and perfect backlit portrait. The level of brightness is defined by the amount of backlighting, so you can try several options to check the effect.
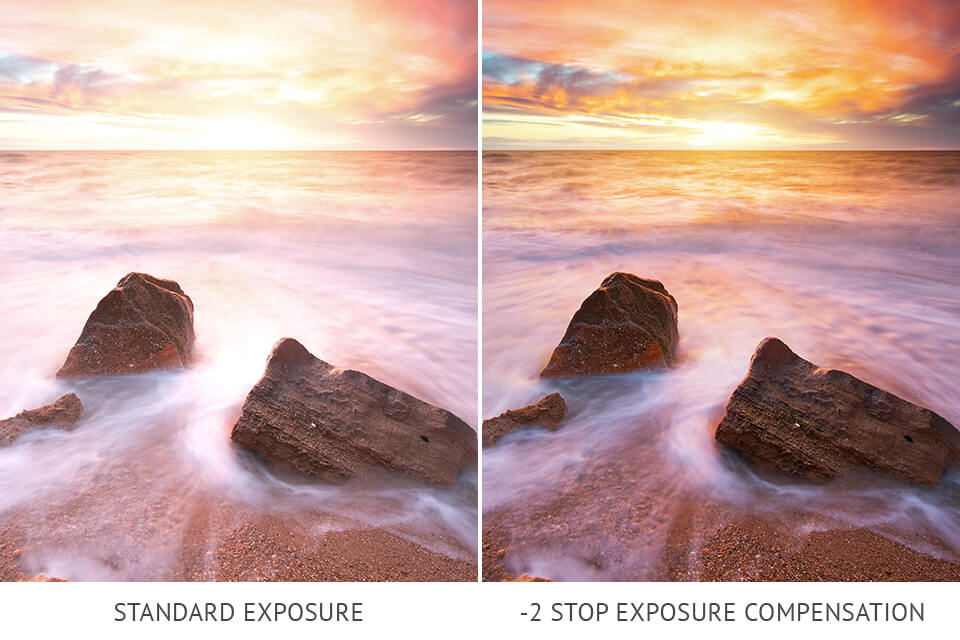
When capturing a sunset, you will need to deal with a completely overexposed sky meaning that the camera won’t be able to render the colors accurately. If you think that by dimming the scene you can achieve the proper color rendering, you should spin the exposure compensation dial to -0.5 to -1 stop.
For twilight photography, it is better to set the exposure to +1-2.

The camera modes influence the exposure greatly.
Aperture Priority Mode: In this mode, the exposure compensation can be achieved by altering the shutter speed. If you select another aperture, your camera will regulate the shutter speed to match it so that the exposure level stays the same. This mode allows altering the shutter speed without changing the aperture you have set initially.
Shutter Priority: When snapping images in this mode, you will see the exposure compensation will change your aperture. Your task is to set a shutter speed, and your camera will set the appropriate aperture and depth of field.
Program: This mode involves changing the shutter speed as well.
Auto and dedicated scene modes are perfect for snapping portraits or landscape photos. They do not allow using the exposure compensation during the photo session. Of course, you can employ this technique when snapping photos in the manual mode, but it is more convenient to employ it when working in the P, S, or A modes as the camera will modify the exposure automatically. If your priority is to snap pictures with manually configured settings, activate auto ISO to see the difference.
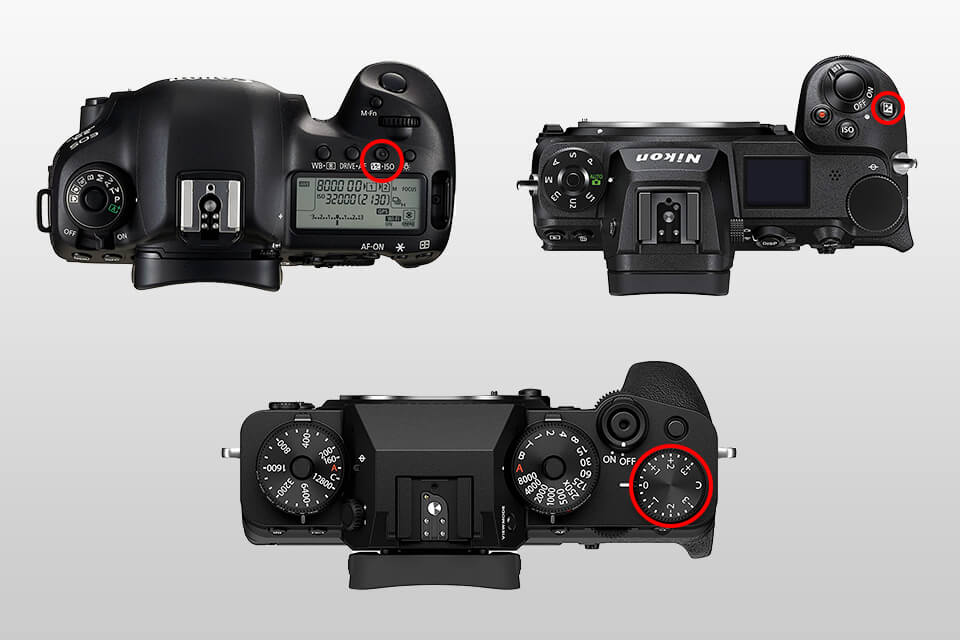
The exposure compensation button allows adjusting brightness after selecting the camera mode. The majority of shooting devices are fitted with a special +/- button that allows setting all the desired configurations and performing the key adjustments. The location of this button depends on the camera model and its manufacturer.
In most cases, you can find this button on the top or the back. Besides, many cameras allow configuring this feature by spinning a dial. The owners of Nikon photography cameras are likely to find this knob next to the shutter button.
Vintage mirrorless cameras have an exposure compensation dial on the top. When using a mirrorless camera, you can follow the transformation of the image color scheme from dim to bright right on the screen and in EVF when dragging the exposure slider.
Since DSLR cameras are fitted with optical VF, they allow modifying exposure within the viewfinder. Take a look at the top part of the LCD screen. It is likely to be there.

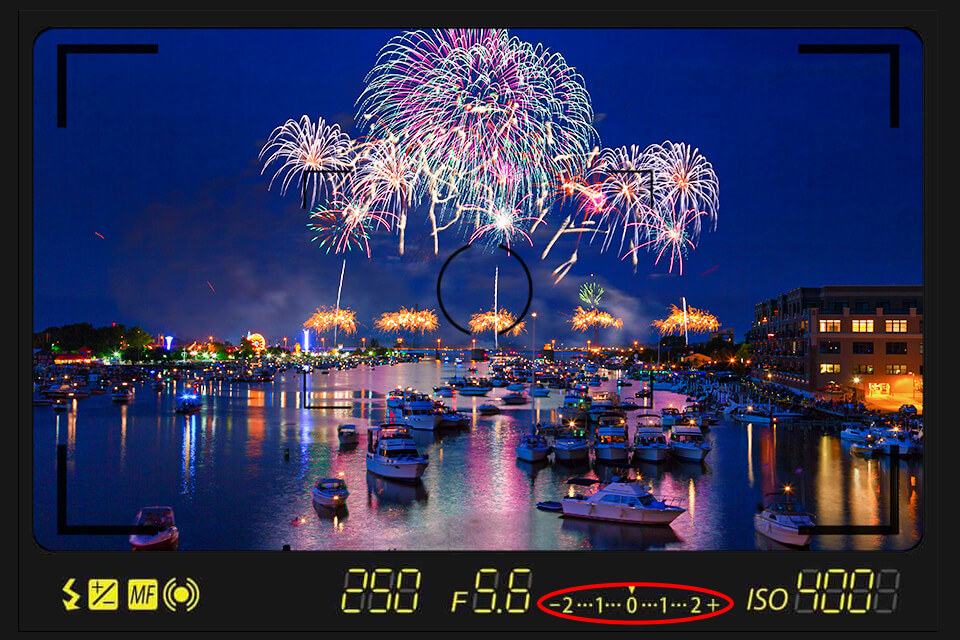
When adjusting the exposure compensation, the most difficult thing is to determine how much compensation you require. If your images are very dim or light you can safely move the exposure slider two points further in the corresponding direction underexposing dark pictures and overexposing bright images.
However, the pictures that feature multiple tones require more time and skills. After configuring the exposure compensation, attempt to snap a picture. Afterward, evaluate the result by viewing the picture on the camera’s display.
If some corrections are required, adjust the settings and take another shot. Keep in mind that the slider should be set to 0 again after the photo session so that the future pictures won’t be spoiled by the wrong exposure.
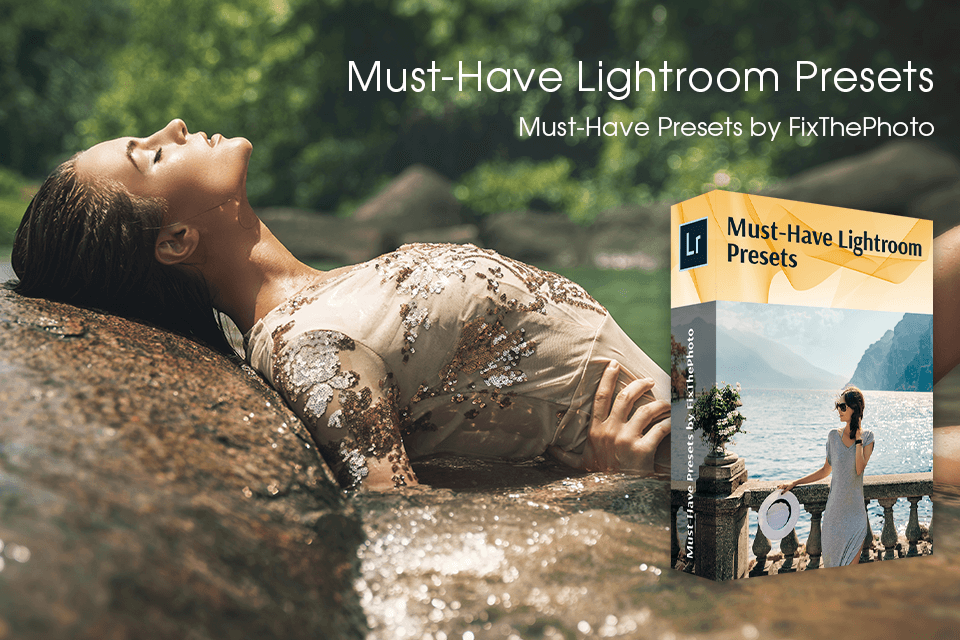
If you like processing images on your own, you can speed up your editing workflow by using this bundle for Lr. This handy collection will make your photos look stunning and help you correct exposure issues.
Another advantage of this bundle is that it allows refining a great variety of images. If you have never used such effects before, you can quickly learn how to install Lightroom presets on Mac & Windows.


