Bracketing Photography Guide
When you purchase through affiliate links on our site, we may earn a commission. Here’s how it works.
Bracketing photography is the technique you need to use with the technical limitations of camera auto-settings, choose natural pictures with the best settings.
Usually, the DSLR preview screen shows a brighter and more colorful version of the shot. To avoid problems with exposure and under- or overexposed settings, use bracketing.
Bracketing Photography: FAQ
Photography bracketing is taking the same picture more than once using different camera settings, giving you the right to pick the best option.
1. When Bracketing Is the Right Choice?
No matter how confident you are in the camera settings, you can make mistakes. Three planned impacts – overexposed, underexposed and the correct ones may not meet your expectations. Instead, you can snap one underexposed picture, one sharply underexposed picture and the one that is correct.

No one can be an ideal judge of exposure in the field of high contrast, bright sunlight or complex illumination (a backlit situation). It is difficult for the camera to pick out details in scenes with a high degree of light variability. Direct sunlight produces sharp shadows that are tough to deal with during picture post-processing and tough to measure for proper shooting.
When you photograph with highlights, halftones and shadows, there may be many details in one light range, and you don’t want to sacrifice details in other light ranges. Photo bracketing is a low-risk technique and a way to take precautions against common errors and loss of details. Use bracketing in scenes that don’t change so quickly: architectural, landscape or studio portrait photography, etc.
2. When Bracketing Is Useless?

Bracketing photography isn’t recommended for dynamic or fast-changing scenes: a sporting event, a bird flying, a flash of lightning or windy clouds. Although the shots are taken one after the other, there may not be a small delay for each shooting scenario.
If you are shooting sports in burst mode, three different exposure values will be included in the package, and a shot with the correct timing may have the wrong exposure.
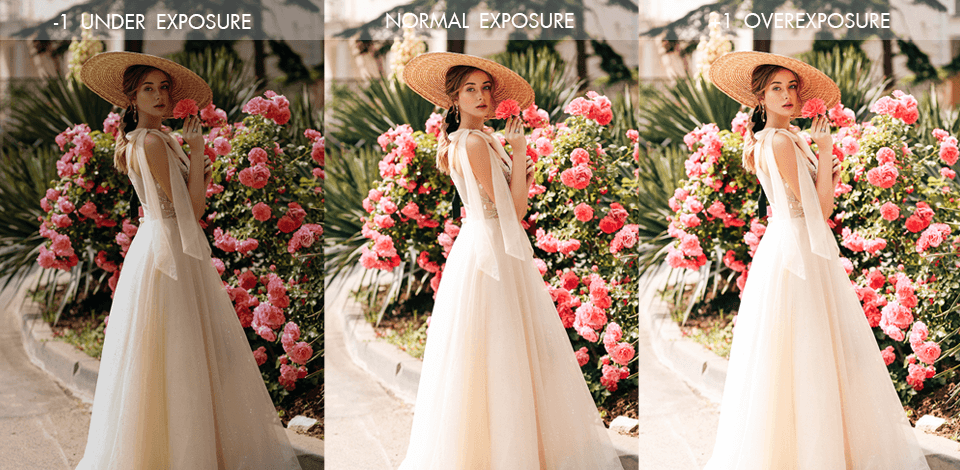
Of the images above, it is actually the darkest one on the left which is closest to an "ideal” exposure. The other two have extensive areas of blown highlights and details, and fully recovering them is impossible.
3. What Do I Need for Bracketing Photography?
A camera with automatic bracketing modes will greatly facilitate the process. An indispensable tool is a tripod. I don’t recommend applying bracketing in manual mode without fixing the image using any tripod brand due to your budget.
Bracketing takes up space and wastes time, particularly if you know exactly what settings are needed for the picture. You will take three times as many pictures in about the same time, and the SD card will fill up three times faster, so take care of extra storage space.
4. What Can Replace Bracketing Photography?
If the sky is too bright to be properly exposed along with the rest of the scene, you can purchase a graded neutral density (GND) filter and attach it to the lens. The GND filter consists of clear and dark areas.
If you place the darker part in the brightest area, then it will darken that area, which will help align the range of light throughout the shot. In many cases, digital processing is a more practical option.
5. What Is Stop in the Bracketing Technique?
Stop is a relative measurement based on the comparison. In exposure bracketing, this relative measurement is located between two brightness levels. So, when we say "stop/-1 stop", we cut the light in half from its original position. When we say "stop/+1 stop", we double the amount of light that hits the camera sensor.
6. Do I Need Bracketing When Shooting in RAW?

These methods complement each other perfectly. If you are shooting in RAW, you will have sufficient exposure latitude before highlights and shadows are blocked. I suggest picking a longer interval of one stop and as many as two to cover a wider range of shutter speeds. With a two-way RAW width, you can effectively cover a range of six stops by setting the AEB to +/-2.
Setting type EV0, EV +2, EV-2 suitable for interior and real estate photography, as well as other contrasting scenes. EV0, EV +2, EV-2, EV +4, EV-4 – all this is for something really high-contrast, for instance, when the sun and dark rock are in the frame.
7. Merging Photos or Exposure Fusing?

So, you have at least 3 different exposures. But what if you like the shadows in one frame and the sky in another? Using Photoshop or another picture editor, you can combine all three bracketing exposures into a single file to use the best bits from each of them.
As a result, you will create a perfectly exposed picture with the best exposure from the top (this shot is obtained by merging the three of them).
8. What Is an HDR Method for Blending Photos?

If you are creating HDR files or want overlayed shots to highlight details from shadows or highlights, then having three RAW bracketed images can come in handy. The goal of HDR photography is to increase the normal dynamic range of the camera, giving the pictures an ultra-realistic look.
This popular method of mixing bracketed HDR shots stands for “High dynamic range”. It is aimed at producing shots in the conditions of extreme lighting and extreme brightness, as well as mixing them correctly to create a high dynamic range image. However, exposure bracketing is focused on finding the correct exposure across multiple images.
9. Why Is Exposure Bracketing so Popular?

One of the most difficult parameters to improve in photography is exposure, as there are many details that may be combined to produce the perfect picture. Specific software can provide some exposure compensation, but it isn’t comparable to getting the correct exposure from the start.
Clarifying the bracketing photography definition, exposure bracketing lets you snap 3 (or more) pictures with different exposures: one uses the suggested camera settings, one is intentionally underexposed, and the other is overexposed. It gives you confidence that one of them will reflect light in the best possible way and will get a decent exposure from an object that is difficult to measure.
10. How Does Automatic Exposure Bracketing (AEB) Function Work?

Automatic exposure bracketing is a feature that almost every DSLR camera is supplied with. After enabling the AEB function, you only need to press the shutter release button once to get several different exposure settings for the same scene. As a result, you will achieve one shot that is too bright, one that is just right (depending on which part you want to display correctly), and the other that is slightly darker.
To access this menu option or a special button, you need to refer to your camera’s operating manual. Some cameras only allow exposure bracketing, while others offer bracketing options for JPEG, white balance and other settings, letting you set the number of bracketing pictures from 3 to 7, the exposure difference between them, and the degree of exposure of each picture.
11. In What Mode Can I Use AEB?
Switch to the shooting mode that supports auto-exposure bracketing. In most digital cameras, you can limit exposure in Program mode (P), Aperture Priority (AV or A) or Shutter Priority (Tv or S). By setting the aperture priority, you will lock it to the selected value with automatic shutter speed control to create a range of short and long frames. By setting the shutter priority, you will maintain a constant shutter speed (it is possible to pick the speed) with automatic aperture control to create pictures with different exposures.
12. How to Use AEB?
Pick the appropriate number of brackets for the scene. Set the timer for 2 seconds with a shutter delay – the camera will automatically accept all brackets without pressing the shutter several times. This prevents the slightest movement of the camera and makes blending easier. Press the shutter button.
If it is windy and there are moving objects (trees), raise the ISO. Then set the camera to burst mode instead of delayed shooting. You can take a series by pressing the button for a longer time.
When you snap a picture using AEB, most cameras do it in the following sequence: standard exposure, underexposed and overexposed. The camera will stay in AEB mode until it enters sleep mode or is turned off. When turned on, it will return to normal exposure mode.
13. When Do I Need to Change the AEB Settings?

You will notice a scale that lets establishing the width of the bracket in full stops or fractions thereof. A dial or multi-function button is typically used to alter values. Therefore, the bracket may be set to, for instance, +1 and -1.
Most camera manufacturers allow for changing the exposure compensation from -2 to +2 EV (exposure value) in 1/3 increments of exposure compensation. 1/3 is a good setting if you are confident enough in your shutter speed for the majority of scenes.
If the scene has a high contrast level, or you are just not sure if your exposure settings are within the right range, adding the number of bracketed photos or setting a higher exposure compensation value increases the exposure range that the camera captures for a wider range to choose from later.
14. How to Work with Manual Exposure Bracketing?
The main principle is to alter the amount of light that falls on the camera sensor, which provides changed exposure levels. If you wish to try manual exposure bracketing, just change the “holy trinity” of settings manually via the Set option: aperture, shutter speed and ISO.
15. Does Manual Exposure Bracketing with Shutter Speed Work?
Alter the camera shutter speed: you maintain the camera’s aperture and sensitivity while experimenting with different exposures (longer exposures give more light). This is the most common method of exposure bracketing, and you should always adjust the shutter speed, particularly if the subject is stationary.
However, in scenes with fast-moving objects and the possibility of blurring, it may not be possible to limit the shutter speed. In these cases, ISO is the best choice.
16. How to Work with Manual Exposure Bracketing with ISO?
Manually alter the ISO of the camera: the higher the ISO, the brighter the shot will be. The disadvantage of high ISO is a grainy effect or “noise”, so keep the ISO as low as possible without creating overly dark pictures.
ISO is also not ideal for adjusting since shots will have different levels of quality. Bracketing photography is still a good idea at high ISO levels if you wish to be careful and avoid highlights in difficult situations.
17. How to Work with Manual Exposure Bracketing with Aperture?
Manually alter the camera aperture: you keep the shutter speed and ISO constant, but change the aperture, which creates a variety in the depth of field of shots. The aperture is often the worst for restriction since the aperture and depth of field affect each other in addition to exposure. The result may look strange with unnatural transitions from blurry to sharp areas. Besides, many of the individual shots won’t have the desired depth of field, which makes them unusable.
18. What Are Other Types of Bracketing?

Exposure isn’t the only variable in the game. Theoretically, bracketing photography can be applied to practically any setting in a shot. It is possible to limit white balance, JPEG settings, noise reduction due to long shutter speed, flash settings, focal length and more.
Exposure bracketing when shooting with flash (FEB): some shots require flash no matter what. But in street photography, you can take advantage of the flash to illuminate different areas of the frame, and then compare the resulting shots.
White balance bracketing: although this method is rarely used in modern digital cameras, it involves adjusting the white balance in the SLR camera for different color palettes.
19. Why Do I Need Focus Bracketing?
Sometimes a picture must have a wider depth of field than the aperture setting can provide. In this case, make brackets with different focus points, so that later they can be combined into a single picture in focus.
The focus stacking technique is what landscape and macro photographers use to artificially increase the depth of field (with a fully open lens and a large aperture).
Focusing bracketing works better when you cross the depth of field from shot to shot. If your “steps” are too wide, the final photo may look strange: sharp and blurry.
20. How to Do Focus Bracketing?

In order to snap pictures in brackets for focusing:
- Mount the camera on a tripod and switch to manual focus.
- Focus on the nearest object and shoot, completely neutralizing camera movements.
- Gently rotate the focus ring to another object a few meters away. This should be the place where the focus area of the previous frame ends. Take a shot.
- Repeat until you cover the entire range to infinity. With the f/16, three shots should be enough.
Take more to be sure, or if you need to set a wider aperture.
Plenty of today’s cameras offer a built-in focus function: just focus on the nearest object, tell the camera how many pictures to snap and pick the step size. I suggest that you pick a smaller step size than the expected one to be safe.


