For novice photographers, exposure as part of the photography basics causes confusion. If you have a hard time understanding the properties of the exposure triangle, you won’t be able to use some other camera mode except the auto one.
In this guide, I cover the elements that make up the triangle and explain how these parameters interact with each other to regulate exposure. In addition, I discuss light stop, so that you can confidently apply the exposure triangle skill, which is necessary for composition.
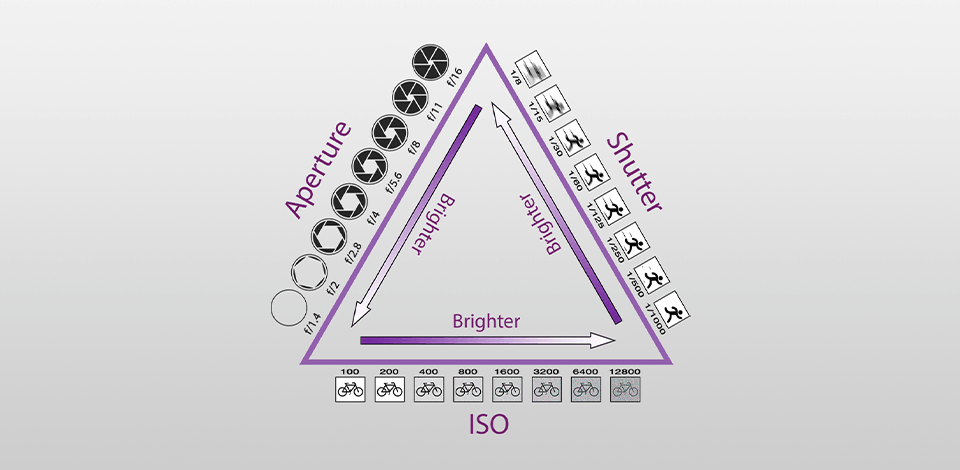
The exposure triangle isn’t a specific camera setup or an exposure setting technique like bracketing photography. This is a whole light control system and a way to link three variables that define the exposure of a shot: Aperture, Shutter Speed and ISO. To achieve the desired result, it is necessary to balance all three of them. Adjusting a particular value often requires compensating for at least one of the other two.
There are two methods to regulate the amount of light entering the camera through the aperture and opening the photosensitive surface through the shutter speed. Besides, there is one method to regulate the sensitivity of this surface (film or sensor) through ISO. It is simpler to imagine these elements as a triangle, each side of which interacts and depends on each other to achieve a decent exposure.
Each element has a different quality of the resulting exposure and is a factor that defines the appearance of the shot. But for novices, the connection between shutter speed, aperture and ISO isn’t obvious. The terms “stop” and “aperture” used as synonyms and referring to different phenomena can be perplexing as well. Therefore, I will give a general idea of the individual exposure configurations and how they operate together.

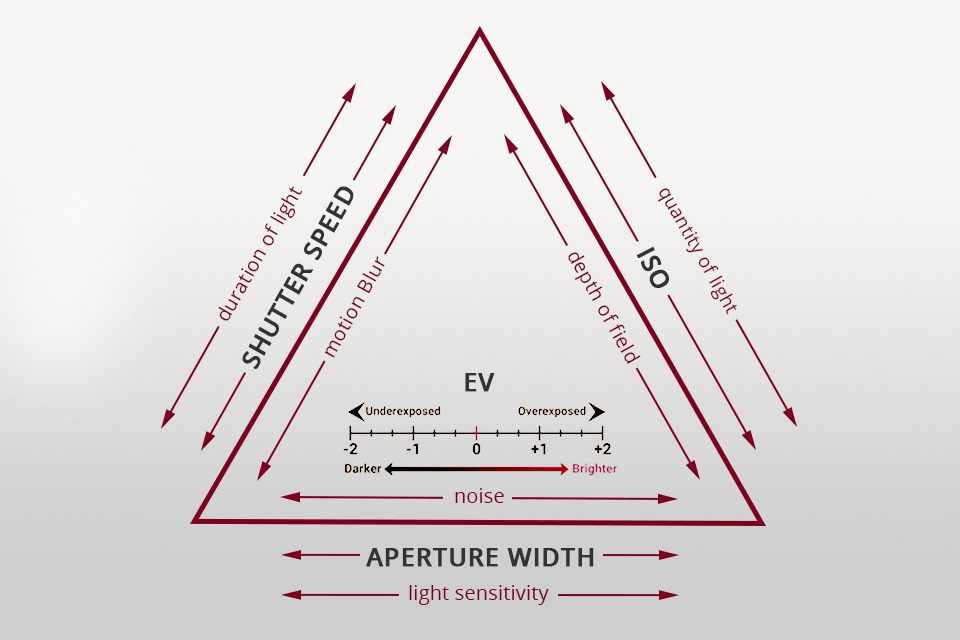
Stop as the stage of changing the exposure is a combination of aperture, shutter speed and ISO. Basically, it means switching to one division of any component that makes up the triangle. In photography, a stop is understood as doubling or halving the initial amount of light that makes up the exposure. To identify this initial level, the initial exposure value (EV) is set to 0.
It is good if you guessed right with the base value and exposure configurations for a particular shoot. But what if you didn’t, or the adjustments make the shot more expressive? Adding one stop of light by doubling the exposure relative to the current level brightens the underexposed shot. Conversely, lowering the exposure by one stop darken the overexposed shot.
The stops let you compare and modify three parameters to achieve the desired shot. Since all three values have different units of measurement, this is the best way to control the deviation from the base EV within the photography triangle. Within each parameter, the stop was assigned quantitative values to define the EV.
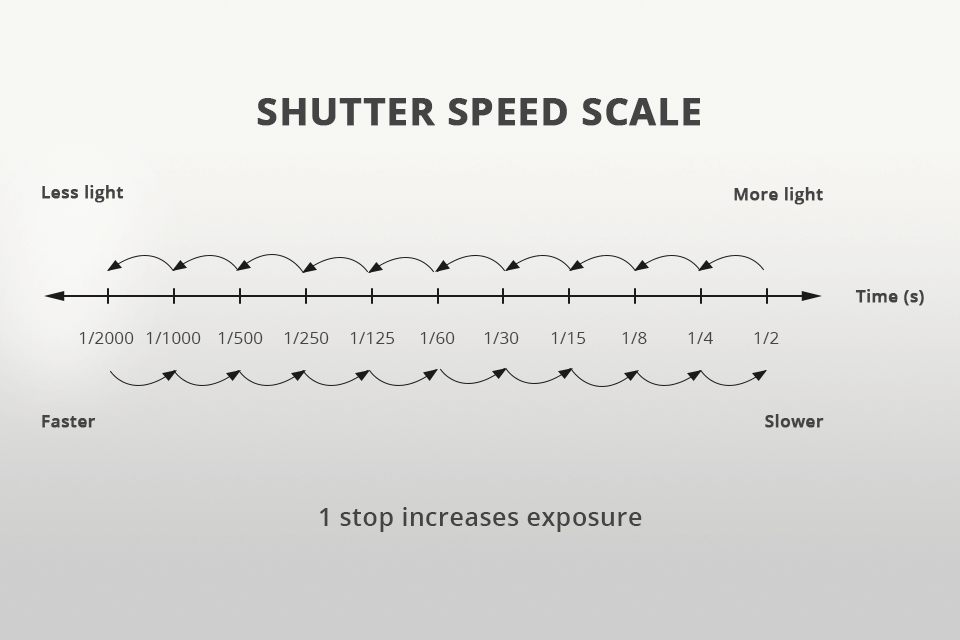
The easiest parameter to understand is shutter speed. It is the time in seconds during which light can hit the sensor before the shutter closes. A shorter shutter speed grants the sensor less time to gather light and lowers exposure. A slower or longer shutter speed grants the sensor more time to gather light and leads to increased exposure.
To double the amount of light, you need to double the exposure time. For instance, switching from a shutter speed of 1/4s to 1/2s will add one stop (one scale division) and double the light, since the shutter stays open twice as long. If you change the shutter speed from 1s to 1/8s, the exposure will decrease by three stops and by 8 times: from 1 to 1/2s is one stop, while from 1/2s to 1/4s is another stop. Finally, the decrease from 1/4s to 1/8s is the last halving or third stop.
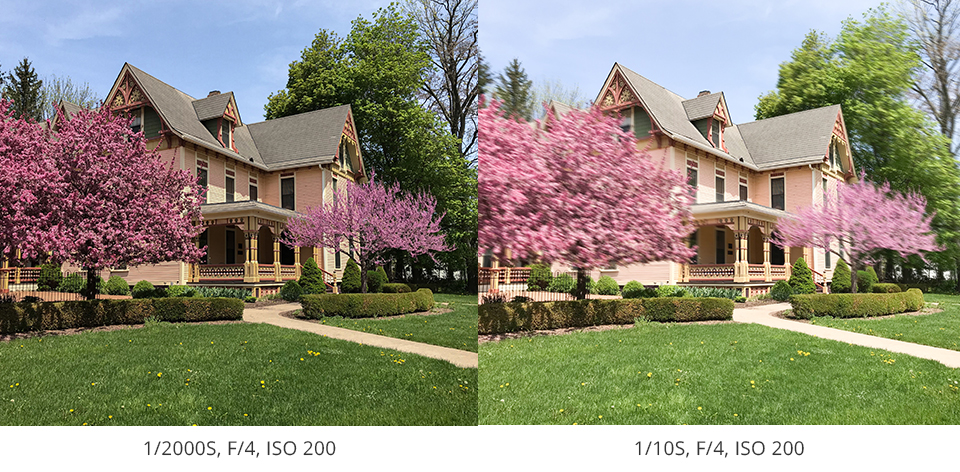
Many photographers believe that it is the most significant aspect of the initial setup. If the shutter speed is already insufficient to achieve a sharp shot, none of the remaining parameters of the photo triangle will save the situation, so you should start with it. This is also true if you plan to take a picture of a fast-moving object to ensure that you freeze the moment of movement.
Follow the rule: when capturing motion, use a short shutter speed, but keep it moderate. Otherwise, you may “cut” the lighting of the scene. Begin with the maximum possible higher value, at which you still don’t allow blurring or loss of sharpness. But if you notice this, raise the speed.
The compromise between the brightness of the scene and sharpness is something you can ace only after taking over a dozen fuzzy shots. A tripod from an efficient tripod brand helps you gather more light if you are sure that the scene is static.
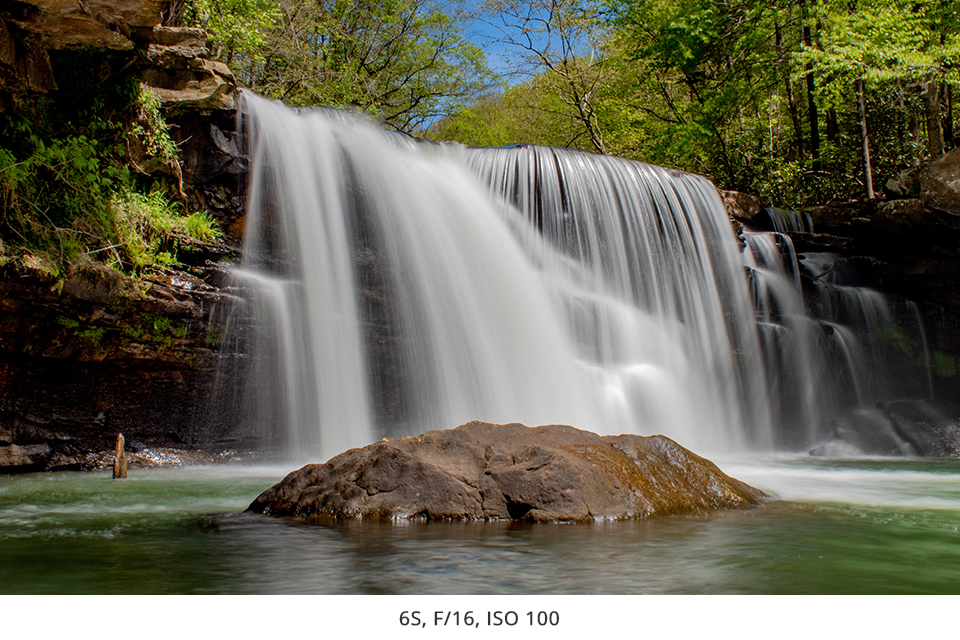
Another reason to use a higher shutter speed is not only to minimize movement and blur, whether it is a camera shake or a moving object, which lets you maintain sharpness. While the shutter is open, the camera records the change in the position of all the elements in the frame, whether it is blades of grass or hair in the wind. If one of the elements moves, this may result in an undesirable blur. But it can also contribute to creating a highly artistic and expressive shot.
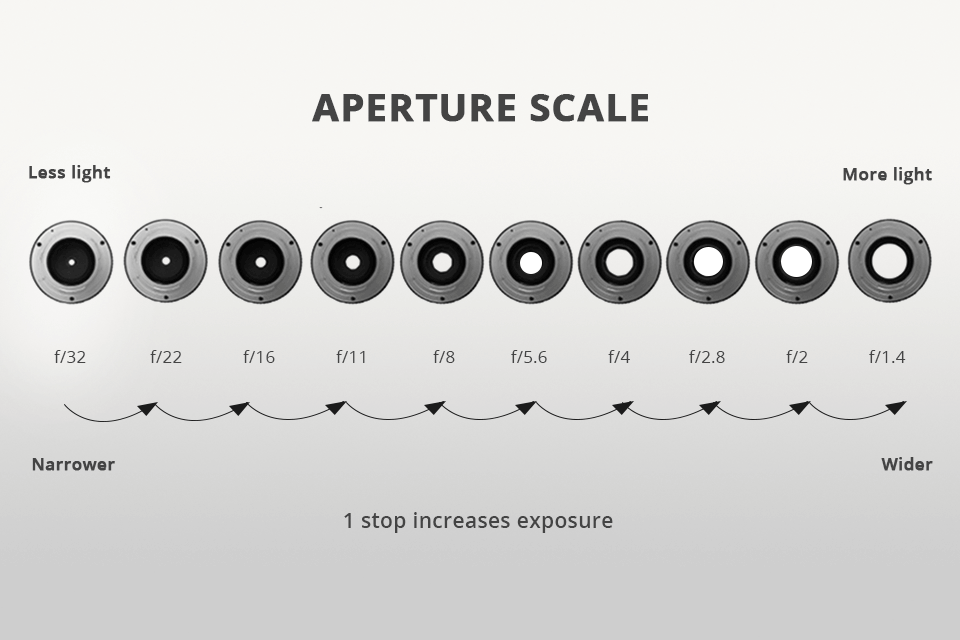
Aperture is the size of the lens hole through which the light passes. The wider the hole, the more light passes, and vice versa. Every time you double the area of this hole, you double the amount of light or raise the exposure by one stop. If you reduce half the area of the opening, you get half the amount of light hitting the sensor. This reduces the exposure by one step.
Without going into details, the aperture is a ratio related to the size of the entrance hole and is mathematically equal to the focal length of the lens (f) divided by its diameter. Therefore, large aperture values refer to small holes, and small aperture numbers refer to wide ones – there is a division. Just remember that the opposite happens with the aperture. Since the focal length is present in the formula, changes in the aperture influence the depth of field.
To double the area of the opening and the amount of light, you shouldn’t multiply twice. Instead, divide the value of the aperture by the square root of two (1,414) – you should be guided by the formula of the circle’s area. That’s why the aperture values may not be integral. If you increase the f/8 aperture by half or by one stop, you get f/8:1,14=5,6. Accordingly, to get half the area and reduce the light by half, multiply the aperture by the square root of two.
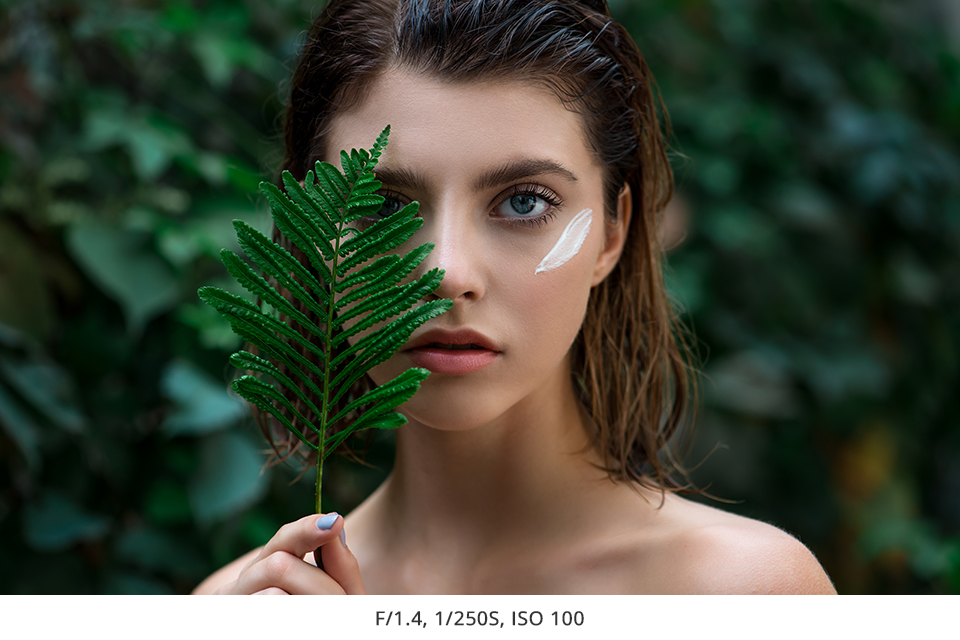
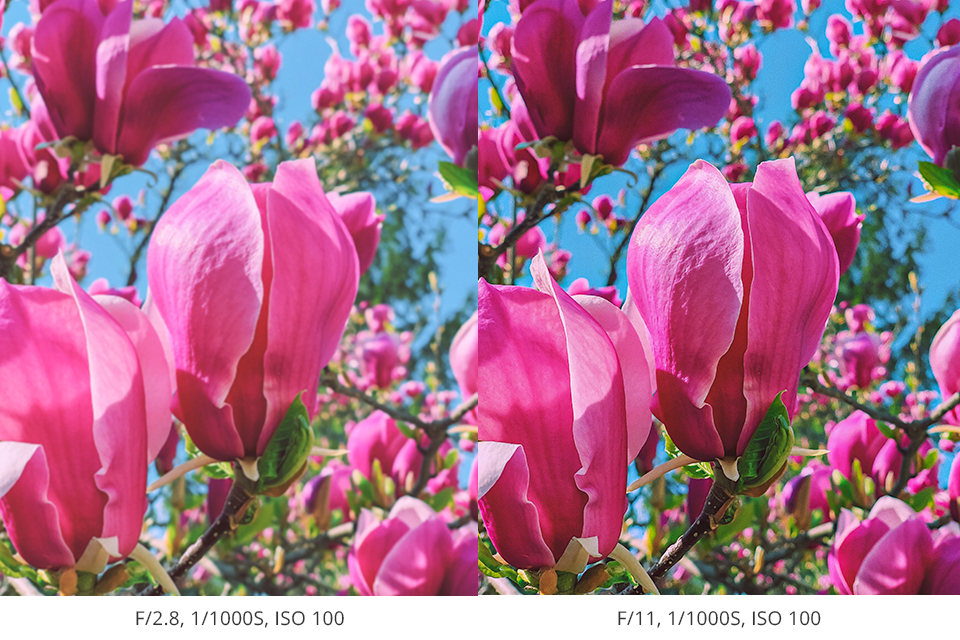
Narrower apertures (high f values) grant a deeper depth of field, letting you get a large part of the scene in focus, for instance, panoramas with foreground and background. A wider aperture creates a shallow depth of field, which helps isolate the subject and is one of the best compositional tools in portrait photography. Most lenses are sharpest in the range from f/8 to f/5.6.
Many photographers are willing to sacrifice sharpness for the isolating effects of a wide aperture to hide an unattractive background behind the focal length. If you wish to capture a still landscape with a large area in focus, start by setting a closed aperture, such as f/11, and then balance the exposure triangle with either shutter speed, ISO, or both. If your goal is a night landscape, start with a wide f/2.8 aperture and then tweak the ISO.
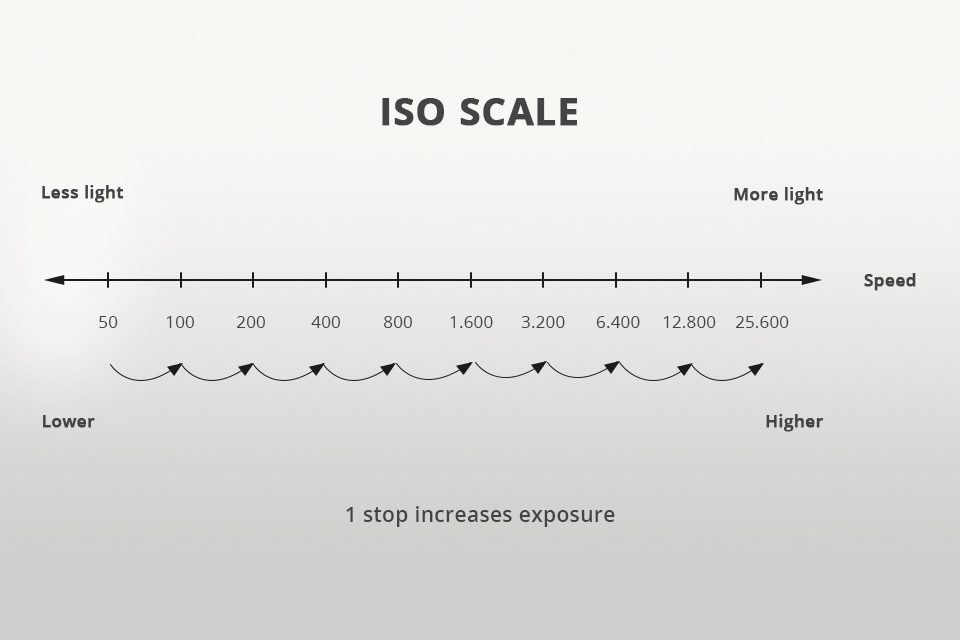
The last variable in the triangle of exposure is ISO. It is a measure of the digital sensor’s sensitivity to light. The higher the ISO, the more sensitive the surface is to light, and vice versa. You can regulate the sensitivity of the digital sensor on the go, although technically this controls the post-image gain applied to the signal. Simply put, ISO is an artificial boost of brightness and amplification of the light captured by the camera.
Like the shutter speed, the ISO scale is easy to understand. Moving by one division leads to a doubling of the ISO and means a boost of exposure by one stop. Reducing the ISO by half leads to a decrease by one stop. A low ISO value (100) is useful for the camera when there is plenty of light because the camera takes a clear shot only in ideal lighting conditions.
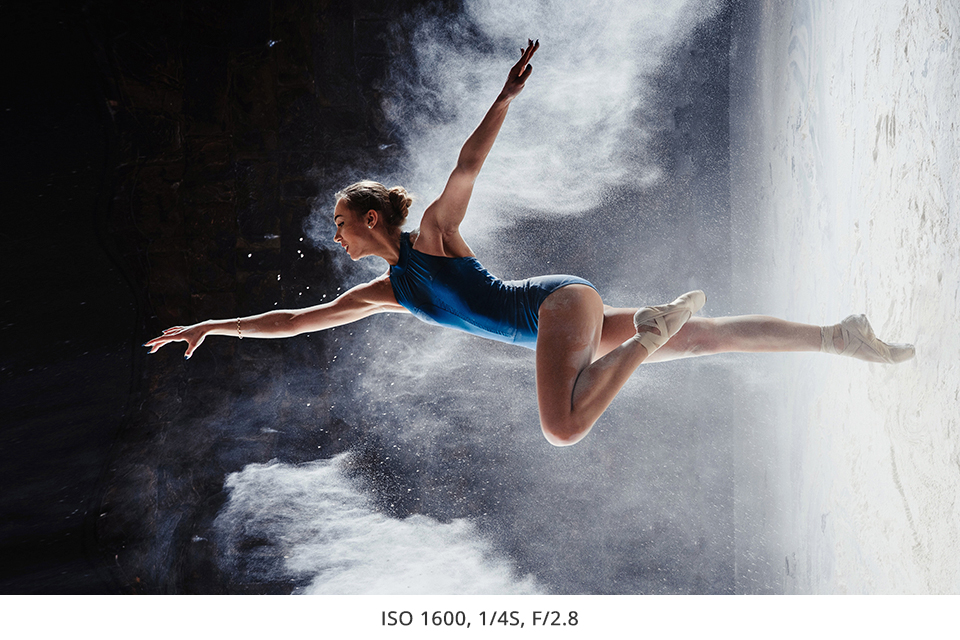
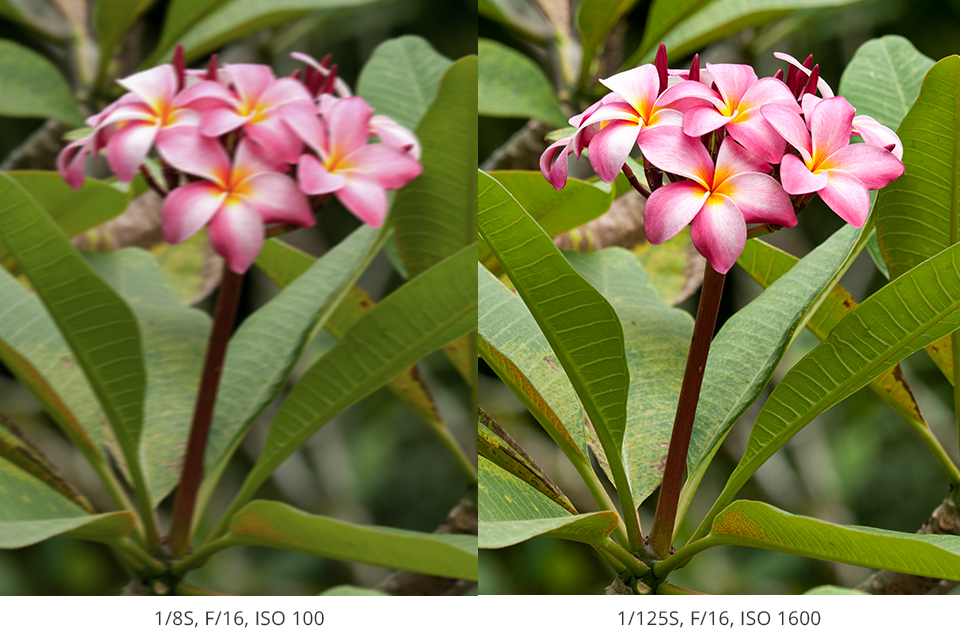
Why use high ISO? When working in low light, you are already using the widest possible aperture and long shutter speed to gather the available light. Your only choice is to raise the ISO. It is not recommended to sacrifice sharpness for a longer shutter speed. Many people would prefer a grainy shot with a clearly defined subject over a smoother solid one with a blurred subject.
Let’s say you intend to take a shot in the evening without a flash. Raise the ISO, and this lets you use a higher shutter speed or a smaller aperture (a larger f-number) and, at the same time, accept the lighting conditions for the correct exposure. If there is insufficient light, and the shots are blurry even due to the low shutter speed, just raise the ISO. However, don’t forget to bring its value back after you are done with night shooting.
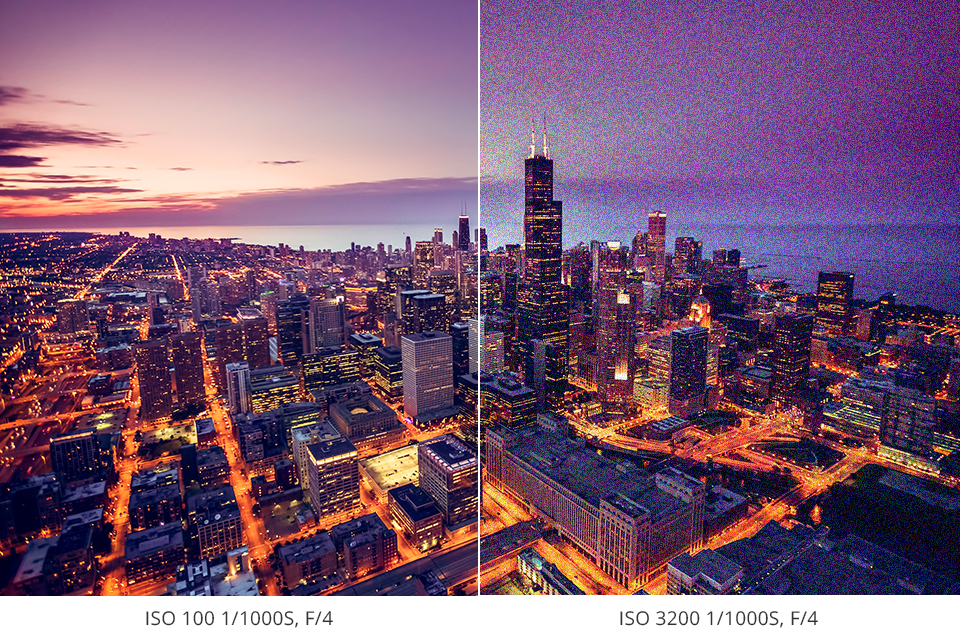
Raising the ISO lets you work with less light. However, the excessive use of ISO leads to increased noise and less detail. Digital noise is the result of random fluctuations in an electrical signal. At lower ISO values, the image signal is larger in comparison with noise, and it remains invisible. When working with higher ISO values, the image signal is close in magnitude to the noise. Thus, the noise becomes visible in the shot.
Digital noise often resembles graininess and can be lowered using, for instance, a dedicated free Lightroom preset. Also, noise may be used for artistic purposes to give the shots a rougher or a film look. To achieve the graininess artificially, raise the ISO. If you are after a clear shot, use the lowest possible ISO value.
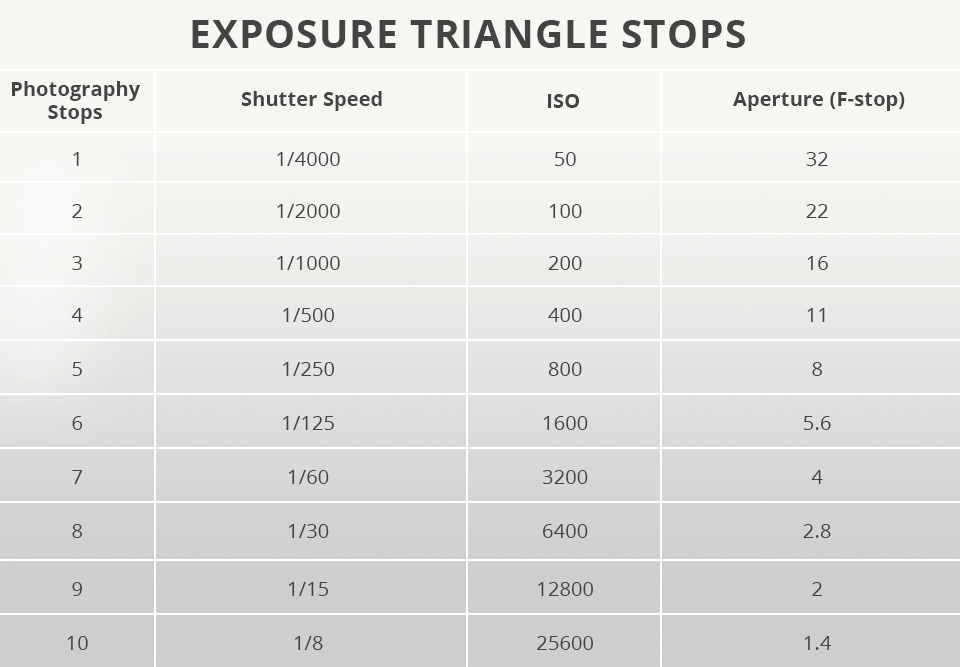
All three elements work in concert to generate an exposure value (EV). It means that you can’t always manipulate one parameter separately without directly influencing one or both of the other elements of the exposure triangle. Most of the values or stops of these parameters are standardized. The exception may be professional-level cameras with switching to a third of the stop or with extended range boundaries.
The main rule of the photography exposure triangle state is balance. When the three sides of the triangle are under control, the correct exposure value will be close to zero. According to this, whenever you tweak one of the sides of the triangle, you have to compensate by adjusting one or two other sides, while maintaining balance, since this is the ultimate goal of the triangle.
For instance, you have an exposure triangle in balance and an EV of 0, and you wish to increase the aperture by two stops to maintain balance. In order for the EV to remain zero, you must reduce the ISO and shutter speed by one stop, or only the ISO by 2 stops, or only the shutter speed by 2 stops.
Let’s say you have configured the following settings for the exposure triangle photography because they provide the correct exposure for a certain scene: f/8 aperture, 1/2000 s shutter speed and ISO 200. However, you know that that the final shot will be unsatisfactory since you are currently photographing a flying bird and you wish to capture the movement.
To fix this, raise the shutter speed from 1/2000s to 1/4000s (which means reducing the shutter speed by one stop and reducing the light by half). But, if you don’t compensate for the rest of the exposure triangle, the EV will change and the shot will no longer be properly exposed for the overall scene.
To compensate for this, increase the aperture from f/8 to f/5.6 (open its hole wider) or raise the ISO 200 to 400 (raise the light sensitivity) to restore balance. The logic is simple: if you shoot less light with a shorter shutter speed, add the missing light using a wider aperture. Either increase the ISO, or all the values to compensate for the exposure triangle and achieve balance again.
The first exposure triangle parameter to tweak in most cases is the aperture. The shutter speed is adjusted first when capturing movement or clearly changeable scene conditions. Then the aperture is adjusted again. ISO is rarely the primary parameter to configure, and it is used to balance the exposure triangle. Set ISO in the first instance only in conditions of obvious insufficient illumination.
Fortunately, even overexposed or underexposed shots (especially old pictures were guilty of this when the ISO of the film was fixed) can be corrected. This is possible thanks to the best photo restoration software or a professional photo restoration service.


