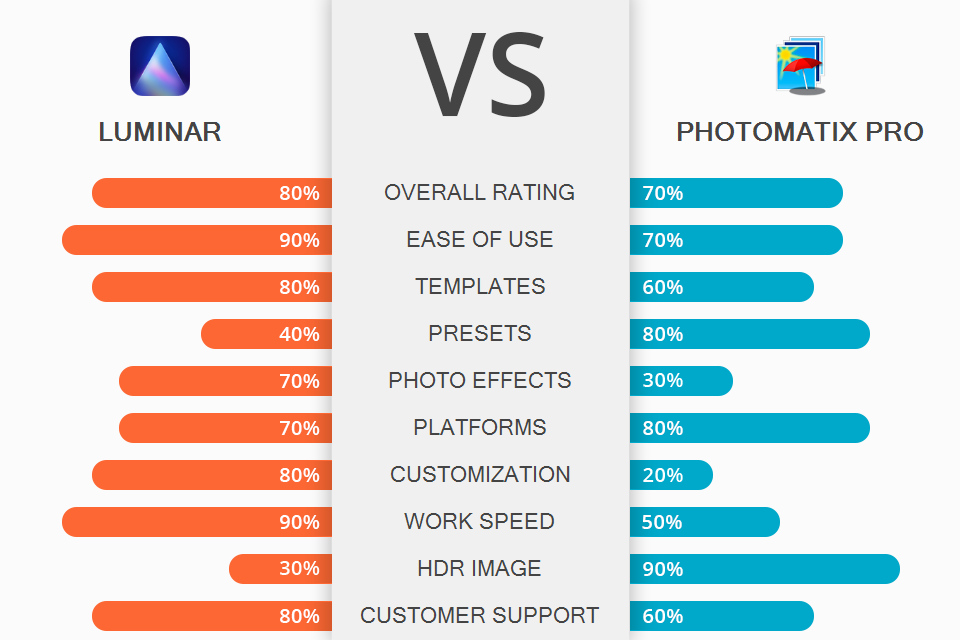
Comparing Luminar vs Photomatix Pro, I’ve noticed that both editors have a lot of features for improving pictures but with some considerable differences. Luminar is an intuitive program designed mainly for newbies whereas Photomatix Pro has a more sophisticated functionality, which will be better for experienced retouchers. The ability to use Luminar as a Photoshop or Lightroom Classic plugin, and as a Photos extension for macOS adds more points to the program. In its turn, Photomatix Pro is only available as a plug-in in Lightroom. Both editors are compatible with Mac and Windows platforms.
Luminar abounds with features powered by artificial intelligence that can handle any editing task in just several clicks. You do not have to be a gig to use this program to turn a dull image into a real artwork. Besides, you are free to tailor a menu layout as you want. You will definitely appreciate its handy toolkit for deep color corrections, convenient modules for basic face & body touch ups.
Photomatix Pro allows merging a series of bracketed shots into one picture for further editing. Besides, you can also process a single shot by tweaking its various specifications: from saturation to curves. The program’s ability to combine several shots taken at various exposures into a single HDR picture is an absolute highlight. This feature allows you to take outstanding HDR pictures. Like its competitor, Photomatix Pro boasts an array of presets and handy settings for speedy post production.
With over 20 original photo effects and a list of editing options, Luminar can perform virtually any editing task. Use it to refine landscapes, enhance portraits, erase unwanted details, etc. Even sky replacement with complete scene relighting turns into a one-click and simple procedure. It is possible to adjust camera exposure, make the colors more vibrant, add a special touch by creating natural haze or mist, and more.
Besides, with Luminar’s toolkit, ideal skin with natural texture is not a dream for amateurs but a reality. Skin AI and Face AI are the options that allow emphasizing every face feature without hassle. Photographers who have compared Luminar vs Photoshop admit that the program is more user-friendly than Adobe Photoshop in this case. Luminar stands out by an array of automatic features to fulfill any manipulation in just 1 click or slider move. Photoshop is primarily oriented toward professional retouchers and digital drawing experts who can reap the benefits from multiple brushes, layers, and masks.
Photomatix is a professional editor that offers countless opportunities for its users. Take advantage of the brush tool to combine your images, tweak their tone and colors, or batch processing mode to apply the same action, edit, or effect to multiple pictures simultaneously. A collection of presets, which you can easily customize, is another bonus. Although this HDR software is complicated for beginners, many YouTube tutorials and tips will let even newbies enjoy the functionality of this editor.
Similar to its competitor, Photomatix helps you start a new project by offering templates to any taste. Users often compare Photomatix vs Lightroom and claim that the former is a more sophisticated product. Photomatix can handle all your basic retouching needs and appeal to photographers with its ability to produce only high-quality prints.
Luminar AI is not a subscription-based program, so you need to pay only once to get a lifetime license that covers both an app and plugin for Adobe Photoshop.
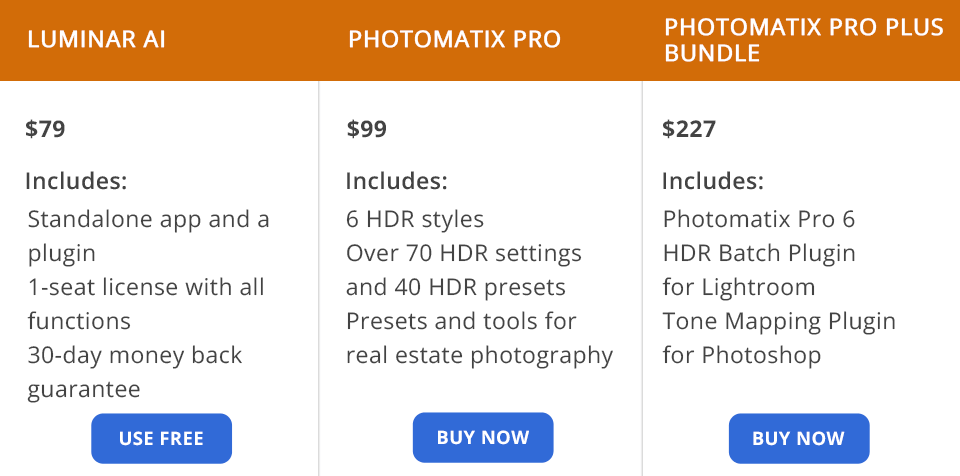
Luminar AI Single License costs $79. This is a one-seat license with full functionality. Other pluses are a 30-day refund guarantee and round-the-clock customer support.
Luminar AI Two License costs $99. This is a two-seat license with full functionality. It also includes a one-month refund and 24/7 customer support.
Before purchasing Photomatix Pro, you can download and try the program for free. But be ready that all your creations will contain watermarks. To get rid of it, choose one of the following paying options.
You’ll need to spend $99 to purchase Photomatix Pro. For this price you get 6 HDR styles, more than 70 HDR settings, 40 HDR presets, a brush tool, templates, and features for real estate shots, etc.
The cost of the Photomatix Pro Plus Bundle is $227. It includes Photomatix Pro 6, HDR Batch Plugin for Lightroom, and Tone Mapping Plugin for Photoshop.
Adobe Lightroom Users can benefit from HDR Batch Plugin, which costs $49.
Luminar or Photomatix Pro – who is the winner for me? Everyone has their defeater, as each program is good doing some specific tasks. For instance, Luminar AI is a more optimal tool for performing basic editing fast and easily to get an adorable picture. The program boasts a range of AI-powered templates to perform high-quality retouching of a particular image section. Although some manual improvements will probably be required, the automatic presets do a pretty good job.
Photomatix Pro excels with its ability to create incredible HDR edits and exposure combinations. Although it has a bit steep learning curve, both amateur and seasoned photographers can reap the benefits from its multiple presets, several rendering algorithms, and a basic set of color correction tools.


