If you are wondering how to increase resolution in Photoshop and make a blurry picture clearer, examine this tutorial. Photoshop offers functions that intend to help you raise the resolution without distorting the visual quality. In 7 simple steps, you will enhance the size of the pictures four times while maintaining clear edges and details.
Pixel dimensions measure the total number of pixels in the width and height of the picture. Resolution is the degree of a bitmap picture’s detail, which is measured in pixels per inch (PPI).

The more pixels per inch, the higher the resolution. Generally, a picture with a higher resolution provides an enhanced quality of the printed result.
If you are wondering how to resize pixel art in Photoshop and how to increase the resolution of an image Photoshop, follow these steps.
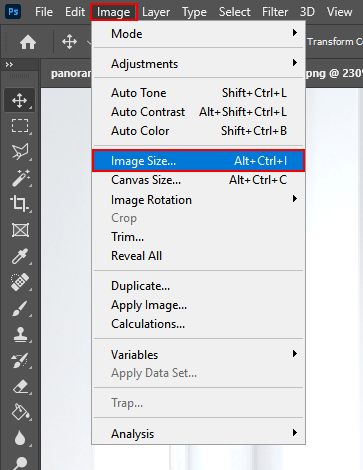
Navigate to Image > Image Size. This dialog box lets you view the correlation between the picture and resolution.
Uncheck Resample Image as there is no need to change the amount of image data in the shot. Then modify the width, height and resolution. When you alter one value, the other two change accordingly.
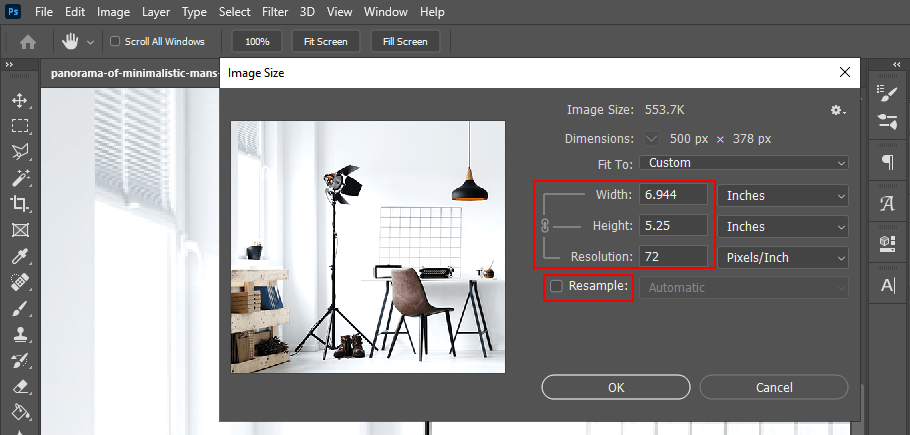
By checking the Resample Image option, you can modify the resolution, width and height of the picture according to the printing needs or the screen. Lowering the resolution at the identical document size leads to a decrease in the pixels’ size when re-sampling.
Photoshop can determine the suggested picture resolution based on the screen frequency of the output device. To do that, click Auto.
In the Screen field, enter the screen frequency for the output device. If necessary, select a different unit of measurement. The screen value is only used to calculate the picture resolution, not to configure the screen for printing.
To fix photo resolution Photoshop, pick one of the options:
Draft – produces a resolution that is identical to the screen frequency (at least 72 pixels per inch).
Good – gives a resolution 1.5 times higher than the screen frequency.
Best – gives a resolution 2 times higher than the screen frequency.
If the picture’s resolution is more than 2.5 times higher than the screen resolution and you attempt to print the picture, a warning message appears stating that the picture resolution is higher than it should be for the printer. In this case, you need to save a copy of the file, and then lower the resolution or crop an image in Photoshop.
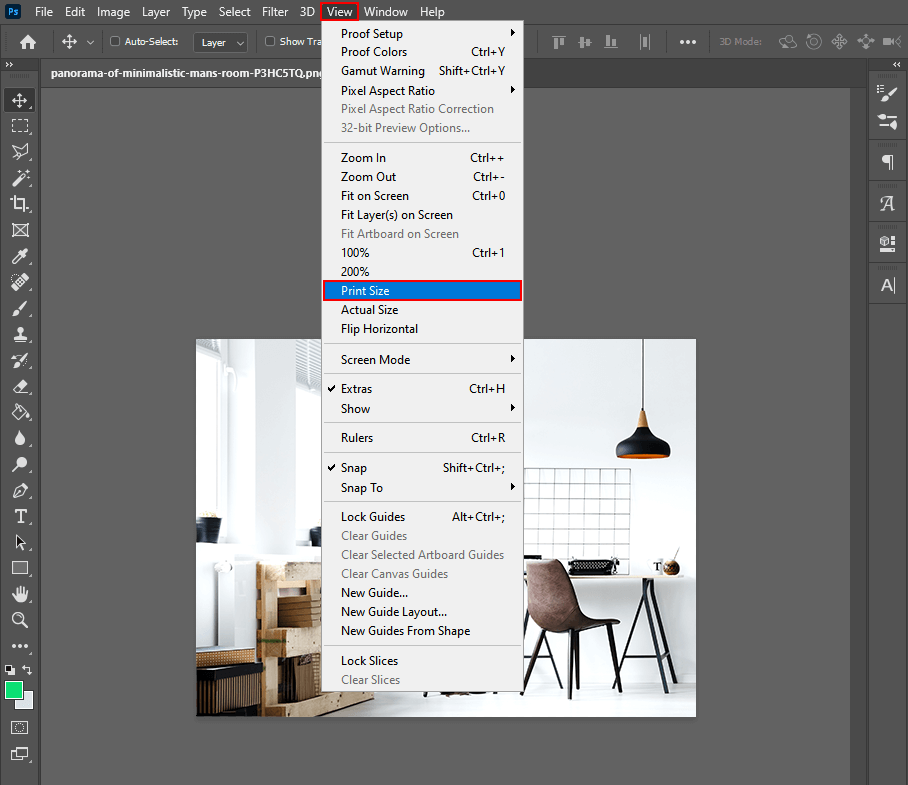
To view the print size on the screen, try one of the following methods. In the View window, click Print Size or select the Hand tool or Zoom tool. Then click Print Size in the options panel.

You have the opportunity to adapt the file size to a particular print template. The picture is redisplayed in its estimated printing size, as indicated in the Document Size area of the Image Size dialog box. The size and resolution of the PC influence the on-screen print size.
Oversampling is a modification in the amount of image data when you are altering the pixels’ size or the resolution of the picture. When the resolution is lowered (the number of pixels is reduced), the information is eliminated from the picture. When you raise the number of pixels or boost the sampling, new pixels are added.
One of the frequently asked questions is how to remove noise in Photoshop. Photoshop tutorials offer several methods to help you cope with this problem so that the pictures do not look pixelated.
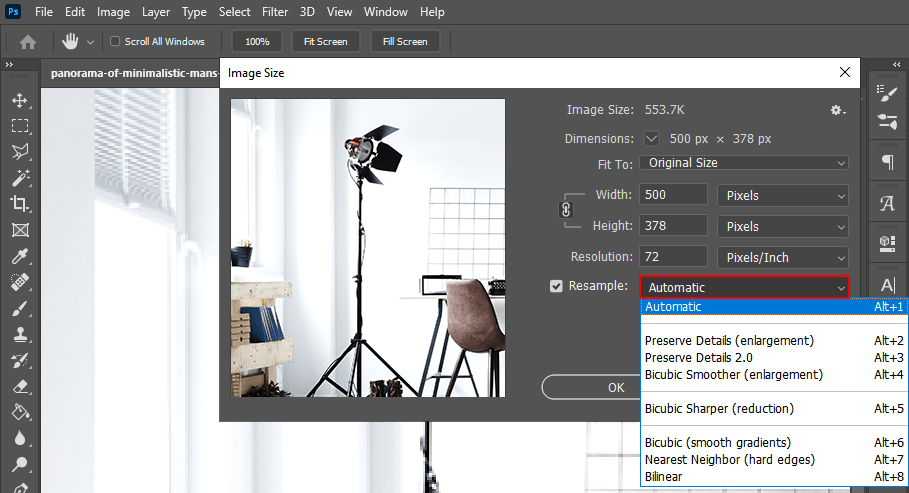
Indicate an interpolation method in the Image Size dialog box to define how pixels are added or removed. You may pick one of these methods: Nearest Neighbor, Bilinear, Bicubic, Bicubic Smoother, Bicubic Sharper.
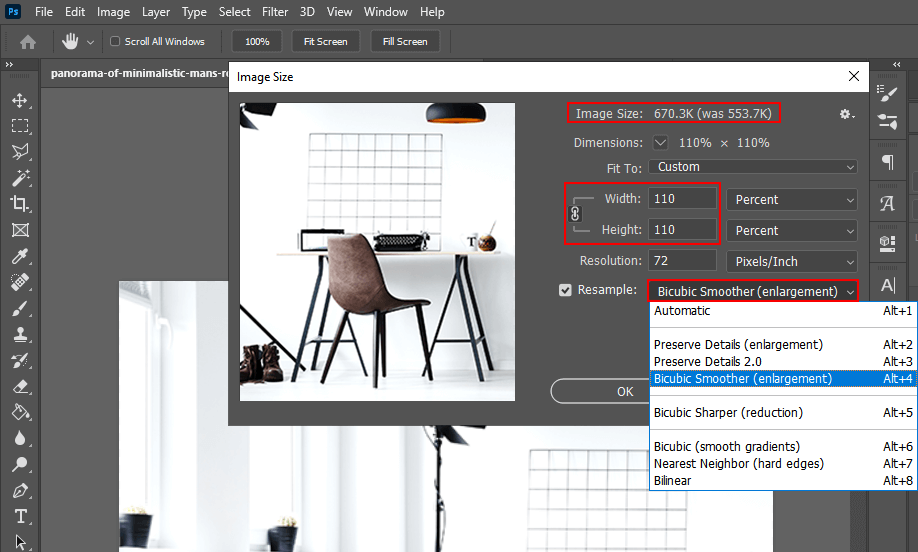
Bicubic smoother is a nice method to increase picture resolution Photoshop. It is based on bicubic interpolation but intended to grant smoother results. To use this interpolation method, open the Image Size window and select Bicubic Smoother. The units of measurement are percentages.
The document dimensions will immediately be set to 100%, so raise them a little – up to 110. At this step, you can click Ok. Thus, for instance, when you zoom in on a picture, Photoshop creates additional pixels based on the values of neighboring ones.
If you are after professional shots in high resolution, approach FixThePhoto expert retouchers. They will help you increase image resolution Photoshop for qualitative printing.

If you are searching for ways to enhance a photo and achieve top-grade quality, find out how to install Photoshop actions and apply them in Photoshop. They are designed by qualified photo retouchers and will perfectly match your photography style. These actions help simplify the work with shots, making the pictures more vivid and attractive.