Filmora Video Editor Review
When you purchase through affiliate links on our site, we may earn a commission. Here’s how it works.
Filmora Video Editor 2026
- Platforms: Windows, Mac OS
- Price: Free or $44.99/year
- FixThePhoto Editors' Rating
(3.5/5)
Are you looking for a good alternative to Windows Movie Maker or iMovie? Then this Filmora video editor review will be very helpful. It may become an effective replacement for these popular programs if you use Windows or Mac for video editing. So, let's find out whether Filmora can be a good software for video editing for beginners.
What Is Filmora Video Editor?
VERDICT: Wondershare Filmora is a simple, elegant video editing software designed for amateur users. Anyone can learn how to work in this program for about 15 minutes. The final results always look nice but if you use its free version, your footage will be with watermarks. The creators position this photo video maker as an alternative to Apple iMovie or Windows Movie Maker.
Wondershare video editor offers many useful features such as the possibility to add overlays, animations, and elements such as GIF images, music, and text to the videos. Moreover, it provides tools that allow users to crop the footage, increase or decrease the size of the clips or adjust them all to specific playback time. You can also use the tilt-shift function to blur certain parts of the video, remove noise from your movie and audio, etc. However, the features are a bit limited if you use Filmora free version.
Filmora Review
Its interface is designed on the principle “all tools are in front of you”. It will attract plenty of beginners who don’t like regular video editing softwares with complicated tools arrangement. I studied the program and can define all its interesting features.
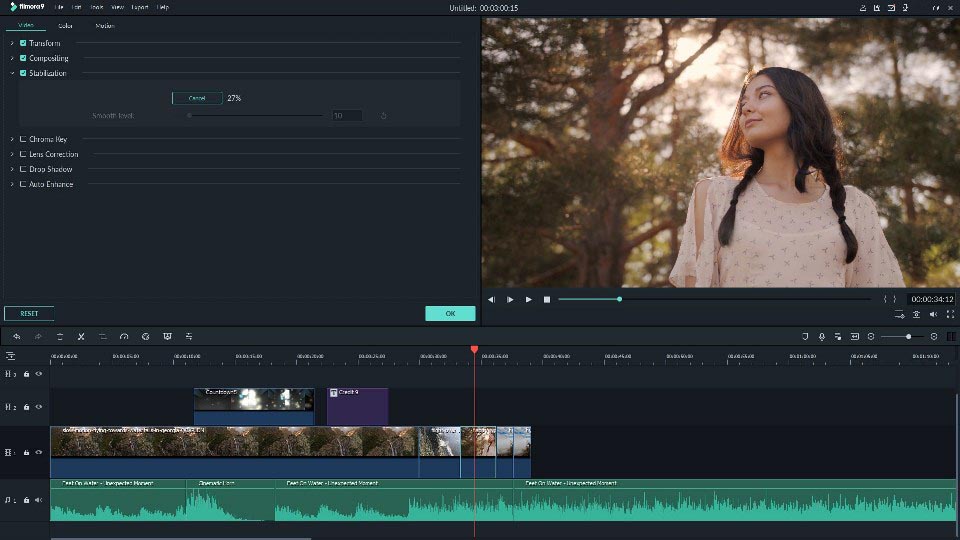
Fantastic Capabilities of the Timeline
A timeline provides a full control over your video project. You can have 100 video and 100 audio tracks for editing. The timeline is even more efficient in the 9th version, so no wonder many users are searching for Filmora 9 free download links.
Very Simple Interface
Filmora’s interface and the workflow are among the easiest to understand among all video editing programs I used. All tools and functions, such as adding text and transitions, applying filters and exporting clips are available on the main interface.
You can learn how to navigate Filmora Pro in just a few minutes, while other programs can take hours to master them.
- Read more about the best video editing softwares.
Various Video Editing Modes
When you first start Filmora, you get four entry points to four editing modes, and their names indicate the focus of the program: Action Cam, Full Feature, Instant Cutter, and Easy Mode.
Unfortunately, you cannot switch to another mode after entering one. You must restart the app. For example, Action Cam mode contains the tools necessary for this genre, in three modules — Fix, Speed, and Color.
- Read more about these modes in this Filmora video editor review.
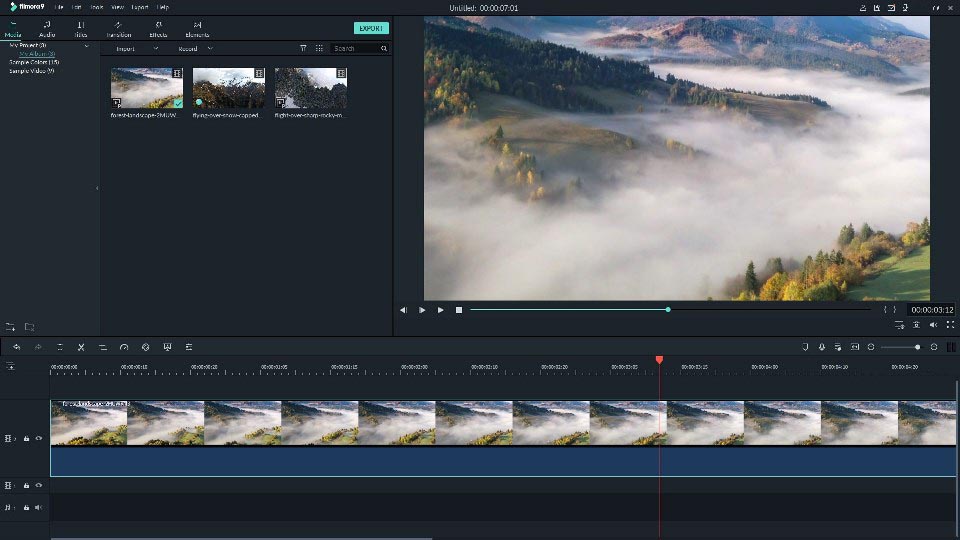
Convenient Import Features
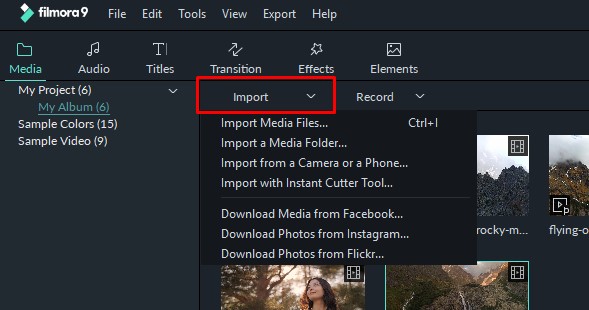
Filmora allows importing standard, HD and even 4K videos. Your media clips, including imported videos, images, and audio files, will be located in the media library, where you can quickly and easily access them without creating unnecessary directories, etc.
Recording Videos
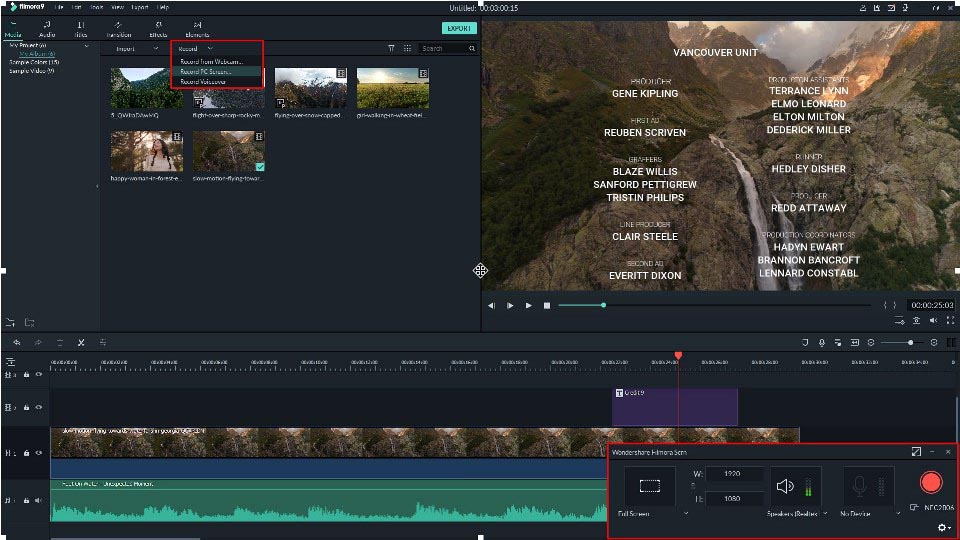
You can record videos in this video editing software from your webcam or PC screen. You can also record voice over it. The video file will be automatically added to the library and you can simply drag it onto your timeline.
Wide Selection of Filters
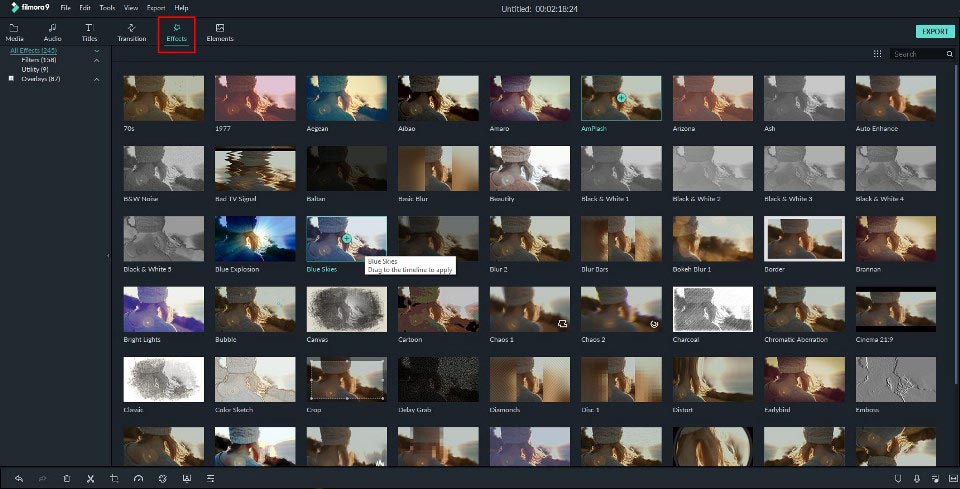
Filmora Wondershare allows you to add as many filters as you want. Click on the “Effects” in the media library and then select the filters or overlays that you want to add to your project.
Hover over the sketch of the effect you want to use. When you see a plus sign in the middle, click on it. Then the effect will be added to the timeline.
Note. If you are editing a “portrait” clip (9:16) in a 16: 9 video format, you can add background blur filters to replace the black bars.
All filters and overlays in this video editing app are sorted by subject category (for example, Faux Film or Bokeh Blurs) so you will find them easily. Go to the “Effects” menu and look at the left side of the screen to see the categories and start watching.
Extended Color Grading
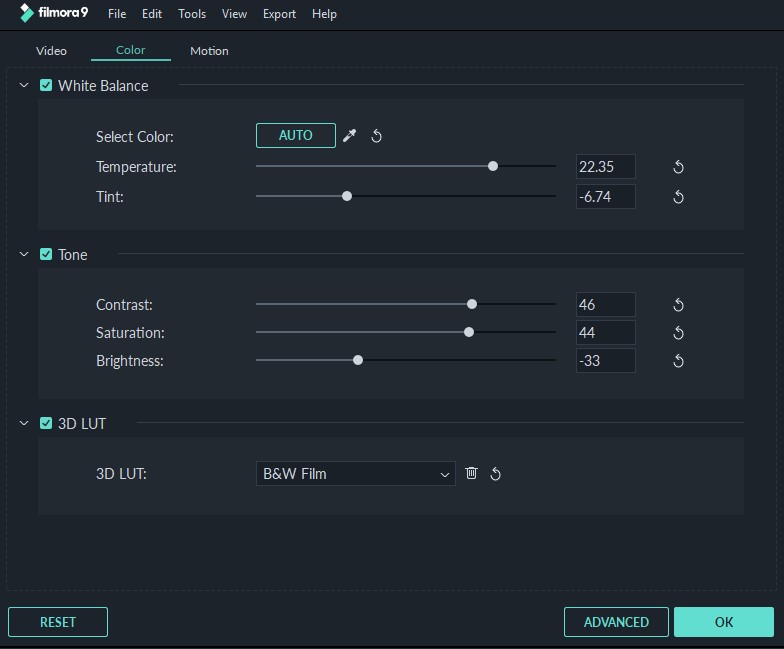
After dragging the video onto the timeline, click on the “Color Palette” icon to open the “Advanced Color Adjustment” window.
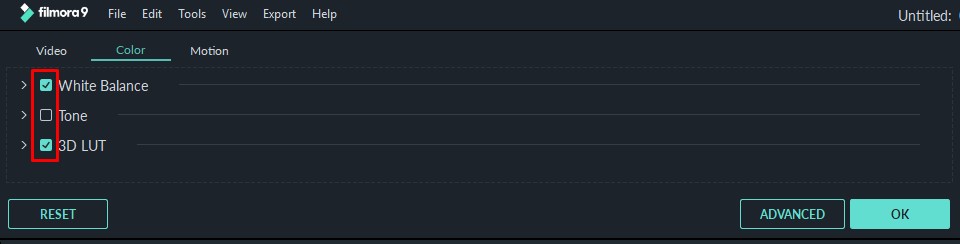
The Preset” tab contains many free templates, including 3D LUT, Vignette, Shared, Movie, Custom, and Favorites. Just double-click on the necessary template and apply it right to the video.
White Balance: this parameter helps you adjust the color temperature. You can set a warm color by moving the light slider toward the yellow side or set a cooler hue by moving the light toward the blue.
3D LUT: color correction presets are usually used as part of the digital intermediate process while creating movies.
Color: in this section, you can adjust the exposure, brightness, contrast, saturation, and shine.
Light: here you can adjust the lighting of the video by changing the basic settings, namely glare, shadows, BW.
HSL: refers to hue, saturation, and brightness, which are used to optimize the individual color range of your clip.
- View more about how to install LUTs.
Changes Preview
Every Filmora video editor tutorial states that you can watch the video in the "Compare Before/After" mode when the setup is over. You can do this in the Side by Side, Left to right or Stacked display.
If you are not satisfied with the setting, you can click the Undo / Redo button in the preview window and configure everything again.
Audio Equalizer
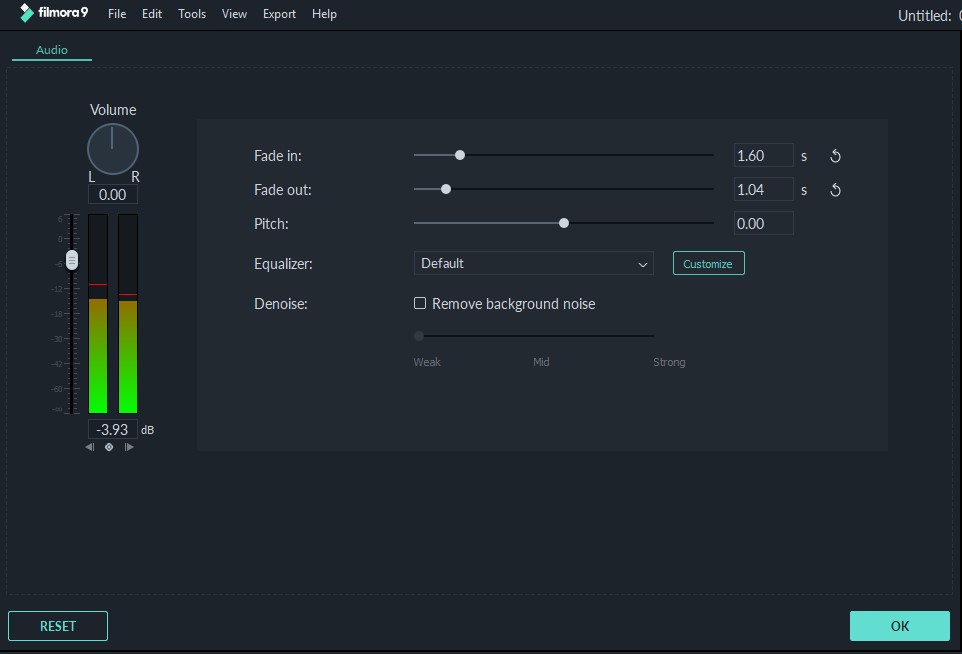
The audio equalizer feature allows you to customize the sound to achieve the perfect combination of audio. Thus, the different instruments and vocals will sound great with each other.
To set up the equalizer, open the Audio Inspector window by double-clicking on the audio in the timeline. Then in the "Equalizer" tab, select options, including default, pop, rock and roll, soft, classic, low bass, lively, country, techno, hard rock, acoustic, folk, blues.
You can also click on the “Customize” button to use additional settings.
Synchronization of Audio and Text
Users can reduce the volume of the part of the clip where the text and effects are displayed. You can not only add phrases but also complement them with beautiful animation and effects. Many users compare Filmora captioning algorithm with the Lightworks video editor.
- Read my Lightworks review.
Split Screen Function
With this feature, you can create videos with multiple clips and frames that are displayed simultaneously in the same video. To do this, you need to select the split screen icon located on the left.
Then you will see the split screen settings, from which you can choose how many screens you need and how they should be located.
Artificial Background Blur
Use the Tilt-Shift feature if you want to focus on one part of the clip and blur the others. The Mosaic option allows users to blur certain parts of the video and adjust the percentage ratio that causes an increase or decrease of the part where blur is applied. It functions similarly to the best free photo mosaic software.
Filmora Video Editor Price
Its trial version lets you export recorded material only 10 times and the program automatically adds the Filmora logo on exported projects. If you want to work without watermarks, pay attention to the prices which depend on the operating system:
Windows:
Wondershare Filmora Personal - $39.99/year
Wondershare Filmora Pro - $89.99/year
MacOS:
Wondershare Filmora Personal - $49.99/year
Wondershare Filmora Pro - $89.99/year
You can purchase a full license without the necessity to pay every month. It is also possible to get a discount for students.
4 Filmora Alternatives
If Filmora effects and functions are not enough or you simply are not satisfied with the software’s interface, then here are 4 high-quality alternatives that will allow you to perform good video editing.
1. Adobe Premiere Pro CC
Platforms: Windows, Mac OS
Price: Free trial or $20.99/month
This is a recognized leader for video editing. This drone video editing software has complete control over the process of creating and processing videos.
It allows you to create, edit and share video files, work with Creative Cloud storage, as well as work closely with other Adobe software, for example, with After Effects to create special effects. Tight integration with Adobe programs gives Adobe Premiere another point in Filmora vs Adobe Premiere competition.
- Read my Adobe Premiere Pro review.
2. Promo
Platforms: Windows, Mac OS, Linux
Price: $39/month
Promo is a pro-level tool, which you can use to create attention-grabbing videos, landing pages, promotion content, media posts, overviews, etc., in retail, travel, real estate and other spheres. There is a bunch of pre-made video templates that make the entire creation process fast and trouble-free. You can easily produce unique videos with custom texts, music, animations, and brand logos.
Looking through the available toolset, you’ll see many handy instruments including those for adding images and watermarking your layouts and photo grids. You can bring to life your specific ideas by resizing and optimizing photos based on requirements set by particular media platforms (Pinterest, Facebook, etc.)
3. Lightworks
Platforms: Windows, Mac OS, Linux
Price: Free
If compare Lightworks video editor with other free softwares for video editing, it will leave many competitors far behind in terms of editing capabilities. Lightworks is truly one of the most powerful free video apps and one of the rarest cases when a free video editor supports multi-track editing.
But on the other hand, it is a program that you need to study for a long time on your own. Lightworks has such an unusual interface that working in it at first resembles a real quest.
- Check out the best video editing software for Mac.
4. Shotcut
Platforms: Windows, Mac OS, Linux
Price: Free
There are a number of differences that distinguish it from the total mass of free video processing apps. This program, for example, offers a history of user actions, so you can quickly return to any stage of video editing (similar to how it is realized in Adobe Photoshop).
Shotcut is not another alternative to Windows Movie Maker. It is an attempt to finally make a convenient free tool for more or less large projects.
Free LUTs for Video Grading
Filmora, unlike many similar simple programs, makes it easy to upload LUTs and use them to color-correct videos.
Aura Free LUT


I think you have seen dozens of videos on the GoPro channel on YouTube, where the clip is simply full of colors.
You may have purchased such a camera but the picture you get is different. You can get the results you want by downloading and applying our LUT. Amazing choice for vlog video editing.
Breeze Free LUT


Mavic Pro is a very cool drone that is considered to be the best one thanks to available capabilities. Its camera allows you to record top-quality videos.
But you won’t be able to get really cool clips without color correction and our LUT will help you with video post production. It will make the colors richer and deeper.
Green Cast Free LUT


A nice LUT if you are recording landscape videos. It works great with shades of green making them rich.


