
While it might be difficult to shoot photos using a black background, you just need to learn how to use a variety of black background lighting techniques to get the desired result. When it comes to photography, people usually talk about different types of light, such as ambient flat, split, rim and butterfly light, among many others. Below, I will tell you about the main techniques that are suitable for using different types of lighting when shooting portraits.

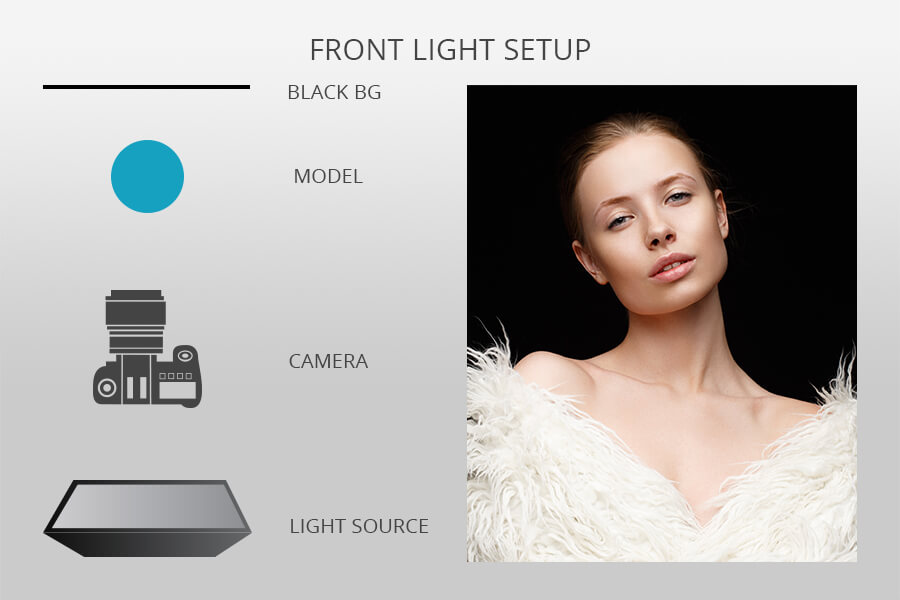
To use a front light, you need to put your light source in front of your model. It will allow you to minimize the amount of shadow and spread light more evenly so that there are no overexposed or underexposed areas visible in the photo.
Flat light is a perfect solution for taking portrait photos. When using it, you don’t need to worry that wrinkles and skin imperfections will be clearly visible in the frame. If you want to create a perfectly symmetric composition, it will be easier to do it due to the lack of shadows from either side of the face.
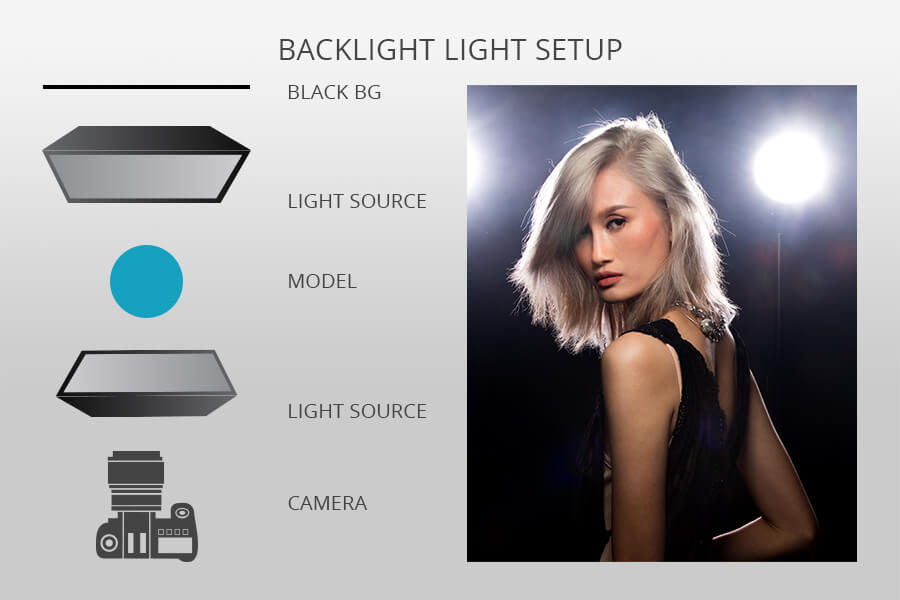
To take backlit portrait photos, you need to hide the light source behind your model. In such a way, the model will stand directly in front of the light source. This technique is perfect for lighting black background as it allows you to emphasize the silhouette of your subject and experiment with long shadows. The only disadvantage of such photos is that you might have some issues with the white balance. As the result, it might be impossible for you to capture some important details.
If you want not only to capture the silhouette but also to make all the details clearly visible, make sure to use a light diffuser. It will allow you to reflect the background light onto your model and emphasize some details.
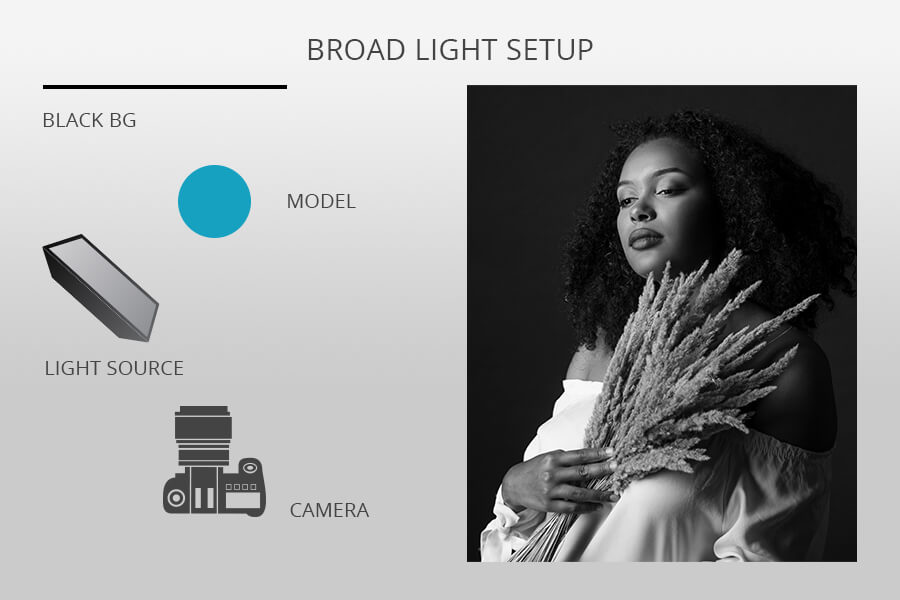
Broad lighting allows you to emphasize the face of your model by directing light at it. The term itself refers to the broad side of the face. It’s one of the most widely used types of lighting in studio photography.
It’s quite different from short lighting as it visually elongates the face, which makes it hardly suitable for taking photos of subjects who already have a wide face. However, you can use it for taking photos of people who have narrow faces.
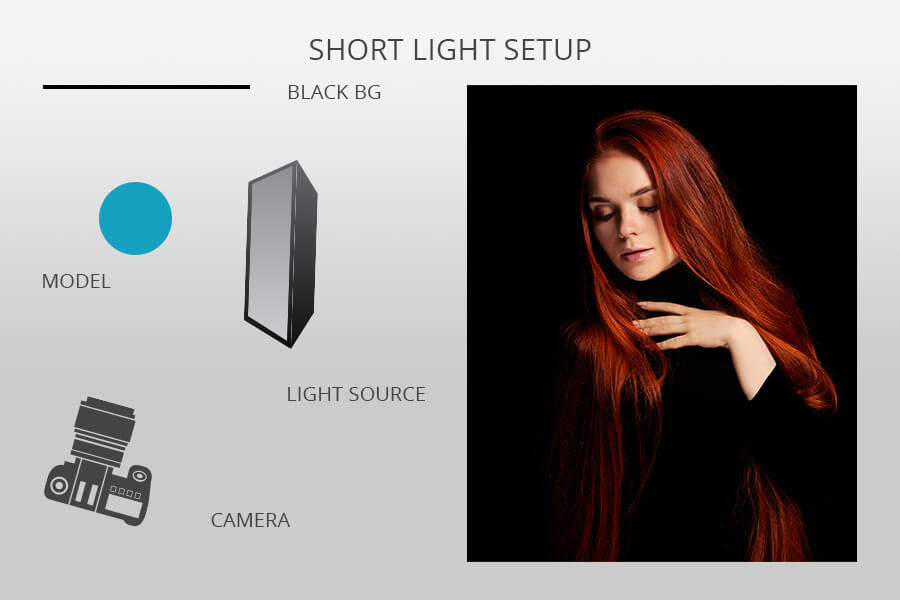
As I have mentioned above, what makes a short light different is that it falls on the side of the face that is farther away from the camera, thus leaving the other side in the shadow. It’s widely used by photographers since it’s suitable for models with different types of faces.
However, you should remember that deep shadows always emphasize textures and make wrinkles and skin blemishes more visible. When using a black background, you should be wary of emphasizing skin imperfections as they might spoil the overall impression.
Make sure to ask your model beforehand how they feel about their acne and scars. If a model is self-conscious about them, it’s better to make the skin imperfections less visible by using a different type of lighting.

To achieve soft black backdrop photography lighting, you need to diffuse light. It will help you avoid deep shadows and make the difference between dark and light areas less noticeable.
If you prefer taking photos in a studio, you can put a reflector in front of your light source. For instance, you may hang a curtain over the window to make light more diffused. Using soft light, you can make your models look younger.
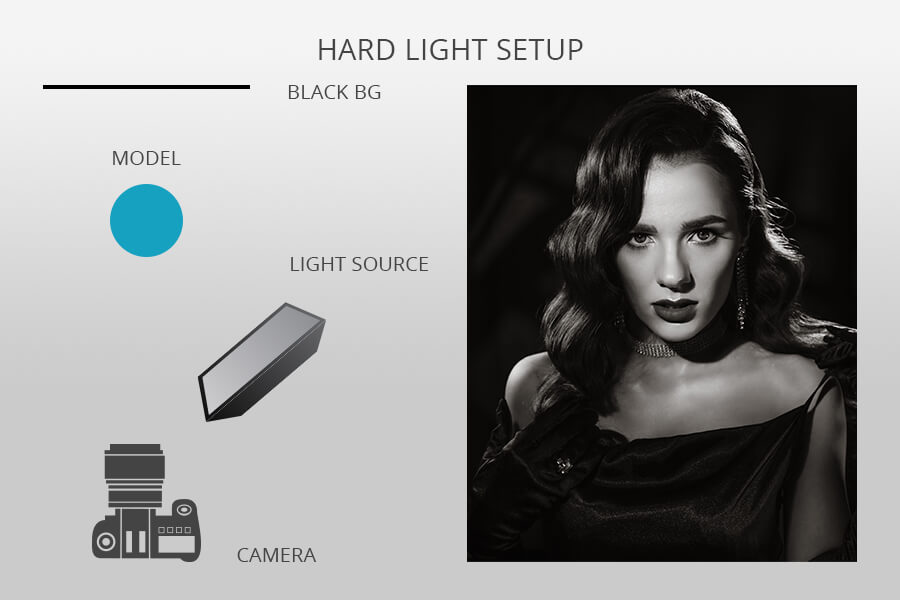
Hard light is achieved when you use a focused, directional light source. When using it, you will notice deep shadows in the frame that can emphasize specific areas of your photo.
This type of lighting allows you to make the distinction between light and shadow more noticeable. If you direct such a light source at your subject, it will cast a deep shadow. You can also use it outdoors on a sunny day when the sun lights all your subject.
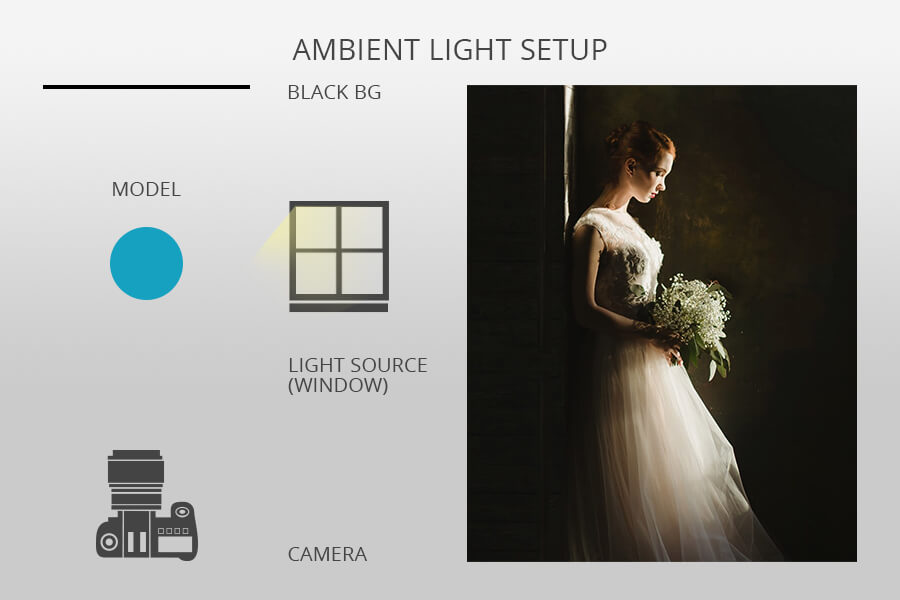
Ambient light allows you to take photos without any artificial sources of light. For instance, you can use sunlight, street lights, or even moonlight as the source of ambient lighting. The main important thing is to select a location that has plenty of ambient light.
By using ambient light, photographers strive to get diffused light that can be reflected from different surfaces. This type of lighting is suitable for taking portrait photos and capturing landscapes.
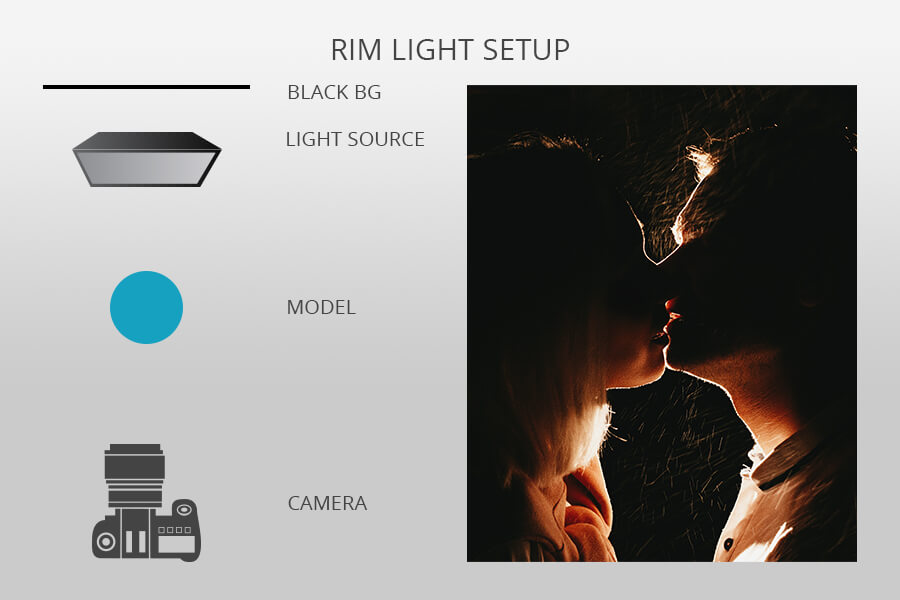
Rim light is a method based on the same principle as the backlight. When using the latter, you might capture images with unfocused highlights in the background, however, the former is perfect for avoiding this effect.
When using the rim light technique, you can make the light emphasize the edges of the model’s body and create silhouette. Your subject will be clearly separated from the background so you won’t see any distracting haze with the exception of the area in the top right part of the frame.
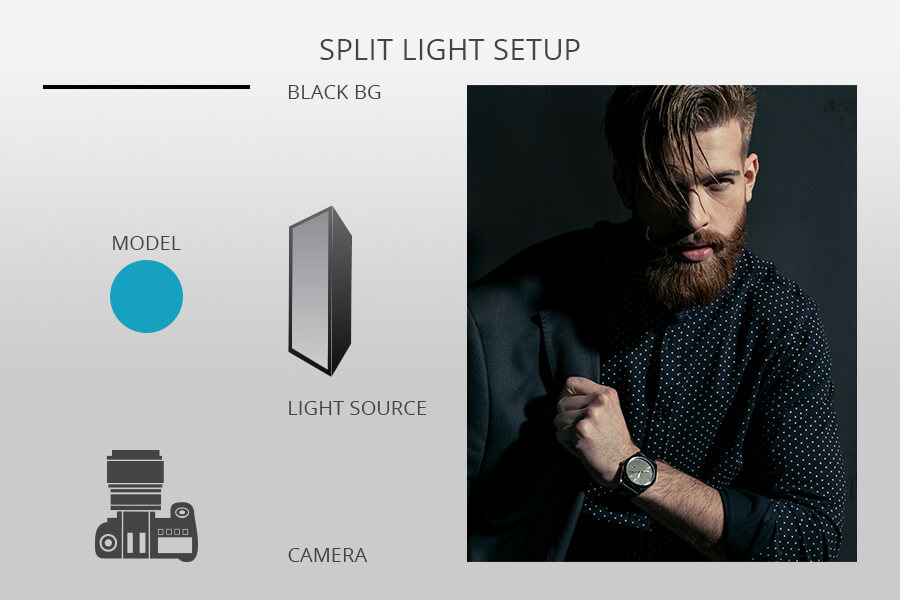
To use split lighting, you need to put the light source on the side of the model at a 90-degree angle. It will allow you to light half of your model, while the other half will remain in the shadow.
Using this technique, you can achieve a dramatic effect when filling the black background with light. It’s suitable for taking photos of male athletes as it makes models look tougher. Besides, it lets you capture the skin texture and facial expressions perfectly. While you can use it to emphasize assertiveness and masculine traits, it’s also suitable for taking glamour photos.

With the help of the Rembrandt lighting technique, you can achieve a striking effect if you put your subject a bit more than 90 degrees away from the source of light you are using. It should be placed at the head height. While one side of the model’s face should remain in the shadow, there should be a triangle of light visible on the cheek. Its width should not exceed the width of the eye and the length should be smaller than the length of the nose.
If your model has a round face, you can sculpt it using this technique to make it look slimmer. The name of this technique refers to the painting method used by Rembrandt.
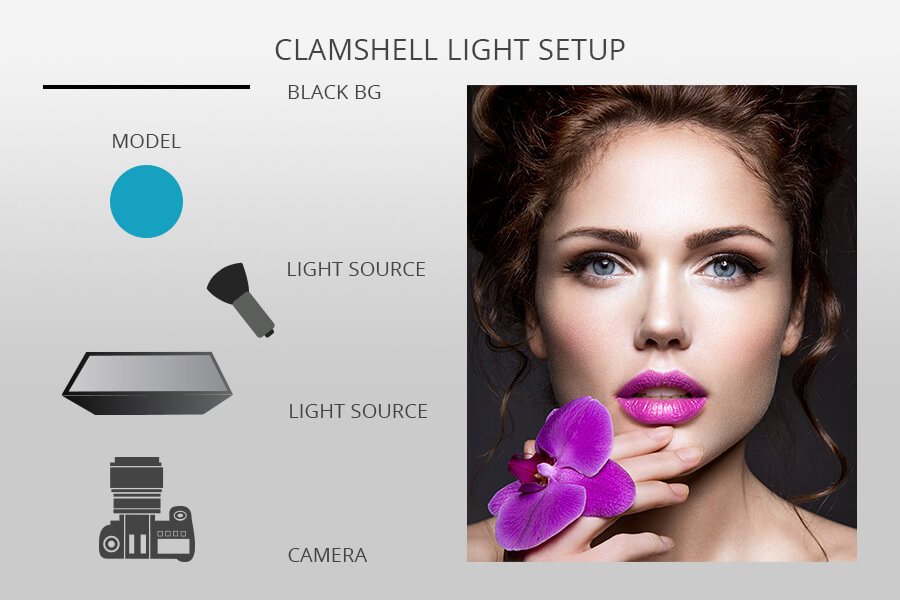
Clamshell lighting is suitable for a variety of uses. There is no need to have expensive photography gear to light your subject using this technique. It allows you to emphasize your model’s cheekbones, focus on the chin line, add catchlights to the eyes, and avoid harsh shadows. For this technique, you will need a source of diffused light, such as a softbox. If you don’t have it, a beauty dish or a reflector will do. This type of lighting is perfect for those who can’t take a lot of lighting equipment with them when going on a trip.
You can use this lighting setup for black background even without a dedicated reflector. However, if you decide to use a silver reflector, ask your model to take off their glasses or anti-reflective lenses. Otherwise, you won’t be able to capture their eyes perfectly as the most important thing about this technique is that it lets you take photos with beautiful catchlights.
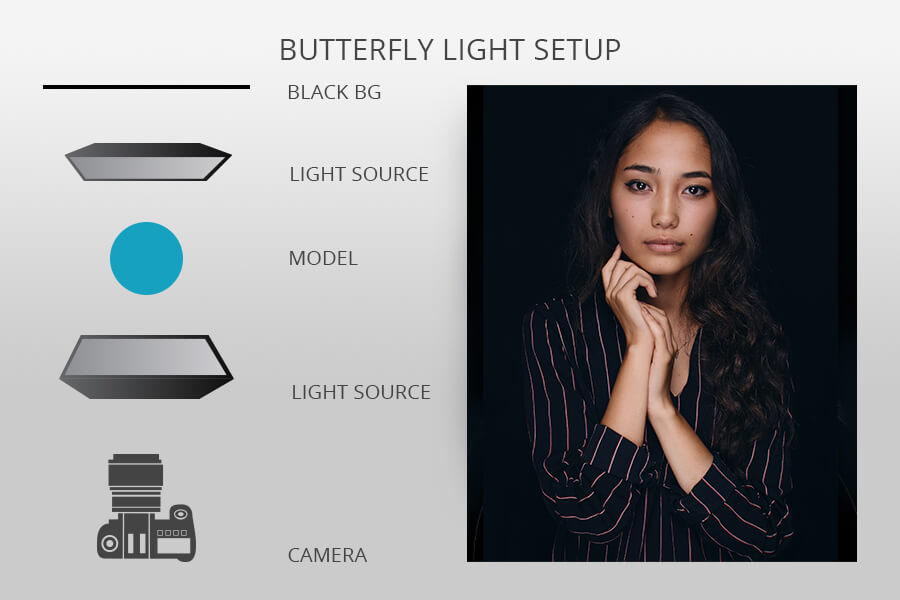
To use butterfly light, you need to put the sources of light above and in front of your model. It will allow you to create a butterfly-shaped shadow under their nose. This method allows you to emphasize the cheekbones of your model. Because of this, it’s most often used by photographers who work with female models.
The only disadvantage is that it might make the under-eye shadows deeper if your model has deep-set eyes. Before using this technique, think about whether it’s suitable for the type of face your model has. This type of light is often called paramount light.
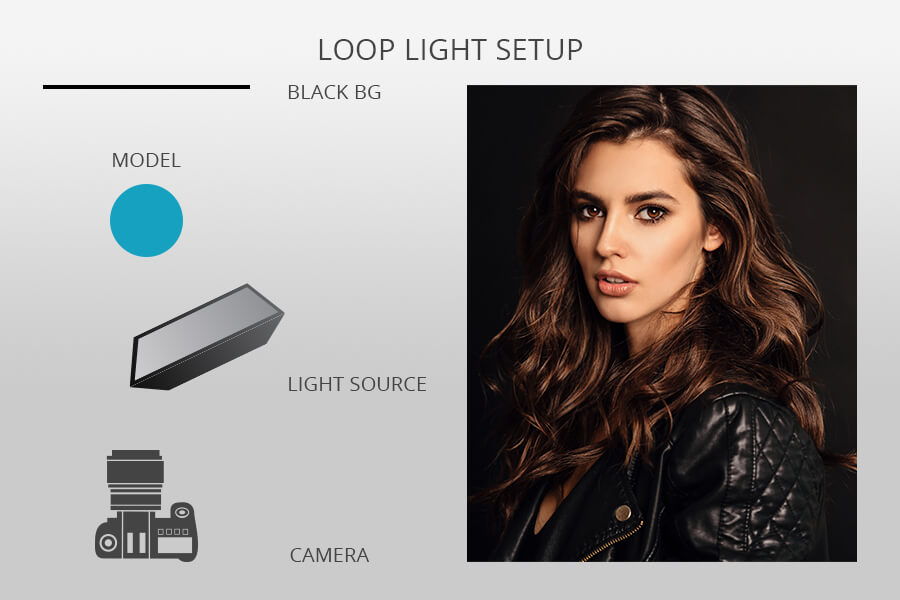
Loop lighting allows you to use your setup to create a circle-shaped shadow under the nose of your subject. You can implement this technique by putting the key light 45 degrees to the side of the face of your model and raising it a bit so that it remains above the eye line.
You will see the circle of a look-like shape below the nose of your subject. It will be on the opposite side of the area where your light source is standing. When using this method, you will also see a long shadow under the jaw of your subject caused by the downward light angle. Loop lighting is widely used by photographers who specialize in portrait photography since it allows them to make their models look beautiful in the frame.
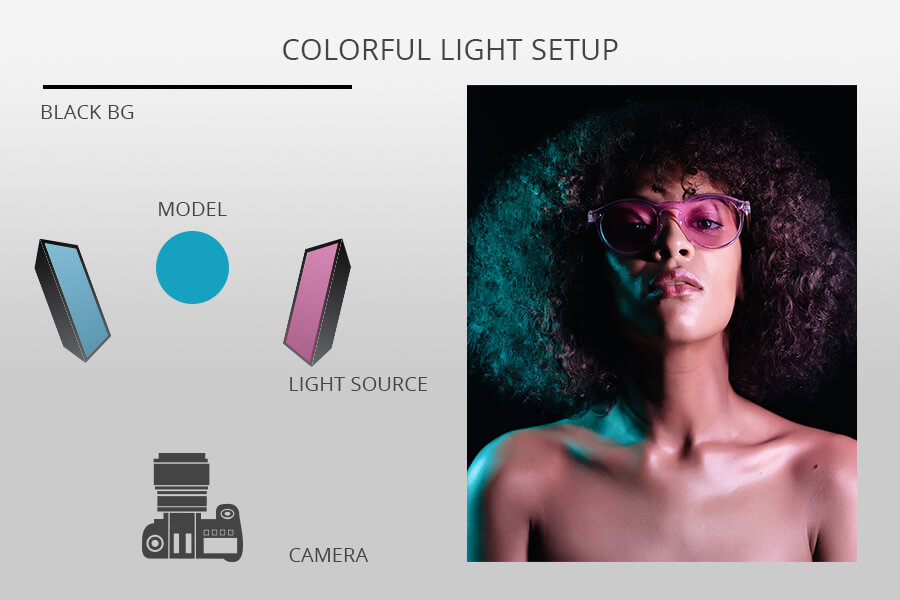
You may have heard that some photographers use softboxes when shooting objects against a black background. I also used this technique before, however, I wrapped my softbox in cellophane to avoid using a gel. There was no need to use a gel as my light source wasn’t particularly compatible with it. I would put the light behind and move them a bit to the side. It allowed me to light the face from both sides.
Using this technique, I managed to create a harsh shadow in the center, which allowed me to make the atmosphere in a photo more mysterious. By adding some color, you can give your photos an otherworldly feel. It allows you to create a sci-fi effect and make your photos more attention-grabbing without using complex techniques.
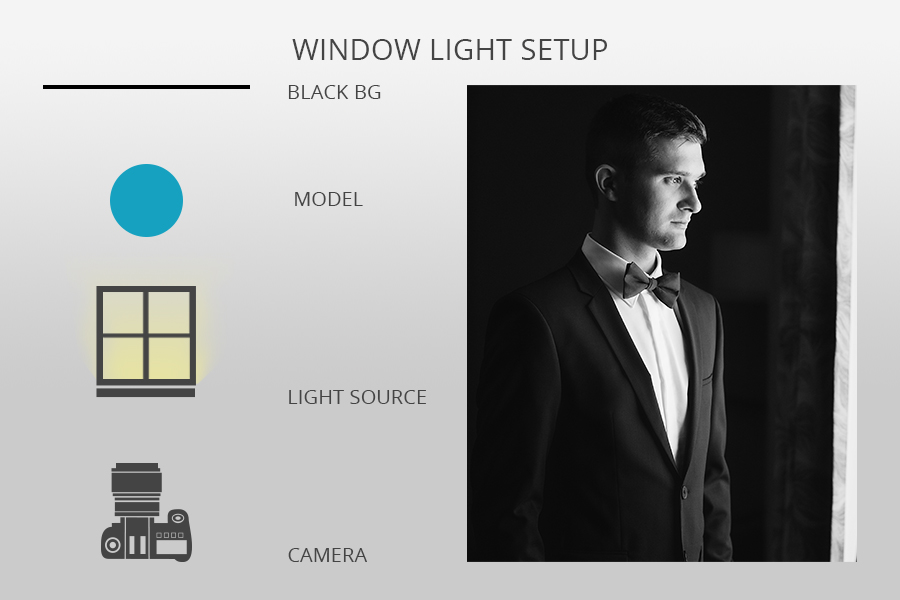
In some cases, there is no need to set up pricey professional lighting equipment as it will suffice to use natural light falling from a window. Even if you prefer to work in the studio, you can still use natural sources of light. Such light allows you to emphasize the beauty of your subject and avoid harsh shadows. However, it’s better to use this light source when there is plenty of sunshine.
Even when taking photos outside, you can still find a black background. When you remain indoors, your source of light will be limited by the size of a window. Fortunately, on sunny days, there will be plenty of light to capture your subject.
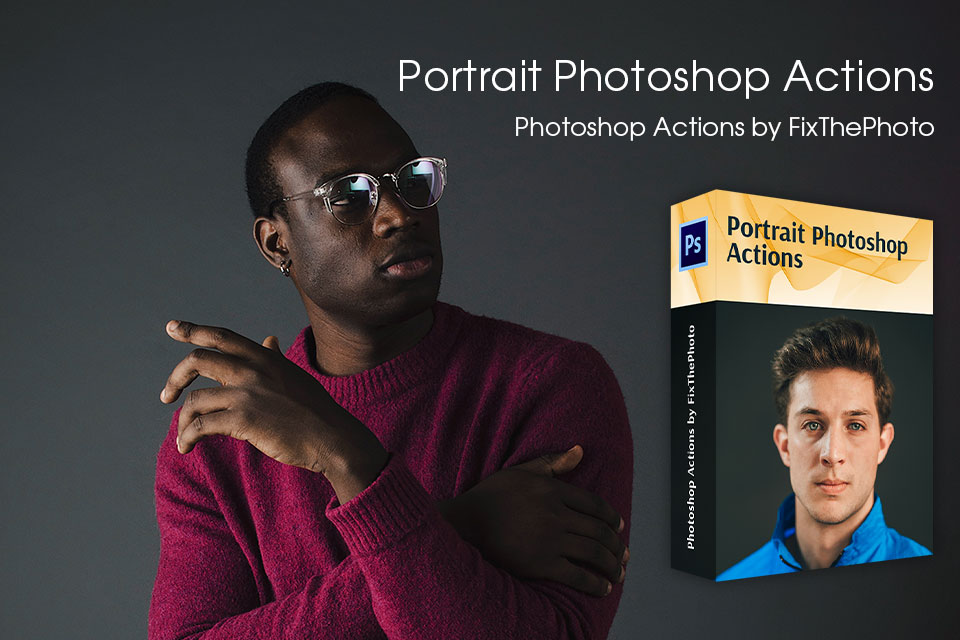
Now that you have selected the best black background lighting for your needs, it’s time to think about post-processing your photos. To speed up your workflow, you can use these actions. They were created by the FixThePhoto experts for photographers who specialize in headshot photography. Using these actions, you can make the model’s skin smoother, add catchlights to the eyes, improve the hair volume, tweak the color of the lips, perform overall color adjustment, delete skin blemishes, and add a variety of creative effects.
You can use several types of photography light. For instance, you can use a front, back, top, or side light. There are also types of light that support different degrees of light diffusion, such as harsh or soft light. You can also make a distinction between direct and indirect light. The latter can be achieved thanks to the usage of reflectors.
Your choice should depend on the type of photo you want to take. A lot of professionals use a speedlight or flash as these accessories are easy to carry around. However, you can also take great photos in ambient light. Everything depends on the object and atmosphere your want to capture.
When using various light sources, you will notice that the light they emit is quite different. Depending on it, your object will cast soft or harsh shadows. If you decide to compare soft light vs hard light, you will see that the former results in hardly noticeable shadows. You won’t see a clear distinction between light and shadows. It happens because the light is more diffused as it gets spread in several directions. Because of this, it can’t be called directional. You can notice such light on a cloudy day. This light is more often used by professional photographers as it allows them to take photos of different objects without harsh shadows.
A gel is made of a transparent substance. It is perfect for changing the color of light. To create a variety of effects, you can just put it over a light source.


