Since my YouTube channel was growing, I wanted to level up my amateurish editing. I'd been piecing videos together with whatever came pre-installed on my laptop, but it wasn't working anymore. Still, I wasn’t ready to pay for advanced software, so I started looking for the best free YouTube video editor available.
I needed something that could handle my mixed content, including head clips, B-roll, screen captures, and voiceovers. But my tools kept crashing or downgrading in quality. Plus, most free editors add huge watermarks to videos during export, which totally kills any professional vibe.
I wanted something quick to learn but still powerful. For me, the best free video editor for YouTube should have a clean timeline, color correction features, audio editing tools, and hassle-free exports. Shortcuts and templates are a must because I'm constantly racing against deadlines.
The tricky part was finding an editor who could handle 1080p and 4K videos properly. I've lost count of how many hours I've spent watching progress bars inch along or dealing with apps that just suddenly freeze. I needed something stable that wouldn't bog down my laptop. Moreover, I wanted a program with decent built-in effects, so I didn’t have to download plugins all the time.
I decided to test multiple free video editors to see what worked best. I looked at how fast they ran, how easy they were to use, and whether the exported videos looked good. I was determined to find something that could help me make clean, professional-looking YouTube videos without spending money or dealing with annoying watermarks. Turns out, that was way harder than I thought. So, I asked my friends from the FixThePhoto team to help me test them since they've used lots of these programs before.
When you're editing for YouTube, you need more than just basic trim and cut tools. There are specific features that directly affect whether your videos look professional or rough around the edges. These are the must-haves that make your content actually enjoyable to watch.
Look for a free YouTube video editor that makes timeline work painless. Trimming clips, adjusting speed, separating audio, and adding transitions should be straightforward. If the basics are clunky, you'll waste hours even when doing simple cuts. Don't skip color correction tools either. YouTube compresses everything heavily, so you need to adjust contrast and saturation in your videos to prevent washed-out results.
Don't overlook sound editing. Crisp audio improves watch time greatly, so you need noise reduction, volume leveling, and keyframe audio controls. The easier it is to sync audio with your video, the better. If basic sound work is complicated, keep looking for another program.
Stability matters, especially with HD and 4K footage. It is highly recommended to get free video editing apps with smooth scrubbing, proxy options for heavy files, and exports that finish without freezing. Make sure it exports to MP4 with customizable resolution and bitrate. YouTube presets are a huge time-saver if they're available.
Good branding needs clean text and modern title features. Look for motion blur, light effects, zooms, and LUTs for color work. The possibility to save intro/outro templates is important, which cuts down repetitive work significantly.
YouTube moves fast, so keyboard shortcuts, quick rendering, and built-in assets, e.g., sound effects or graphics can save you hours. Such features turn editing from a slog into something manageable.
AI has become one of the quickest ways to edit YouTube videos free. You can speed up your workflow, clean up your clips, and get a high-quality look, without the hours of tedious editing.
One of the best things AI can do is handle the repetitive editing tasks that eat up your time.

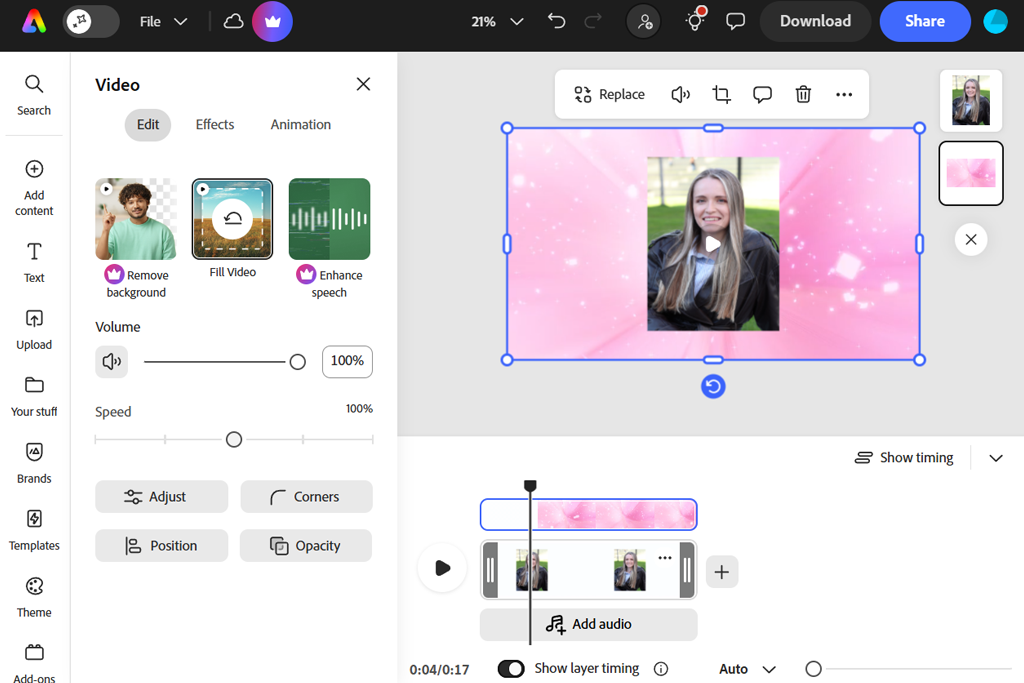
I decided to test the capabilities of Adobe Express with a quick vlog edit. Could I turn my messy raw footage into something YouTube-ready? Turns out, it could. Thanks to the templates and storyboards, everything was straightforward. I added my clips, picked a style, and the AI recommendations looked modern and clean. The result looked perfect for an intro.
Next, I tried the branding tools. I uploaded my logo and color palette and let this free video editing software for YouTube generate a few variations. It kept my branding consistent better than I thought it would. Everything exported cleanly and worked fast on my laptop. Most of all, I appreciate that I can make good-quality content fast.
Then I tested subtitles and motion graphics. You don’t need to be an expert to use them both. To test its limits, I switched between tricky aspect ratios (4:5 to 16:9), and it reframed things beautifully. Not many tools can do the same.
The trade-off is that it's template-driven, so you won't get fine-tuned keyframing control. But when you're racing the clock, the automation is killer. It is always great to have reliable tools at hand that work perfectly without delays or freezes.
“Great, beginner-friendly tools for quick videos. The templates and stock assets are very helpful. Still, if you have a longer video, layering can be tricky.”

For my stress test, I made a three-minute video with layered text, music, and multiple cuts. Everything stayed smooth and the YouTube export looked clean. I love how it gently guides you toward best practices, like proper text sizing and safe margins. This is perfect for people just starting out. Still, I wish the program had more robust color correction and audio mixing tools. Generally, it covers most of what I actually use day-to-day for YouTube content.
Want modern-looking, branded videos without learning complex software? I kept coming back to this one. It's not the best fit for very detailed video editing work, but it's great for thumbnails and short promos. Besides, if you want to use ready-made templates instead of spending hours fine-tuning everything, Adobe Express is worth checking out.
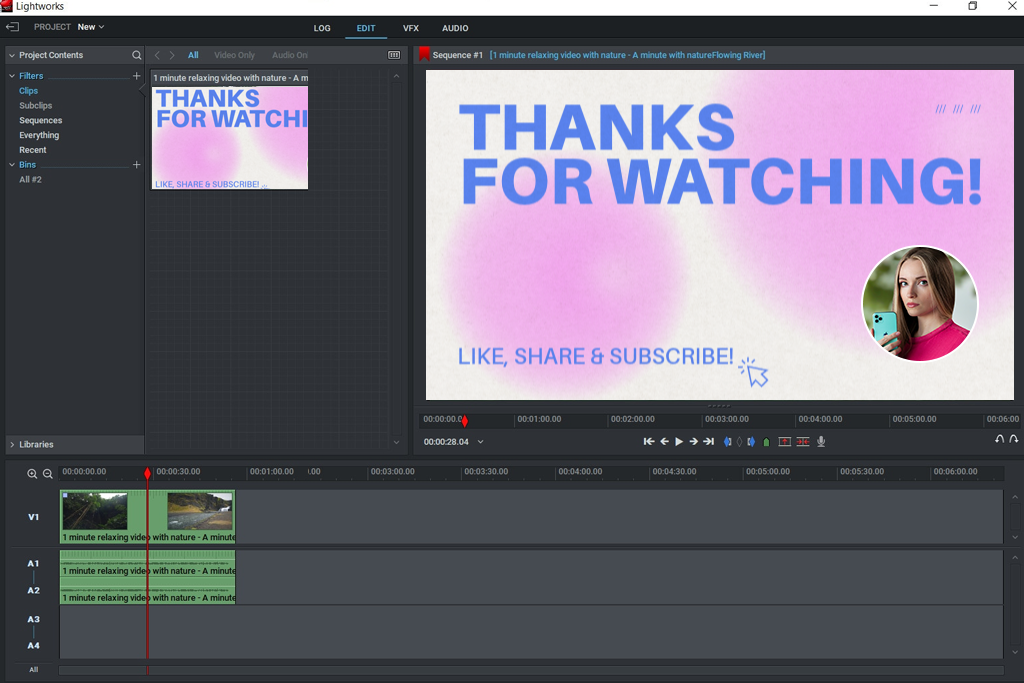
I jumped into Lightworks to see how fast I could edit with it. I started with a long interview that I needed to chop up. The trimming was surprisingly smooth. I managed to cut pieces, adjust clips, and tweak timing without any issues.
Then I tried editing with two camera angles at once. Switching between them was very responsive. If you're someone who cares more about quick, efficient video editing than fancy effects, Lightworks is definitely a professional tool that doesn't slow you down.
When I added titles and basic effects, I appreciated that Lightworks kept the entire workflow simple. You don’t have to deal with a variety of trendy templates. There are user-friendly tools that let you make solid editing decisions. I tested different export formats, namely, MP4s for social media and DNxHD files, and was able to export all my files without watermarks.
Still, higher-resolution exports require an upgrade. So, make sure to double-check what your project needs. But if you are looking for YouTube video editor free that offers fast and precise editing, Lightworks can fit the bill.
“Lightworks is like a mini-pro editor. There are great trimming features and effects, but export is restricted in the free version. Plus, it takes some time learning the UI.”

Even on my not-so-powerful Mac for video editing, I made lots of clips and nested sequences in Lightworks. It stayed rock-solid stable. Still, the interface is a little dated compared to more modern editing software.
It took some getting used to, but once I got the hang of the keyboard shortcuts, I was flying through edits. I created a captivating five-minute tutorial faster than ever and had a clean file ready for YouTube in no time.
Generally, Lightworks is perfect if you want to edit fast with professional-level tools. It concentrates on speed and precision rather than fancy effects.
I tested Premiere Pro like it was the most powerful tool in the bunch. I worked on a complex travel video that had multiple camera angles, color adjustments, audio mixing, and animated graphics. During the free trial, I could export videos without any watermarks. That was great. Right away, I noticed how easy it was to organize my files. Everything from backup copies to linked files worked perfectly.
I spent a lot of time adjusting colors to make footage from different cameras look the same. The color tools were reliable. I was able to get the exact look I wanted without just guessing. My computer handled everything properly. When I needed interesting text effects, I connected with After Effects to achieve professional outcomes.
I also tried out the AI features, namely, automatically reformatting videos for social media, lowering music volume when people talk, and creating captions from speech. These features genuinely saved me time. Plus, I evaluated functionalities for teamwork. Sharing project files, swapping files with Photoshop, and using graphic templates were easy.
When I exported videos for YouTube, they looked great. The file sizes were easy to adjust for uploading. The biggest drawback is the price after the trial ends, but all the features make it worth spending.
“Great program, overall. Lots of features and professional tools, but they are paid one the trial is over. Plus, it requires a powerful laptop.”

I pushed this video editing software for Windows and Mac with lots of effects and long videos. The processing times were pretty good, and my computer's graphics card definitely sped things up.
Adjusting audio directly in the timeline was easy. I managed to achieve professional-sounding results fast. If you're going from casual video making to more serious projects, Premiere can be the best YouTube editing software free for you. If you want full control over your edits, need to work with a team, and want software that can grow with your channel, I highly recommend this program.

I tried out DeepBrain AI to see how it handles video content with people talking directly to the camera. I gave it some unedited lecture videos and a basic script to work with. I liked how it created lifelike digital presenters and matched their lip movements to the words perfectly. This free video editor for YouTube videos made a quick intro, and it looked pretty convincing.
The pre-made templates and voice copying features saved me lots of time. I finished a draft faster than I would've by editing everything myself. This tool is definitely designed for creating presenter-style videos rather than fancy movie-like edits.
I also checked out the subtitle feature and automatic chapter dividers. The subtitles were accurate, and it split my content into clean sections that worked great for longer YouTube videos. If you're someone who turns written content into videos, this tool is a real time-saver.
However, if you use it too much, the videos can look a bit unrealistic. Generally, DeepBrain AI is perfect for creating lots of content quickly, but it's not the best choice if you're filming authentic travel adventures or trying to create cinematic masterpieces.
“Amazing AI avatars. Creating talking-head videos is very quick. Free version has limitations for video duration and applies watermarks, though.”

I tried out Blender in a different way, not just for basic video editing, but as a complete creative tool for making a short video with lots of movement. First, I used its 3D features to design animated text and moving backgrounds. Then I put everything together in its video editor (called VSE). It is special because you can create 3D intros, camera movements, and combine different elements in one place. I used this to make an eye-catching opening for a channel. It takes some learning, but once you get it, you can do amazing things.
While editing, I used Blender's special effects tools to mix my 3D animations with regular video footage and added cool lens effects that are tough to create in other free YouTube video editing tools. To keep everything running properly, I used proxies that make preview videos lighter on my computer's graphics card.
The video editing software for Mac and Windows handles the basics like cutting clips, transitions, and color tweaks just fine. But the real highlight is that it lets you combine regular video with 3D graphics and special effects. When I was done, I quickly saved my final video in high quality without annoying watermarks.
“You can edit your video like a pro if you know how to use different tools. Video Sequence Editor is amazing, but the interface may be a bit confusing.”

Next, I created animated text overlays and green screen effects. The way Blender handles transparency and layering made it very easy to drop these into my final video. If you're a creator who wants custom animations or gaming-style intros, this free VFX software gives you professional-level tools without spending a dime. Just know it'll take more time to learn than your average video editor.
If you like working with 3D or want to build completely unique animated elements right inside your video projects, Blender gives you creative freedom like nothing else. It's not designed for quick, simple edits. This program is a real find for creating one-of-a-kind visuals that stand out.
I wanted to see what DaVinci Resolve could really do, so I created a colorful, movie-style video to test its color grading and polishing features. The way you work with colors (using "nodes") lets you apply precise adjustments and create cool visual styles that look great on YouTube. Plus, I could edit the audio right there in the same program without switching to another YouTube video editing app free.
I tried out multiple cameras at once, proxies, and special effects. Everything worked really well. When I exported my finished 4K video, it was quick thanks to my graphics card. Besides, the resulting projects come without watermarks even in the free version.
Then I tested the Magic Mask feature. It lets you select people or objects and change their colors separately. It worked surprisingly well, even when things were moving around. I also tried the automatic captions feature, which is particularly helpful on longer videos. The only thing to know is that a powerful computer makes everything run smoother. If your computer is average, you'll need proxy files to prevent lagging. But even on my laptop, the proxies worked fine, and my final video still looked amazing.
“I absolutely love this free editor for color grading and VFX. There are lots of pro tools, but they require a strong PC. Besides, it takes some time to learn all the features.”

When I worked with my colleagues, I noticed how easy it was to share project files and color presets between teammates. This software is aimed at professional video work and gets better the more you learn about it. If you're a YouTube creator wanting a unique visual style, you'll get access to the same tools used in Hollywood movies. And the free version gives you almost everything. I believe this is a terrific option for creators who care about making their videos look and sound great.
All in all, if you want pro-level color and audio tools without spending money, DaVinci Resolve beats everything else I tried. Plus, using DaVinci Resolve LUTs, it is possible to speed up the video editing process a lot.

When testing DesignWizard, I decided to create short promotional videos that needed to match my brand. I loved that I just needed to drop in my files, choose an animated template, and the tool created several top-quality versions ready for different platforms, including YouTube. It won't replace full-fledged NLE, but it's fantastic for churning out branded videos fast.
This YouTube video maker free simplified my workflow a lot. I could create different sizes, e.g., square videos for Instagram or horizontal ones for YouTube, from the same project without starting over each time. The animated graphics looked modern and worked great for thumbnails and quick intro clips. If you're someone who cranks out lots of short promo content and wants everything to look cohesive, this tool handles the boring, repetitive tasks, so you don't have to.
“User-friendly and modern tool. I like using it for marketing-style videos, but there is no multi-track editing or fancy effects.”

I brought clips from DesignWizard into my main editing software. They worked smoothly with transparent backgrounds when I needed them. The only issue is that you can't do detailed timeline editing inside DesignWizard itself. It is like a quick template maker and branding helper rather than a full editing suite. The final videos came out clean and sharp with no watermarks.
If you regularly create branded content and need to pump out videos in different formats, DesignWizard is a handy shortcut that works great alongside your regular editing software.
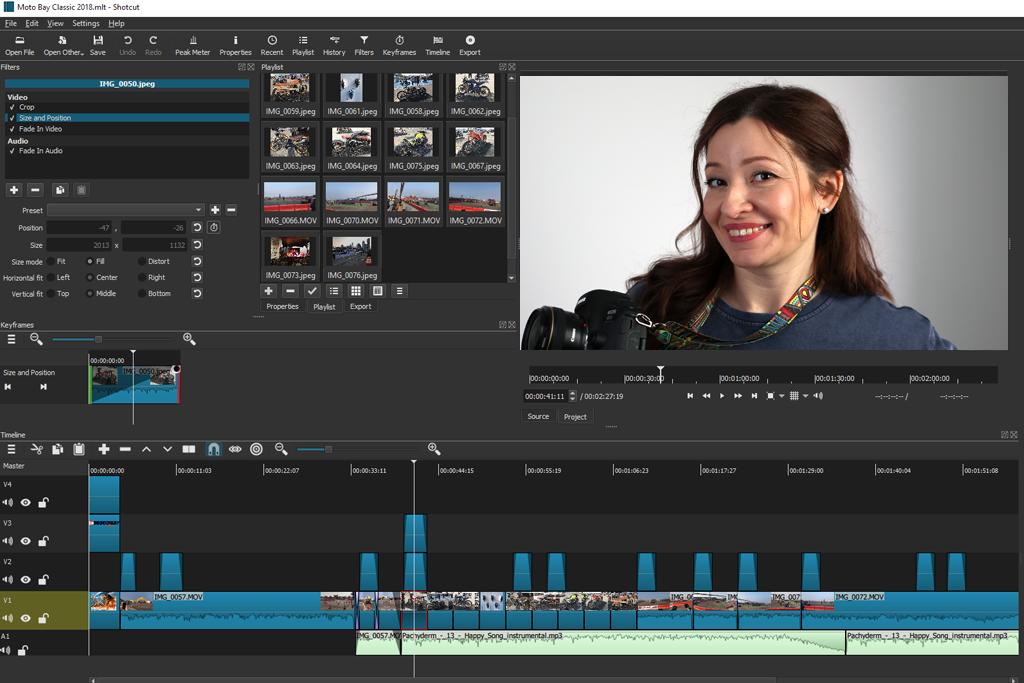
To assess the capabilities of Shotcut, I worked on a video project that mixed screen recordings with footage from my DSLR camera. This free YouTube editing software really impressed me. It has lots of cool features, e.g., I could fine-tune colors in specific areas and create smooth scene changes between clips.
When I played around with the export settings, I loved the control I had over video quality and file size. It is very important for creating high-quality YouTube videos that don’t take forever to upload.
The program handled my 4K videos pretty well, and there's even a proxy that creates smaller preview files. I also experimented with adjusting audio and adding animation effects. Though there is nothing mind-blowing, the effects are good enough for professional results. The layout takes a little getting used to at first, but once I arranged everything the way I liked it, working in Shotcut became easy and quick.
“Free and very powerful tool. It supports many different file formats. However, the interface isn’t very modern, and effects are a bit slow.”

I tested Shotcut by stacking a bunch of video and audio layers together. It handled everything well, though a few special effects did make the preview playback a bit sluggish. The best part is that you get access to professional-level tools and multiple customization options completely free. It's perfect if you like the technical side of video editing.
Shotcut is an excellent choice for content creators who want powerful editing features and full control over their video quality, without dealing with subscription fees.
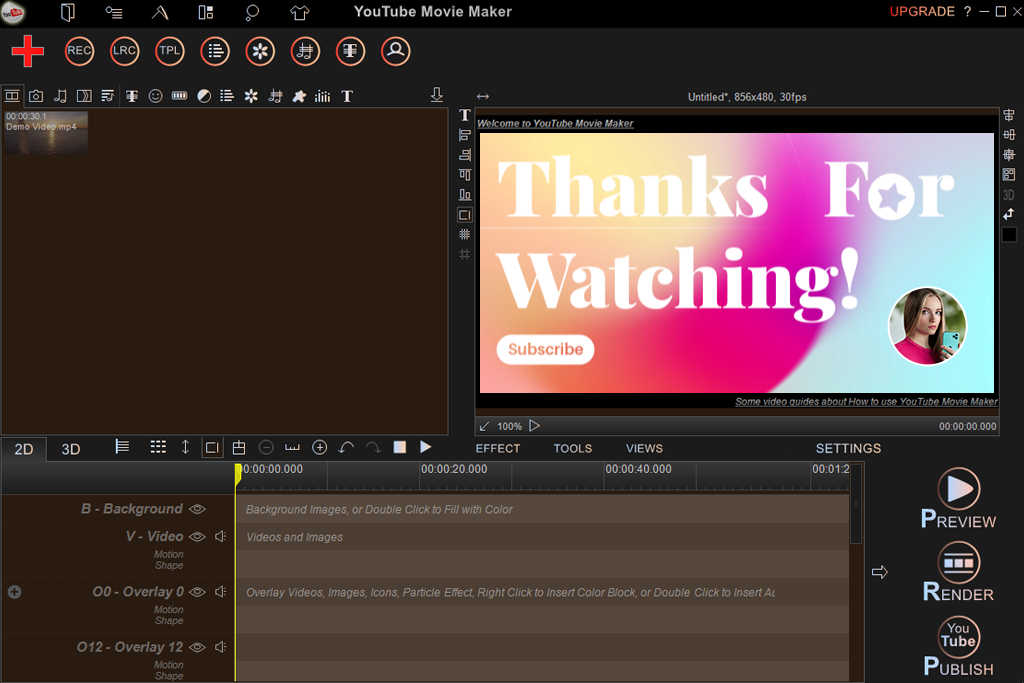
I tested YouTubeMovieMaker and it brought back memories. It looks like old Windows editing programs, but that's not a bad thing. I made a reaction-style video with some text, music, and simple cuts between clips. The software found all my files right away and put them in order without any problems.
What I noticed is that it's really made for people who post on YouTube. It comes with ready-made templates for intro videos, moving text, sing-along captions, and you can even upload straight to YouTube. I didn't try the upload feature, but I loved how quickly I could add scrolling comments and text boxes without doing everything from scratch.
“Very beginner-friendly. Good for quick vlog-style videos if you don’t mind the lack of advanced features.”
I was pleasantly surprised that it worked well on my old computer. The preview wasn't flawless, but the renders were pretty fast. Besides, there were no annoying watermarks anywhere. Matching video cuts to the rhythm of my music was very straightforward. Most basic editing tools make this way harder than it needs to be.
Generally, this is a perfect YouTube editor free no watermark when you need videos quickly. It's not trying to compete with professional editing software, and that's actually a good thing. It is a user-friendly tool that makes creating YouTube content or vlog video editing easy without special technical expertise.
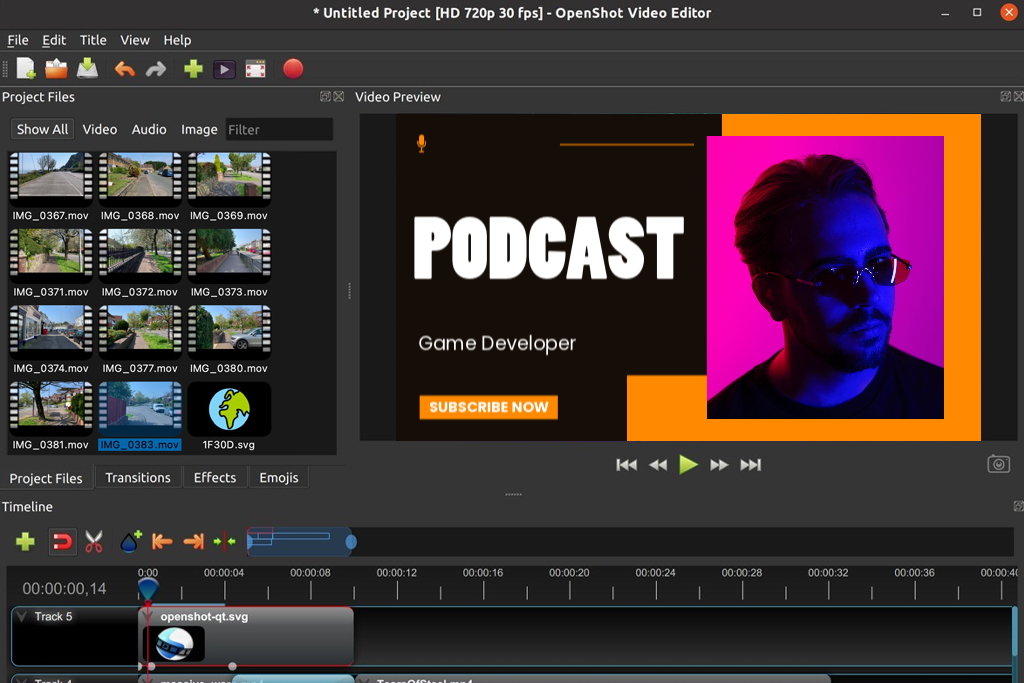
Many users think that OpenShot is an easy-to-use free open source video editor. While testing it, I made a simple video blog with quick cuts between clips, some background music, and fun animated text. This YouTube video editor online free was very easy to work with. I just dragged my clips onto the timeline, and everything worked smoothly. Adding transitions between scenes was natural, and the ready-made title animations were a huge time-saver.
The software did slow down a bit when I added lots of effects at once, but for basic editing, it worked well. I liked that all processes were simple. You don't need to hunt through complicated menus. All the tools are right there and easy to figure out.
“Many free filters and effects. I also like a screen recording feature. The interface is clunky at first, and you need to pay for some functions.”
I was impressed by how well the animation tools worked. I could easily fade text in and out, resize video clips, and add simple zoom effects. OpenShot handled my high-quality 4K videos without any issues, though saving the final video took a little while. The good news is that your videos come out great with no annoying watermarks. Besides, there are helpful presets for uploading to YouTube.
OpenShot is a fantastic choice if you want video editing without spending hours learning complicated software. It won't confuse you with too many options, and while it's not as advanced as expensive professional programs, it's ideal for new content creators making simple videos.
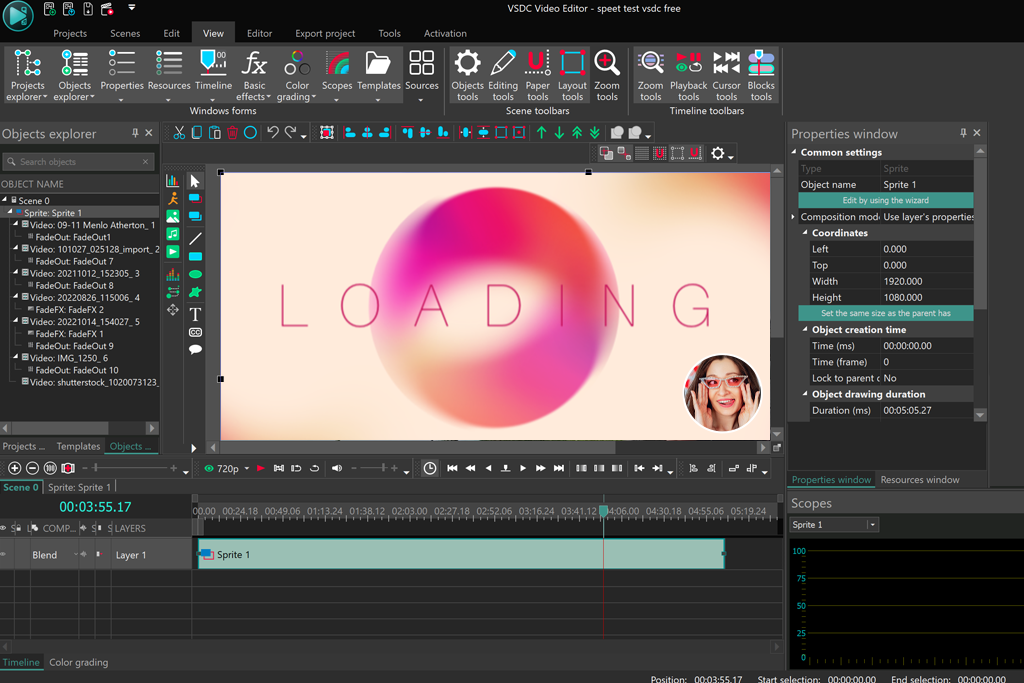
VSDC resembled me an advanced video editor that doesn’t cost a dime. At first, the layout seemed a bit confusing, but once I started dragging my video clips onto the timeline, it all made sense. I decided to edit a product video with cool effects, including color adjustments, smooth transitions, and moving text.
I was stunned by how many professional tools you get for free. You can mask parts of your video, blend layers together, follow objects as they move, and fine-tune colors with precision. I used the masking feature to draw attention to a product label, and it worked better than I expected. The motion tracking wasn't flawless, but it's definitely good enough for YouTube videos and similar projects.
“Simple video editing tool suitable for basic corrections. Still, you have to put up with occasional crashes and freezes.”
It worked smoothly. I uploaded big 4K videos, piled on tons of effects, and VSDC barely slowed down. When it came time to export, I had multiple options to tweak video quality and format. I chose HEVC compression, and my final video looked very crisp.
Overall, VSDC looks like professional video editing software that just happens to be free. Sure, it takes time to understand all the features. But once you figure out how everything works, you can make great-looking YouTube content.
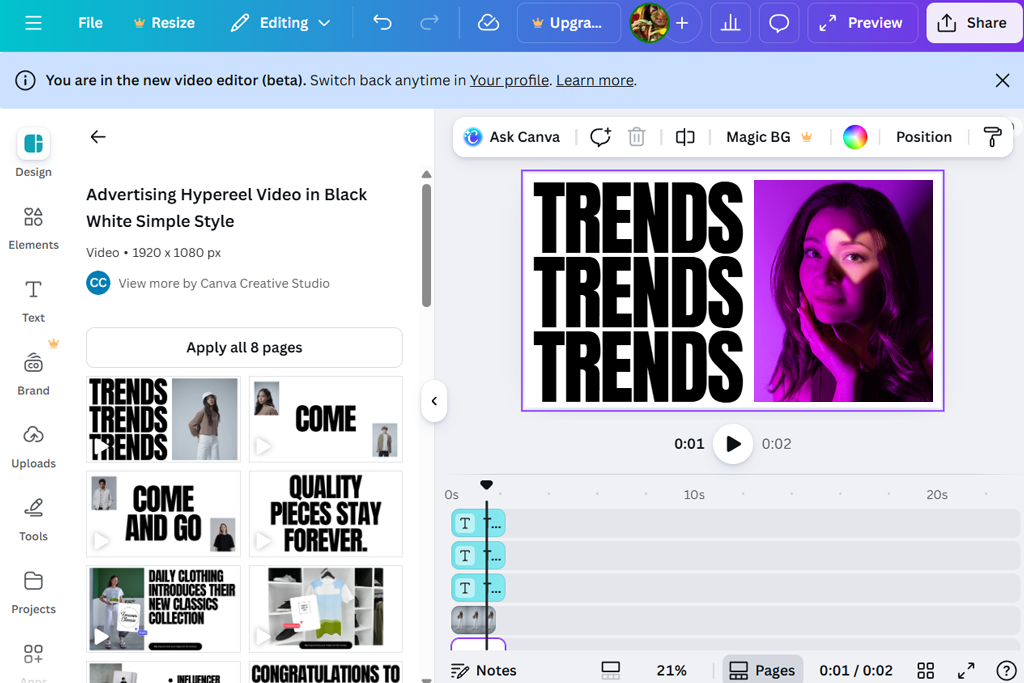
I tried editing a YouTube video in Canva, and it's nothing like regular video editors. I made a short video with lots of text and visuals, and the whole process was like creating a fun poster rather than editing footage.
The highlight of this free YouTube video cutter is the range of assets it gives you. There are many ready-made transitions, graphics, stickers, and video templates. I didn't have to build much from scratch. Cutting clips and adjusting timing was easy, and the color filters looked perfect for social media content.
“Drag-and-drop workflow is very convenient, especially if you want to make quick videos. Still, Canva can’t compete with a serious editor.”
Keep in mind that Canva works online, so all the processes are fluid if you have a stable internet connection. The video processed quickly, and I got a clean 1080p download without any annoying watermark. I also loved how easy it was to share my work with others.
Canva isn't meant for complicated video projects. But if you need to create quick, eye-catching YouTube videos using templates and graphics, it's absolutely perfect. You can make trendy-looking content without being a pro editor.
When I first opened ACDSee, I loved that it was clean and modern. To test its capabilities, I made a tutorial video with screen recordings, webcam footage, and some fun animations. The editor handled everything well and worked better than I thought a free tool could.
The timeline was really easy to work with – clips snap together nicely and editing flows naturally. My favorite feature was recording my screen right inside the program. Everything lined up properly on the timeline. Even the transitions and motion effects looked surprisingly professional.
“Lightweight and user-friendly program. Good for basic multi-track edits, but there are no advanced tools and features.”
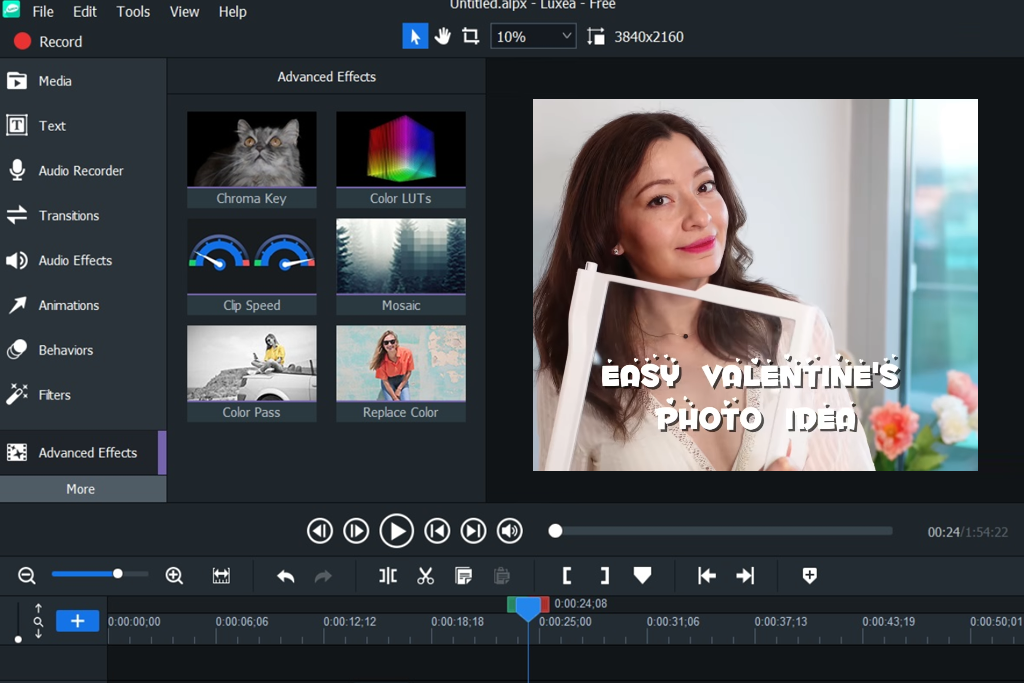
I evaluated Luxea by tweaking colors and adding LUTs. Sure, it won't replace professional YouTube editing tools free, but it handled everything I needed for my YouTube videos without crashes. The rendering speed impressed me, and I also liked the possibility of saving my go-to settings for future use.
Luxea may not be a household name yet, but it definitely won over me. The straightforward design, stable performance, and built-in screen recording make it perfect for how-to videos and product reviews. Plus, the photo video maker is very helpful when I'm putting together quick video presentations for my channels.

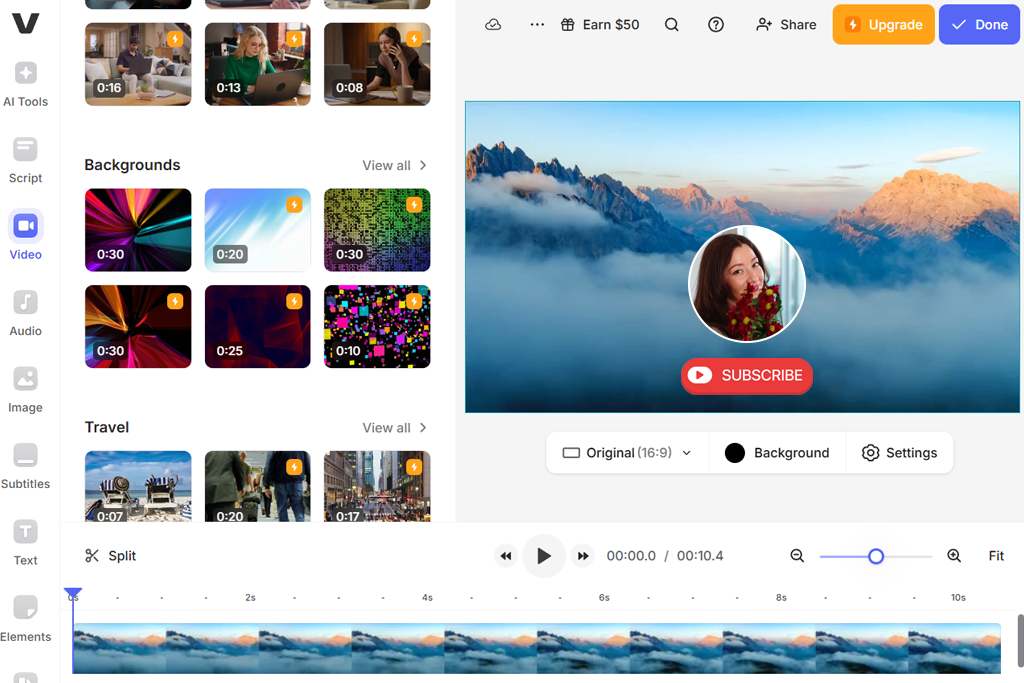
I frequently use CapCut on my phone, so I was excited to try it on my computer. I made a quick YouTube video with lots of fast clips and text overlays. The AI features impressed me a lot. It added captions automatically and cut out the boring parts without me doing much work.
I think CapCut is a great free YouTube video trimmer for everyday content creators, not professional video editors. Transitions, sound effects, and other assets are perfect for making social media videos. I experimented with effects like motion blur and speed changes, and achieved the desired result without complicated settings.
“User-friendly program with lots of effects and AI features. I like using it for short YouTube videos, but it struggles with longer edits.”
While editing, I didn’t face any performance problems. Even when I piled on different effects, the video played without lagging. When I finished, exporting was quick, and I got crisp 4K quality with no annoying watermark slapped on top.
Still, if you're looking for advanced editing tools, CapCut won't have everything. But for YouTube creators who want to make fun, energetic videos without getting lost in complicated video color correction apps, CapCut is perfect. It's fast, easy to use, and gets the job done.
Using VEEDio was easy and fun, resembling a design app rather than a complicated video editor. I tried it out on a video where I added captions, emojis, sounds, and little animations. My absolute favorite part was the auto-subtitle feature that added text so I didn't have to type everything myself.
Since VEED works right in your web browser, the workflow is very straightforward. Want to cut, crop, or add cool effects, just make a click or two. I loved how quickly I could make professional-looking videos without dealing with confusing timelines. Plus, there are ready-made templates for intros and outros.
“Since it works online, you can edit videos on the go. Subtitles and auto-captioning are very helpful. But, if you use a free version, there are limited export options.”
The speed was pretty good, though uploading big 4K videos took some time. Once everything was ready, it processed fast and my final video had no watermark. VEED keeps things simple and automatic instead of giving you multiple complicated controls.
After trying it out, I'd say this free video cropping software is perfect for content creators who want to work quickly without stress, especially if you need captions and fun meme-style edits.
Our FixThePhoto team consisted of Tata Rossi, Julia Newman, and Eva Williams. Together, we tested the most popular free YouTube video editors to help you pick the perfect one.
We started by gathering the most feted free editing tools like Adobe Express, Lightworks, Blender, DaVinci Resolve, Shotcut, Canva, CapCut, VSDC, and OpenShot. We wanted to find programs that work great for both newbies and more experienced creators.
To make our tests fair, we made the same 5-minute video in every editor. Each video included raw footage, photos, stock footage, text, transitions, music, and basic effects. This way, we could see how well each program handles real editing tasks and creates quality final videos.
While testing each editor, we looked at everything that matters: usability, cutting and trimming tools, working with multiple video layers, animation controls, color adjustments, and the selection of effects and transitions.
We also checked out the audio features carefully, mixing options, sound effects, syncing audio with video, and recording voiceovers. Plus, we tried AI features like automatic captions, turning scripts into videos, and computer-generated voices.
Our team split up the work. Tata Rossi checked how user-friendly each free YouTube video editor was for beginners. Julia Newman tested all the video and audio effects to see how easy it was to add transitions, filters, and animations.
Eva Williams focused on export quality, AI tools, and how smoothly each program ran, keeping track of any crashes or problems. After finishing our test video in each editor, we scored them and wrote down what they did well, where they disappointed us, and what made them special.
Then we compared everything to figure out which editors are perfect for beginners, which ones offer pro-level features, and which have the coolest AI tools. Using the collected info, YouTube creators will be able to choose the free video editor that's right for their needs.


