Luminar AI vs Polarr: Which Tool is Better

When you purchase through affiliate links on our site, we may earn a commission. Here’s how it works.

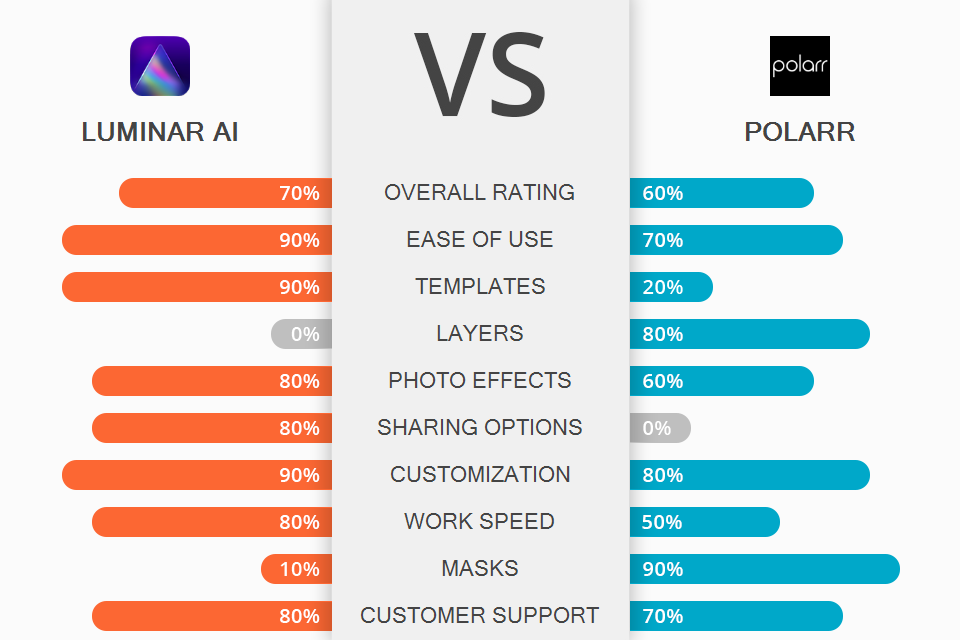
Comparing Luminar AI vs Polarr, I learned that both programs have lots of tools and features for image editing and management. Besides, they are optimized for Windows, Mac, Android, and iOS devices to cater to the needs of numerous users. However, while Luminar can also function as a plugin for Photoshop and Lightroom Classic, its competitor is standalone online software.

Luminar AI has tools for cropping images, adjusting levels and exposure, and customizing tones and colors. Besides, it appeals to users with many automatic functions. Using the software, you can keep tabs on the edits and even save them for future projects. Thanks to its AI nature, altering the smallest details and textures is no longer a conundrum. What’s more, it is possible to experiment with paint, radial, and gradient masks to conceal something in a picture or apply artistic touches.

Polarr attracts users with integrated special effects and top-notch retouching tools. They are easy to use, so you can achieve a fantastic result without mastering complicated techniques. The program has varied layers, masks, and filters, which are sure to interest experts. Similar to Luminar AI, it offers all standard editing instruments for cropping and resizing, adjusting colors, and applying automatic changes. Besides, there are vignette and lens distortion filters that can serve as a basis for creative edits.

What Is Luminar AI?

luminar logo

Luminar AI or Polarr – everything depends on how much you want to expedite your editing workflow. The thing is that most processes in Luminar are performed without the user’s intervention, which is great for inexperienced novices. For example, the program will recognize an object in a picture and suggest the most suitable template you can apply. Moreover, you can launch automatic sky replacement, power line removal, skin smoothing, photo sharpening, and more.

In fact, if you look at your photo and aren’t sure whether it requires any corrections, you can upload it to the program and let Luminar AI define weak points. Next, the software will suggest recommended improvements for you to choose from. If you immediately discern that your picture is of low quality, take advantage of Infinite Pix.

PhotoXpanse may also come in handy if you want to embellish your shots with 3D effects without going overboard. I believe the possibility to use it as a plugin for Adobe Photoshop entices many users.

1/2
  • luminar ai interface
  • luminar ai interface

    Luminar AI: Pros and Cons

    User-friendly. When you open the software, you see the Welcome screen. Everything is pretty standard there. Keep in mind that Luminar AI is not only a great editor but also an efficient image organizer. By default, it generates a folder for storing your files. However, you can keep them in any other place if you want, e.g., an external hard drive.

    Click “+” in the upper navigation bar to add a photo or several files. If you add a folder of images, you will see it stored in the navigation bar at the right. All folders you upload to the program are stored there in the Catalog.

    Rich collection of templates. Templates in the program resemble standard presets but with AI properties. So, when you apply such a template, it analyzes the content and colors of your picture and recommends the best edits. The best part is that every template is customized based on your photo. In other words, the software can suggest one and the same template for a series of images, but it will be adjusted individually for every shot. Thus, you can achieve an urban style, a big screen effect, etc.

    Auto Skin AI enhancement. Preparing this Luminar AI vs Polarr comparison, I found out that the first program will better suit portrait photographer, who usually have a hard time editing model’s skin. There is a purpose-built tool for the task, which is reminiscent of the Spot Healing brush in Photoshop. However, when working in Ps, experts have to spend about half an hour removing all defects and making the result look realistic. With Luminar AI, you can achieve the same outcome in a matter of seconds.

    Composition AI to change perspective. You may have experienced situations when you took a picture that looks nice but has problems with perspective. Many photographers, especially novices, simply delete such a shot even without trying to save it. Fortunately, this software has a tool that you can use to fix perspective issues. It is also helpful for adjusting the composition and pruning needless pieces.

    Useful Structure AI. Another function that deserves mentioning is Structure AI. It allows adjusting and highlighting details, which may become murky or blurred because of incorrect camera settings or movement during shooting. This tool works wonders with restoring details.

    Occupies much disk space.

    Doesn’t support layers.

    What Is Polarr?

    polarr logo

    Polarr is a great program for image editing enthusiasts. Its most notable feature is Styles. Any user can create a unique Style and share it with others through a QR code. Besides, there is a separate section called Discover. It contains different styles created by other users. So, head there if you want to experiment with new filters. The software also contains overlays, tools for face editing, selective AI objects, masks, HSL, toning, and other tools.

    When using Polarr, you can customize the workspace by applying different themes and choosing what tools will be displayed. Photographers often compare Polarr vs Photoshop, claiming that the former is more suitable for quick color correction. Since there is a separate sketching workspace with varied brushes, you can fulfill basic tasks in an instant. Adobe Photoshop comes out on top if you are mainly interested in customizable layers for sophisticated edits.
    1/2
    • polarr interface
    • polarr interface

      Polarr: Pros and Cons

      User-friendly interface. Similar to its competitor in the Luminar AI vs Polarr battle, this program is rather intuitive to use. Every tool has a dedicated icon while the entire toolkit is logically structured. The workspace is neat and stylish with editing instruments arranged on the left and retouching features – on the right.

      Plethora of overlays. No matter whether you apply a mask to your photo or not, you can still experiment with different overlays. There is a collection of pre-designed options or you can upload your own variants. By trying different blending modes, you are sure to create amazing compositions.

      Histogram feature. By default, Polarr displays a color histogram. You can expand it into separate RGB histograms if needed. Since there is no clipping display, having a color histogram activated, you can keep an eye on your edits and whether your photo acquires the desired look. Drag a semi-opaque histogram anywhere in the photo and monitor corrections made.

      Masking. The biggest advantage of the software is definitely its masks. They are indispensable for local adjustments. You can use radial, gradient, color, brush, depth, and luminance masking tools to select a particular area in a picture and change it without affecting the rest of a photo.

      Use the Brush tool to select a part of an image manually. In this case, you also get an optional “Edge Aware” aid to prevent edge overlapping. This is a frequent problem, which arises when painting areas for selection. When working with masks, you can adjust brush size, hardness, flow, view mask and perform the inversion.

      Tone and color adjustments. Polarr loses to its rival in the Luminar AI vs Polarr competition, in terms of color and tonal controls. Though it has tools for adjusting these parameters, you won’t see any auto WB option, and customizing this setting manually is a challenging task. Anyway, improving the overall color gamut is easy thanks to the Vibrance slider.

      With the histogram turned on, you can change highlights, shadows, as well as colors more precisely. Switching from mid-tones to whites and blacks, you can get very lifelike colors in your pictures. By altering highlights and shadows, you instantly affect the brightest & darkest areas in your shots.

      Lacks organizational tools.

      Poor sharing options.

      Luminar AI vs Polarr: Price

      luminar ai vs polarr price

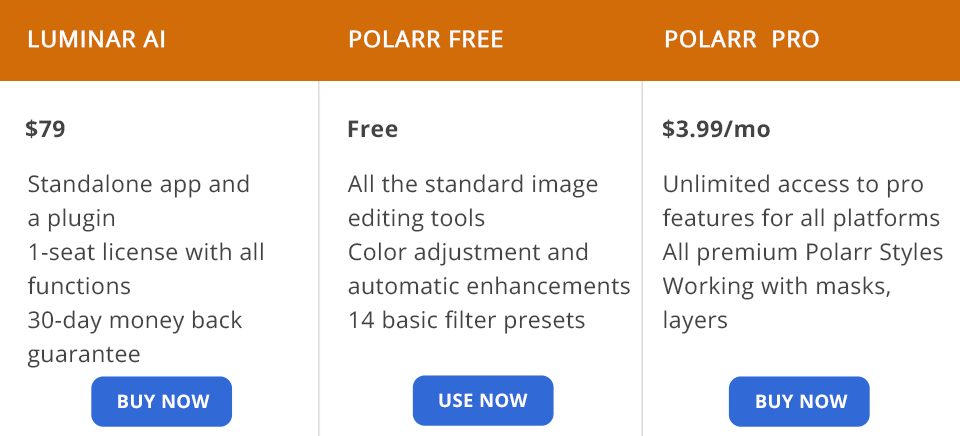
      You can get Luminar AI by paying for it once. No matter what license you choose, you will receive a standalone app and a plugin. Skylum doesn’t offer subscriptions.

      Luminar AI Single License costs $79 (all editor’s features, 1-seat license, 24/7 technical support, 30-day money-back guarantee).

      Luminar AI Two License costs $99 (all editor’s features, 2-seat license, 24/7 technical support, 30-day money-back guarantee).

      Polarr is available for free and on an optional subscription basis. You will get access to all cool features regardless of the OS you use.

      Polarr Free (all the standard image editing tools like cropping and resizing, color adjustment and automatic enhancements).

      Polarr Pro costs $3.99/mo or $19.99/year (all premium Polarr Styles, working with masks, and layers).

      Luminar vs Polarr: Who Wins?

      Defining a winner in this battle is easier if you clearly understand your goals. In case you are a busy photographer with no time for performing manual editing, this program is a perfect variant for you. Or, if you lack the skills to make all the edits yourself, you should also opt for this Luminar AI. Since most processes are optimized, you will get a pro-level result with no effort on your part.

      If you are looking for budget-friendly Photoshop alternatives with similar tools, Polarr is definitely your choice. It comes with a variety of beautiful effects, retouching tools, and helpful features. If you purchase the Pro version, you will get even more efficient instruments.

      Eva Williams

      Writer & Gear Reviewer

      Eva Williams is a talented family photographer and software expert who is in charge of mobile software and apps testing and overviewing in the FixThePhoto team. Eva earned her Bachelor’s degree in Visual Arts from NYU and work 5+ years assisting some of the city’s popular wedding photographers. She doesn't trust Google search results and always tests everything herself, especially, much-hyped programs and apps.

      Read Eva's full bio

      Tetiana Kostylieva

      Photo & Video Insights Blogger

      Tetiana Kostylieva is the content creator, who takes photos and videos for almost all FixThePhoto blog articles. Her career started in 2013 as a caricature artist at events. Now, she leads our editorial team, testing new ideas and ensuring the content is helpful and engaging. She likes vintage cameras and, in all articles, she always compares them with modern ones showing that it isn’t obligatory to invest in brand-new equipment to produce amazing results.

      Read Tetiana's full bio

      Contents:
      SAVE UP TO 66% OFF SAVE UP TO 66% OFF