ISO indicates how much light a camera needs to allow you to take a perfectly exposed photo.
When talking about the importance of ISO in photography, people refer to the sensitivity of a camera’s sensor to light. This is why it’s important to learn more about this setting if you want to find out more about the role of the exposure triangle in photography.
When using a low ISO value, you don’t need much light. A high ISO value is used when a photographer needs to take pictures in low-light situations. ISO values were created by the International Organization for Standardization to help photographers get more information about the sensitivity of the film to light.
When more people started to use digital cameras, they started to use ISO to measure the sensitivity of a sensor to light. Low ISO values mean low sensitivity to light, while high ISO values indicate that a sensor has high sensitivity.
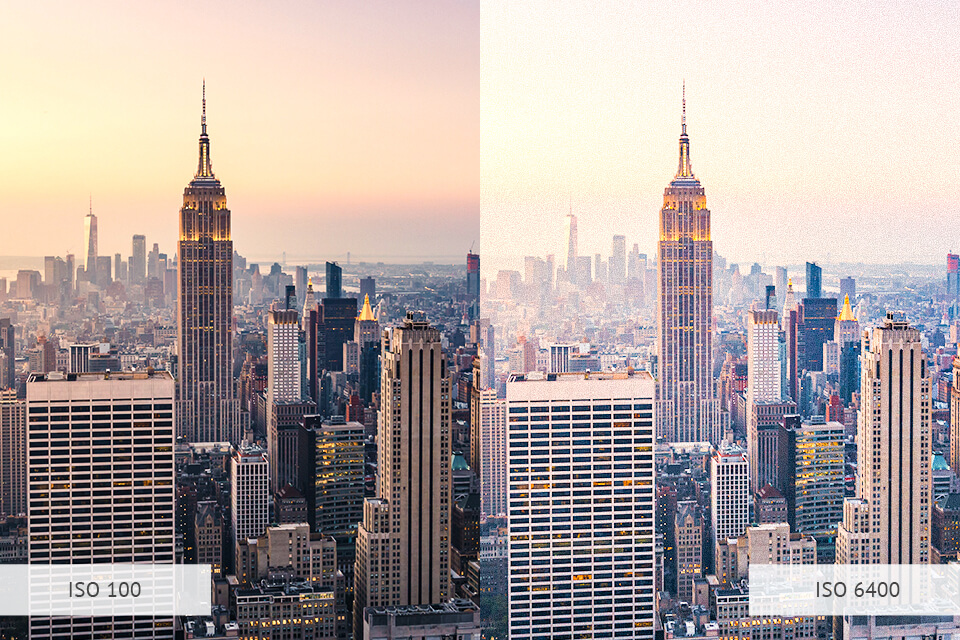
Be careful when raising ISO to higher values, as your photos might contain a lot of noticeable grain. To minimize the noise level, it’s better to use lower ISO values. By making a photo brighter when using ISO, you risk decreasing its value. This is why you should do it only in situations when you can’t increase the brightness by changing the shutter speed or aperture.
This is a common issue faced by those who specialize in high speed photography. By using a long shutter speed, you might make your image less clear, this is why it makes sense about learning how to change ISO.
The base ISO refers to the sensitivity of a camera’s sensor that wasn’t adjusted. Most cameras support ISO 100 as the basic value that is set by default.
Using this ISO value, you can take high-quality photos with minimum noise and an impressive dynamic range. Professional photographers use this setting when the scene is well-lit. However, this base value might differ depending on the model of the camera.
If you take a look at Nikon photography cameras, you will see that they have ISO 200 as the base value. Canon cameras usually have ISO 100 as the minimum value of this setting. However, it might be hardly suitable for low-light situations.
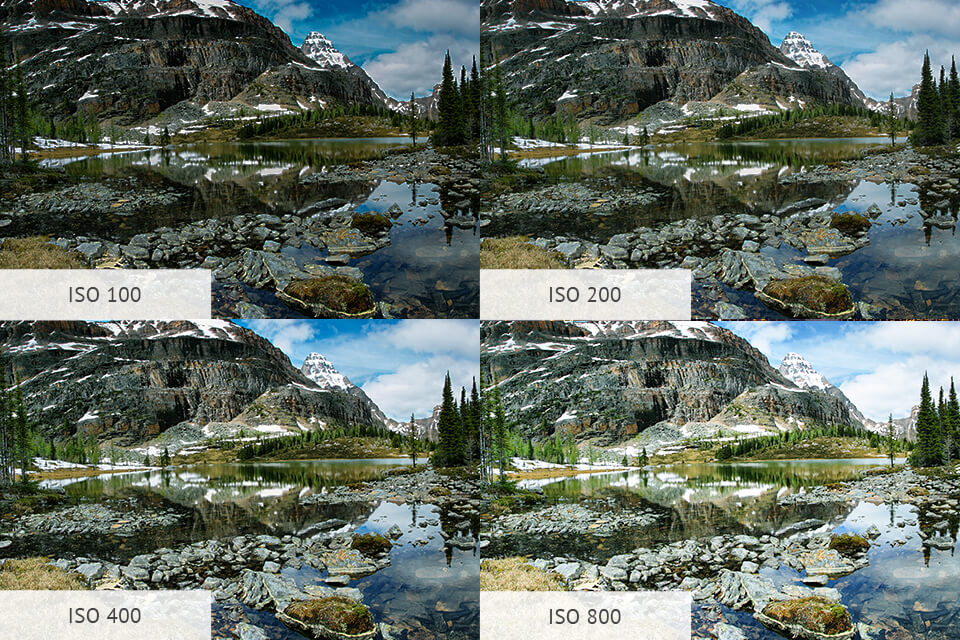
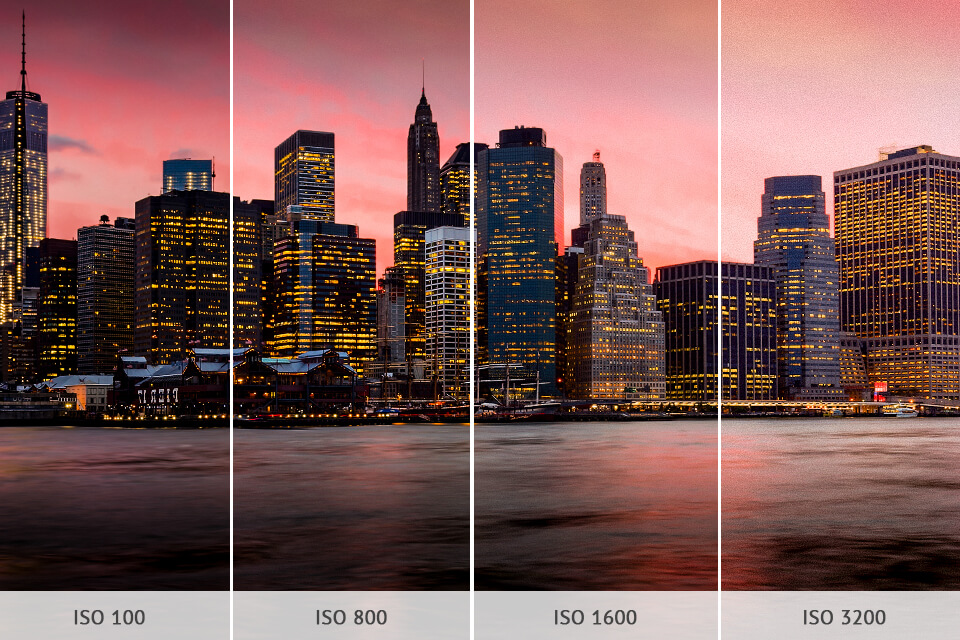
You might have noticed that general ISO values are the following: 100, 200, 400, 800, 1600, 3200, 6400. It happens because they have a two-multiple increment in every value. To understand the ISO meaning photography professionals should consider the fact that each step between these values doubles the sensor’s sensitivity.
It means that ISO 1600 allows you to increase the sensitivity of the sensor to light by 16 times if the base value is ISO 100. A picture taken at an ISO 400 value will be twice brighter than an image taken at an ISO 200 value.
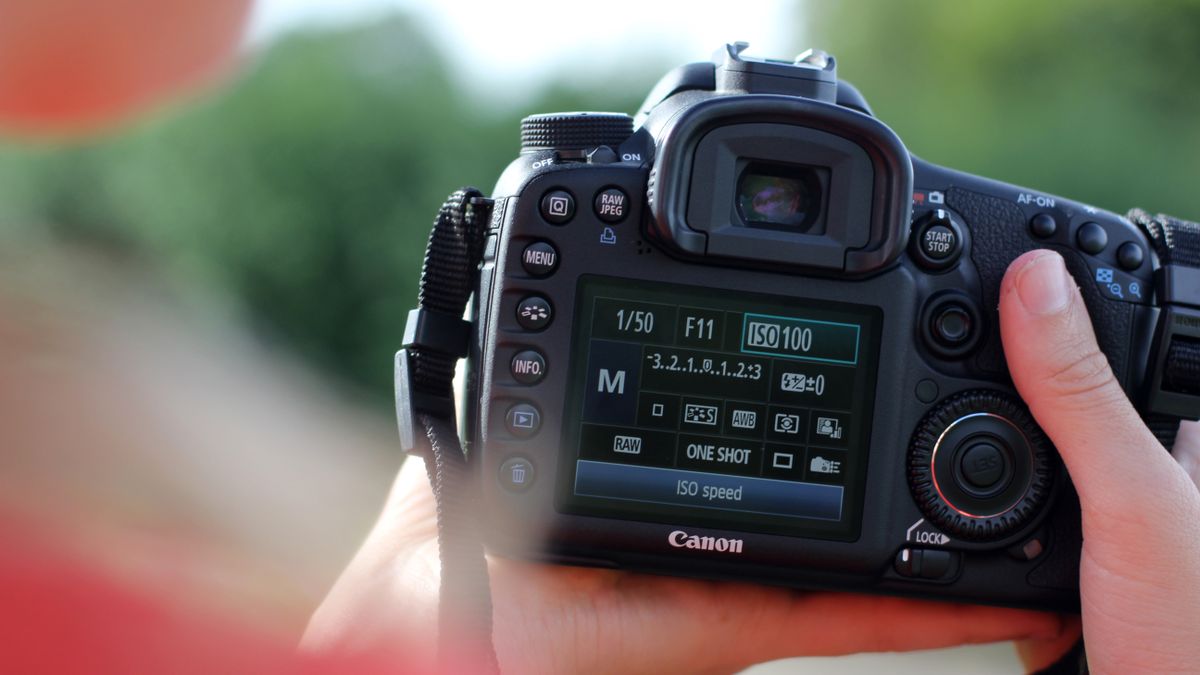
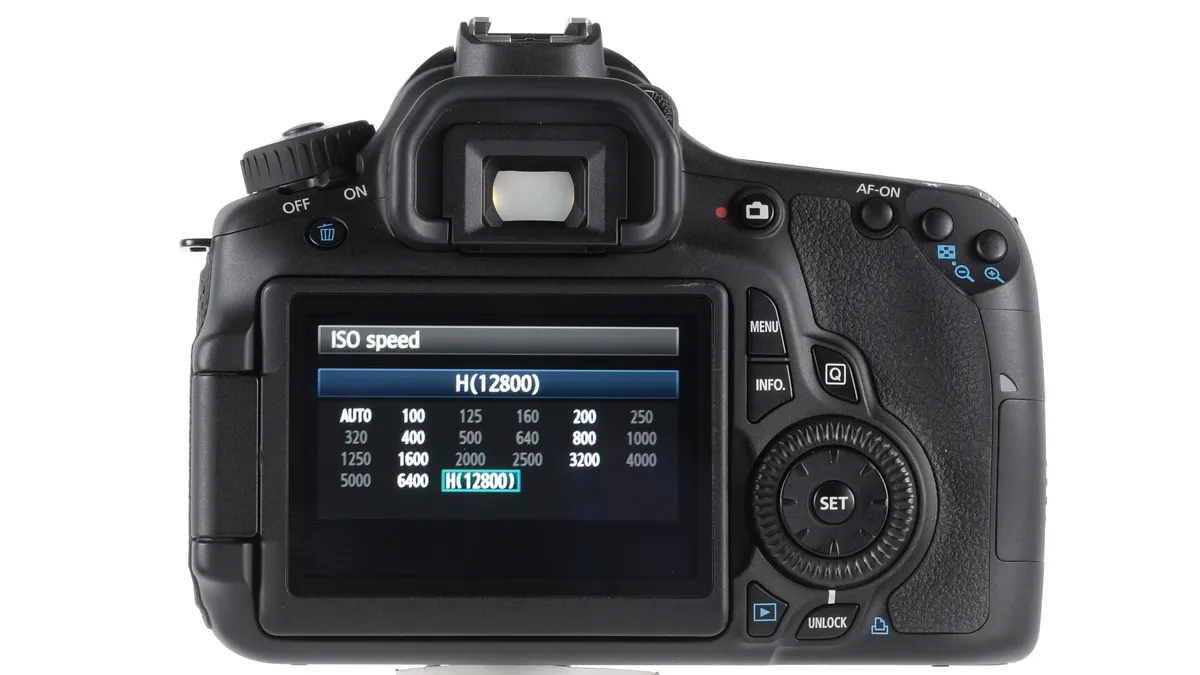
If you are wondering how to change an ISO value, keep in mind that the way you can change this setting ranges depending on the camera model. There are several ways to do it:
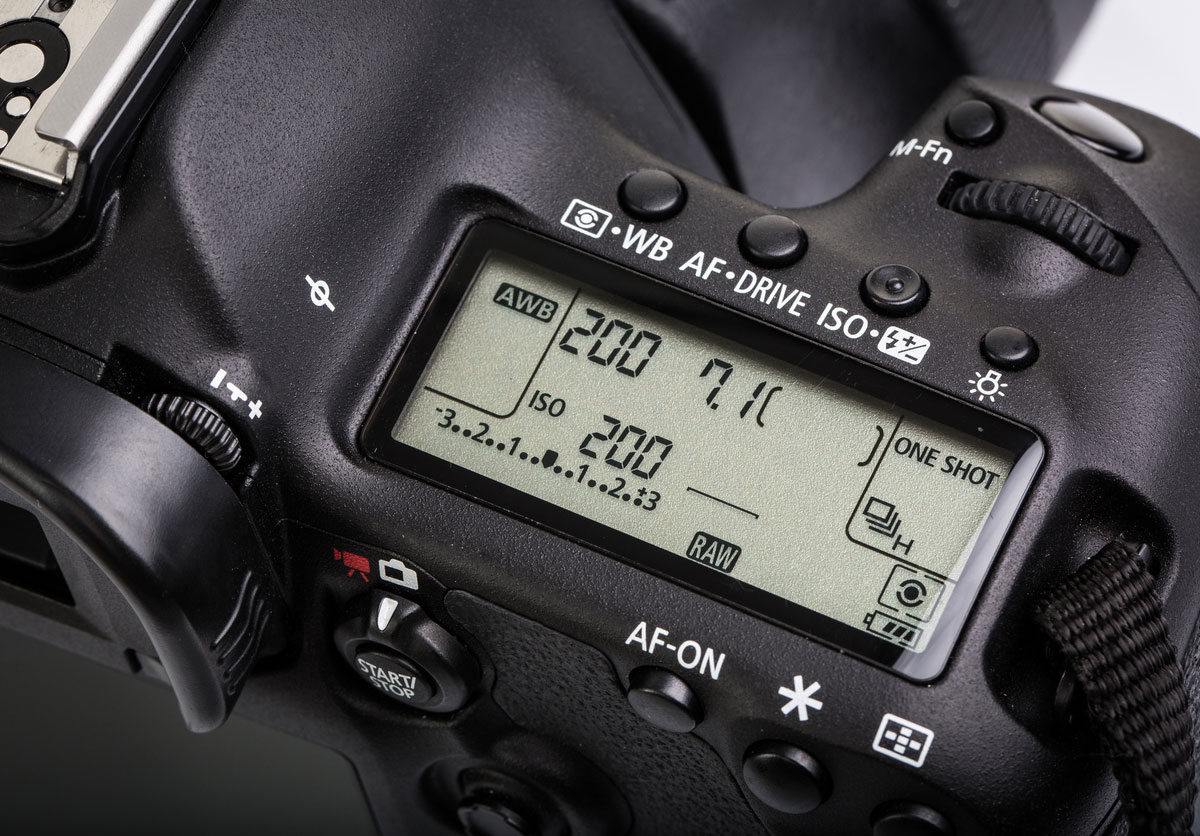
If you can’t find a dedicated button, take a look at the manual that comes with your camera. It’s important to memorize how to adjust ISO quickly. It will help you adjust the camera settings manually in situations when there is not enough light or when you need to use a tripod or flash.
If you have some experience, you might know a thing or two about ISO, however, it might still be difficult for you to select the most suitable ISO setting. You might have noticed that your camera allows you to select from a variety of ISO settings. It’s better to make your choice depending on the situation.
Professional photographers use the lowest ISO setting that ensures a proper exposure level at a specific shutter speed. It allows them to minimize camera shake and use a sufficient f-stop for achieving the depth of field they need.
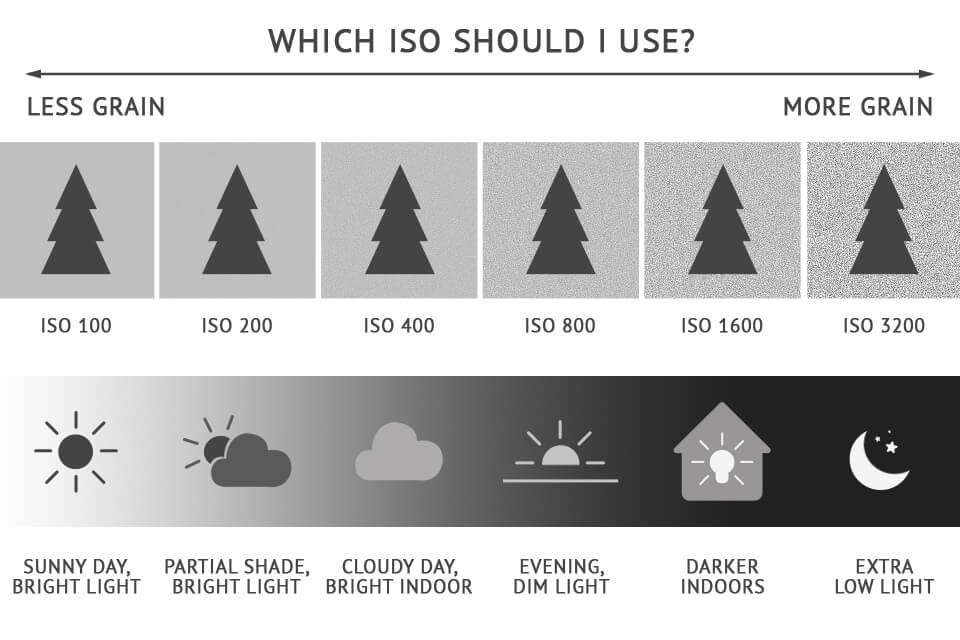
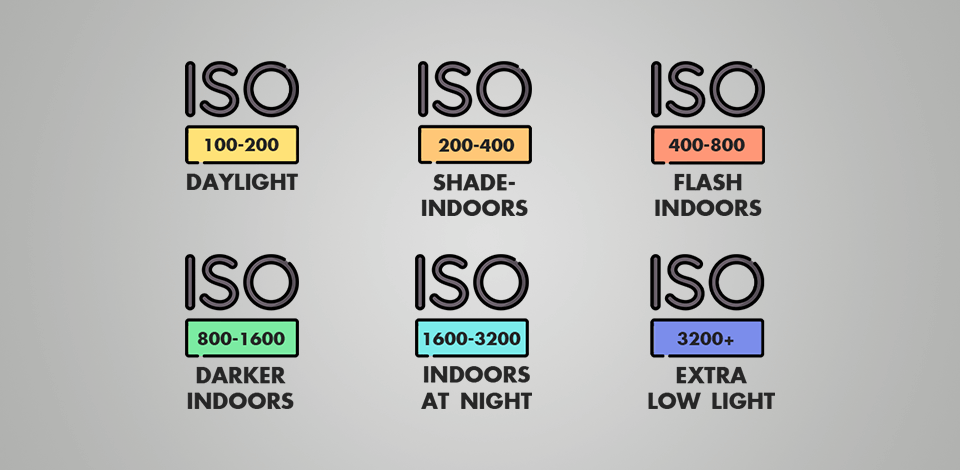
ISO 100: Use this ISO value when taking photos outdoors when the weather is nice and there is plenty of sunshine. Besides, it’s suitable for long exposure photography.
ISO 200: Suitable for sunny days when there are plenty of shadows visible in the frame.
ISO 400: When there is plenty of light but it doesn’t seem to be overly bright. For instance, when you need to take photos indoors or outside when the sky is overcast. This is when you might need to use a higher ISO value.
ISO 800: If you specialize in portrait photography and need to take photos in a dimly lit room or want to use a flash, this ISO value will be the most suitable for your needs.
ISO 1600: When there is not enough light and you need to snap pics indoors, it’s better to use a high ISO.
ISO 3200+: This ISO setting will be suitable for extra low-light situations. If you need to capture a moving object, use a high ISO with a high shutter speed.
This is a common misconception. You might have seen plenty of articles mentioning that ISO acts like sensor sensitivity, however, it’s not quite the case. The sensitivity of a digital sensor doesn’t depend on ISO. Instead, it will be more correct to say that ISO allows you to tell your camera how bright a photo should be when you use a specific exposure.
It is better to set ISO to lower values to achieve high image quality. For instance, if your frame looks perfectly exposed, you can set ISO to 100.
If there isn’t enough light, you will have to take photos with a lower shutter speed. Because of this, you might notice some signs of camera shake, which might result in blurry pictures. To solve this problem, opt for a higher ISO, for instance, ISO 1600. When deciding whether you need to set ISO higher, pay attention to your aperture and depth of field. You should consider the light situation as well.
Professional photographers prefer to select the right ISO settings when taking photos. If you try to adjust it during the post-processing stage, it might make your photos look blurry. Besides, in this case, it will be difficult for you to minimize the noise level. This is why it is better to take care of the ISO setting when taking photos. If you need to take pictures in poor light conditions and want to set ISO higher to achieve the perfect exposure, you might notice some grain in your photo. However, the overall image quality will still be better than if you decide to edit ISO during post-processing.
Now that you know about ISO meaning, keep in mind that there is a range of recently released camera models that support auto ISO. Thanks to it, you don’t need to worry about adjusting the ISO setting manually. Besides, such models usually automatically configure other camera settings for portraits depending on the lighting situation as well as the aperture and shutter speed that you want to use. Auto ISO will come in handy for those who work outside when the weather changes all the time. It allows you to automatically select the most suitable ISO setting without configuring it manually. When using Auto ISO, it’s important to understand the algorithm may not necessarily select the most suitable ISO for your lighting situation, which is why, in some cases, you might need to adjust the ISO settings manually.


