In this tutorial, I will show you how to make gold text in Photoshop using Layer Styles. You can follow these guidelines when working in various versions of Photoshop. Learn how to turn standard text into a shining design element for your banner, publication in social networks, or brochure.
Check out this post to find out how to create gold text in Photoshop using a set of basic tools for aspiring photo retouchers. After reading this Photoshop tutorial, you will be able to add sparkling text to your image and make it more unique.
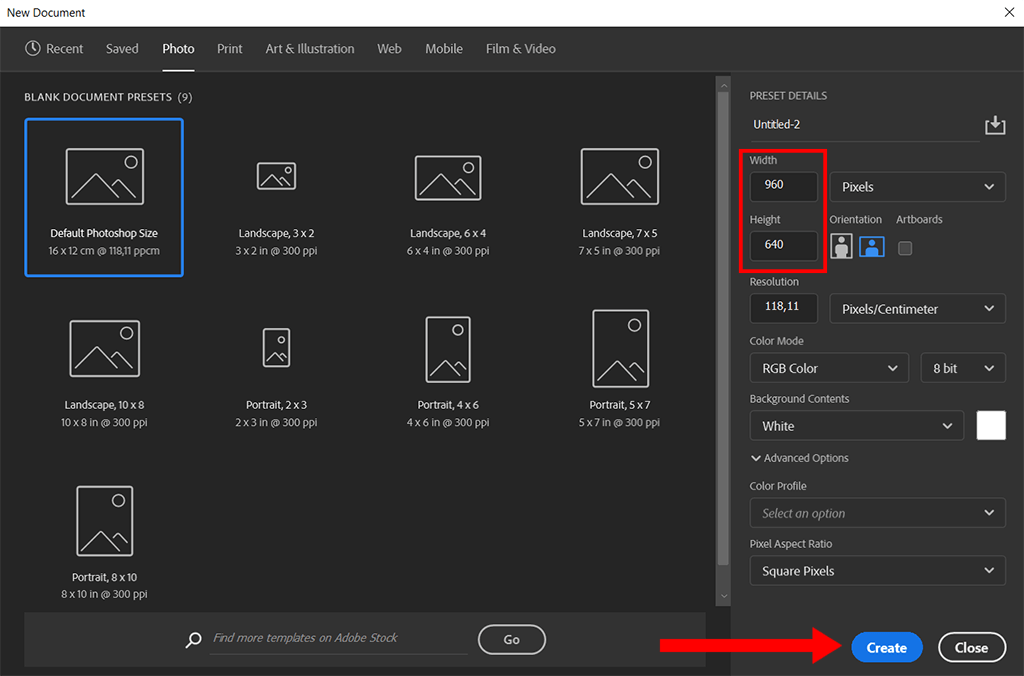
Open a new document in Ps. To do this, go to the "File" menu and select "New." Select the file size, for instance, 960x640. Then click "Create." The new document is ready.
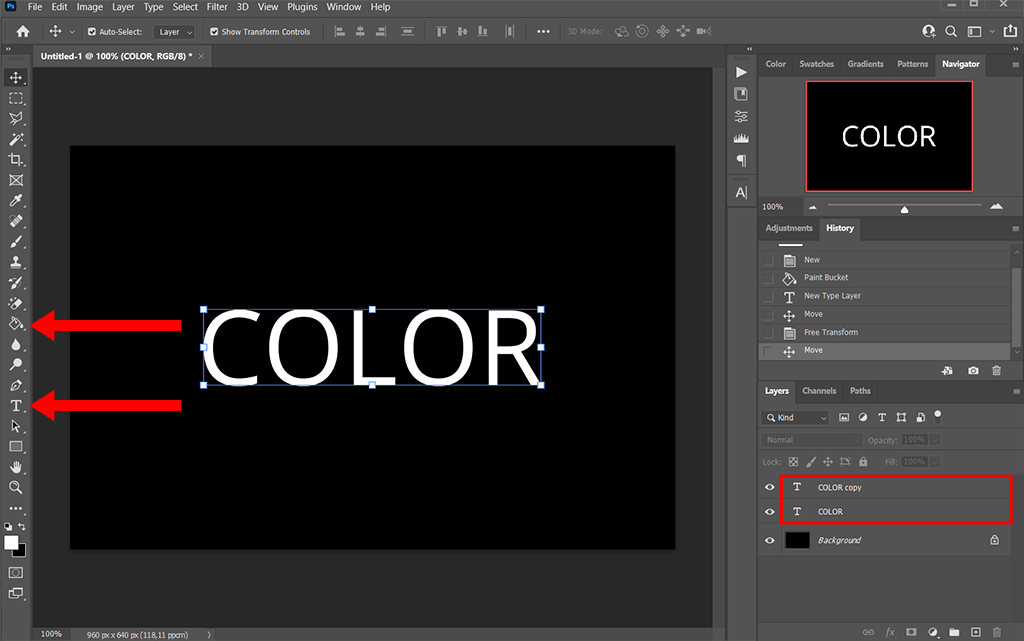
Gold text looks better against a black background, so you need to replace the white one. First, press the G key. If you are a Windows user, hold Alt + Backspace to fill the background layer with black. For Mac devices, use the Option + Delete combination.
Select white as the main color and click on the Text tool or press the T key. You can choose a font from the bar or download one of the free Adobe fonts. Then click inside the document window and enter your text.
Use the Free Transform command to resize the text. Press Ctrl + J to duplicate the text layer quickly. You should have 2 text layers.
Now let's find out how to make gold letters in Photoshop using layer effects. I will start with Gradient Overlay.
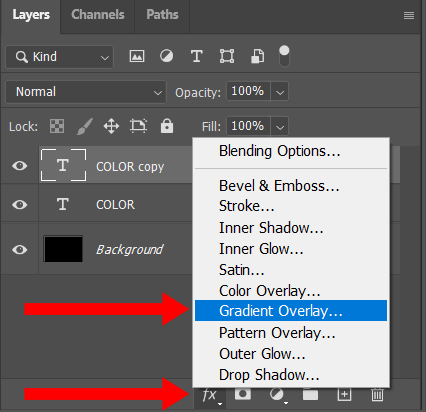
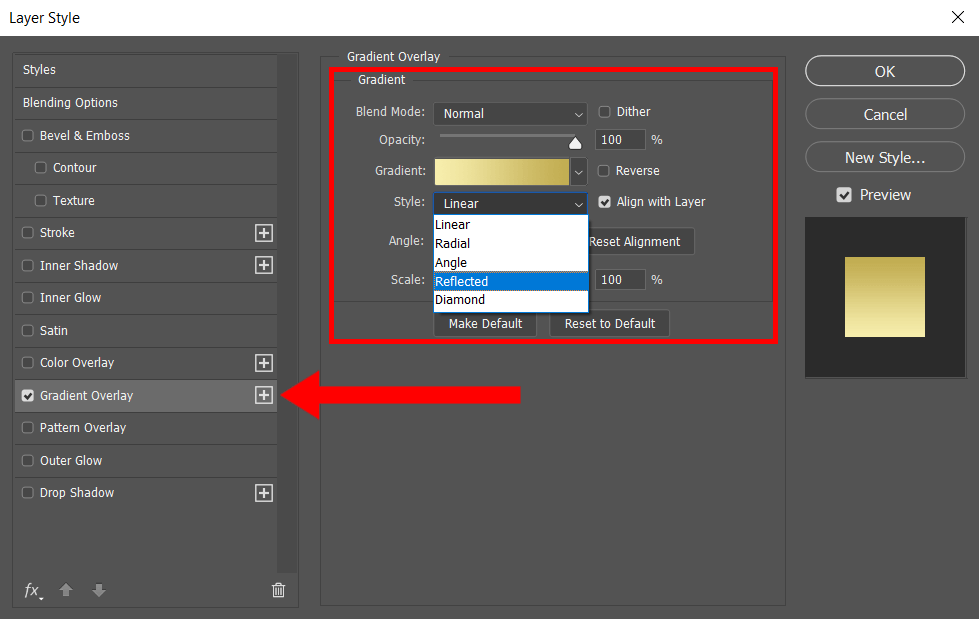
You can make a gradient in Photoshop yourself. First, select the layer with the copied text, click the Layer Styles icon and choose Gradient Overlay. You can adjust the effect parameters in the dialogue box. To set the necessary values, open the gradient editor by clicking on the preview area.
Select the left color market when the window appears. You should use these values to get the golden gradient: Red - 247, Green - 238, Blue - 173.
Then open the right color market and set Red to 193, Green to 172, Blue to 81.
Return to the Layer Style tab and choose Reflected.

Go to the Layer Style menu and select the Bevel and Emboss option. Next, find its structure parameters in the middle of the dialog box, click the down arrow to the right of the word "Smooth" and change the Technique to Chisel Hard.
In the Shading tab, you should click the down arrow to the right of the word "Gloss Contour" and select "Ring - Double." You can apply the Anti-Aliased option to get rid of rough edges.
Increase the size of the outline to fill the space inside the letters. Go back to the Structure parameters and drag the size slider to the right until you cover the empty spaces inside the letters. In my case, this parameter is 27 pixels.
To enhance the lighting effect, set the depth value to 180%. Then find the Contour effect and activate it by clicking inside the checkbox.
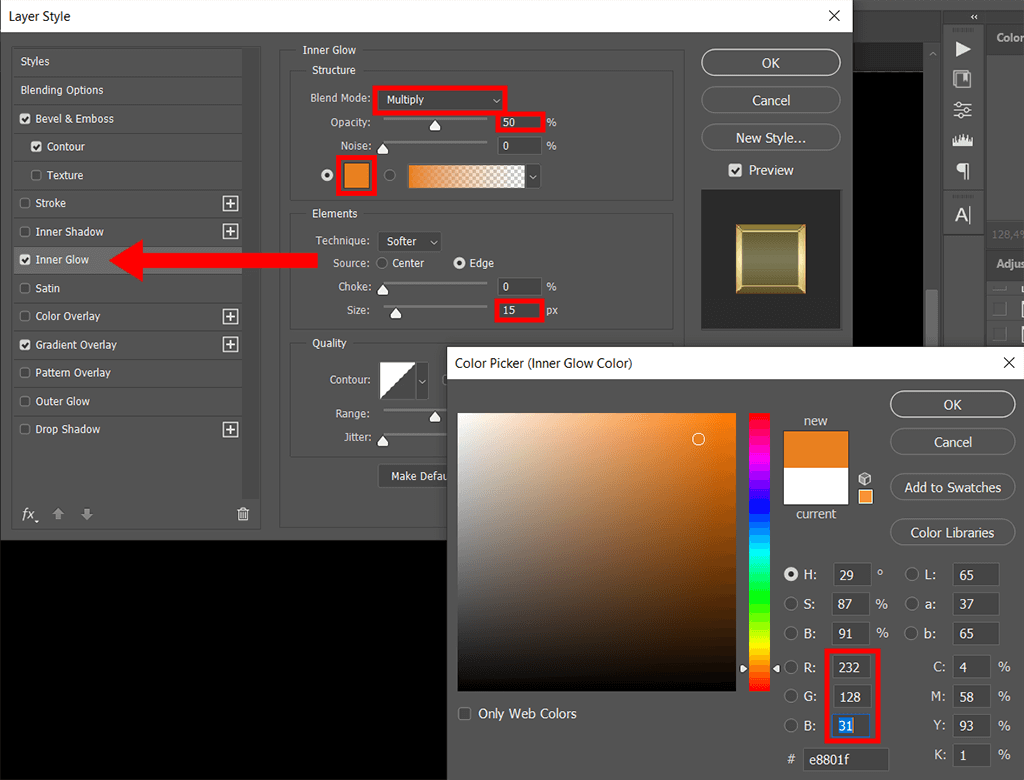
Open the Layer Style menu and click on the appropriate effect. Use these Multiply parameters:
Opacity — 50%;
Noise — 0%;
Size — 15 pixels.
Then set these color values: Red - 232, Green - 128, Blue - 31.
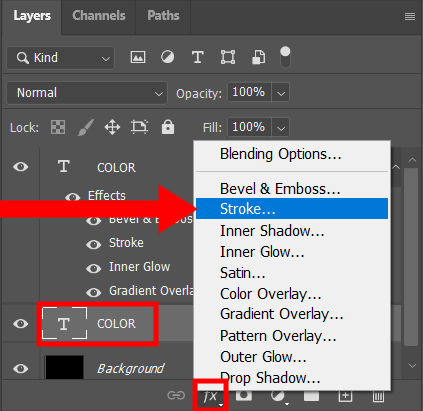
To outline text in Photoshop, return to the original text layer. Click on "Layer Styles" and mark the "Stroke."
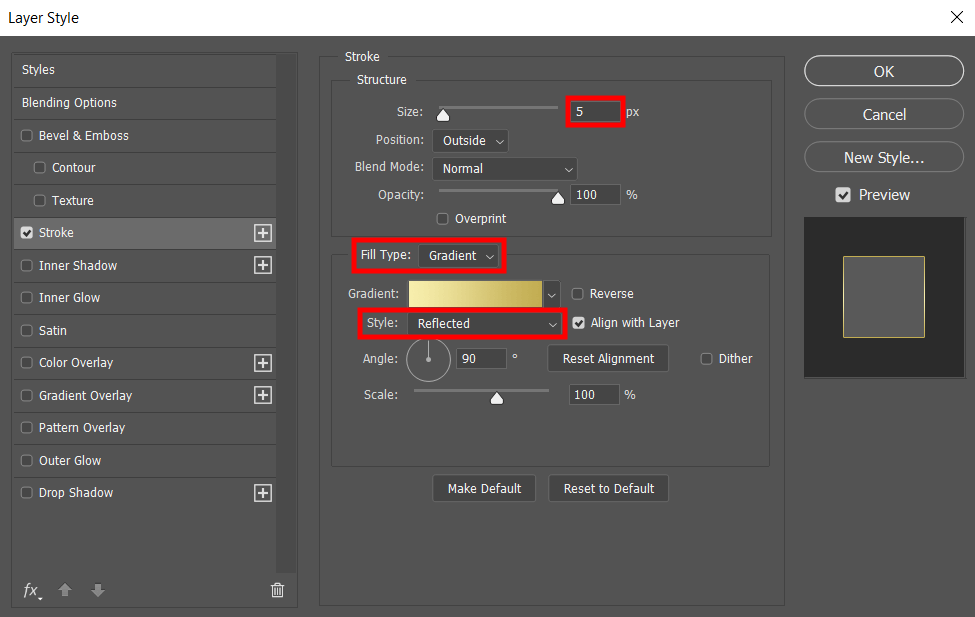
Then select the following options:
Size — 5 pixels;
Fill Type — Gradient;
Style — Reflected.
Use the same colors for the gradient stroke and the gold text effect Photoshop. The left color values are Red: 247, Green: 238, Blue: 173, and the right ones are Red: 193, Green: 172, Blue: 81.
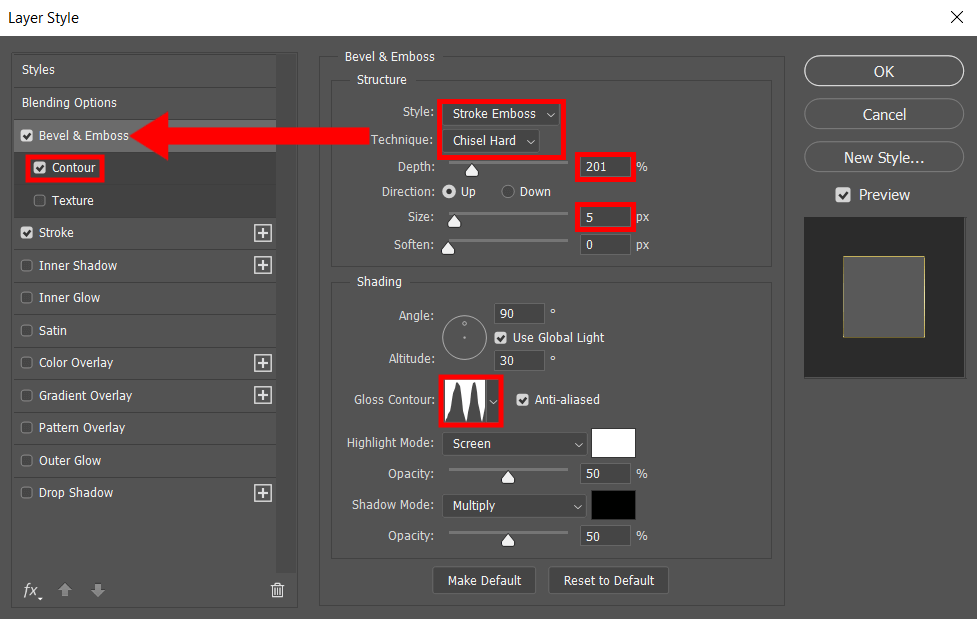
Apply the Stroke Emboss style. Select the Chisel Hard technique. The size value should be the same as you set for the stroke. I chose 5 pixels for my design.
In the Contour menu, you need to find and select Ring - Double. Open the Layer Style window and find the Contour effect. Apply it by marking the checkbox. This way you can make the lighting around the stroke more visible.
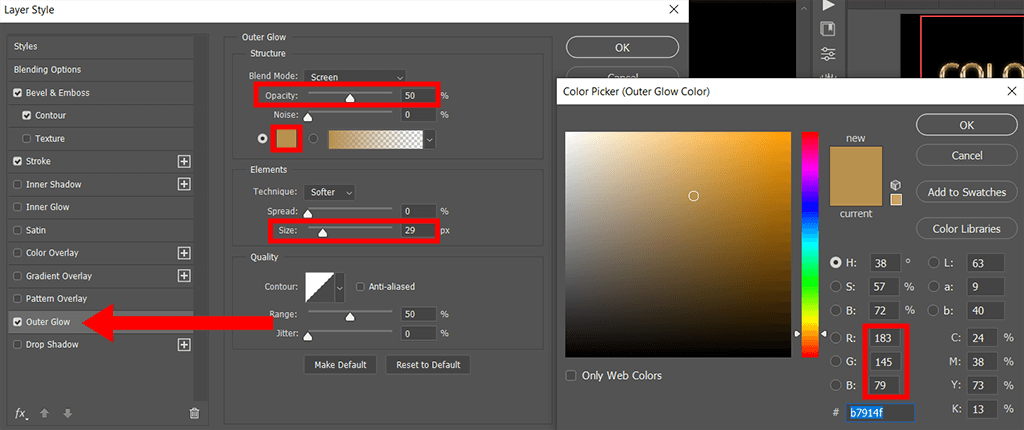
Find the Outer Glow option and set the following values:
Opacity — 50%;
Size — 29 pixels;
Set Red to 183, Green to 145, Blue to 79;
Press ОК.

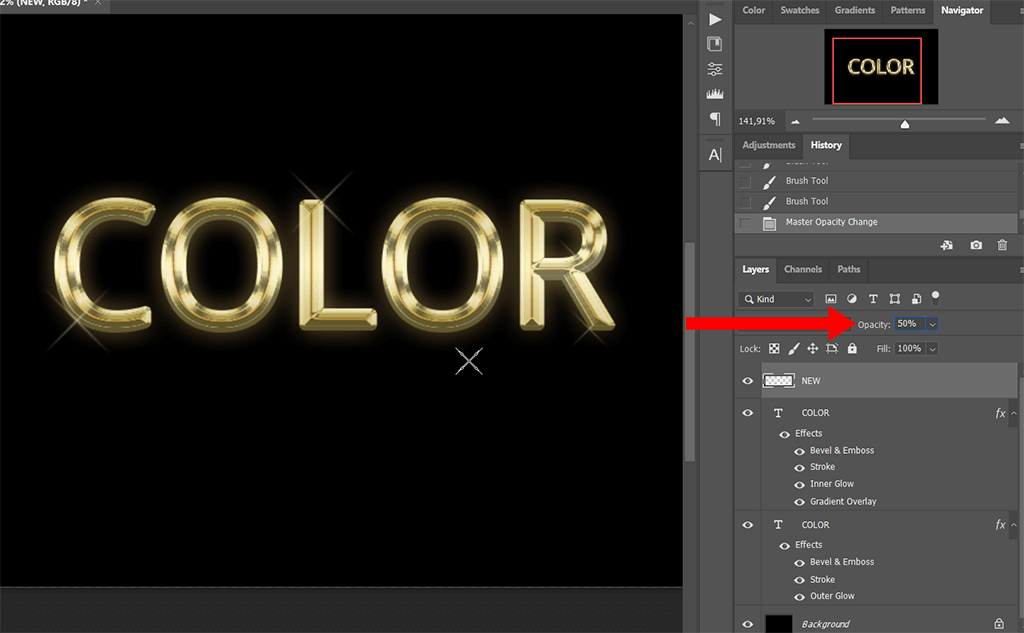
Go to the Layers panel. Select the layer with the copy of the text. Create a new layer.

Use the Eyedropper tool to select the desired color. Press the I key to activate it.

Press the B key and right-click on the area to get additional brushes. When the dialog box appears, select Legacy Brushes → Assorted Brushes. Apply the brush 48.

You can add some sparkles to make your Photoshop golden text more attractive. Click anywhere around the letters. You can use the left and right bracket keys to change the size of the brush. Shrink the brush with the left bracket key and enlarge it with the right one.

Be careful not to use too many sparkles. Just a few strokes with small and large brushes will look great. You can always undo your last action using special keyboard shortcuts. Press Command + Z for Mac devices and Ctrl + Z for Windows.
Moreover, you can adjust the brightness of the "Sparkles" layer by changing its opacity values.
Once you've learned how to make gold in Photoshop, you'll need a great collection of fonts for your designs. With their help, you can make your banners or images for social networks look more eye-catching. All the tools are suitable for various photography genres.


