Working at FixThePhoto service, I often retouch photos with grain, which was either added intentionally for artistic effect or appears on a photo as a problem that needs to be fixed. Also, a lot of people who follow us or work with us ask about grain in photography – when to add it, how to manage it, and when to get rid of it. I thought it was finally time to explain this topic.
Grain is really important in photos. It can make pictures look moody or old-style, and helps edited spots blend in naturally. But if you don't use it right, it can mess up details, especially in dark areas or on skin. I've used grain to make photos look vintage or to soften pictures that are too sharp. I've also had trouble fixing noisy photos without losing detail. Knowing when to add grain and how to control it makes your photos look much better in the end.
Grain in photography started with old-fashioned film. Film has a special coating full of tiny crystals that react to light. When you take a picture and develop the film, these crystals form the image. The way these little crystals clump together is what we see as grain.
Many photographers like grain because it gives photos a textured, old-style look and adds emotion or a real-life story feel. Today, even famous photographers like Annie Leibovitz, Ryan McGinley, and Petra Collins add grain on purpose. They do it to copy the film look, add mood, or make very clean digital photos feel more natural.
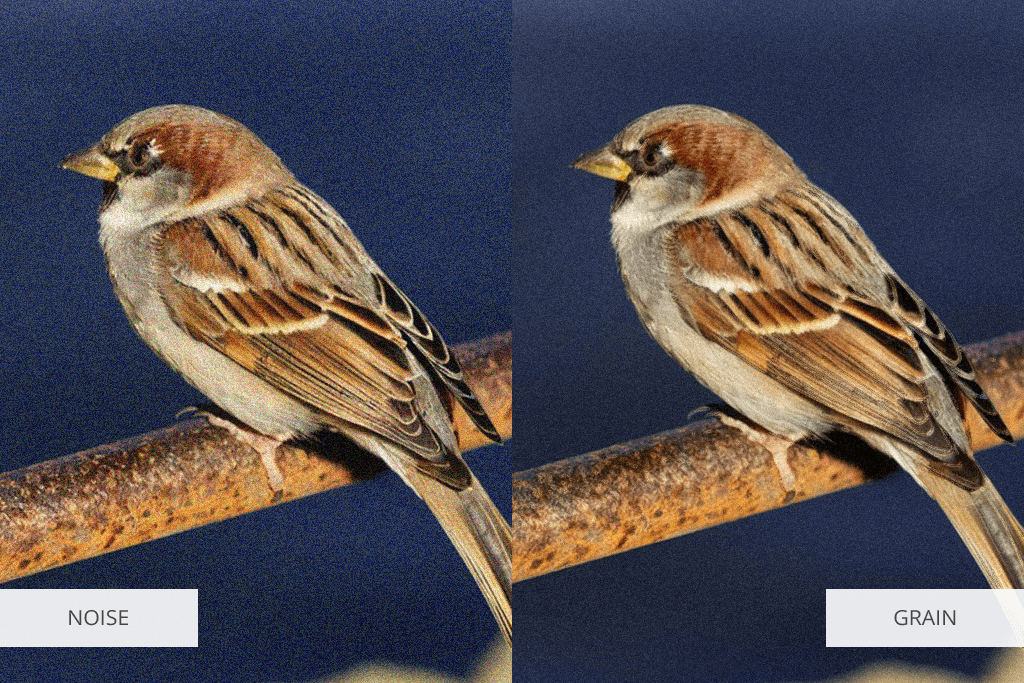
As a photo editor, people often ask me about noise vs grain in photography - and they're not the same thing, even though they can look alike. I really enjoy using grain, especially when making photos look like old film. Grain comes from tiny particles in traditional film and has a natural, uneven texture. It gives photos an old-time feeling or movie-like mood, and when used well, it adds emotion without making the photo look worse.
In contrast, noise is what I need to eliminate. I usually remove noise in Photoshop. The camera sensor is the part of the equipment that produces this digital artifact, which appears when shooting in dim spaces or at high ISO settings. Noise appears as strange, colored dots or blotchy patches, usually in dark areas. Unlike grain, noise looks annoying and messy, especially when it ruins skin.
You can use grain and noise in creative ways. I sometimes add grain after taking the photo to make clean digital photos feel warmer and more textured. And sometimes I leave a little noise in dark, moody portraits because it fits the feeling I want.
“Just remember: grain is added on purpose to improve a photo's look, while noise usually happens by accident when your camera settings are wrong (like in low light).”

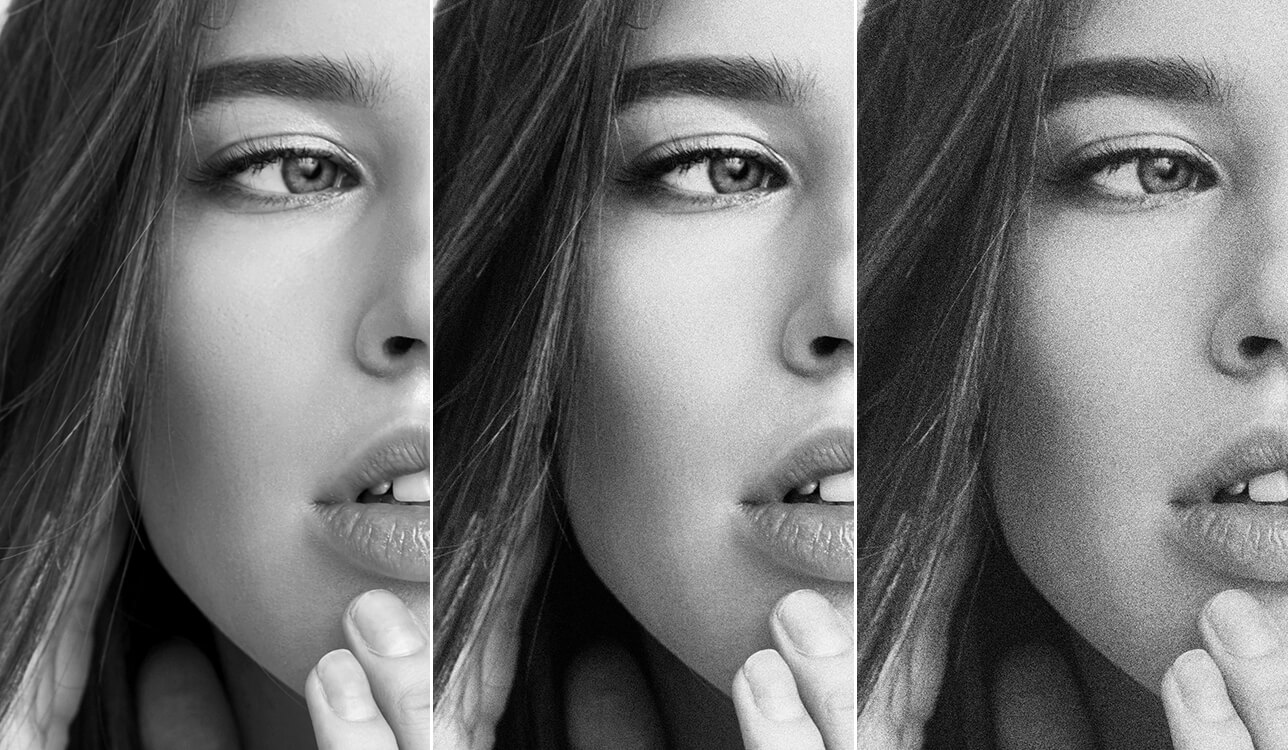
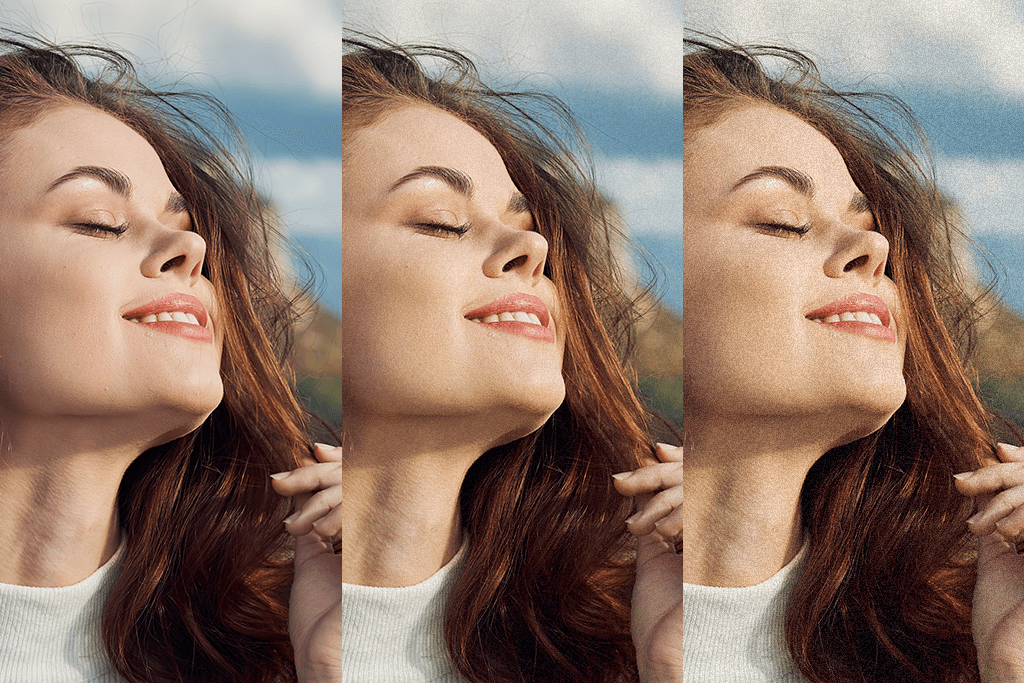
Your camera's ISO setting controls how much grain (in film photos) or noise (in digital photos) you see. The higher the ISO, the more visible and rough this grain or noise becomes.
In Film Photography
ISO measures how sensitive film is to light. A higher ISO number means the film is more sensitive. But there's a downside.
In film, higher ISO means bigger grain. Photographers pick different types of film not only to get the right brightness, but also because they like how the grain looks.
In Digital Photography
ISO controls how sensitive your camera's sensor is to light. When you increase the ISO, you also increase digital noise. This noise can look like film grain, but it’s caused by something different.
Even though there is a difference between noise and grain in photography, digital noise has a similar effect: higher ISO makes your photo look rougher and messier.

Grain makes photos better, not worse when done right. My FixThePhoto colleagues use it to add feeling and depth, making a story come alive, not to fix errors.
“Add a little grain to dark or moody photos. It gives them a raw, real feel - like a moment from a movie.”

Grain can improve a picture, but only when used carefully. Over time, I've found that adding grain isn't just moving one slider. Here are common errors I skip:
Grain is a great assistant, but only with careful use. For me, it's about refining the picture, not using a "filter" to cover flaws.
Grain looks good when you plan to use it, but sometimes you want clean photos. Here’s how I avoid grain:
Both Photoshop and Lightroom have tools that let you fix grainy photos or add grain effects. You can control how heavy, big, or rough the grain looks.

Here is my algorithm of how to reduce grain in film photography using Lightroom while keeping details sharp and natural.
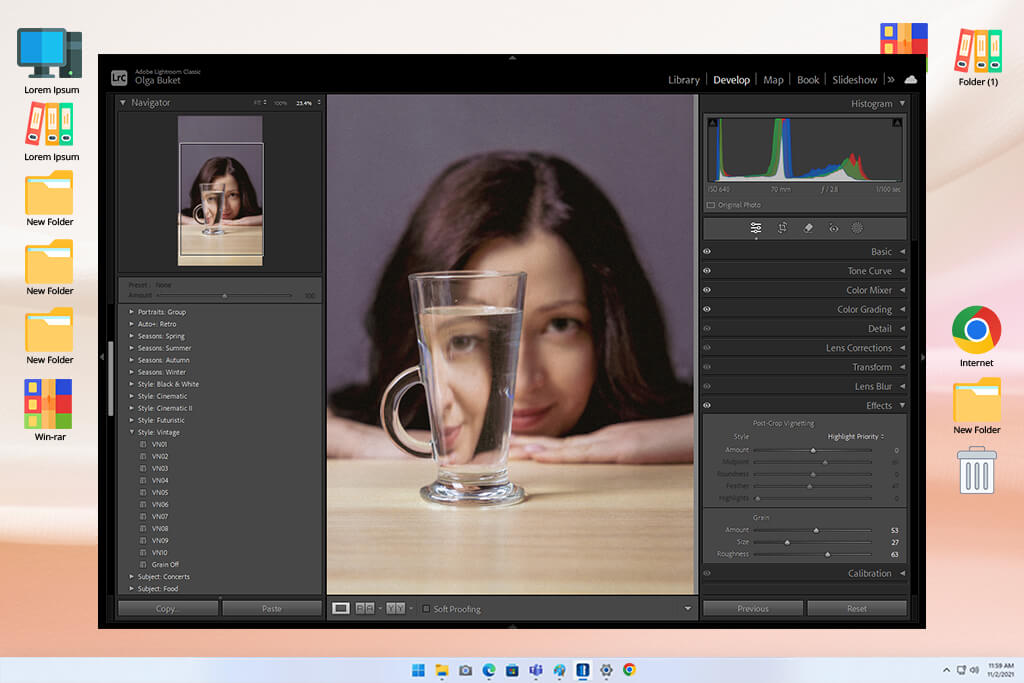
Step 1: Open the Image in the Develop Module
First, I upload the scanned film image to Lightroom, and then go to the Develop panel.
Step 2: Go to the Detail Panel
Here's where I reduce grain and noise, even in scanned film photos.
Step 3: Adjust the Luminance Slider
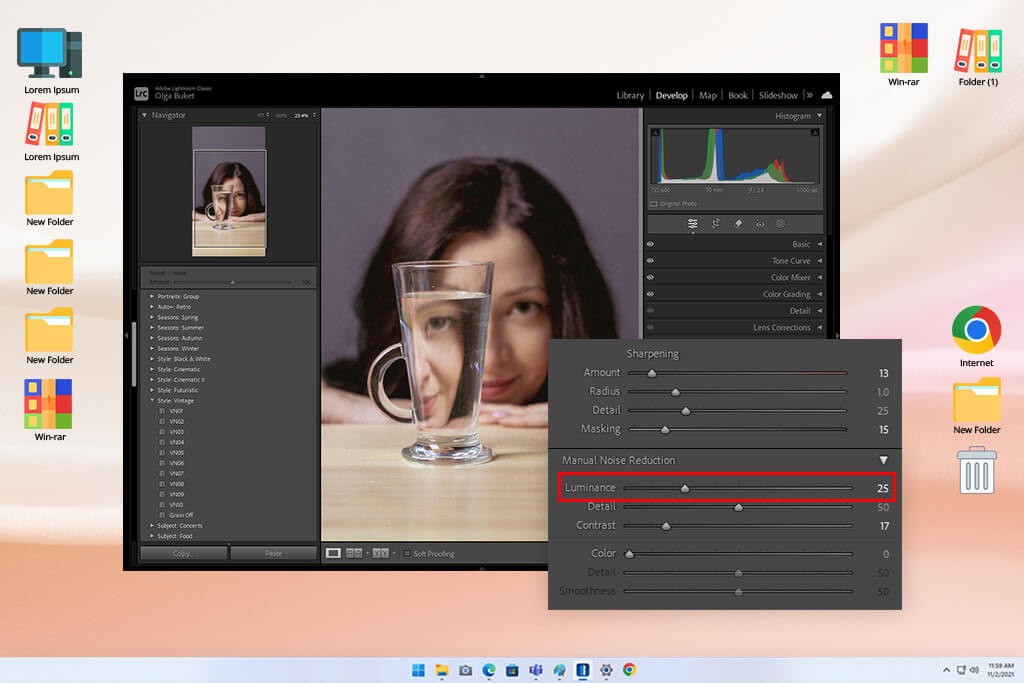
Step 4: Fine-Tune the Detail & Contrast
Optional: Use Masking or Local Adjustments
Sometimes I only want to reduce grain in specific areas, like skin, while leaving the background untouched. In that case:
My Goal: Make the grain not so noticeable where it becomes distracting, while retaining a natural film look. My aim is not to fully eliminate it, but to control it.
“In Lightroom, add grain and a little more contrast. This gives portraits a soft, movie-like look.”

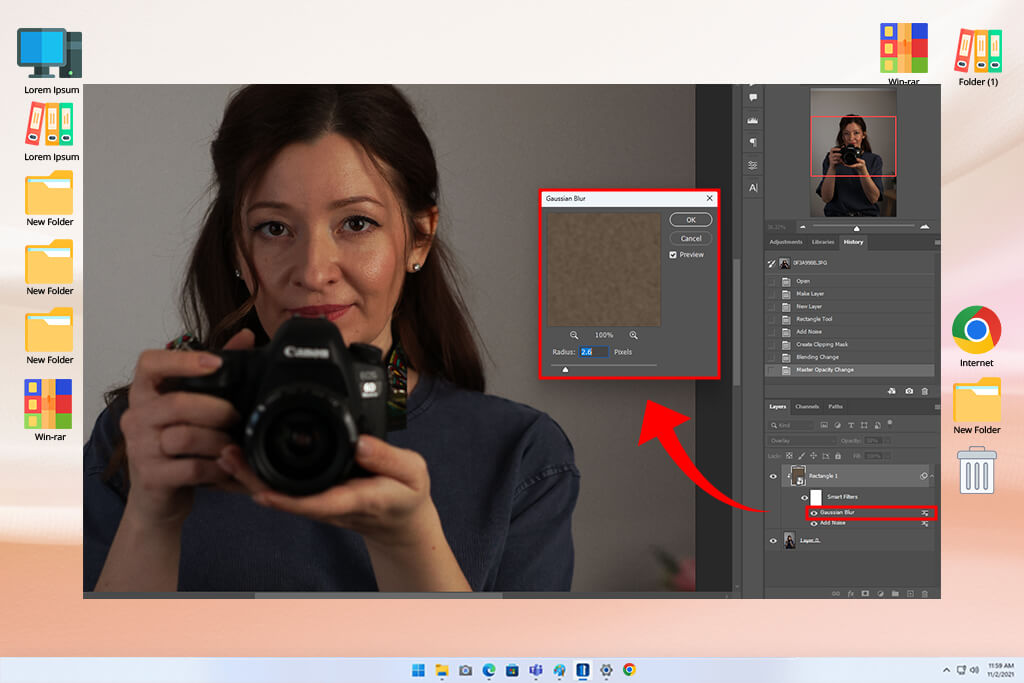
We tested different ways to add film grain in Photoshop. The easiest method is the Noise filter. You can blend, adjust, and edit this noise to get the exact graininess you want. For even more control, use blending modes to creatively fine-tune the effect.
Here’s how I perform this job in Photoshop:
In Lightroom, the process takes even less time:
Sometimes I use both Lightroom and Photoshop. I add the main grain in Lightroom, then use Photoshop to add more grain only to certain spots. It's a small step, but if you do it well, it really adds mood and character to the photo.
Grain overlays are pictures of film grain or texture that I mix into my photos using software like Photoshop. Grain filter apps, like the ones in Lightroom or special grain apps, can add grain effects fast. You can easily change how big, rough, or see-through the grain looks using sliders.
To save time, you can use ready-made overlays with film grain already added. These let you easily make your photos look textured and old during editing. Using overlays, filters, or presets gives me the freedom to create different styles like classic film photos, rough street scenes, or just artistic touches, while I can still control how it looks.
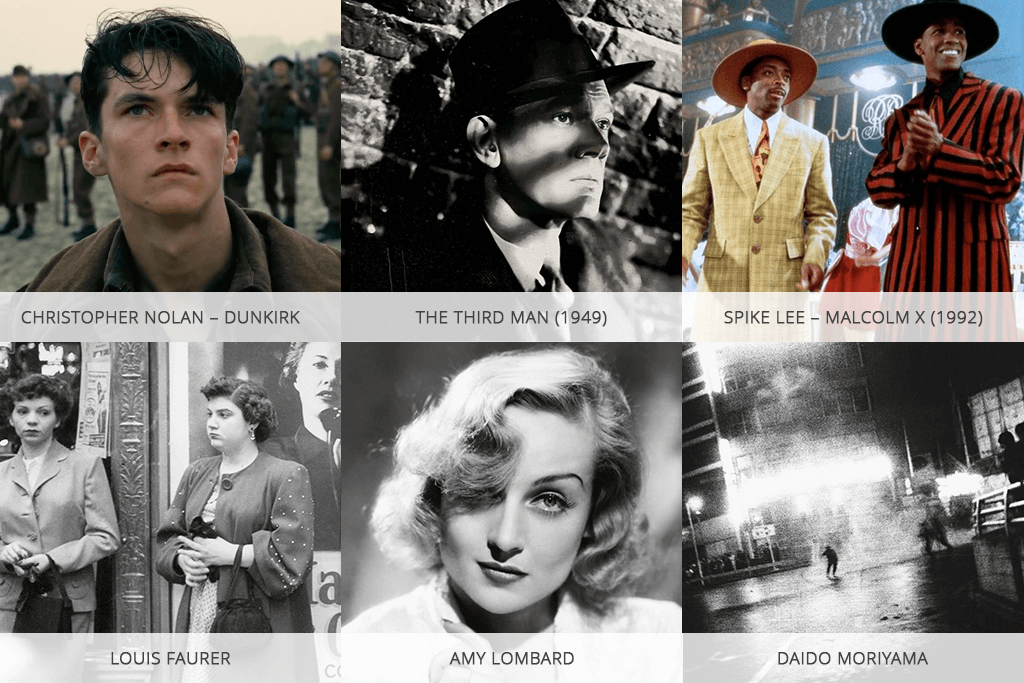
Film grain in photography isn't just about looking old. It's a useful tool that artists have used for years to make stories, feelings, and moods stronger. Grain makes pictures feel authentic, rough, and human, in old movies and new photos alike. Here are some great examples that inspire me when I use grain:
Christopher Nolan – Dunkirk
Christopher Nolan likes shooting on real film, and Dunkirk shows this well.
The natural grain makes the battle scenes feel lifelike and intense, like you're actually there.
He often uses IMAX film, as the grain in these shots makes things look big and grand without losing detail.
The Third Man (1949)
This famous noir film, The Third Man, shows perfectly how grain and light work together. Shot in Vienna after World War 2, the grainy night scenes make the mystery, tension, and gritty mood stronger. This proves that grain isn't just texture, but the instrument for telling the story itself.
Spike Lee – Malcolm X (1992)
He kept or even made the grain stronger in some scenes on purpose. This helped show the old-time importance and deep feelings. Mixed with stylized lighting, the grain adds roughness and gravity.
Louis Faurer
Louis Faurer took real, emotional photos on the streets. His night pictures show how grain can create feelings and make loneliness or closeness stronger. For him, grain wasn’t just a technical detail; it helped express emotion.
Amy Lombard
This modern photographer mixes bright colors and grain in fresh, artistic ways. Though she doesn't always use heavy grain, her photos often have a film-like texture. This grain helps busy, colorful scenes feel deeper and more real.
Daido Moriyama
Daido Moriyama is a famous street photographer. He takes gritty, high-contrast black-and-white photos. He uses heavy grain to give his pictures of Japanese cities a raw, chaotic feeling.
Grain is a natural feature of analog film, with an organic, textured pattern. Digital noise is an electronic artifact that can look harsher and more random, often caused by high ISO settings or low light.
In film photography, you can control grain by picking the film's ISO number – films with low ISO (like 100 or 200) give smooth grain, while high ISO films (like 800 or 1600) give rough grain. In digital photography, you can control grain (called "noise") by changing your ISO setting, exposure, and lighting.
Higher ISO means larger grain in film and more noise in digital. Grain can be an artistic choice; noise is generally unwanted.
Many photographers add grain to digital photos to give them an old-time film look. Add grain in Photoshop or Lightroom, or even use film grain PNG overlays.
Film grain isn't always bad. It can make photos feel moody, textured, and real. The important thing is to decide if the grain helps your photo look good and tell its story. Sometimes having less grain is actually better.
Add a little grain after all your other editing steps. This helps blend places you've edited or gives your photo a film-like feel. Change how big the grain is and how rough it is to fit the feeling and look of your picture.


