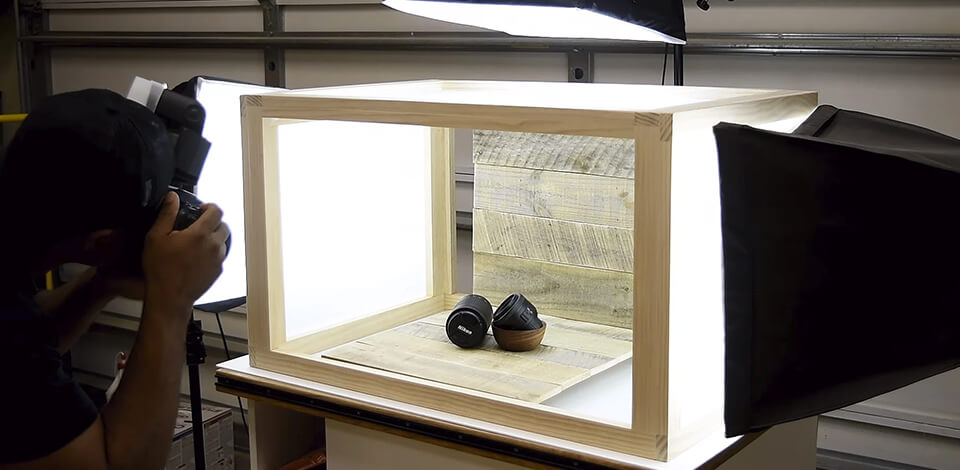
Whether you don’t have to take photos in natural light or lack sources to buy lighting equipment, you might need to create a DIY light box. You can use it for product shoots instead of buying an expensive photo light box. All you have to do is to arrange a number of low-cost lamps and attach diffusing boards to a cardboard box.
You can either purchase costly lightboxes on Amazon or get all the necessary materials to create a suitable DIY lightbox for your home photography studio.
.jpg)
Box. Making a lightbox is rather simple if you find a square and thick cardboard box and light it. Visit the back of grocery stores, malls, convenience stores or any nearby places which sell products to find such kinds of boxes.
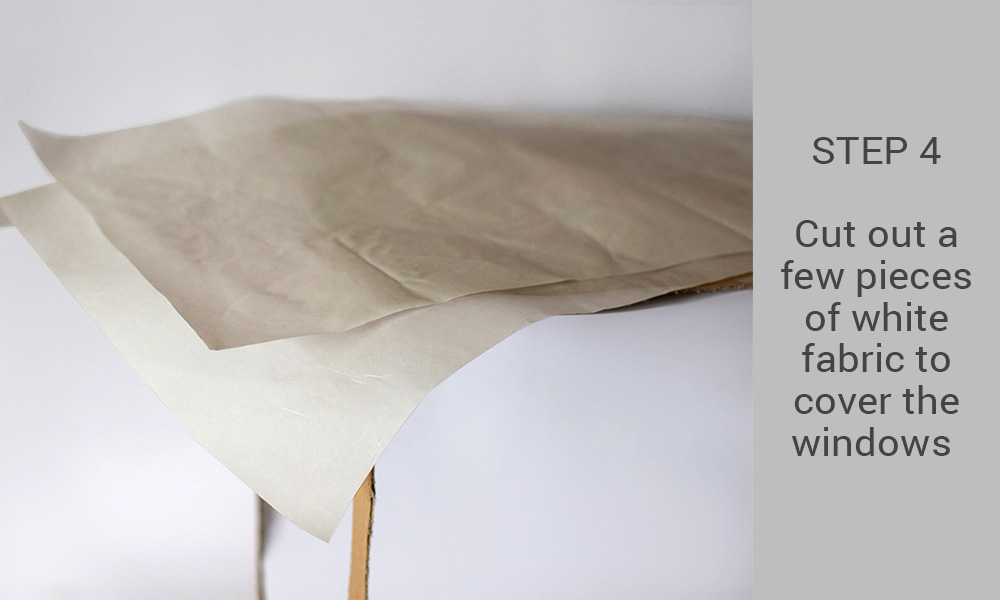
Fabric. For instance, I bought white muslin in a nearby craft shop. Don't forget to measure the size of the box when purchasing fabric – it must be enough to cover the whole box. White fleece, nylon, and even old white undershirts are also excellent choices.
Lights. Visit a nearby hardware store and invest in several light bulbs. Pay attention to “Daylight” fluorescent light bulbs or “Full Spectrum” bulbs. In addition, it will be a great idea to construct a lighting fixture for your DIY photo light box. For this purpose, you may use your desk lamp.
White Bristol board. This massive thick paper functions as the background and lines the box on the inside. Before you buy the Bristol board, consider the size of the box. You might need from 2 to 3 sheets for lining the box and one for the background. It doesn't have to be necessarily white, other colors are suitable as well.
Tape. In order to fasten the fabric to the sides of the lightbox for photography, you will need a tape. For example, I use ordinary masking tape so that I can easily change fabric if needed.
Miscellaneous tools & glue. If you are wondering how to make a lightbox, you can't do without a knife, scissors, and a regular ruler or a triangle. For gluing the lining in the photo light box, you should purchase a glue stick or spray adhesive from a local stationery shop.
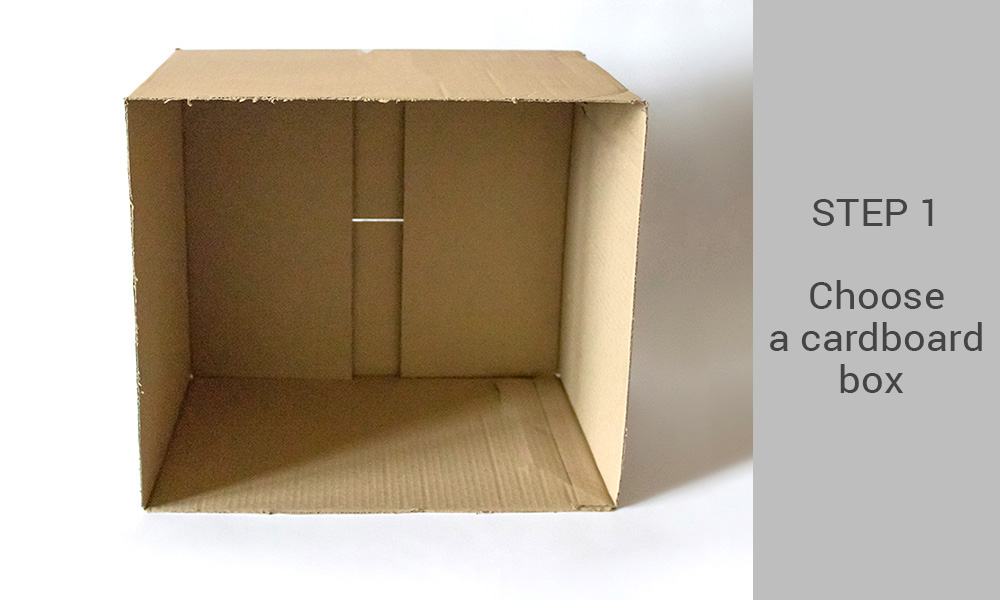
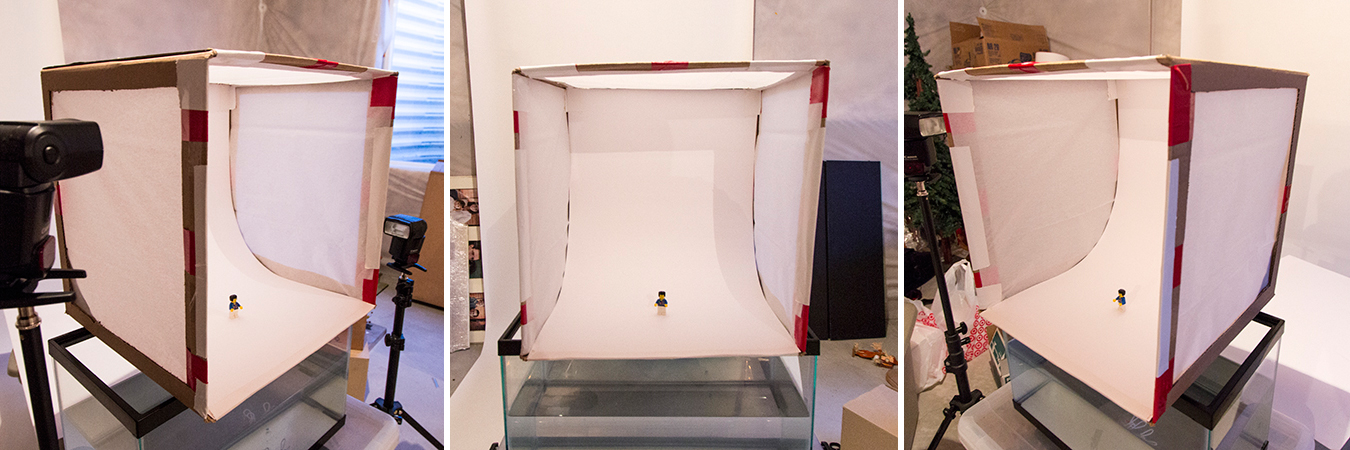
To make a proper DIY light box display, you need a huge cardboard box. The bigger your box is, the more extensive variety of objects of different sizes you will be able to photograph. Ask workers at nearby stores for unnecessary boxes or buy the most suitable one from a storage enterprise.
In case you wish to learn how to make a lightbox for photography that will serve you for a long time, use durable materials. Boxes made of wood or opaque plastic are a good fit. But keep in mind that in order to cut the panels in the side of such boxes, you will need a sturdier tool, for instance, a saw.

Locate the box on one of the sides for the flaps to be open in front of you. Mark a point approximately 5.1 cm (2 inches) with a ruler from every edge on the side of the DIY light box. Use a pencil to draw one line near the box's edges and connect the points. As a result, you would see a rectangle-shaped area near the edges. Don't forget to do the same on the other side.
This particular area is your window which would be covered with fabric or a sheet of parchment paper. In case the box is pretty large, I suggest you scale back the size of a window so you could put a piece of paper or fabric over it.
When you need the subject of a shot to be lighted from above, you may draw a window on the upper part of a lightbox for photography.
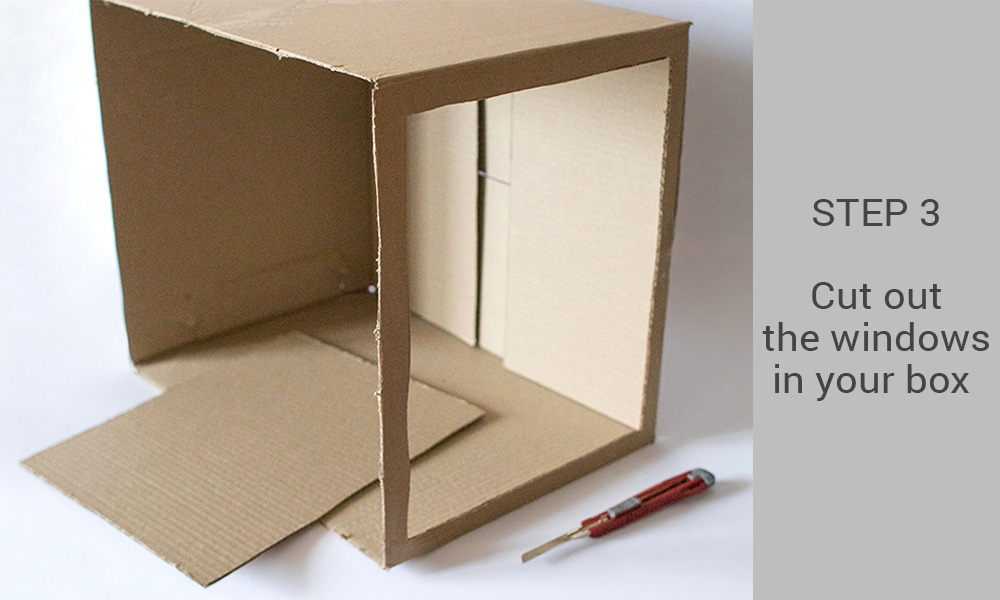
Cut along each drawn line of the box with the help of scissors or a designated cutter. After you’ve finished, you would be able to extract a piece of cardboard from the middle and see a window. The same must be done on the opposite side.
In case you wish to ensure that the lines are super straight, place a ruler near the lines and cut across them. Therefore, you could not only get the best light box for jewelry pictures but the one that looks neat.
Locate the white poster board or a thick sheet of white paper on the upper part of the photography light box DIY. In order to fit precisely into the box, get rid of the board's unnecessary edges using the cutter or scissors. The board must be nearly twice as large as the upper side and equal in width to the box.
I advise you the white poster board. Thanks to its even surface, it won't wrinkle inside the box. Search for such a board at the nearby craft shop, it doesn't cost much. In case you have problems finding it, you may use a broad sheet of white paper with a matte surface instead.
In order to make your own light boxes and give them an “eternal” look, you won't find anything better than a white poster board. It will make an object look more isolated. You may even use various colors to diversify the shots.
Keep in mind that a chosen poster board or a sheet of paper should have a matte surface. Otherwise, a shiny material would reflect the light and your light box would be useless.
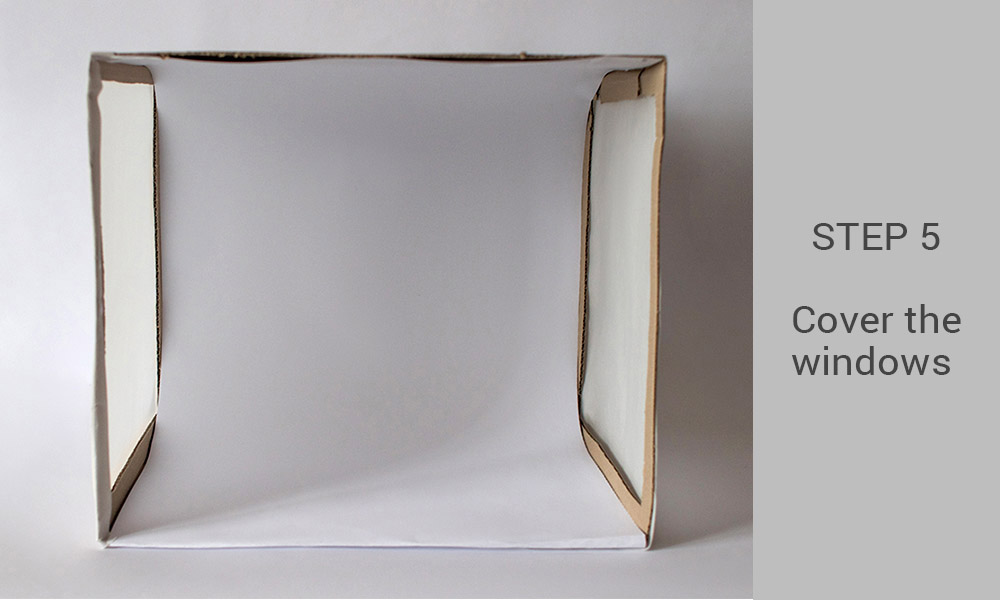
Begin with the upper edge of the selected material and fasten it to one of the windows with the help of glue or tape. Then move onto the opposite sides while letting the material hang down over the window. The same must be done to all the windows of the photo light box.
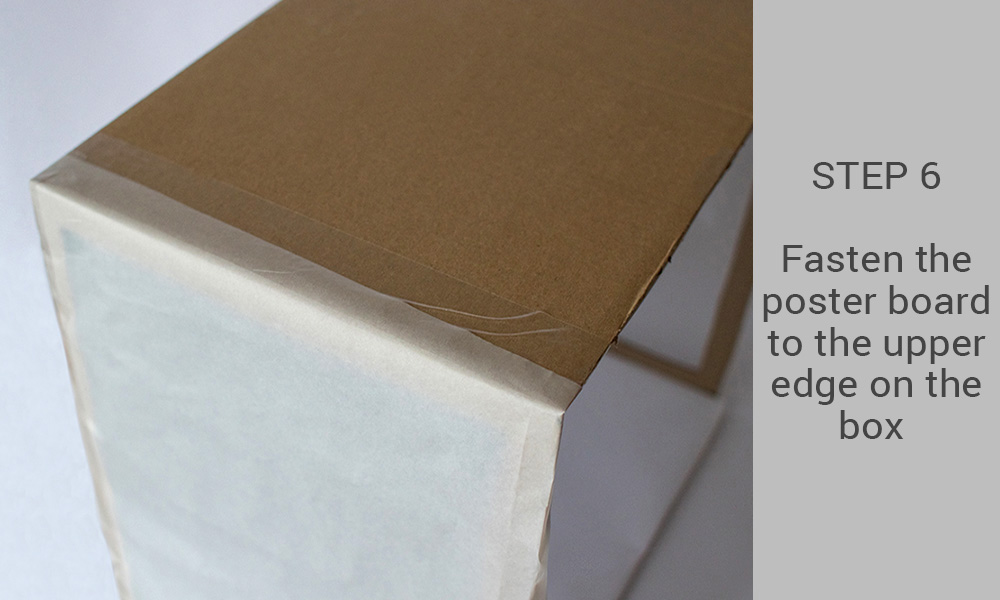
The next step is to put a large piece of packing or duct tape on the upper edge of the poster board. While keeping an eye on the tape, fasten it to the inside part of the light box photography closer to the upper part of the back side.
Fasten the opposite edge of the board to the box's bottom using one more piece of tape. When creating a DIY lightbox for photography, be careful not to wrinkle or fold the poster board. Make the board slightly curved by angling it along the back bottom corner.
While attaching the material to the DIY light box, remember to leave a pretty wide area to take shots without the cardboard being visible.
Start by selecting the perfect position for your product when doing tabletop photography. Shift the camera and the object. Stop when you see a clear picture without cardboard being visible.
If you are wondering how to make a light box with even lighting, put the light sources on the sides. It will allow you to achieve even lighting. If they are not far from the windows, they will be more focused. Make sure to select the most suitable distance from your object that will allow you to achieve the perfect lighting.
You may use the following tips to choose the right position for the light box:
Change the light ratio. Before taking photos of specific products, think about whether they would benefit from even lighting. Some objects might get a flat look. If you notice this issue, move one of the lights closer while moving the other further.

In case you are still not fully satisfied with the result, you may need to experiment with the intensity of light. It will allow you to separate the main light and the fill light.
Shape the light. To make the background more attention-grabbing without buying any extra accessories, you can achieve a graded light effect with the help of flags.
You can do it using the cardboard rectangles that were left after making the windows. If you put them on both sides of your object, you will block the light and make some areas appear darker.
Use top light. If you want to make your own light boxes, you may use the window on the top of the box to add extra light. It will allow you to create reflections or achieve even lighting. You can use this light source as the key light. In addition, some photographers use it as the only light source with a black background to take more atmospheric photos.
If your first picture turned out to be too bright or the colors look off, make sure to adjust the shutter speed, ISO, and WB until you are fully satisfied with the result.
Recommended settings:
If you take photos with your smartphone or do iPhone product photography, you can use default settings. In case your photos look excessively blue or yellow, you might need to adjust the white balance. When photos look overexposed or underexposed, change ISO, aperture, or shutter speed.
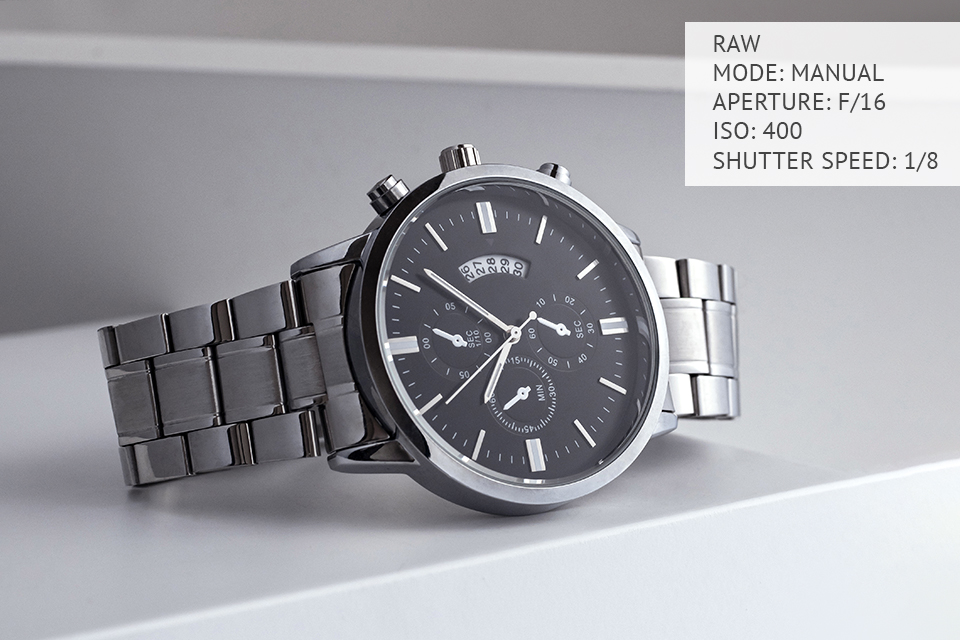
The aperture can be chosen depending on the desired look of a shot. Wide apertures like f/1.8 and selective blur are recommended for food photographs. Thanks to these settings, the dishes appear tastier.
At the same time, you should use a narrow aperture like f/22 for taking pictures of handmade items and other crafts. This ensures spotless focusing. Set the focus on the area of the item that is closest to the camera. It prevents unattractive blurring in the foreground.
Don’t forget about exposure compensation. Mind that +1 suits white backgrounds better. The black backdrop requires -1. Try a half or a third of a stop, if it is too dark or too light.
After selecting the best position for your object and adjusting camera settings, you can take product photos.
I advise you to take pictures using a tripod. This device gives an opportunity to use longer shutter speeds and get sharp photographs as a result.

Firstly, fix the camera on the camera mini tripod. Then, adjust the 2-second timer or a remote shutter release. You must be sure that your equipment is steady enough. In the case of shooting with a lens that provides photo stabilization, switch off the vibration reduction or control.
Correct the white balance. In this way, the product photos taken in a DIY light box won’t look yellow. You should pay attention to the color temperature of the light sources and use this information to find the ideal white balance. This adjustment can be also made manually. Just photograph a white card and calibrate the white balance from that picture.

Set up the Levels. This Photoshop feature allows correcting each end of the histogram. The user can see which parts of the image are being clipped by holding down the Alt key while working with the slider. You have to keep moving the slider before you see that the background is clipped evenly but the subject is left intact. Sometimes the central subject might be influenced by the adjustment. If you need to avoid this, just scale back this action.

Use trusted software and apps. You may use both free and paid professional software.
GIMP is a free Photoshop alternative. Having downloaded this software, you can change the background, create a clipping path, and perform color correction, but it will be more difficult and longer than in Photoshop, even though it will be for free.
RawTherapee is the best software for deep color correction and basic editing. Choose product photos you need to edit and remove all imperfections caused by poor light and distracting shadows.
Polarr is a very user-friendly app for tweaking the colors in your product photos taken with a smartphone. Add filters or cut out your photo easily and fast.
SumoPaint is probably the only free photo editor that won’t distract you by its constant advertisements. Here you can adjust masks and layers like in Photoshop but slower.
Pixlr is a free online editor you can use to correct white balance, make product photos bright, saturated, clear or add an HDR effect. Easy, fast, and without additional payments.
To enhance your product photos, you may use the tools available in Lightroom. If you want to fix the white balance, use the Color Grading tool. In addition, you may remove imperfections with the help of the Clarity tool. You can test out the program for free using a 7-day trial or pay $9.99/mo for a subscription.

If you want to change your photos background – this Photoshop texture if a good decision for you. Change your table background on canvas in several clicks.
This is a perfect way to adjust your product photo’s white balance in 1 click. Remove distracting yellow and green colors and make product photos clear with the help of this free Lightroom preset.
Make your lifestyle product photography bright and pop. Fresh tins, clear edges, no noise, and amazing and colorful colors.
This free Lightroom preset is a perfect way to edit product photos taken in natural light. Make your product photos clear and pop in several clicks and for free.
Add the natural luxury design trend to your product photo backgrounds. Make your photos elegant and luxurious in several clicks.
This free Photoshop texture creates a luxe effect for your product photographs. Download this free texture in high resolution and add to your photo in several clicks without losing its quality.
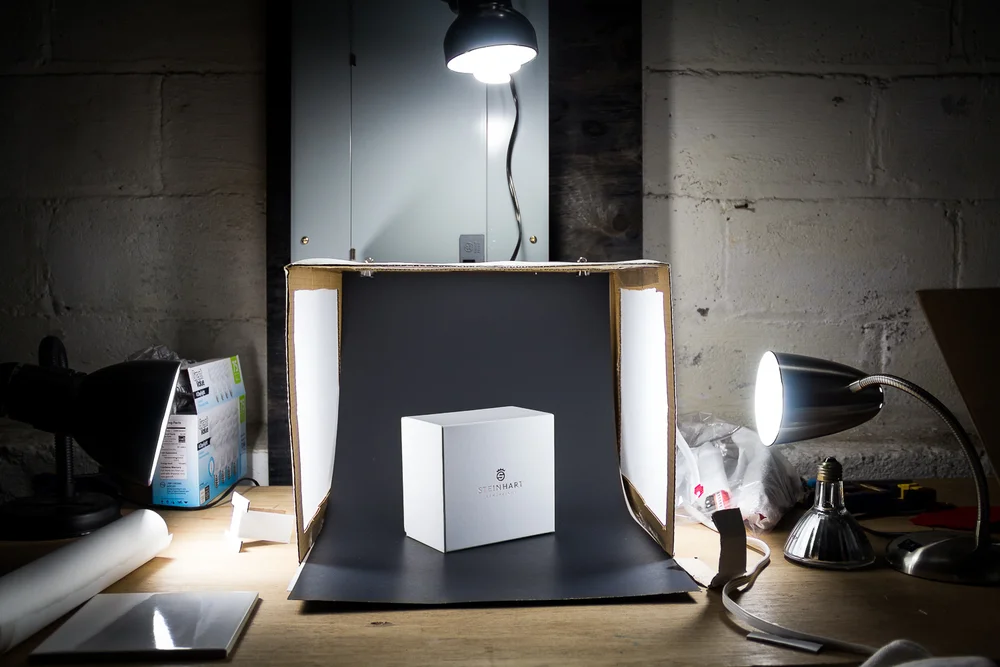
Be mindful of high-quality lighting for the photo shoot. In such a case, I highly recommend directional illumination instead of ambient one. The best product photography idea is to use one light source per each window of the DIY light box. The lamps should face directly into the holes of the light tent. Remember about it while positioning the light sources.
Don’t overheat the box. Put your lights 5 inches away from the windows. It will allow you to keep the cover material colder.
Find light bulbs with a cool white color. They will prevent you from getting an unattractive yellowish tinge in the light box photography.

Keep your eyes on low-cost office lamps for making a lightbox. You should also draw your attention to models that can be attached to furniture. You will find these supplements in many online shops and local stores. They are quite useful and have reasonable prices.
Select a suitable depth of field. Images with a detailed foreground and a blurry background have a shallow DoF. Using a longer depth of field, you can keep a larger part of your photo in focus. A shallow DoF allows you to take great close-up pics with a perfectly blurred background. It allows you to emphasize the key selling points of your products.
Take photos from different angles. Experiment with different perspectives to show your product from all sides. Think about the details that your clients may want to see. Capture them from up close to meet the needs of your clients. You can also capture a model using your product. When it’s necessary, you may also show the true scale of an object by placing it next to a regular object.
A light box is mostly used for product, food, and still life photography. This DIY box is particularly suitable for photographing jewelry. With the help of jewelry photo retouching, you can easily fine-tune the lighting, colors, and shadows to create stunning results.
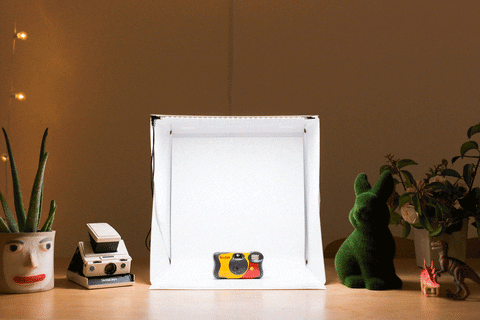
The beauty of creating a light box is its simplicity and affordability. With just a few basic materials, such as a cardboard box, white fabric or poster board, and a couple of desk lamps or studio lights, you can make your own light boxes and assemble your own portable studio in no time. The process is straightforward and requires minimal technical knowledge or investment.
Firstly, it provides a controlled and evenly diffused light source, eliminating harsh shadows and reducing the need for complex lighting setups. The diffused lighting helps showcase the product's details, textures, and colors accurately, resulting in professional-looking images. Secondly, a light box offers a clean and consistent background for your product. Lastly, a DIY light box is portable and can be easily set up and dismantled as needed. Its compact size allows for flexibility in shooting locations, whether you're working in a studio, at home, or on the go.


