When you purchase through affiliate links on our site, we may earn a commission. Here’s how it works.
best free video compressor for mac best free video compressor for mac

THE BEST FREE VIDEO
COMPRESSOR FOR MAC

For users looking for the right video compressor for Mac, VideoProc
is a top choice because of its advanced AI features and a free trial.
However, if you prefer online options, Clideo is a great choice with its
convenient free version.

Over the years, I've tried many video compressors for Mac to manage my growing collection of video content (I'm a YouTube vlogger).

Yes, you might suggest using the built-in iMovie, and you would be partly right. However, iMovie mainly focuses on video editing rather than compression. It doesn't offer many options for customizing compression settings, which is a problem because I need more control over the final file size and quality.

The tools on this list have shown they are great in terms of features, how easy they are to use, and, most importantly, their ability to make high-quality compressed videos without costing too much.

I recently tried all these Mac video compressors to find the best one for me. I tested each program by compressing a 1GB family video and recorded the results.

1. VideoProc

Original Size: 1GB

Compressed Size: 400MB

Time Taken: 8 minutes

VideoProc compresses videos to lossless formats such as AVI, WMV, and MPEG-2. It has various features, including an Analog Film Compressor, which compresses analog video. VideoProc will compress your video up to 50% faster than any similar video compressors for Mac.
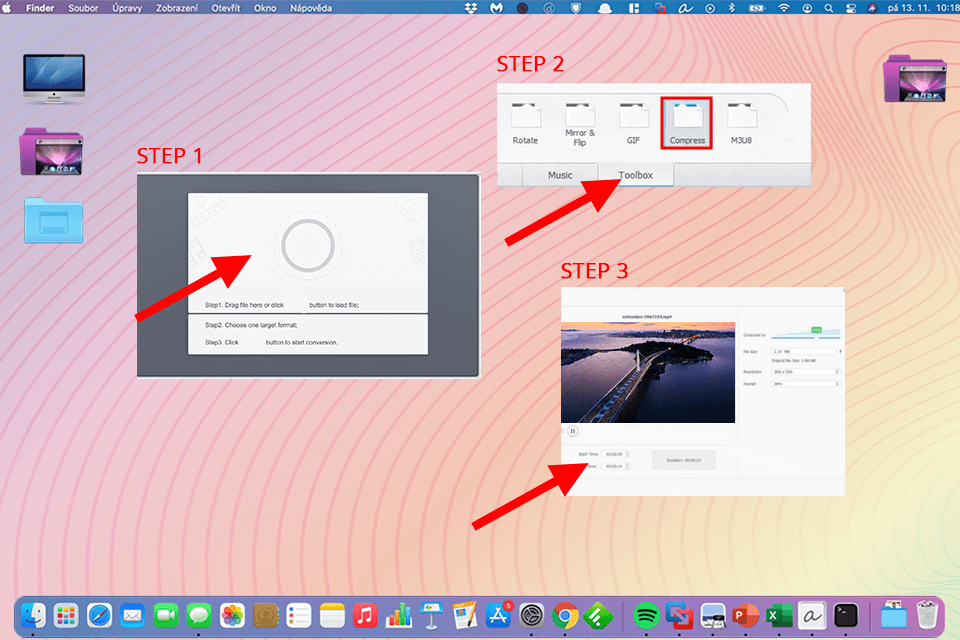
Here's an easy guide for using VideoProc on your Mac:

Step 1. Open VideoProc Convert and click "Video Converter" on the main screen. Then, drag and drop your video files into the program.

Step 2. At the bottom, click on "Toolbox" and choose "Compress" to open the built-in compressor.

Step 3. Double-click on "Compress." You can now reduce the video size by moving the slider or typing in a specific size. A 70% compression ratio is a good balance between smaller file sizes and good quality.

free video compressor for mac videoproc

2. Clideo

Original Size: 1GB

Compressed Size: 450MB

Time Taken: 10 minutes

Clideo is very user-friendly and gives you high-quality digital video with fast processing for professional-grade results. With the help of this program, you can compress clips while preserving video quality. This video compressor for Mac is well-priced because it comes with different features for users who are looking for something simple.
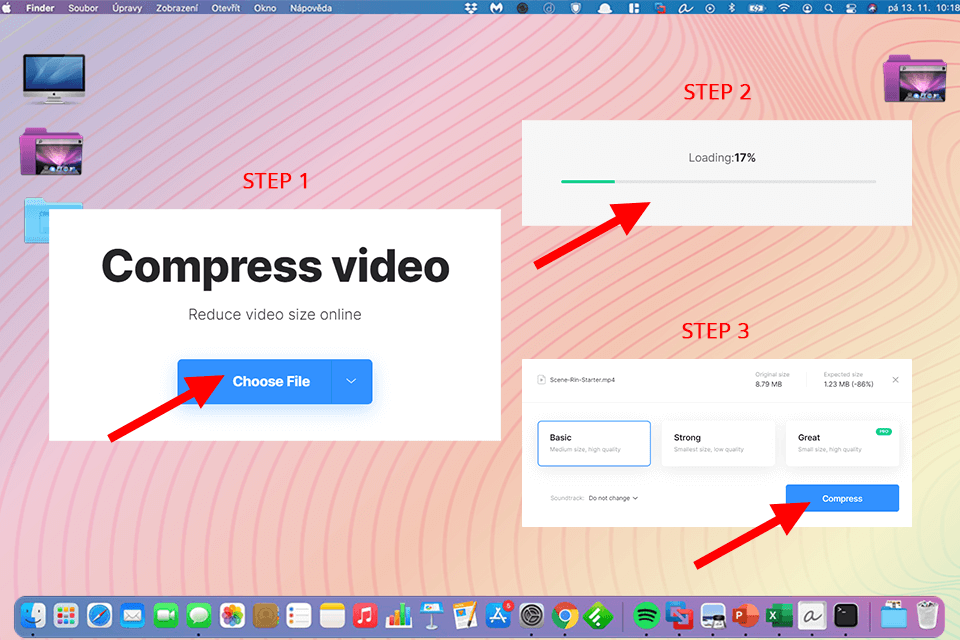
Here's a simple guide for using Clideo on your Mac:

Step 1. Go to the Clideo website and click "Choose file" to upload your video from your Mac or enter a file URL.

Step 2. Wait a moment while the tool sets up your video's settings.

Step 3. Check the preview. If you're happy with it, download the video. If you need changes, adjust the settings, and then download it.

free video compressor for mac clideo

3. Wondershare UniConverter

Original Size: 1GB

Compressed Size: 420MB

Time Taken: 9 minutes

Wondershare UniConverter is an all-in-one video tool that can do many tasks, such as converting videos, compressing videos, transferring videos, burning DVDs, editing videos, and downloading videos.

This Discord video compressor supports converting to over 1000 formats and can also convert to formats for specific devices. On a Mac, this video compressor reduces video size by adjusting the size, bit rate, resolution, and frame rate.

Here's a simple guide for using Wondershare UniConverter on your Mac:

Step 1. First, open the program and go to the "Compressor" tab. Then, use the add files icon to import videos from your Mac.

Step 2. Decide if you want to compress multiple videos together or adjust settings for each one separately by clicking the "Setting" icon.

Step 3. Check the new sizes of your videos. Choose where you want the compressed files to go, then click "Start All" to begin compressing them on your Mac.

4. Movavi Video Compressor

Original Size: 1GB

Compressed Size: 430MB

Time Taken: 7 minutes

Movavi Video Compressor comes with compression and conversion options. With the help of this software, you can convert a variety of videos, including MP4, 3GP, AVI, and MPEG, as well as reduce the size of your heavier files to keep a personal music or movie collection in good order. This video compression software comes with an interface that is easy to operate.
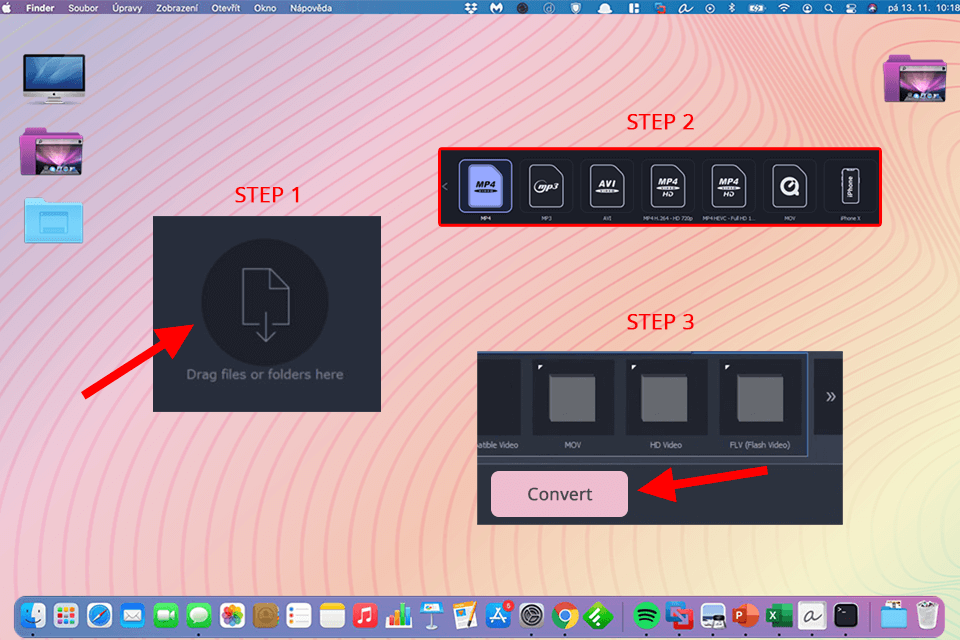
Here's a simple guide for using Movavi Video Compressor on your Mac:

Step 1. Start by dragging and dropping your video files into the software window. You can compress multiple files at once for your convenience.

Step 2. Next, choose the output format you want by clicking on the format icon. Movavi Video Compressor supports over 180 formats, including popular ones like MOV, MP4, MKV, and AVI.

Step 3. Once you've picked your format, click the "Convert" button to compress your videos.

free video compressor for mac movavi video compressor

5. Clipchamp

Original Size: 1GB

Compressed Size: 500MB

Time Taken: 12 minutes

As one of the best video editing software for Mac, Clipchamp offers users some great features that are very easy to use, for example, a built-in virtual compressor, on-screen help, online video tutorials, and a lot more. This product will help you to organize your video library. Clipchamp can compress and resize different video formats. That means that you can transfer your files to multiple systems as well.
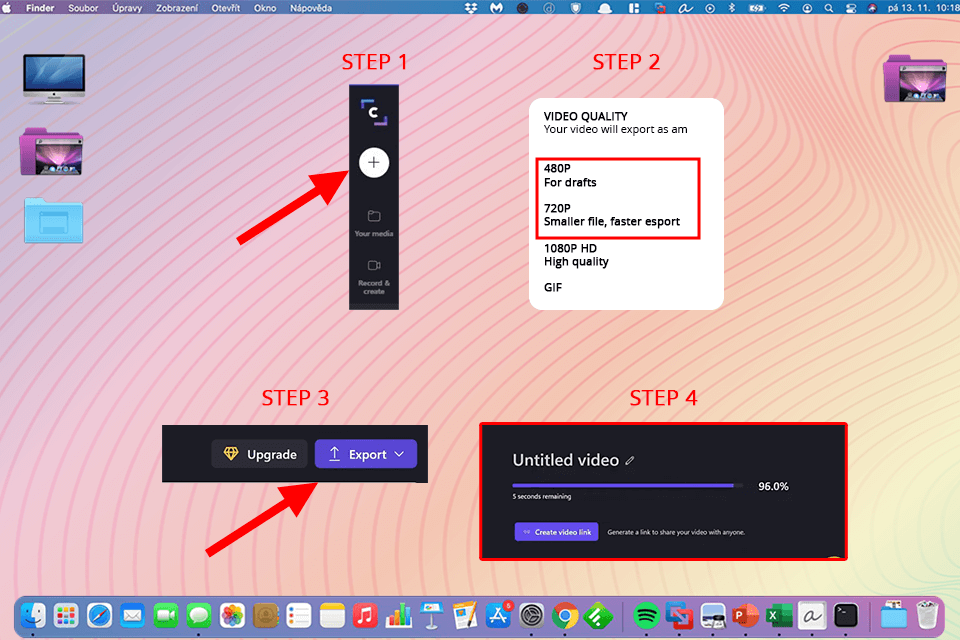
Here's a simple guide for using Clipchamp on your Mac:

Step 1. First, bring in the video you want to make smaller from your Mac into Clipchamp.

Step 2. Pick the settings that will shrink the file size, like choosing a smaller resolution or bitrate.

Step 3. Once you've set everything up, hit the "Export" button to start compressing the video.

Step 4. When it's finished, save the resized video wherever you want on your Mac. You can also share it straight from Clipchamp if you like.

free video compressor for mac clipchamp

6. Any Video Converter

Original Size: 1GB

Compressed Size: 470MB

Time Taken: 9 minutes

Any Video Converter can compress your video and convert it into a format compatible with most computers for free. It has an inbuilt anti-aliasing effect, which helps eliminate jagged edges found in some videos. This video compressor app offers a user-friendly interface that makes it easy to navigate the conversion process.
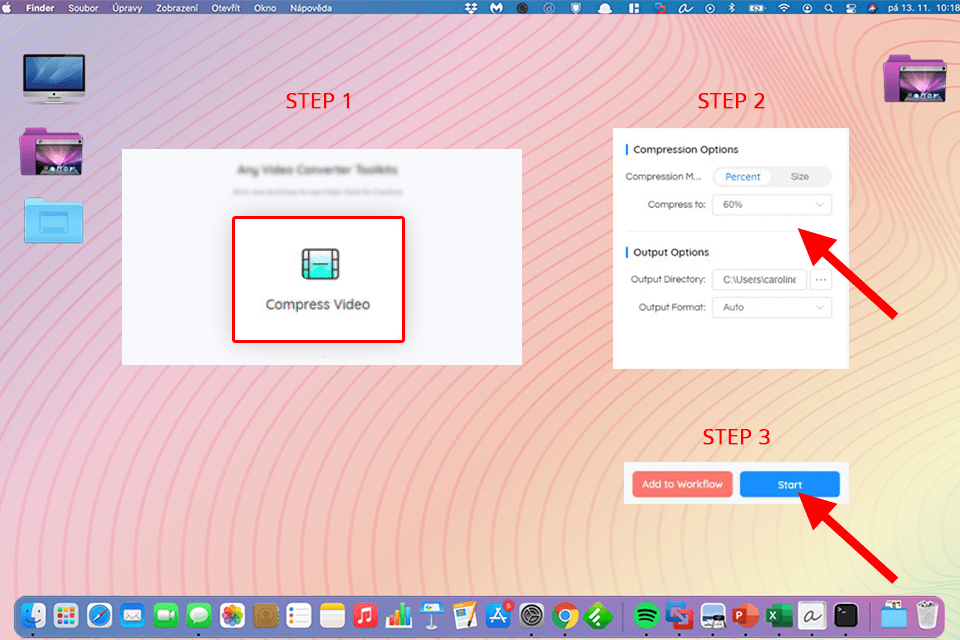
Here's a simple guide for using Any Video Converter on Mac:

Step 1. Start by selecting the "Compress Video" tool from the list and then upload your video or videos.

Step 2. Adjust the compression and output settings on the right side of the screen.

Step 3. When you're ready, just click the "Start" button to begin compressing your video.

free video compressor for mac any video converter

7. VideoSmaller

Original Size: 1GB

Compressed Size: 480MB

Time Taken: 11 minutes

VideoSmaller has unique video compression algorithms that use your computer's processing power to compress video files. It comes with a 30-day trial offer, so you can try it before you decide if this is something you want to get involved with. This free online video compressor supports all popular video formats, including MP4, AVI, MPEG, and MOV.
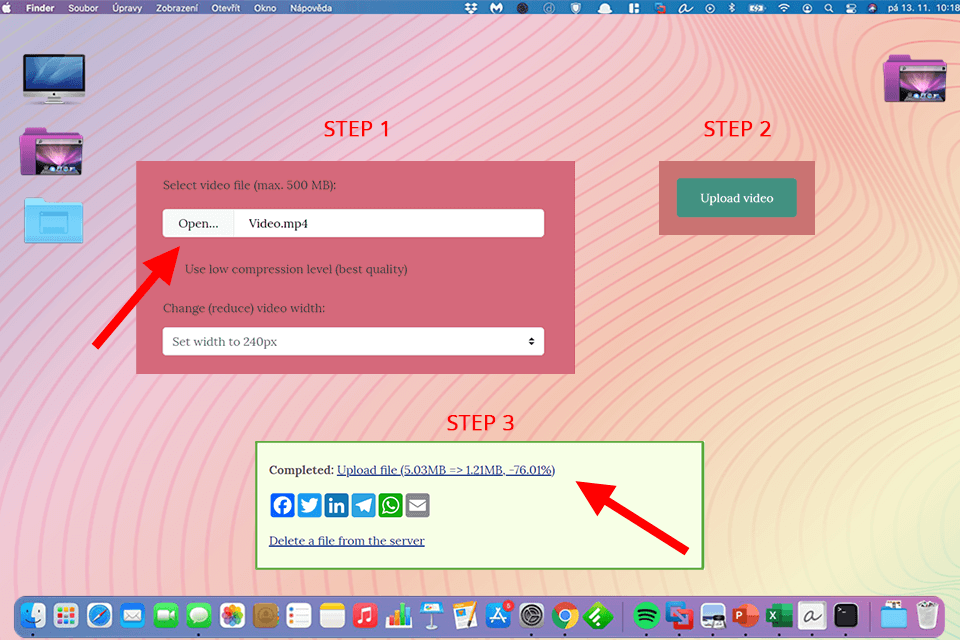
Here's a quick guide for using VideoSmaller on your Mac:

Step 1. Start by clicking the "Open" button to find the video you want to make smaller. It can be in formats like MP4, MOV, or AVI.

Step 2. Once you've picked your video, hit the "Upload Video" button. Then, just wait while the website compresses it. Make sure not to close your web browser while it's working.

Step 3. When it's done, you'll see a link to download your compressed video. Just click on it, and your smaller video will be saved to your Mac.

free video compressor for mac videosmaller

8. HandBrake

Original Size: 1GB

Compressed Size: 430MB

Time Taken: 8 minutes

Being one of the best free video converters, Handbrake allows you to compress your videos and pictures from your hard drive. One of the main reasons I recommend Handbrake is because of the high-quality output that it provides. Many options are available with this free video converter for Mac, such as color correction, image enhancement, cropping, etc.
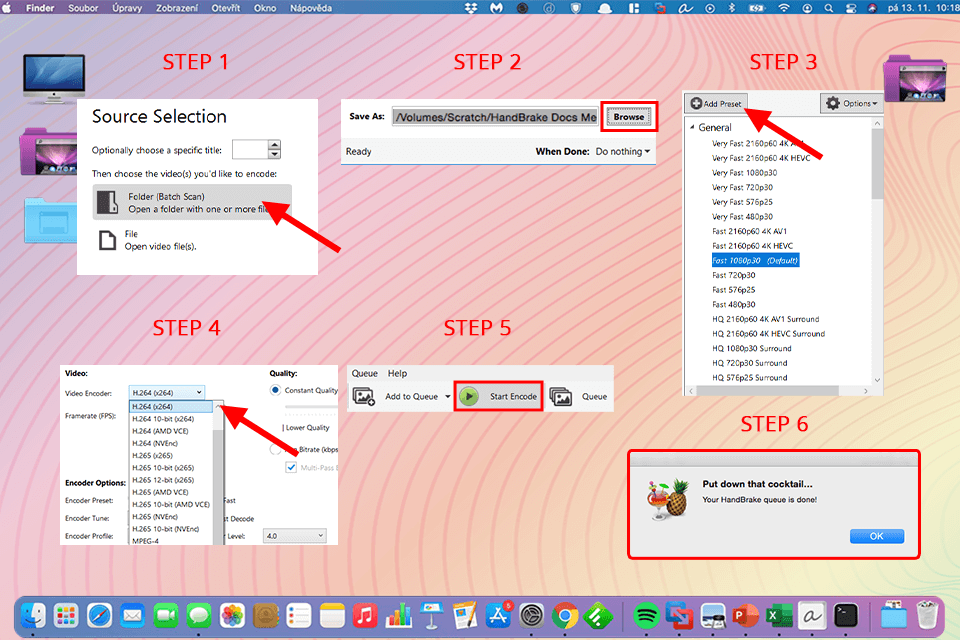
Here's a simple guide for using HandBrake on your Mac:

Step 1. Find and click the "Source" button in the top-right corner. This lets you pick the video file you want to make smaller.

Step 2. Go to the "Destination" tab and click "Browse" to choose where your new, compressed video will go on your Mac. Hit "Save" when you're done.

Step 3. Pick the format and video settings you want. Choose "High Profile" from the presets list and tweak things like frame rate if you need to.

Step 4. If you want to change the size or quality of the video, click "Picture Settings" and adjust the options there.

Step 5. When everything looks good, hit the "Start Encode" button at the top to start shrinking your video.

Step 6. Once it's finished, you'll get a message telling you it's done.

free video compressor for mac handbrake

BONUS: Comparison Chart

I've also prepared a chart that shows details about each tool's features and prices. This will help you choose the right video compressor for Mac.

Tool Key Features Free Version

Lossless compression, fast processing

✔️

User-friendly interface, online tool

✔️

Complete video toolbox, device-specific formats

✔️

Compression, conversion options

✔️

Built-in virtual compressor, user-friendly

✔️

Video compression, format conversion

✔️

High-speed compression algorithms

✔️

High-speed compression algorithms

✔️


Eva Williams

Hi there, I'm Eva Williams - a professional blogger, read more

SAVE UP TO 66% OFF SAVE UP TO 66% OFF