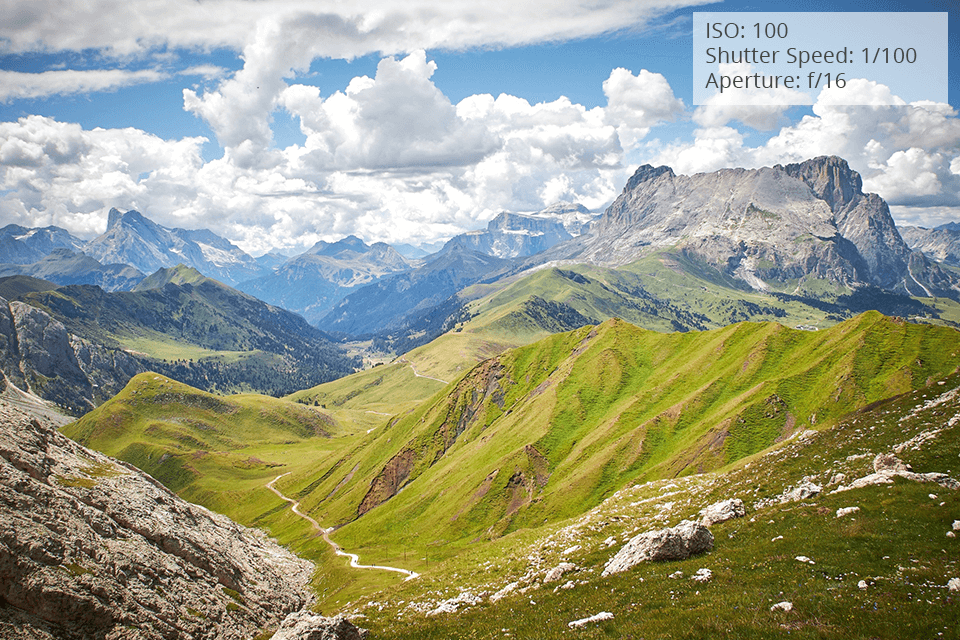
By following the Sunny 16 Rule, you can determine the correct exposure during daylight without using an embedded camera meter. Simply put, if you are going to take pictures on a clear, sunny day and the aperture is set to f/16, no matter what ISO you choose, the shutter speed is reciprocal to the ISO value.
Mathematically it can be described as ISO X = 1/X seconds shutter speed.

For instance, if ISO is 200 at f/16, the shutter speed will be 1/200 seconds, or if ISO is 100, the shutter speed will be 1/100 seconds. Beginners film photographers leveraged the Sunny F16 Rule long before cameras with integrated sensors were invented.
Though famed photographers used to carry light meters around to adjust equipment properly, that wasn’t an option for novices who couldn’t afford such equipment. So, they used cheap methods to “read” the light and choose proper camera settings.

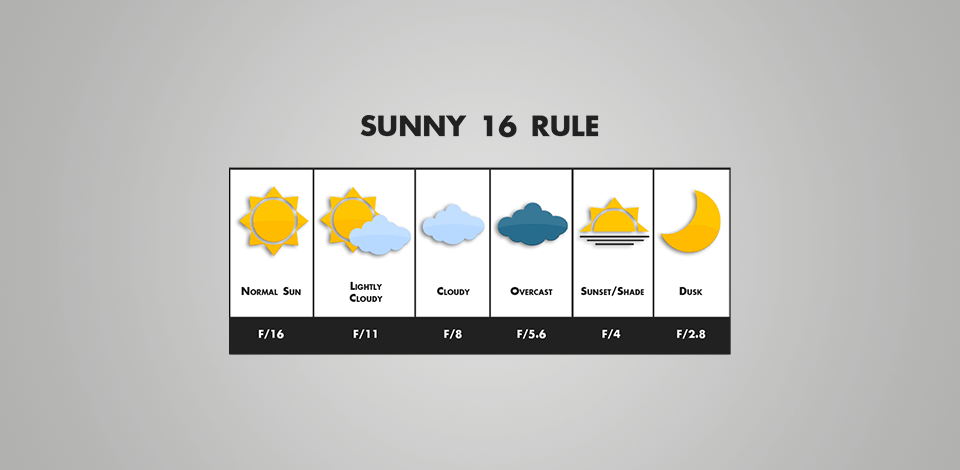
The first aspect to consider when applying the Sunny Sixteen Rule is lighting conditions. It was initially created for use in bright sunlight and if this isn’t your case, you may need to tweak camera settings more meticulously.
Once you’ve arrived at the shooting spot, you should evaluate the scene and weather. There are 5 basic options, so choose the one that describes your current scene best of all:
This method doesn’t work in aperture and shutter priority camera modes. So, you need to switch to a manual mode to have complete control over your camera.
Each of the abovementioned weather conditions has a unique aperture and depth of field. Adjust your camera in accordance with the cheat sheet above.
If you are going to take images of backlit subjects, you need to overexpose by 2 stops, e.g., f/2.8 to f/4. Alternatively, you can choose a shutter speed in the range from 1/250 to 1/60. The main caveat to remember is that backlit objects are very intricate to deal with, so you need to pay more attention to them.
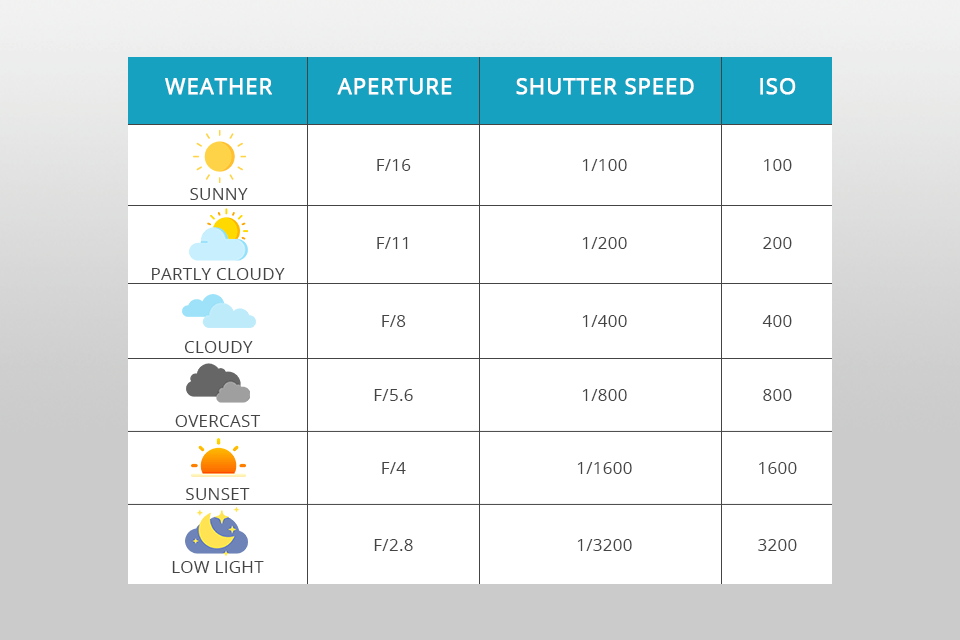
Once you’re done adjusting an aperture, you need to choose the proper shutter speed. At this stage, you should check the speed of film you are photographing at (or ISO value for digital cameras) and pick the inverse of that value.
For example, if you are using a 400 speed film, e.g., Portra 400 for high speed photography, the shutter speed should be 1/400. For a 100 speed film, such as Ektar 100, the shutter speed will equal 1/100.
Therefore, whatever ISO number you choose, the same figure will be used for shutter speed. For instance, ISO 200 means a shutter speed is 1/200.
When major parameters are set, you should take a test photo to discern whether everything is OK with exposure. If it appears too bright, opt for a faster shutter speed, e.g., 1/400th of a second. If you achieve the opposite exposure result, you should use a slower shutter speed, e.g., 1/30th of a second.
You may need to take multiple test images till you get the perfect exposure for your scene. Besides, if you work in changeable lighting conditions, you will need to make such adjustments again over time.

The Sunny 16 Rule photography method is an understandable practical approach for setting exposure. But you can also use it for some creative experiments. For example, if you make your photos overexposed or underexposed on purpose, you will receive interesting high-key and low-key photos.
If you use a film camera for taking images, you definitely don’t want to capture all 36 frames and develop them to discern whether a meter is functioning properly.
A quicker way to find it out is to use the Sunny F16 Rule to set a camera and compare the values with those shown by an integrated meter. If the numbers are almost identical, then you can trust an embedded meter, if not – you should replace it with a new one.
You may happen to take photos with vintage cameras that typically lack an embedded meter or devices that simply have a broken meter, so the only way to get a correct exposure is to leverage the Sunny 16 method.
Some experts even like using film cameras that come with no batteries. Such models will lack a meter by default because there is no source of power for charging it.
While most modern DSLR cameras have built-in light meters, not all of them can brag about the correct and accurate operation. In such situations, the Sunny Sixteen Rule is a lifesaver. Of course, you can always purchase an external dedicated light meter for the most precise results, but they are rather pricey and may cause inconveniences during transportation.
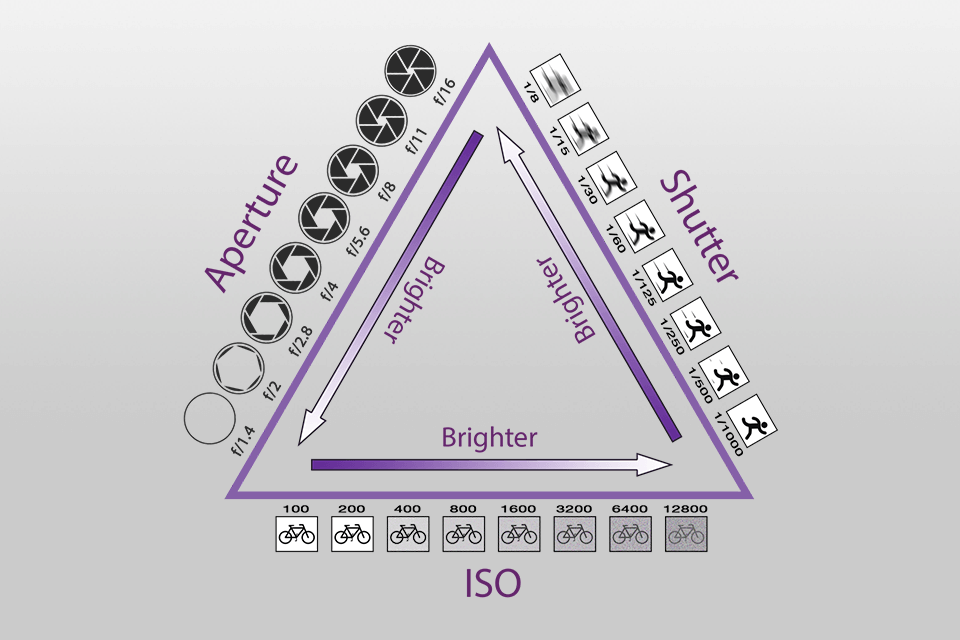
With the Sunny 16 Chart at hand, you can better understand the essence of an exposure triangle in photography. Make sure to analyze the chart meticulously and you will grasp how aperture, shutter speed, and ISO are related and how you need to alter them to get the correct exposure.
If you are good at using this photography rule, you can also quickly understand whether there is something wrong with the camera’s internal light meter. For instance, you may photograph a pure black car on a cloudless sunny day on ISO 200 film, setting the shutter speed to 1/250 and your meter recommends going for F8.
In other words, the meter “sees” that dark car but perceives the color as middle grey, not pure black, and if you apply such parameters, your picture will end up overexposed. It is highly recommended to double-check the numbers suggested by a built-in meter with those you get by applying the Sunny 16 Rule.
Yes, it can work for any camera for beginners, including digital and film models. This is actually a core guideline for determining exposure as long as sunlight is intense and direct.
Definitely. You can easily pair with the Zone System or the exposure triangle. In fact, by using a combination of several techniques, you can adjust exposure more precisely and receive well-balanced photos.
If you use this rule and still experience problems with exposure, it is necessary to change the aperture, shutter speed, and ISO. If your camera comes with an integrated light meter, you can try it for finding perfect values. Besides, you take advantage of exposure compensation to get the correct exposure in some specific cases.
Though it was initially developed for photography, you can also rely on this rule when recording videos. However, you may have to customize your camera settings more frequently since video filming involves constant motion and changing lighting conditions.
Remember that it is meant for shooting scenarios when sunlight is strong and this is hardly the case with flash photography. If you turn on a camera flash, you’d better make use of its internal metering system or an external flash meter for the proper exposure.
Want to streamline your photo editing workflow? Then get Lightroom for free and apply them to your images for quick and professional changes. Wait several seconds and export mesmerizing photos. The best part is that these presets are suitable for editing shots taken in different weather conditions.


