Retouch4me Photoshop Panel
Verdict: Working as a retoucher at FixThePhoto, I have extensive experience in editing photos in different genres, from portraits and wedding photos to fashion and product pics. I have always been interested in software that can help me optimize my workflow and maintain high editing quality. When I first heard of the Retouch4me Photoshop Panel, I became interested in the capabilities of this AI-powered plugin.
Using this extension, I can access a variety of Retouch4me tools directly from Photoshop. I decided to test Retouch4me Photoshop Panel after reading many positive reviews on Reddit and professional forums to see whether it would meet my expectations.
I have used a variety of retouching tools and effects in Photoshop, including custom scripts and advanced solutions like Infinite and RA Panels. Most of them support batch processing and allow me to use handy shortcuts. However, after I found the Retouch4me free Photoshop panel and installed it on my device, I was able to access powerful AI plugins.
They stand out for their streamlined interface, which allows me to avoid switching between different programs or exporting RAW files to perform batch processing. Using these plugins, I can remove skin imperfections, apply the Dodge and Burn effect, clean the background, and make other non-destructive edits in Photoshop.
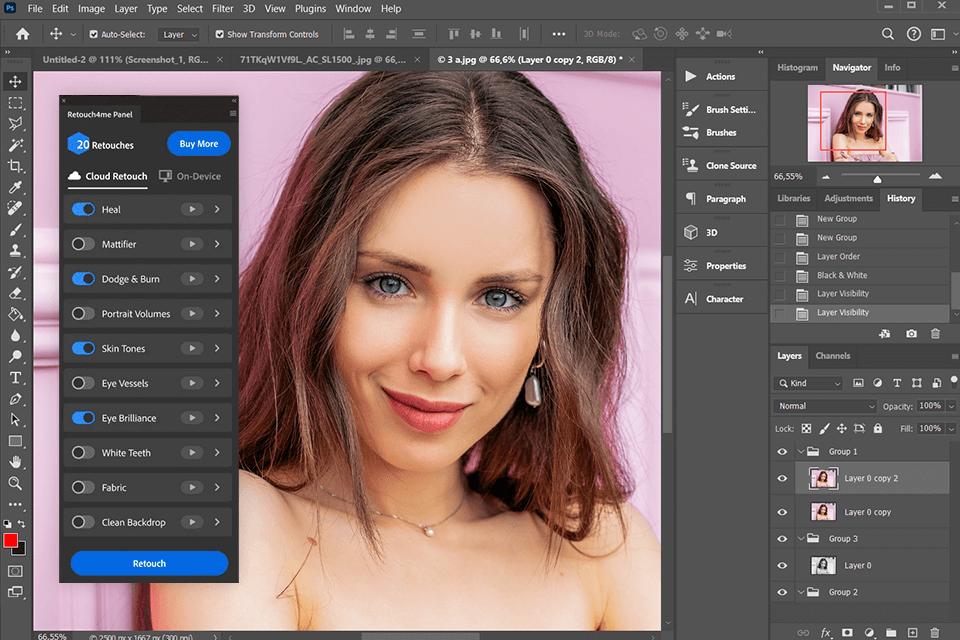
Plugins included in the Retouch4me Photoshop Panel:
What I like most about Retouch4me plugins is that they were designed to augment a professional retouching experience. These AI-driven tools allow users to perform 80% of the work in a few clicks, which allows them to save time and gives them enough flexibility to complete the task.
What makes it different from AI-powered tools I have tested before is that Retouch4me maintains the original skin texture. It allows me to achieve professional-level results when using it. Even though some other plugins are better suited for specific lighting setups, this panel can replace them with ease.
I can apply these plugins with one click and further enhance the result using masks and layers in Photoshop. The tools from the Retouch4me Photoshop Panel can be used even by professional retouchers. They are equally suitable for enhancing headshot photos and images taken for commercial campaigns.
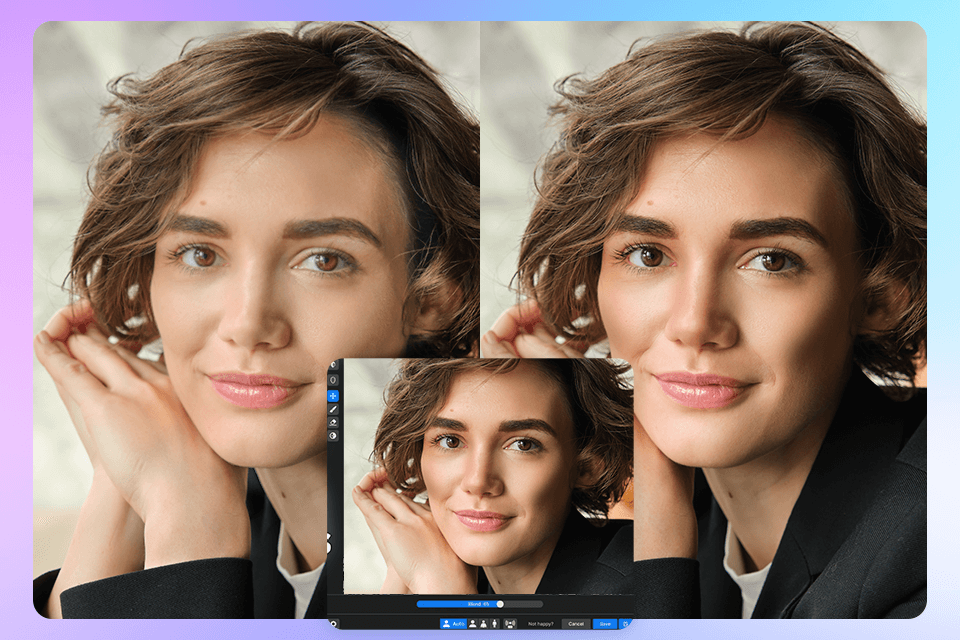
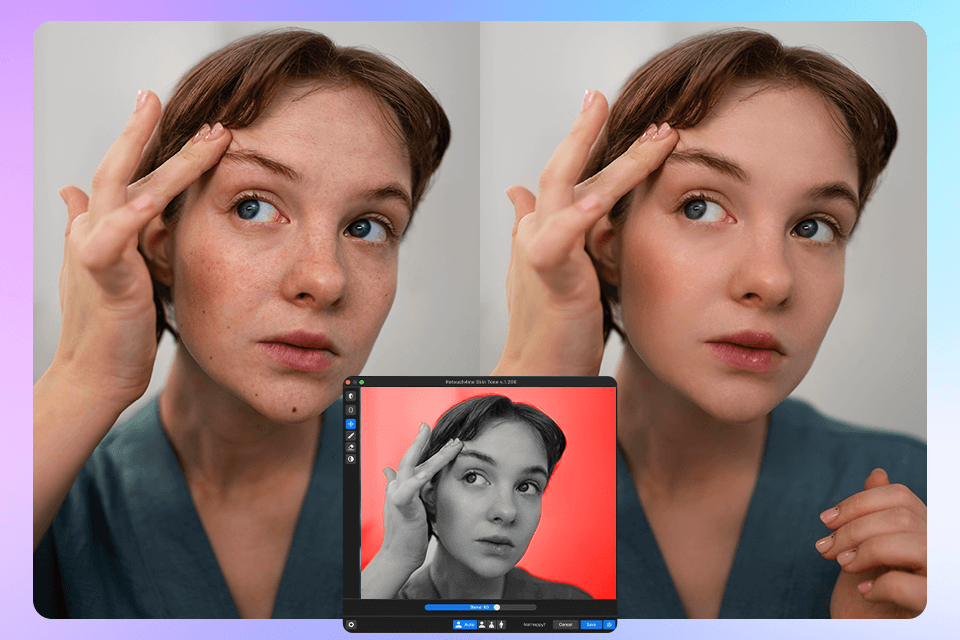
I tested the Portrait Volumes plugin when editing photos taken during multiple portrait photoshoots. The bundle included photos from a series of corporate headshots and a romantic photoshoot that took place outdoors during golden hour.
When using this free Photoshop plugin, I was able to perform contouring in a few clicks. It helped me emphasize cheekbones, sculpt the jawline, and slightly edit the forehead and temple areas. When I apply the Dodge and Burn effect in Photoshop, it takes me 15-20 minutes to complete such a task.
I was impressed by the smart capabilities of the neural network on which the plugin is based. It analyzed RAW files and accurately detected different lighting conditions. I used it to enhance photos taken in diffused daylight. It added some definition without affecting skin texture. When I applied it to the photos taken indoors, it emphasized shapes without adding noise.
The UI is quite streamlined. You just need to upload a photo, find the plugin in the Retouch4me Photoshop Panel, click on it, and use it to analyze the picture. While it’s possible to configure the intensity afterward, I did not use this option often, as the default settings are suitable for all sorts of situations.
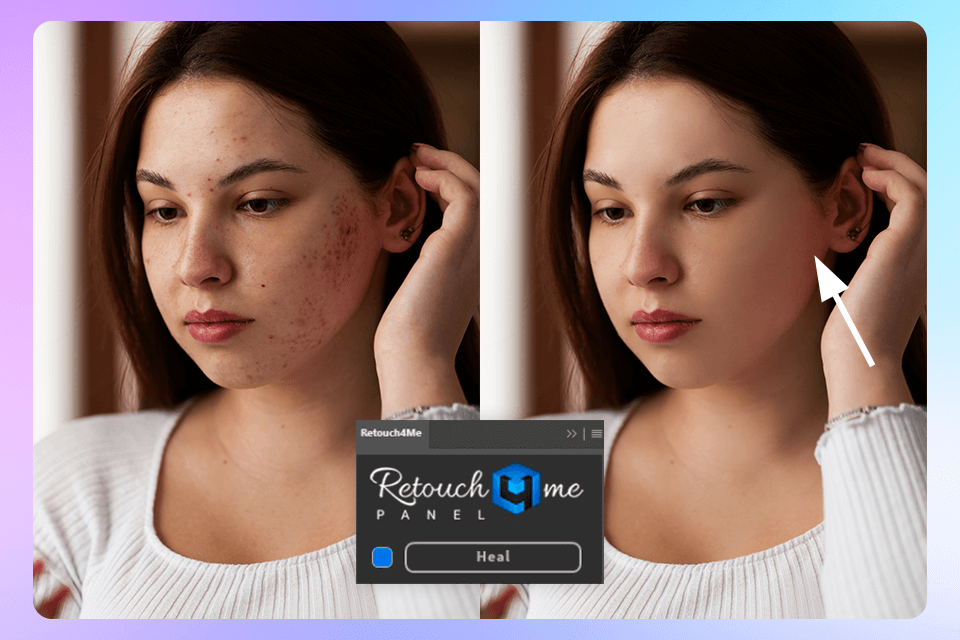
I tested the Heal plugin when editing a series of close-up beauty portraits where models have some redness and acne issues. Besides, the skin texture has some imperfections. When I perform manual skin smoothing in Photoshop, I work more slowly than when I use this retouching tool. The plugin helped me remove blemishes without affecting the skin texture or giving it an artificial look.
The plugin is especially suitable for enhancing photos shot with consistent lighting. However, when editing photos with uneven lighting, I noticed some leftover shadows that I had to edit manually. The plugin allows me to perform 90% of the tasks in seconds without distorting the original image, which helps me meet my clients’ expectations.
The Heal plugin can be accessed directly from the Photoshop Panel. The AI can differentiate between freckles and skin defects, making it even more convenient to use.
What could be improved: To give this plugin a full 5 stars, I would like to see its functionality improved to allow me to edit photos taken in low-light conditions and enhance pictures with uneven lighting with high precision.

I tested the Dodge & Burn plugin when enhancing high-end beauty portraits and fashion editorials. They had noticeable contrast and were shot with directional lighting. Typically, it would take me 20–30 minutes to adjust the contrast manually using curves and soft brushes when editing the face to change its shape subtly and give it some depth. When using this plugin, I was able to make 80% of the edits in less than 1 minute.
I was impressed that it emphasized cheekbones and jawlines without producing halos or making the output look unnatural. This AI photo editor was trained on high-quality datasets, which allows it to perform complex retouching tasks without making specific areas over- or underexposed. Despite this, when I was editing photos with complex backdrops or clothes with textured patterns, the plugin would occasionally enhance the areas that I did not want to change. In such cases, I had to add masks manually.
I liked the natural look of the output, as there were no harsh transitions noticeable. The plugin helped me optimize my workflow, as I needed to make subtle adjustments when editing my image instead of enhancing it from scratch.
What could be improved: To get 5 stars, the plugin needs the high-accuracy edge detection feature. It should also allow users to adjust the strength of an effect.
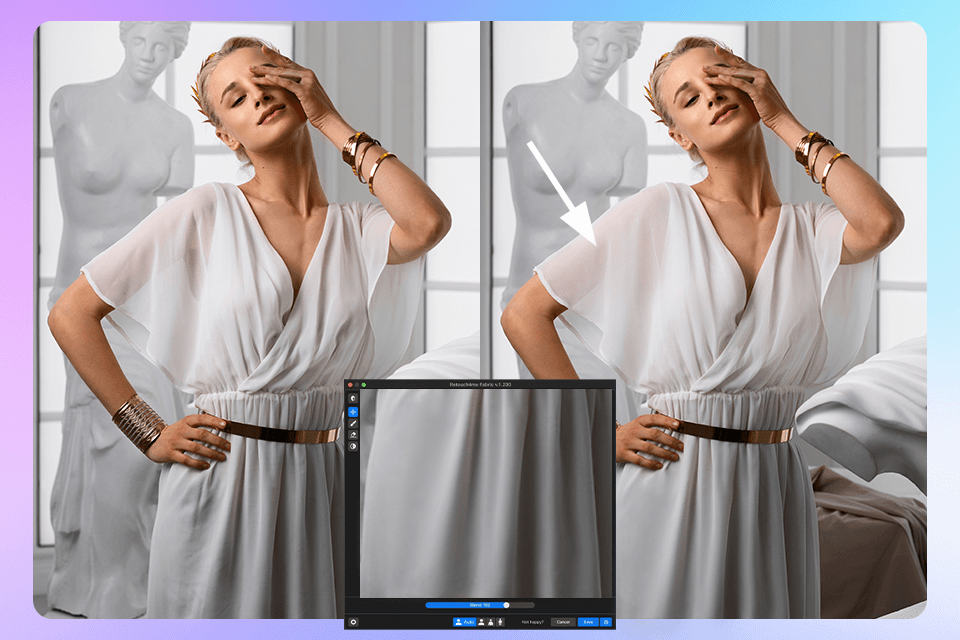
When testing the Fabric plugin, I decided to enhance a bundle of studio fashion photos and wedding portraits. There were some wrinkles on the suits, dresses, and other outfits. Wedding photographers know that making fabric texture smoother without making it look artificial is an arduous and time-consuming task. However, the plugin helped me enhance my pictures quickly.
I used it when editing the creases on a bride’s satin gown. When using the Clone Stamp and Healing Brush, I would need to spend 10-15 minutes on the task. However, the Fabric plugin helped me remove 90% of the folds in a few seconds. This efficiency makes it perfect for those who are looking for an automatic photo editor.
The plugin delivered perfect performance when I used it on wool, denim, and other textured fabrics. It did not make the details blurry but removed wrinkles naturally, as if I performed manual frequency separation.
Nonetheless, I have noticed that this plugin was less suitable for editing sheer or lacy materials, as it failed to detect folds on transparent fabric. However, if you create a mask, the task will become easier to handle.
What could be improved: To get a full 5 stars, the plugin needs a masking preview or the edge refinement feature.
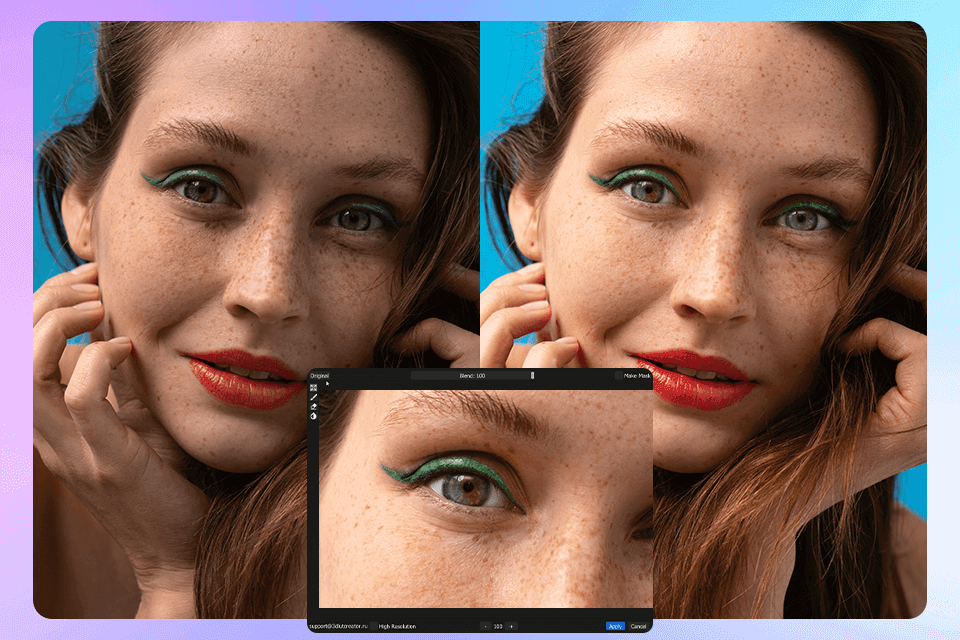
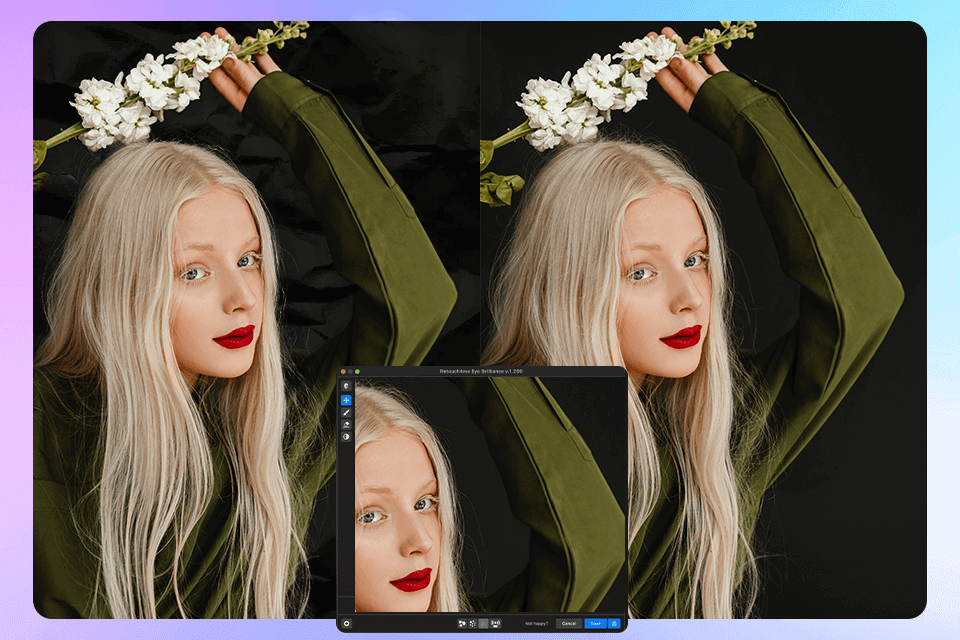
To test the Eye Bundle plugin, I launched it via Retouch4me Photoshop Panel and used it when editing close-up beauty portraits and candid shots taken during an engagement photosession we organized recently. The plugin has Eye Vessels and Eye Brilliance features, allowing users to make the eye whites whiter and enhance the iris. It saved me a lot of time.
Until recently, I would spend 5-10 minutes per photo fixing red eyes in Photoshop using the Healing Brush. I had to apply a subtle dodge & burn effect to make the iris brighter manually.
To utilize this plugin, I launched the panel and changed the mask a bit to improve its accuracy. After applying the effect, I was pleased by the fact that the eyes looked brighter and clearer without looking unnatural. There was no excessive whiteness or strange glow, which can often happen during manual editing or when a user applies cheap effects.
The plugin is perfectly suitable for dark and light eye tones. The best thing about it is that I did not need to leave Photoshop and switch to another software or apply different effects to enhance the eye whites and iris. This plugin is an excellent choice for those who specialize in beauty, wedding, and corporate photography.

I decided to test Clean Backdrop when editing portrait photos taken in the studio. Most of them have gray or light beige backdrops. Because of this, I was able to see traces of shoes, folds, or issues emphasized by uneven light. Typically, I remove such imperfections manually using the “Patch Tool” and “Clone Stamp.” It might take me 10-20 minutes, depending on the task’s complexity.
However, when I launched this plugin via Retouch4me Photoshop Panel, it automatically selected the background and removed 80% of defects. In one photo, I had to adjust the mask manually, as the model’s hair merged with the background. The whole process took less than a minute, which helped me expedite my workflow.
Clean Backdrop is perfectly suitable for those who need to edit photos with simple light backgrounds. However, when editing pictures with dark or textured backgrounds, for instance, concrete or fabric, you may need to further enhance them manually.
What could be improved: It would be great to access more advanced settings to perform cleaning at an advanced level and use a “protect subject edges” feature to avoid deleting barely noticeable details.
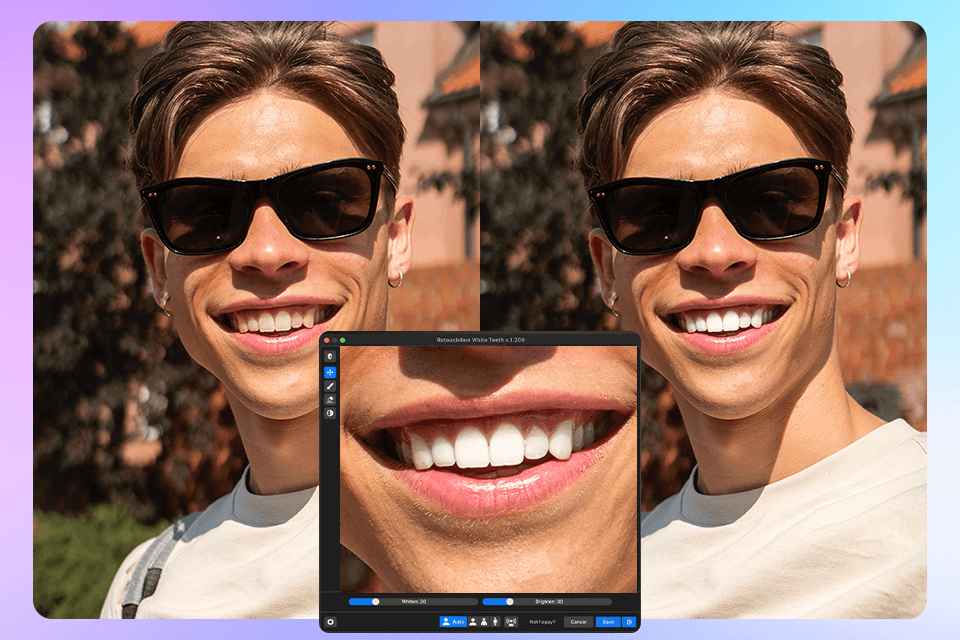
I decided to experiment with the White Teeth plugin when enhancing close-up beauty portraits and lifestyle photos with smiling models. These pictures were taken with natural light. The plugin can be launched directly from the Retouch4me Photoshop Panel. It helped me add a realistic teeth whitening effect without giving teeth an artificial look or making them look grayish. This problem often happens when I edit photos manually using Curves or Hue/Saturation layers.
During an editing session, I decided to whiten teeth in five headshot photos. When editing photos manually, I would typically create a mask, perform desaturation, and apply the teeth-lightening effect. It takes me 3-5 minutes per photo. However, when using this plugin for photo editing software for PC and Mac, I have completed the same task and edited 5 photos in less than 5 minutes. The plugin selected the teeth with high accuracy, even when they were partially covered by lips. I did not have to perform any manual corrections afterward.
The key advantage of this plugin is that it does not add an oversaturated white color or a strange glow.
What could be improved: I would like to be able to access a strength slider directly from the panel to configure advanced settings more quickly and avoid tweaking opacity later.
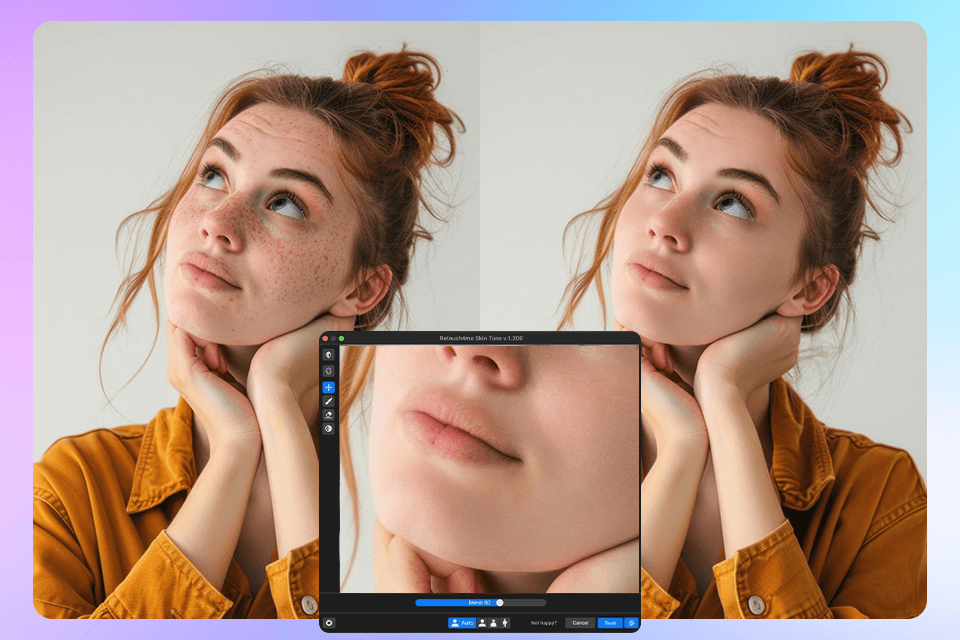
I decided to test the Skin Tone plugin to enhance three bundles of portrait photos, including the one shot in a controlled studio environment, another one shot outdoors during golden hour, and the third one taken indoors with mixed lighting. Each bundle has its specific color issues, including uneven tones on cheeks and forehead, or red blotchiness on the area.
When using Photoshop and other compatible photo editing software for beginners like Lightroom, I was able to launch the plugins quickly and enhance each image in a few seconds. I was pleased by the well-balanced skin tones, as the plugin helped me maintain natural skin texture. When editing studio photos, I noticed that the model has some redness on her nose and chin. The Skin Tone helped me fix this issue without impacting blush or contour.
In addition, I compared the result with the output I achieved when performing color grading manually in Camera Raw. It took me less than 30 seconds instead of 10-15 minutes to edit each image. The output quality looked more consistent as well.
I tested Skin Mask when editing a batch of close-up portraits with a beauty dish. They had a high level of detail, noticeable pores, and a shallow depth of field. We wanted to prepare these images for advanced retouching by enhancing specific skin areas.
It was easy to launch it from Photoshop without delays. It helped me select specific skin areas. Even the most challenging zones, including the area around the lips and eyebrows, were masked seamlessly, without impacting hair or background. I compared the mask it created with the one I created manually in Photoshop. While it takes me 7-10 minutes per image to complete this task, I spent less than a minute on each file when using this plugin and did not have to waste any time on cleanup.
I was pleased by the fact that I was able to use this mask to streamline frequency separation and apply dodge and burn. It helped me save a lot of time when retouching batches of editorial images and photos from client galleries.
This is the perfect batch photo editor for those who prioritize high accuracy and retouching speed.
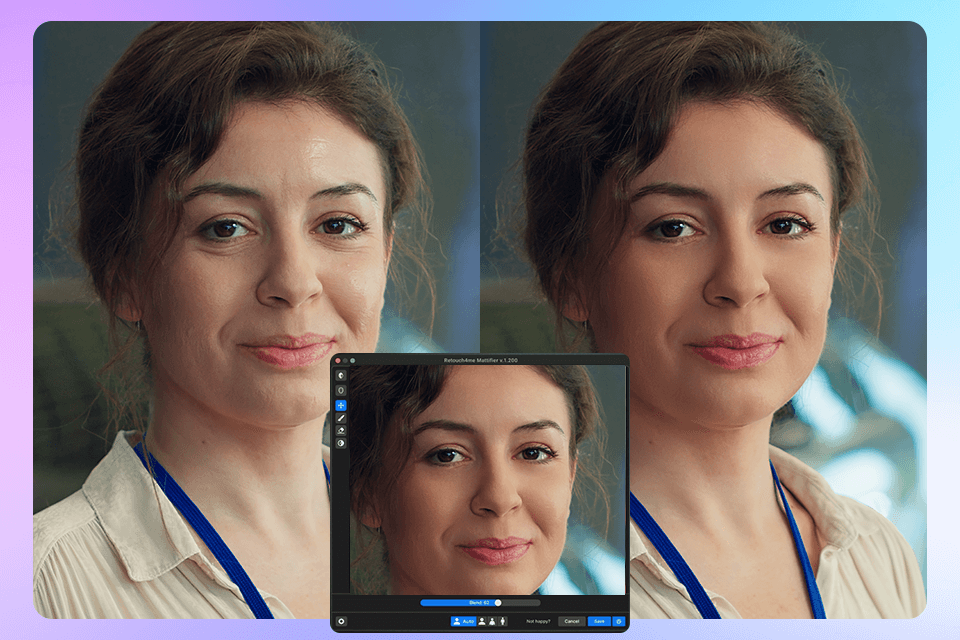
I tested Mattifier to enhance a variety of beauty portraits and corporate headshots. As we used powerful key lighting, it emphasized forehead shine and oily T-zones. After running the plugin from the Retouch4me Photoshop Panel, I was impressed by how quickly it analyzed my image and eliminated shine without making the skin texture look unnatural.
When I was editing portraits with controlled lighting, I was able to make my photos clean and natural-looking in a few clicks. The skin texture looked perfectly healthy, but the shiny areas were less noticeable. I even decided to compare this approach to the technique of editing portraits in Photoshop that I typically used when I applied manual dodge effect on the low-opacity layer with soft light. The Mattifier helped me achieve the same results more quickly. Besides, it allows me to enhance portrait photos of people with uneven skin types.
Despite these advantages, when I was editing images with harsh specular highlights, this plugin made some areas duller. Due to this, I had to quickly adjust the mask.
What could be improved: To give this plugin 5 stars, I'd love to see a wider choice of control sliders. Besides, I could use a preview mask for more precise adjustments.

I decided to test the Dust plugin when editing a bundle of studio portraits captured against simple paper backdrops. Even though they were taken in a virtually sterile environment, some specks of dust, fabric fuzz, and dirt were still visible. I used this Photoshop AI plugin, which helped me find and remove imperfections in a few seconds, even the ones I did not notice.
What I liked the most about this plugin is that it did not distort natural gradients in the background. I did not see any blotches or smudges in the photos with colored seamless paper in the backdrop. Typically, I would spend 5-10 minutes per photo using the Spot Healing Brush or Clone Stamp tool. The plugin helped me reduce this time to 30 seconds per photo.
It is also invaluable for those who need to enhance close-up portraits, as it allows users to remove dust and fibers from clothes. If you need to retouch high-end fashion photos or beauty editorials, Dust is exactly what you need. It will help you save a lot of time and enhance your photos with high accuracy.
You can download the Photoshop Panel free of charge to access Cloud Retouch and On-Device modes. They are suitable for novices and professionals who prioritize different tasks and have specific workflows.
Cloud Retouch Mode. When using this mode, you can enhance your photos using Retouch4me’s cloud servers. It allows you to access a variety of plugins without installing them on your device.
On-Device Mode. When using this mode, you can install and run plugins locally on your computer via the Photoshop panel. After finalizing a purchase, you can enhance an unlimited number of pictures without paying extra.
|
Pricing |
|
|
|
|
|
|
Ideal for |
✔️ Users with budget computers |
✔️ Professional photographers and retouchers |
|
|
|
|
Requirements |
✔️ Photoshop v23.3+ |
✔️ Photoshop v23.3+ |
|
|
|
When testing the Retouch4me Photoshop Panel, I decided to check whether it was suitable for solving typical tasks I worked on. Besides, I wanted to test plugin performance and check whether the UI was easy to navigate for those who use Photoshop regularly.
After installing the panel on the MacBook Pro with M1 chip, I decided to test it on multiple portraits we worked together with the FixThePhoto team. Some pictures were taken in a well-lit studio, while others were captured outdoors in challenging lighting conditions.
Installation and panel interface. It took us less than five minutes to install the panel. It integrates perfectly with Photoshop’s interface. We were able to quickly find it in a dedicated tab with other plugins we installed. I liked the fact that it was easy to launch the plugin from the panel. I did not need to use any third-party apps or open new windows. I was able to work in the Photoshop workspace without using third-party software, which helped me optimize my workflow.
Plugin switching and performance. I performed side-by-side tests on pictures that required manual retouching, frequency separation, and dodge & burn. I decided to enhance them using Retouch4me plugins like Heal, Dodge & Burn, Skin Tone, and Eye Bundle. It took me about 10-25 seconds to render each image. It typically takes longer to render high-resolution pictures. Due to the plugins, I was able to save up to 40 minutes per retouch session.
Practical scenarios. When editing a bridal portrait shoot with textured backgrounds and natural skin tones, I decided to use Clean Backdrop, Skin Mask, and Mattifier. Clean Backdrop helped me retouch backdrop wrinkles in a few clicks. This process typically takes about 10–15 minutes when I perform this task manually. Skin Mask is perfect for high-accuracy masking and performing targeted edits. It might be quite cumbersome and time-consuming to perform this task by hand.
Panel flexibility. After using the main features of the Retouch4me Photoshop panel free of charge, I decided to test the Cloud and On-Device modes. The former was especially useful when I worked outside the studio on my older laptop. The latter allowed me to edit large batches securely when using my main workstation.
If you want to expedite your portrait retouching workflow while maintaining high quality, these free Photoshop plugin bundles created by the FixThePhoto team will help you level up your game. They include actions and effects created for those who specialize in portrait editing.
Using them, you can make the skin smoother, emphasize eyes, make the teeth whiter, and perform color correction without making tones look artificial. Whether you need to enhance family photos, social media content, or portraits, these effects will help you improve your photos and give them a professional feel.


