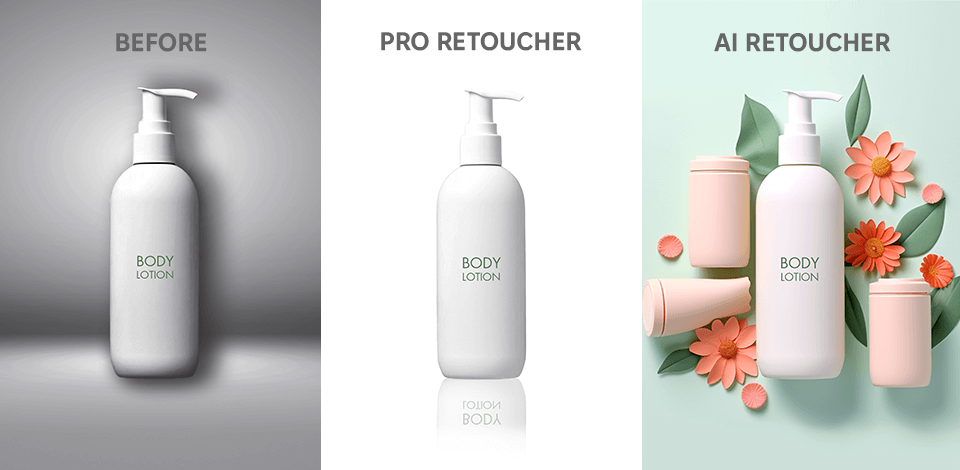
The world of photo editing is changing so fast and as a retoucher at FixThePhoto, I come across more and more images that are improved with the help of AI tools and filters. That’s why, I decided to compare AI vs professional photo retouching techniques to see how far these editors can do and will I lose my job soon. Frankly speaking, I'm impressed with the results delivered by AI instruments.
Since I have access to Adobe collection of tools, including Adobe Sensei, Photoshop Neural filters, and Lightroom’s AI-based color edits, I decided to compare them with the popular AI photo editors from other developers.
Generally, AI tools can accelerate your photo editing process twice or even more, but the results aren’t always realistic. For instance, you may receive disproportional body features, random elements added to a photo, or excessively retouched pictures.
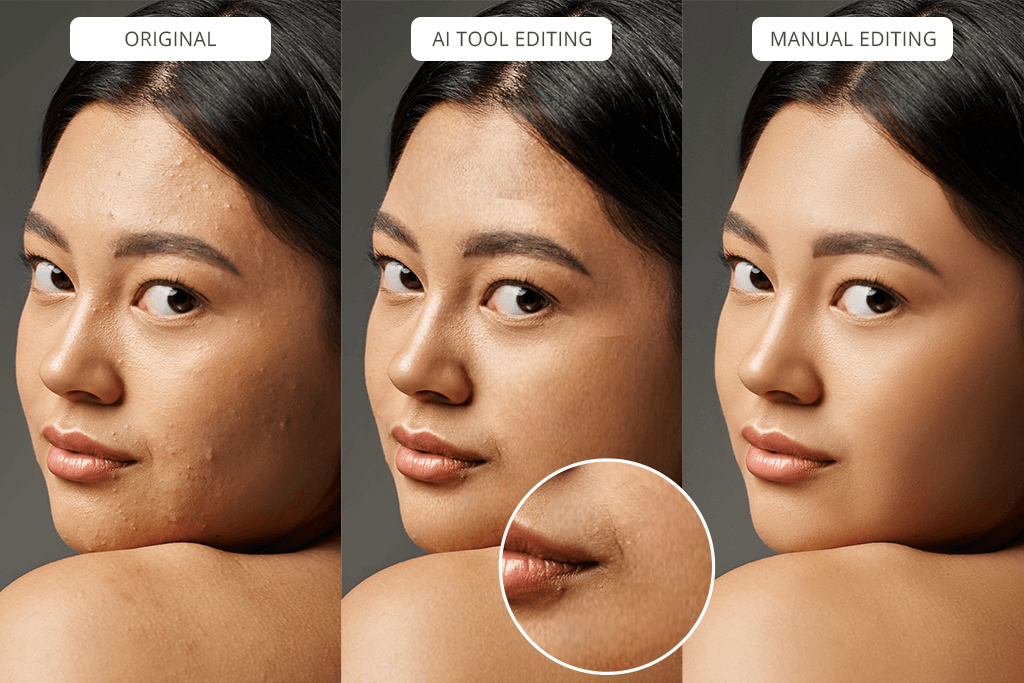
In my post below, I'm going to show you how it is possible to edit photos using three different methods.
My main motivation to compare these techniques side-by-side is to discover the advantages and disadvantages of each for producing high-quality edits. I’m not going to tell persuade you stop using ai for retouching, rather would like to show you the difference between classical and modern ways of image post production.
I will also write how much time I spend improving images, using different approaches. This is particularly important for anyone engaged in eCommerce editing. I know that dealing with lots of photos is tiring, so it is natural to look for the quickest way to edit in batches.
I often use the Lasso or Pen tool to manually remove backgrounds on photos. This process can be quite tedious, especially as a part of products retouching when you have to manage intricate details that require precise edge selection.
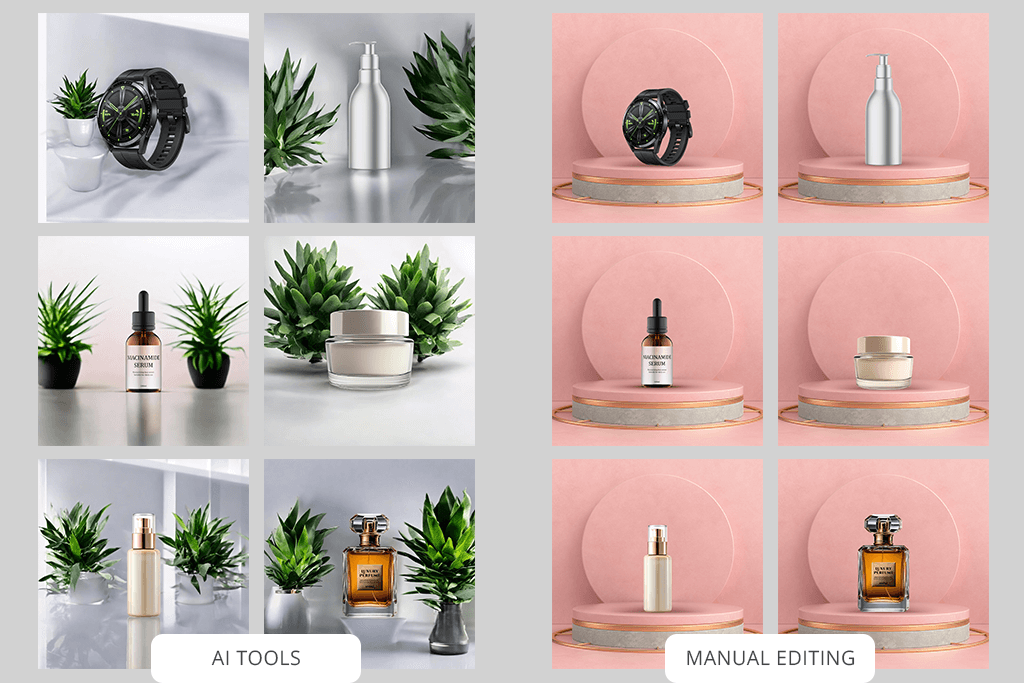
Adobe's Enhance and AI-powered selection features cope perfectly with isolating objects and replacing backgrounds. I just entered the prompt and got the quick result. Alternatively, you can let AI take the lead. Either way, the process is very fast.
However, if you use these tools for images of products with many little details, AI can disappoint you. The backgrounds may look similar in the pictures, but they're never exactly the same. Therefore, you can’t maintain consistency across a range of pictures.
When your background has similar shades, the AI won't be able to accurately cut it out, honestly, even Photoshop’s AI is bad here. If the shadows or colors of the product match the background, the AI will simply cut out a chunk without properly isolating the subject.
To compare AI photo editing vs human retoucher, I decided to use Mokker AI and Pebblely. These are two popular background removal tools. They're effective, but rather pricey, especially Mokker AI, starting at $29 a month. Generally, they do a good job, but sometimes overlook important details or cut out too much. Plus, if you make a mistake, you can't just go back to the original image. You have to manually fix any errors, which is time-consuming.
In the end, I received the results similar to what Photoshop AI delivered. But I had to pay for the program extra. If I want to spend money on photo processing, it is better to choose Adobe Photoshop because it offers more features and control.
1. Classical Manual (10-15 min per photo):
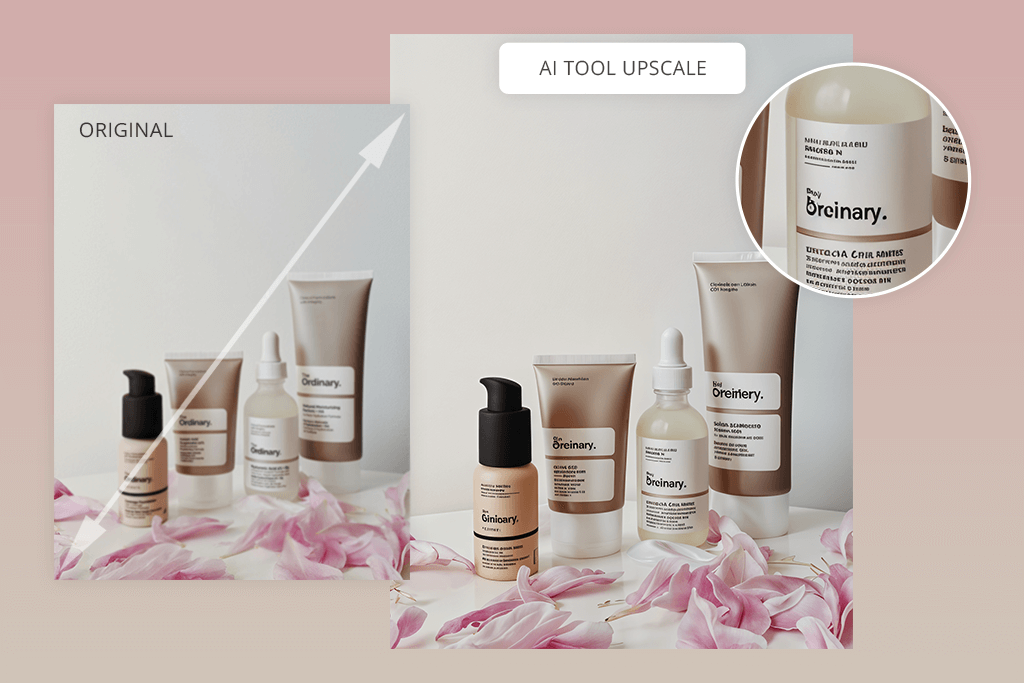
Can AI replace professional retouchers when it comes to resizing images, while retaining their quality? To learn the truth, I decided to use the Camera Raw filter. With its help, I improved sharpness, contrast, and color accuracy. Additionally, I tested the “Preserve Detail 2.0” feature in Photoshop for image upscaling. I like that the resulting photo was still of decent quality.
To improve the clarity of your pictures even more, you can use Smart Sharpen and Noise Reduction tools. With such a collection of instruments at hand, you are sure to get top results.
2. Classical + Adobe AI (5-10min per photo):
Using such tools, you can make your images sharpen and colors more vibrant. I particularly like such features as "Enhance Details" and "Smart Sharpen" in AI Photoshop. They handle the task you throw at them promptly, without sacrificing quality.
Sometimes, AI may add elements to your photos that you don't really want, but you can easily remove them. Anyway, this is one of the best ways to improve product photos quickly and receive top-notch results.
3. AI Tools (1-3 min per photo):
I've used Pixelcut to clean up photos and make them sharper. The process was intuitive and quick. When I tried to fix a blurry product photo, Pixelcut fixed it well but as usually all filters of this type – changes the text. I had to use Photoshop to finish the job, because somehow ai doesn’t recognize texts on photos and distort them.
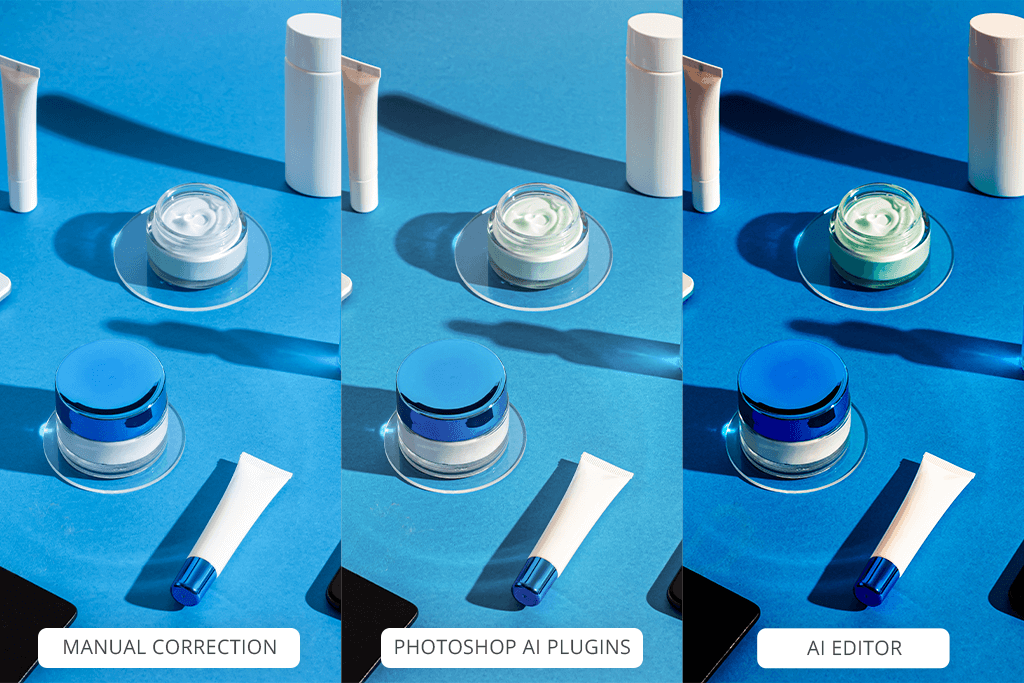
1. Classical Manual (15-20 min per photo):
I use Lightroom to manually adjust colors in my photos. My go-to tools for the task are Color Balance and Hue/Saturation. With them I can correct the colors very meticulously. When working with product photos, I often use Selective Color. It does wonders at fine-tuning specific color tones, so that resulting product photos look lifelike.
Most of the time spent correcting each photo is on manual mask work. This is especially important when dealing with similar shades in both the product and the background, such as when a blue tone appears in both. You need to ensure that the blue in the product, like in a bottle or glass, remains accurate, while the background’s similar tone is separated and cleaned up.
Using masks allows you to isolate and adjust specific areas without affecting other parts of the image. Without careful masking, adjusting one color slider could ruin both the bottle's color and the background.
2. Classical + Adobe AI (10-15 min per photo):
Photoshop offers some tools that are particularly helpful for color correction too. Most of all, I like using Photoshop actions for product photography with Neural Filters and Auto Tone. They allow changing colors just the way I want, preserving realism. Besides, I appreciate that these tools deliver very quick results.
Still, I believe that relying fully on such tools isn’t the best option. You still need to scrutinize the outcome and apply manual corrections if needed.
3. AI Tools (1-3 min per photo):
One of the best AI tools for photo retouching and color correction in particular are Auto Color and Color io. They allow making color fixes promptly. Unfortunately, the results aren’t always great and I frequently need to make manual fine-tuning but overall it’s not bad for fast ads editing. Therefore, you can use these tools to speed up your workflow, but don’t expect flawless outcomes.
All in all, if you are serious about product advertising, you may better hire a skillful retoucher, who can guarantee the desired precision and accuracy.
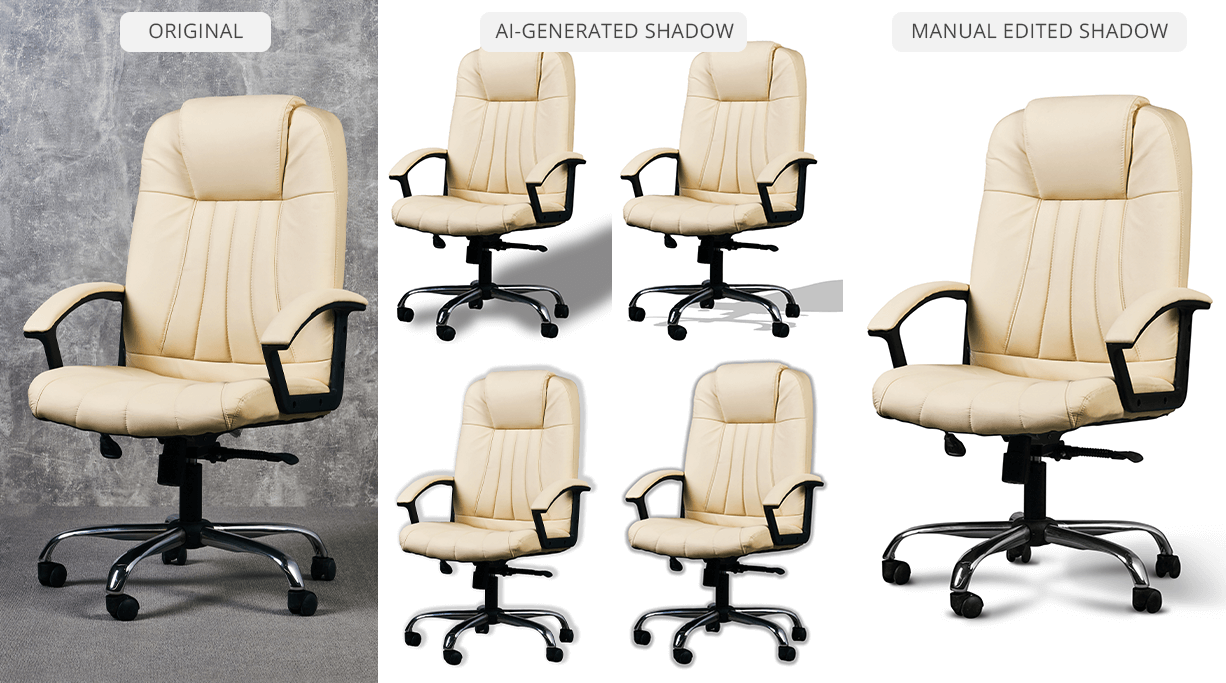
1. Classical Manual (10-15 min per photo):
I like to hand-draw and adjust shadows myself. Thus, I can be sure they look real and match the way the light hits the product. In Photoshop, I usually use the Drop Shadow layer style and the Brush Tool to make natural shadows. But it can be tough to choose the right shadow. Besides, it takes a long time to do it this way.
2. Classical + Adobe AI (5-10 min per photo):
Using AI features for working with shadows is beneficial due to high speed. For instance, Adobe's AI filters help make shadows look deeper and more realistic. Such an option may work for people who can’t really figure out which shadows are particularly suitable for their goods on photos.
3. AI Tools (up to 3 min per photo):
To my mind, Photoroom is a powerful tool for adjusting shadows in a quick way. Actually, it takes a couple of minutes to complete the task. However, it is best suited for adding shadows to smooth objects with little detail. If you try to use it with tiny elements, you may encounter unpleasant so-called photoshop fails.
Therefore, to achieve a purely impeccable look, you need to adjust the result image manually. No wonder, your workflow will be extended.
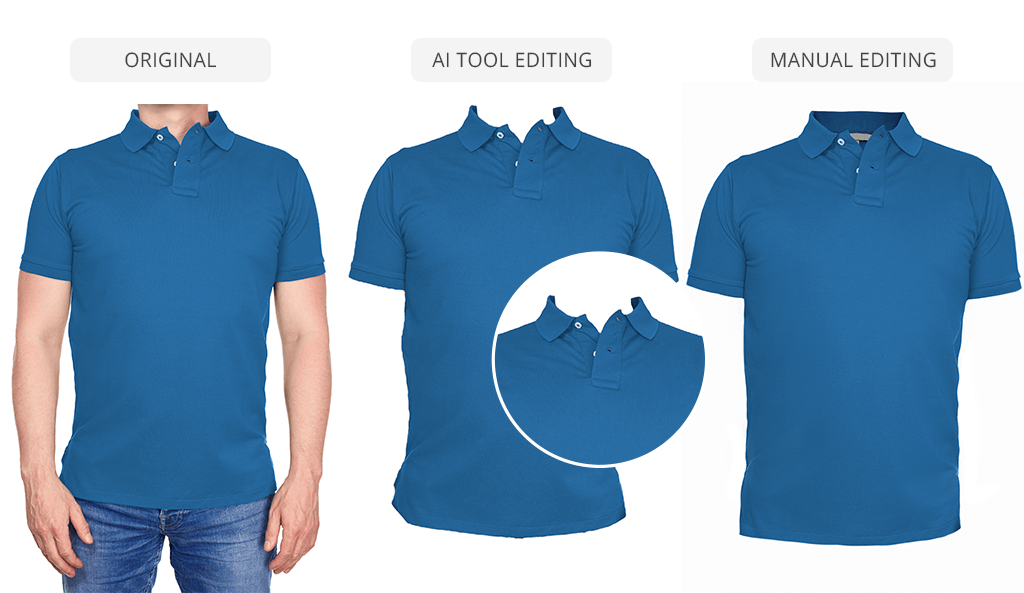
1. Classical Manual (3-10 min per photo):
Clipping path is a great way to highlight specific details of a product in a photo. By manually cutting out the product, I can make sure it looks its best and draws attention to the most important features. I typically use the Crop Tool and Lasso Tool for this task.
2. Classical + Adobe AI (5-10 min per photo):
With AI features, it is possible to crop images quickly. However, they are not always efficient with items that have uneven edges or lots of details, like a sweater with loose threads or a necklace with intricate designs or if it’s clothes with a model like on the example above. Therefore, unwanted background elements may be still visible, so the final images will look messy.
3. AI Tools (1-3 min per photo):
Is AI better than professional retouching in terms of cropping? For now, no for sure. AI cropping tools are still at a pretty low level when it comes to precision. What you see in ads, even in paid versions, is often far from reality.
I used the Crop photo app to cut out clothing images from a winter collection, which had a lot of fluffy materials. Even though the program is really fast and can finish edits in a couple of minutes, it ditches important parts of the clothes.
The truth is, you're still manually doing the work, just within their program, and it's labeled as 'AI.' In reality, you still have to use manual crop to achieve the desired result, especially when it comes to complex backgrounds.
1. Classical Manual (20-30 min per photo):
Batch editing features available in Lightroom are pretty basic. I apply specialized Lightroom presets for product photography by copying settings from one photo to another, which doesn't always look great on every image. Fixing such problems later is not very convenient and takes time.
Still, if all the photos were taken in a photo light box, you are better to use Lr. Since the lighting is consistent, I can apply the same edits to all the photos and they'll look great.
2. Classical + Adobe AI (10-15 min per photo):
Although automated tools can make editing faster, they can't always discern photos as accurately as professional retouchers can. For example, Photoshop supports Actions and Presets aimed at making the same changes to many images at once.
However, they can’t properly evaluate the unique characteristics of a picture, so the results often require manual tweaks.
3. AI Tools (1-5 min per photo):
I have tested multiple instruments for my manual retouching vs AI retouching tools comparison. As for now, I haven't found any AI tool that can edit multiple photos in one go and constantly deliver good results.
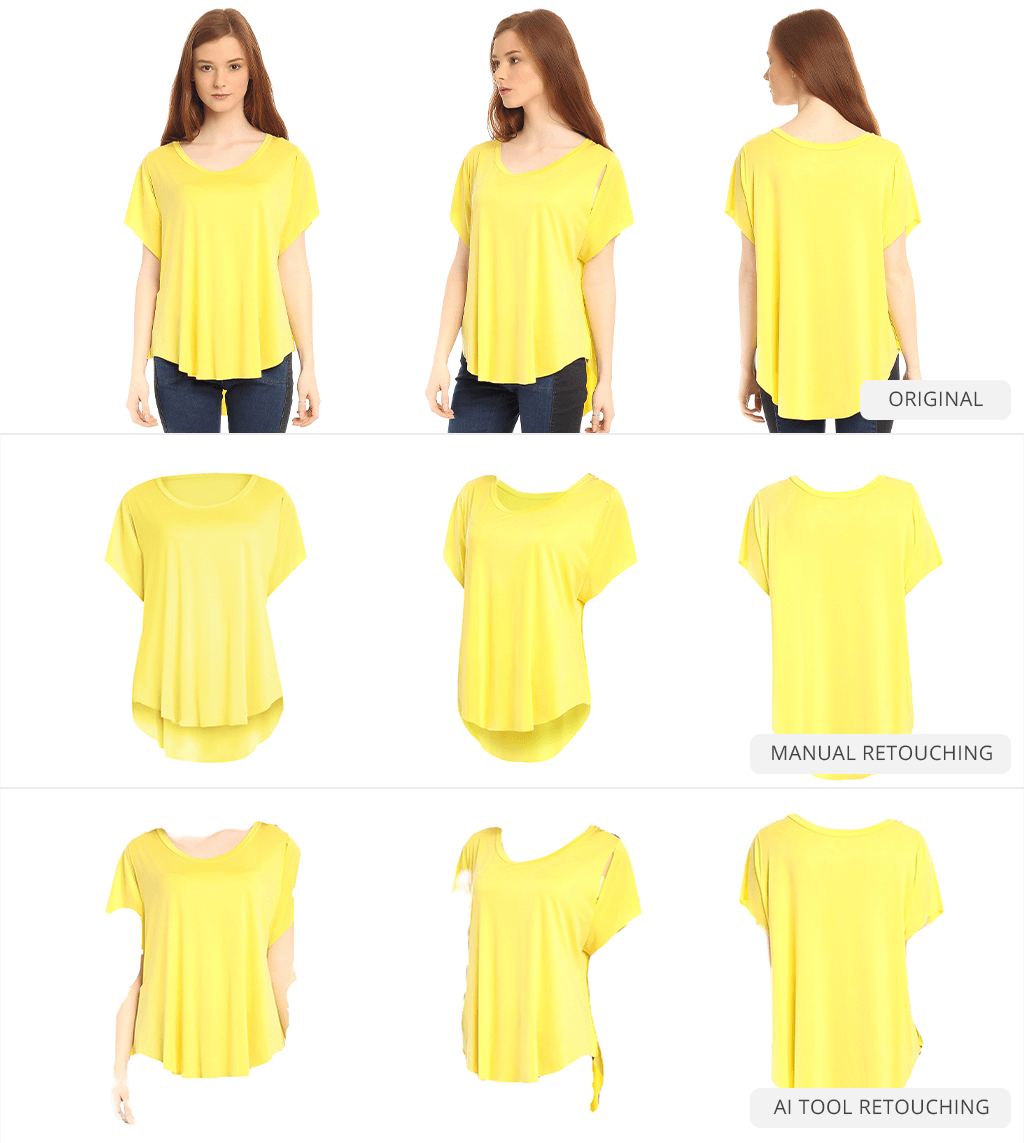
1. Classical Manual (20-30 min per photo):
I always inspect mannequin photos closely to find any imperfections, such as loose threads, uneven areas, or incorrect clothes shape. I focus on ensuring the clothing maintains the correct volume and structure, so it doesn’t just hang awkwardly on the mannequin.
I also remove any parts of the clothing that might be obstructed by the mannequin or model to make the product fully visible. Thus, I can create images that look absolutely flawless. I also edit mannequin photos very accurately to achieve a polished look while retaining naturalness.
2. Classical + Adobe AI (15-25 min per photo):
Using AI features is advantageous if you are pressed for time. In other words, with these instruments, you can make changes quickly and easily.
I tried editing the mannequin photos 15 times, but only 2 of them turned out OK. The rest looked weird and strange. No surprise, I was disappointed because my prompts didn’t work with all photos.
3. AI Tools (5-10 min per photo):
If your mannequin doesn't have a face, AI-based tools may not work at all. In that case, you'll need to fix your photos by hand. This way, you can be sure that everything looks perfect and the product is shown in the best possible way.
Besides, you often need to upload almost 360 photos from every angle to get it to work properly. All the photos must be taken from the exact same position. If there’s even a slight difference, the AI won't be able to stitch them together correctly. It simply won’t process the images or deliver the seamless result you’re looking for.
1. Classical Manual (15-25 min per photo):
I frequently use the Healing Brush, Clone Stamp, and Frequency Separation when editing photos. They are suitable for fixing wrinkles on clothes, blemishes on faces, and other flaws. My goal is to create high-quality product images that can meet Amazon standards.
This technique is particularly great for making skin look smooth and clear without going overboard. Generally, I can improve natural features, applying some artistic touches. When it comes to commercial images, it is not always possible to say whether the image is photoshopped or not thanks to delicate manual work.
2. Classical + Adobe AI (20-30 min per photo):
When using a combination of manual editing techniques and AI plugins, you may end up with photos that still have visible defects. This means, you will have to correct those imperfections manually, once the automated processing is over.
For instance, there often appear color shifts in product photos that totally degrade the quality of pictures. Besides, images featuring jewelry may eventually suffer from severe distortions.
Today, AI plugins can’t fully replace a human editor, but they are upgrading at very quickly.
3. AI Filters (up to 3 min per photo):
When zooming in on photos, AI-based tools tend to drastically degrade the image quality. This happens because the AI tries to overlay textures from other parts of the image or from external data onto the product being edited.
However, it often fails to match them perfectly, leaving areas where textures are inconsistently blended or mismatched. Instead of covering imperfections smoothly, the result can look like a messy mixture, reducing the clarity and natural look of the image.
1. Classical Manual (15-20 minutes per photo):
I can carefully control the size and quality of my images using Photoshop's Image Size dialog and similar tools. Therefore, I can be sure my pictures look great both online and in print. The biggest advantage of manual editing is definitely the level of control. However, the entire process can take a while to find the perfect balance between image quality and file size.
When I need to make my images smaller, I sometimes use online tools like TinyPNG or JPEGmini. They can shrink the file size without degrading the quality.
2. Classical + Adobe AI (10-15 minutes per photo):
Using AI to shrink images can be really useful. Generally, such tools can make files smaller without reducing quality much. But you have to be careful to check the results, because sometimes AI might miss something important.
3. AI Tools (5-10 minutes per photo):
I used Optidash for my projects, but I think it's too expensive for what it does. Currently, the cost is $39/month. For the same price, I can get a subscription to Adobe, and receive access to more features and tools.
AI is a valuable tool for photographers and retouchers, not a threat. It can automate routine tasks like photo editing and file arranging, freeing up time for creativity. However, it's important to remember that AI can't replace the unique artistic vision and personal touch that human professionals bring to their work. Over-reliance on AI could lead to a loss of individuality and creativity in the field.
AI can't fully replace human photographers and retouchers because it doesn't have the same artistic vision, emotional understanding, and brand awareness.
Even though AI can create realistic images, real photography is still the best way to capture real moments and emotions. AI won't replace photography completely, but it may change how photographers and retouchers work by encouraging them to try new techniques, styles, and methods.
To make AI-generated product photos look more lifelike, create a big prompt with all details described. For example, if you want a photo of a handmade ceramic vase, describe its color, texture, and any special features. Also, describe the setting, like a wooden table or a white background on product images, to help the AI create a realistic image.
Automated tools can rapidly process images, so you can rely on them if you have many photos that require improvement. For instance, AI can swiftly remove backgrounds, change colors, and add effects, while photographers are fully concentrated on more creative projects. This speed is especially helpful for online stores that need to create many photos of products within a short time.
Although AI is fast, it lacks the capability to understand the detail and artistic elements of photos unlike a professional editor. Human editors can still better cope with complex changes and offbeat manipulations required for individual shots. Professionals can look at each image carefully and make sure the final result is exactly what the customer wants.
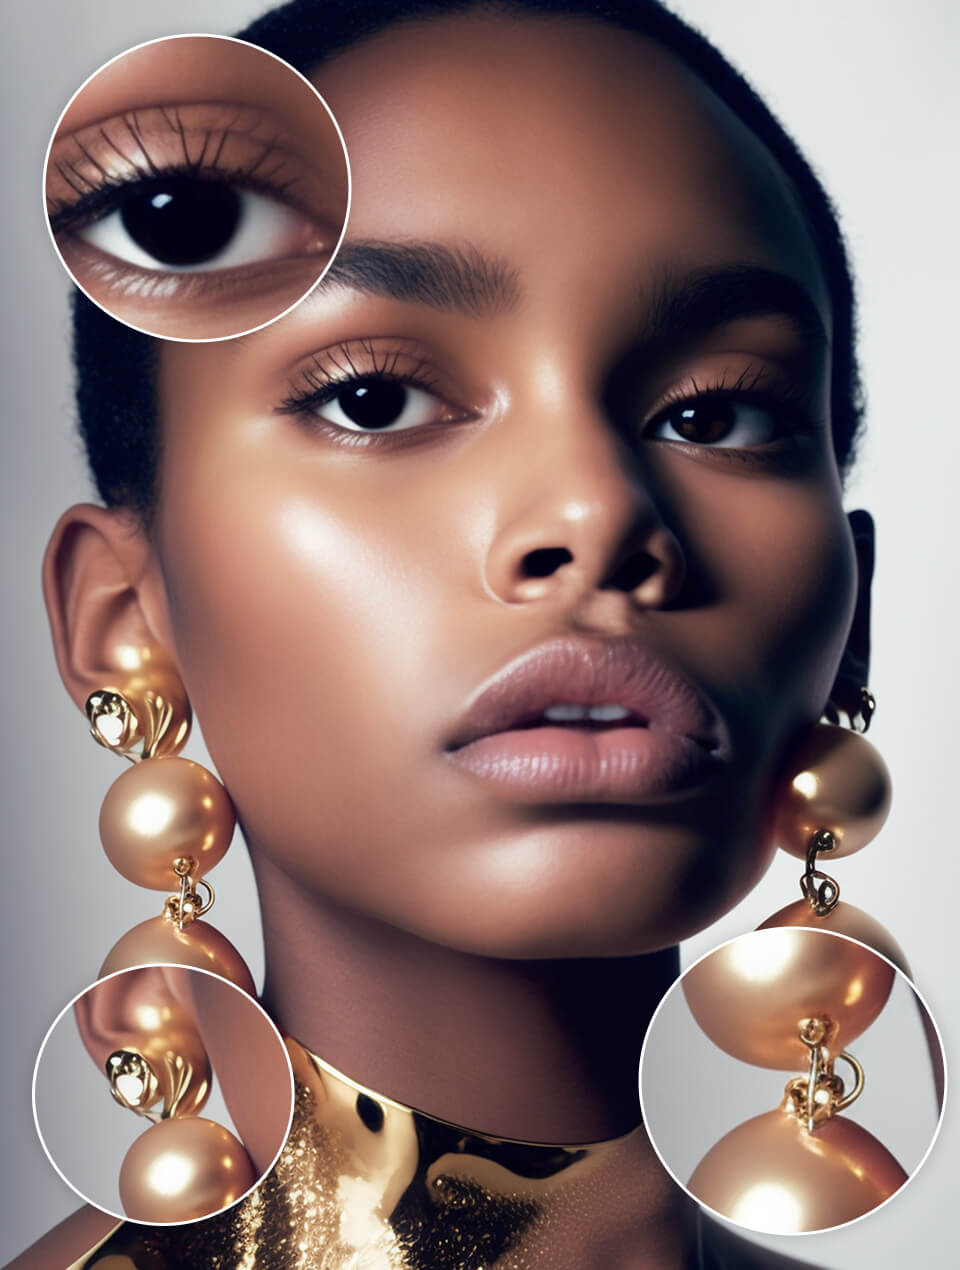
❌ Over-smoothing skin: When using AI to improve images of luxury jewelry, it's important to be careful about how much you smooth the skin. Too much smoothing can make models look artificial and hide their unique features, like freckles or wrinkles. If a model's skin is too perfect, it can make the jewelry look less appealing and take away from the realism.
❌ Distortion of facial features: AI tools can sometimes change how a person's face looks when they're edited. As a result, person’s features will look different or even strange. For example, in an ad for fancy earrings, the AI has made the model's eyes look uneven and too detailed, with weird reflections or textures that weren't there in the original photo.
❌ Wrong color balance: AI can sometimes make mistakes when adjusting the colors in images. For example, it can make a model's skin look too orange or too pale if the earrings are a different color. Thus, the jewelry will be less attractive to potential buyers.
❌ Poor details: AI image editing tools can sometimes overlook important details, leading to a loss of clarity. For instance, when enhancing a photo of a ring with intricate designs, AI may blur or remove fine details like the delicate filigree or the gemstone settings. Such oversight will diminish the overall appeal of the image.
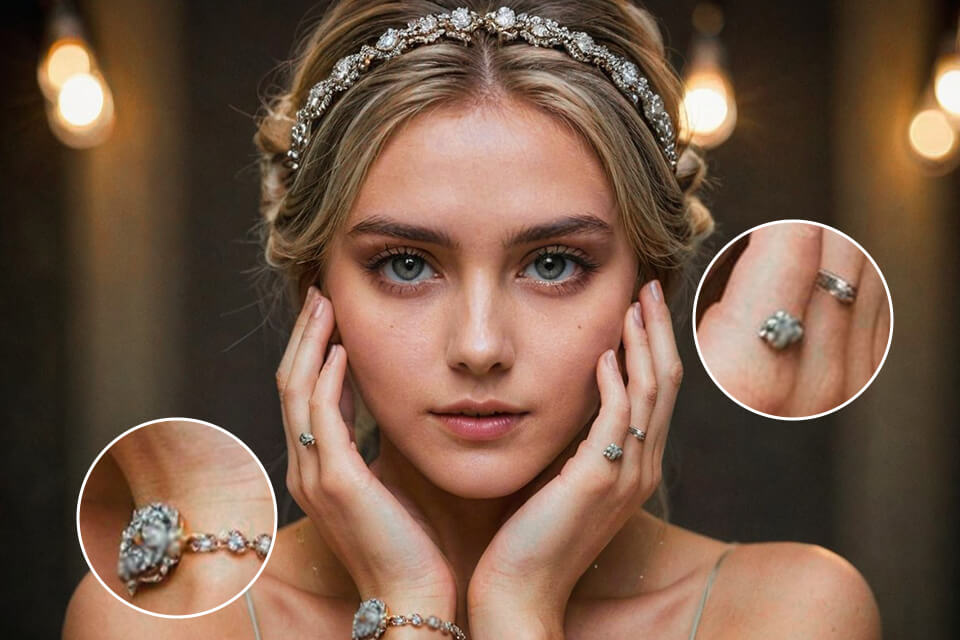
❌ Artifacts caused by over-editing: For instance, when promoting new running shoes, AI may add details like stripes or patterns that weren't actually on the shoes. This can confuse customers, as the shoes they receive may not look exactly like the enhanced image. No wonder, such misrepresentation will take a toll on the brand's reputation.
Lighting is important for all stages of photography, including image editing. The type of lighting I use can greatly affect how my images look after editing. For example, when I photograph glass without reflections, soft, indirect light makes the glass appear clearer and brighter. Editing such pictures is generally easier. On the other hand, harsh lighting can cause shadows that are difficult to fix, taking more time and effort during the editing process.
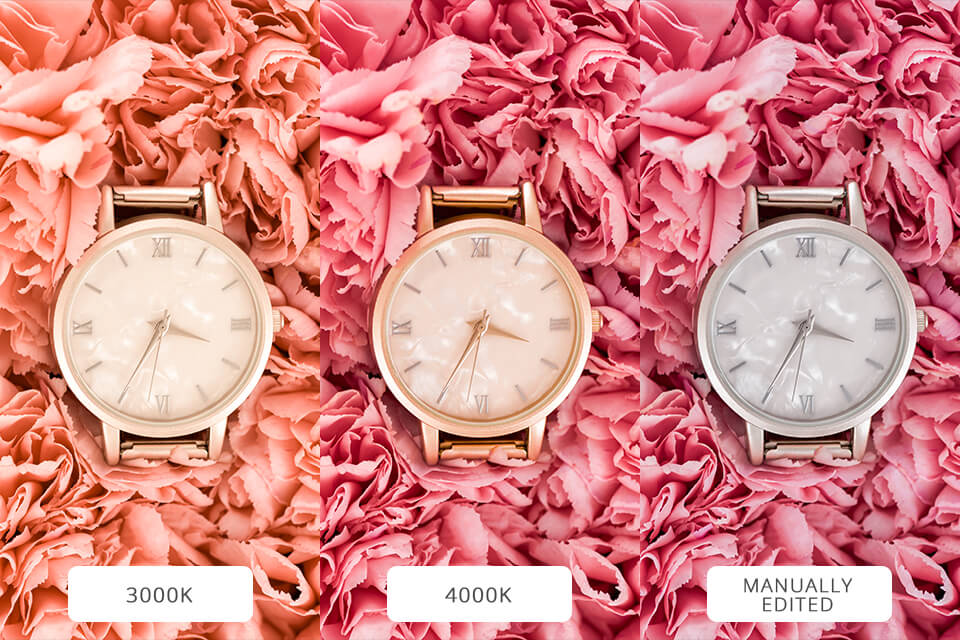
Lighting can also help create a specific mood for the product. When I photograph kitchen items, I do all possible to establish good lighting. It is necessary to emphasize the textures and colors, making the photos more attractive. If the lighting isn't good, I often have to adjust the brightness and shadows during photo editing to make the final image look professional.