When you purchase through affiliate links on our site, we may earn a commission. Here’s how it works.
adjustment brush tool photoshop interface adjustment brush tool photoshop interface

Adjustment Brush Tool
In Photoshop:
New Feature Overview

Photoshop 2025 was updated with a new feature we had been waiting for —
Adjustment Brush Tool. This innovative tool facilitates making local edits without
using complex masks and layers. If until recently it was necessary to create an
editing layer, add a mask, and then use a brush to select the areas for editing,
now everything is much easier.

If you have an updated version, you just need to choose the Adjustment Brush tool in Photoshop, select the area that requires editing, and change its parameters, as you do in Lightroom. This feature is somewhat similar to the Local Adjustments option, however, it supports improved AI-driven object detection and allows you to enjoy more freedom when editing photos.

I thoroughly tested the new tool when working with different types of images, including portraits, landscapes, and product photos. My conclusions are based on our standard approach to testing.

I tested the following things:

✔️ The performance speed of the new tool when editing large RAW files.
✔️ Whether it is possible to avoid using masks and layers.
✔️ Whether the tool is suitable for deleting complex details, for instance, hair.
✔️ Whether it is possible to create precise masks without manual adjustments.

How to Use the Adjustment Brush Tool in Photoshop

Getting Started

  • Open a Photo – Run Photoshop and export the picture you want to enhance.
  • Find the Photoshop Adjustment Brush tool – Go to the Tools panel and find a brush icon with an adjustment symbol. If you cannot find it anywhere, click the small arrow in the top right corner to see all the options available in the Tools panel.
  • Select an Adjustment Option – Click the dropdown arrow next to the brush icon and choose the settings you want to change. You can adjust Hue, Saturation, Brightness, Contrast, or Exposure.

Applying Adjustments

  • Paint Over the Image – Move the brush over the areas you want to improve. You will see the result of your editing in real time.
  • Modify Intensity – Configure the Opacity and Flow settings in the Options bar. By increasing Opacity, you can achieve a more noticeable effect. Lower Flow values allow you to create a gradual transition effect.
!

Tip: If you want to make high-accuracy object-based adjustments, use the "Apply to Object" feature. It will allow you to edit only selected objects without affecting the rest of the image.

Working with Adjustment Layers

When you use the Photoshop Adjustment Brush tool, the program creates a new layer. It ensures that the source image won’t be affected by your edits. You can experiment with various settings without worrying about the result.

You can use a layer mask when performing the following tasks:

  • Paint with black to mask the adjustment.
  • Paint with white to make the adjustment noticeable.

This approach allows you to achieve high precision, which is especially important when making localized edits.

Creating Smooth Transitions with Gradients

If you want to make the difference between adjusted and unadjusted areas less noticeable, use a gradient brush with the Adjustment Brush Tool.

  • Select a Gradient – Open the Gradient Picker and browse through a collection of presets. You can choose between black-to-white, linear, or radial gradients.
  • Apply the Gradient – Click on the gradient and drag it on your image. It will allow you to blend the adjustment smoothly.
  • Edit the Gradient – You can change the angle, shape, or colors using the Gradient Editor or Options bar. It’s also possible to enhance the affected areas by painting on the layer mask with a black or white brush.

The use of gradients will allow you to recreate subtle lighting effects, add color transitions, or create realistic vignettes.

My Impression: The Tool Changes the Approach to Retouching

When I started to use the Photoshop new Adjustment Brush tool, I thought that it was quite similar to the Dodge & Burn feature. However, after making a few edits, I was impressed by the functionality and high precision of this tool. It helped me significantly streamline and expedite my workflow.
adjustment brush tool photoshop portrait

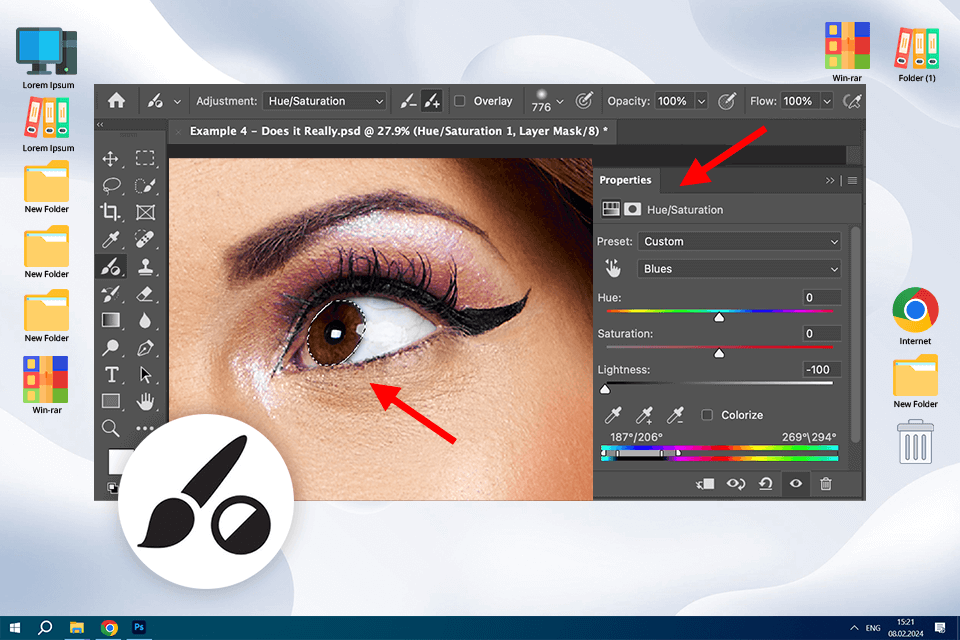
The first thing I decided to do was experiment with portrait photography editing techniques and try making the eyes in my photo brighter. I was pleased by the fact that the AI tool quickly separated the sclera from the iris. It allowed me to make precise adjustments without affecting the eyelids or surrounding skin.

adjustment brush tool photoshop landscape
I was extremely happy with this automated tool, as I typically had to adjust the mask manually. When editing landscape photos, I was able to edit the cloud by adjusting contrast without affecting the sky. This tool can automatically detect object boundaries, which facilitates editing.
adjustment brush tool photoshop product
When working on product photography projects, I was able to emphasize the texture of the fabric without adding any noise. It makes this tool more efficient than traditional editing features. I was able to expedite all my routine processes, as I did not have to create masks and layers manually.

Main Features

  1. Localized color and exposure adjustments. Until this tool was released, I has to use an adjustment layer, add a mask, and make edits manually. I wanted to learn how to adjust Brush tool exposure in Photoshop, so I decided to test out the new feature. With it, I can quickly select the area that requires editing and fix exposure, contrast, saturation, or even color temperature. It saves me a lot of time.
  2. AI-powered for more precise editing. I was pleased by how Photoshop uses artificial intelligence to recognize object edges and select them with high precision. It allows me to select skin, hair, fabric, or small details, including reflections. This AI tool facilitates making quick edits and enhancing only specific areas. Using it, I can perform object separation and expedite my workflow.
  3. Flexible brush settings. The brush has impressive flexibility. I can change its hardness, size, and opacity depending on the area of a photo I need to edit. Besides, I can save custom brush presets, which facilitates switching between different tasks.
  4. Intuitive interface. The program has a well-thought-out UI that is easy to use and navigate. You can make quick, one-click edits. It allows me to fully dedicate myself to creative tasks instead of spending hours adjusting settings. This solution has streamlined functionality, which helps me expedite my photo editing workflow.

Comparison with Alternatives

I wanted to check whether Adobe Photoshop Adjustment Brush tool is better than the available alternatives. This is why I also tested widely used photo editors to see whether they deliver comparable performance and have many uses. Here is the comparison table I created:
Editor Tool Pros ✔️ Cons
Enhance AI + Local Masking
  • Auto contrast/color adjustment
  • Streamlined edits
  • For novices
  • Limited control
  • AI often overemphasizes effects
  • Sometimes look overly edited

Local Adjustments

  • Very precise adjustments in color grading
  • Allows editing masks with high accuracy
  • More convoluted than Photoshop
  • Takes a while to learn how to navigate

Brush-Based Adjustments

  • Brush tools
  • Compatible with graphic tablets
  • No subscription
  • No AI-driven object detection tool
  • More challenging to edit images

U Point Technology

  • Selective corrections
  • Quick workflows
  • Less flexible than the Adjustment Brush Tool
  • Not suitable for complex edits

Local Adjustments & AI Masking

  • Handy selective editing tools
  • AI-powered masking features
  • Sometimes detects objects with poor accuracy
  • Needs additional manual adjustments

Final Thoughts

logoI always rely on Adobe Photoshop when editing digital images. It comes with handy tools that allow me to edit photos, work on my design projects, or even enhance video elements.

I often use the recently released Adjustment Brush tool in Photoshop. It’s perfectly suitable for making high-precision, localized edits without impacting the rest of the photo. Whether I need to adjust brightness when editing a face, tweak colors, or increase contrast for specific details.

All our FixThePhoto experts agree that if you are serious about retouching, product photography, or landscape photos, Adjustment Brush Tool in Photoshop is an excellent option to consider.

💡 For whom this update will be useful?

✔️ Photographers who want to make quick local edits.
✔️ Retouchers who want to spend less time editing masks.
✔️ Designers who want to adjust color saturation in specific areas.

I consider this tool as the perfect example of a feature that supports localized editing. Until recently, I had to use masks. As a result, it took me twice as long to edit my photos. Now, using the Photoshop Adjustment Brush tool, I can make instant edits without taking any unnecessary steps.

This Photoshop update is an excellent feature. I recommend trying out this tool if you need to complete your tasks more quickly and efficiently.

Tata Rossi

Tech Trends Journalist

Tata Rossi is a photographer-advisor, key contributor at FixThePhoto, sharing her expertise about photography and 55% of photos you see at our blog are taken by her. She is a Bachelor of Fine Arts in Photography from the Massachusetts College of Art and Design. She is the main so-called teacher in our team, conducting courses on photography and editing for beginners and anyone interested.

Read Tata's full bio

Tetiana Kostylieva

Photo & Video Insights Blogger

Tetiana Kostylieva is the content creator, who takes photos and videos for almost all FixThePhoto blog articles. Her career started in 2013 as a caricature artist at events. Now, she leads our editorial team, testing new ideas and ensuring the content is helpful and engaging. She likes vintage cameras and, in all articles, she always compares them with modern ones showing that it isn’t obligatory to invest in brand-new equipment to produce amazing results.

Read Tetiana's full bio

GET OVER 66% OFF GET OVER 66% OFF