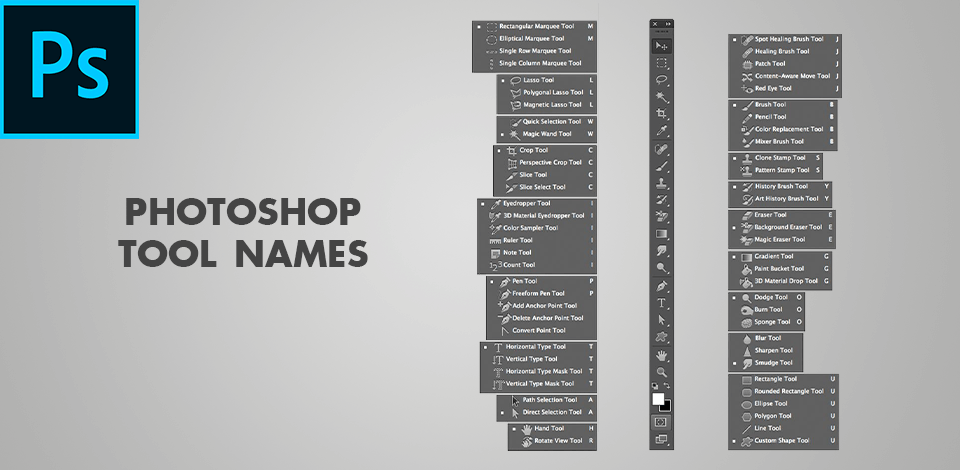
If you’re just starting editing photos in Photoshop, you can find it very difficult to grasp such a huge number of functions at once. As a professional FixThePhoto retoucher for whom Photoshop is like the Holy Bible, I decided to prepare for you a short, but clear and understandable guide to main Photoshop tool names with a description of what they do and where they are located. To make it easy to read, I classified everything into categories to which the tools belong.
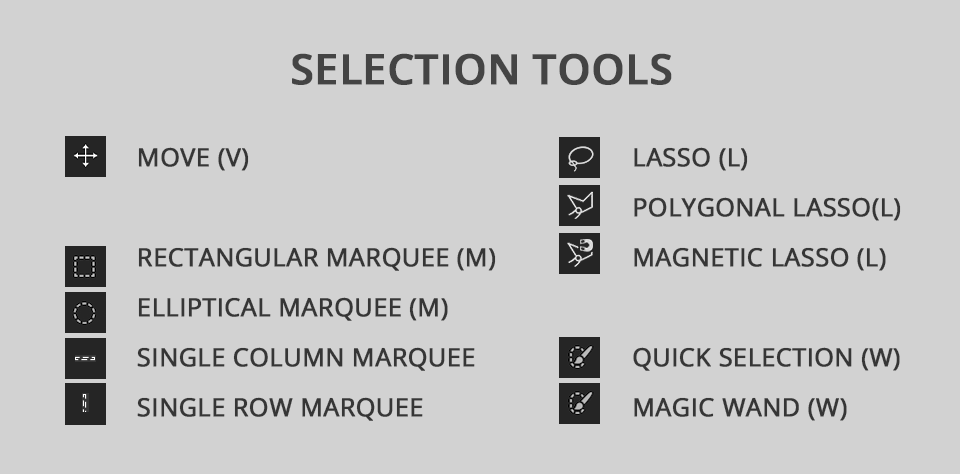
As the name implies, the Selection tools in Photoshop select the necessary part of the active layer for further post production, separately from the non-selected part. Each of these tools has its own specific functions.
Move Tool is designed for moving layers, selections, and guides in your project.
Rectangular Marquee Tool is used for outlining rectangular selections.
Elliptical Marquee Tool is used for outlining elliptical selections.
Single Row Marquee Tool is used to select one row of pixels on the canvas from left to right.
Single Column Marquee Tool is used to select one column of pixels on the canvas from top to bottom.
Lasso Tool is used for free outlining around an object.
Polygonal Lasso Tool is used for polygonal outlining of an object with straight edges.
Magnetic Lasso Tool selects an object in such a way that its outline is bound to the object’s edges while moving the cursor.
Quick Selection Tool offers to select and deselect in Photoshop an object quickly and hassle-free using just one brush.
Magic Wand Tool in Photoshop finds the parts of the image with the same color as the one you have chosen and selects them.
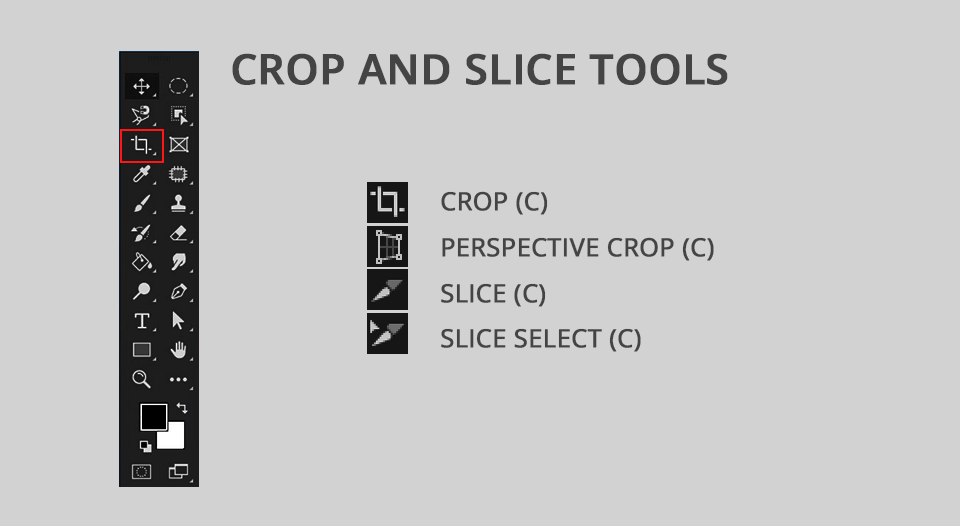
Photoshop toolbar also offers you Crop and Slice category tools that you can use for separating parts of your project for further extracting and using.
As the name suggests, the Crop Tool will help you crop an image in Photoshop, as well as delete unnecessary parts of it. It also offers non-destructive document cropping. All you need for this is to uncheck the Delete Cropped Pixels box, which can be found in the Options Bar.
Perspective Crop Tool is ideal for cropping your canvas and fixing distortion & perspective troubles.
With the Slice Tool, dividing a document or even a layout into pieces of different sizes is a no-brainer task. The resulting parts may come in handy so that you can export or enhance them individually.
Slice Select Tool is linked to the previous tool, highlighting the parts divided by it.
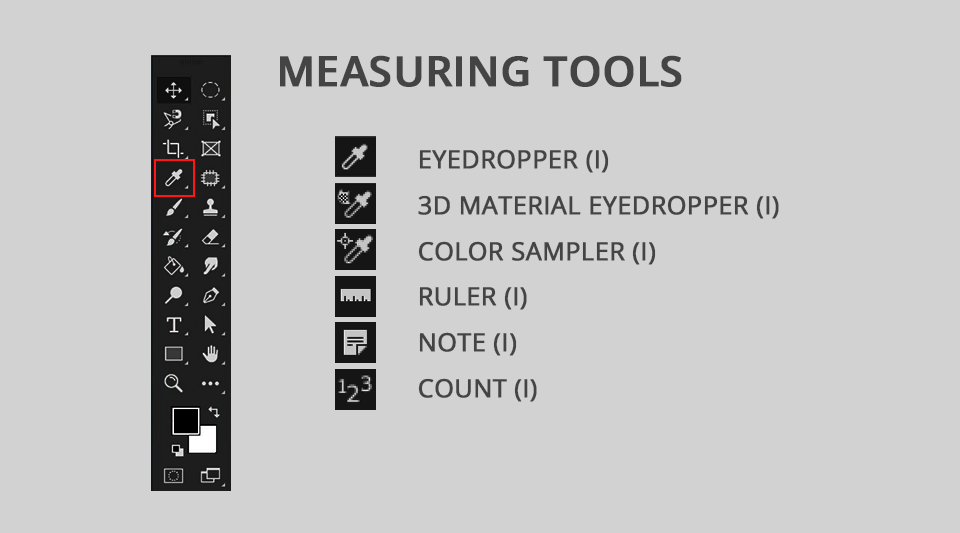
Measuring Photoshop tools make it possible to select a color from the layers of an image and save a certain number of color values for further use. Measuring objects, straightening an image, and adding notes are all available to you with this section of tools.
Eyedropper Tool offers a color sampling from your project. To improve the displaying of the color of the sampled part, try to increase Sample Size a bit, which can be found in the Options Bar.
3D Material Eyedropper Tool offers sampling material from a 3D model.
Color Sampler Tool represents the values of the colors of the picked part of the project. Users can sample max 4 parts at once. If you want to study color data, refer to the Info panel.
Ruler Tool is used for measuring distance, location, and angle. It does a great job of arranging projects and objects exactly where you need them.
Note Tool is perfect for attaching texting notes to your project. Suh notes can come in handy for you or your colleagues. Ps saves them as part of the PSD doc.
Count Tool provides you with manual counting of the picture’s objects. Otherwise, the program offers auto-counting of the selected image’s parts.
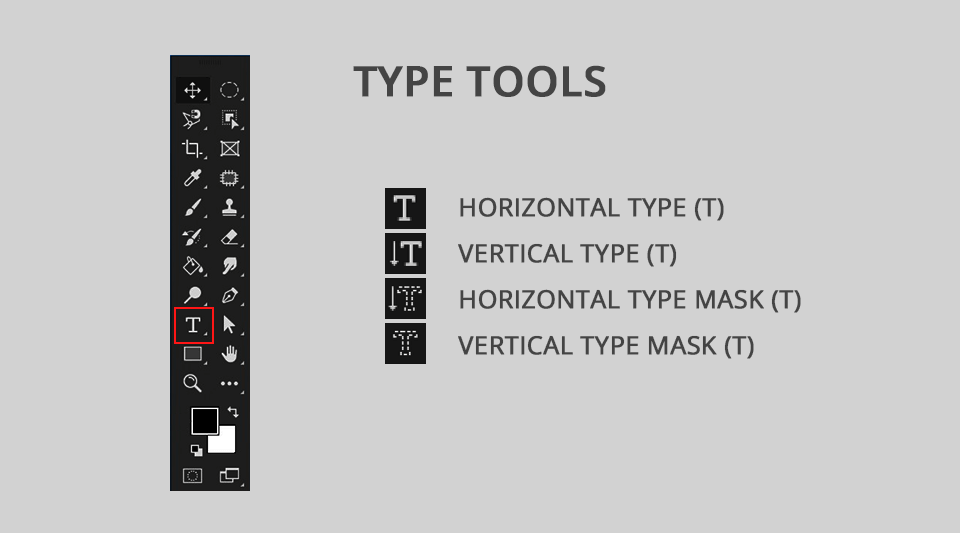
Next, I want to describe different tools of Adobe Photoshop in the Type category. They are perfect for adding texts and adjusting corresponding parameters – font and size to name a few. In combination with our Photoshop text effects tutorials, you can achieve really unusual results in designing ads and titles.
Horizontal Type Tool performs horizontal type adding to the project.
Vertical Type Tool also adds types to your project but does it from top to bottom, i.e. vertically.
Vertical Type Mask Tool outlines the type shape vertically instead of just adding the text that can be edited.
Horizontal Type Mask Tool performs the same as the abovementioned tool, but horizontally.
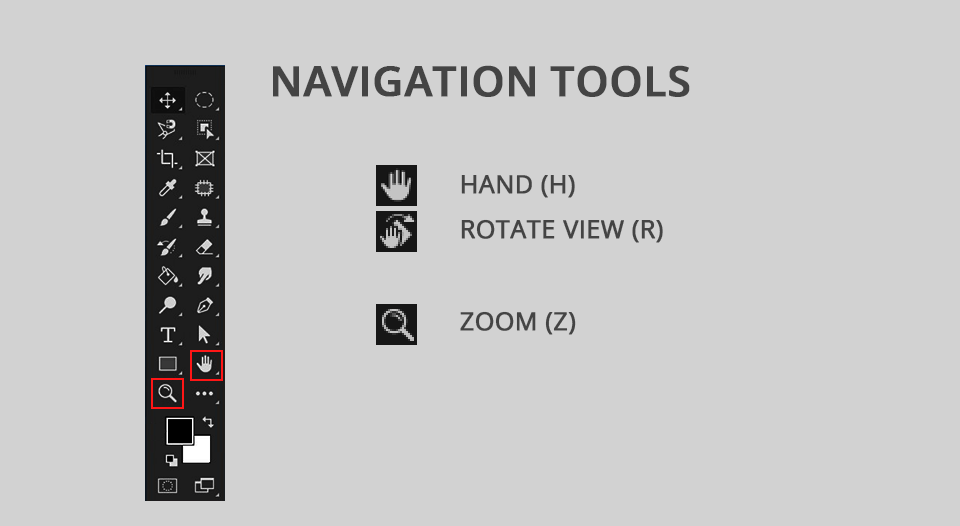
Among the Photoshop tool names, you can also find the ones from the Navigation category. As their names suggest, they can help you navigate across the working space, quickly zoom in on a picture to get a closer look at the result, flip the workspace, and move the photo.
Hand Tool provides you with clicking and dragging your project around on the screen. Thus, you can view any part of it zoomed in.
Rotate View Tool allows rotating the project with further editing and viewing it from any angle.
Zoom Tool was designed to zoom in Photoshop for any part of an image. For zooming out, just press and hold Alt/Opt button while clicking the Zoom tool.
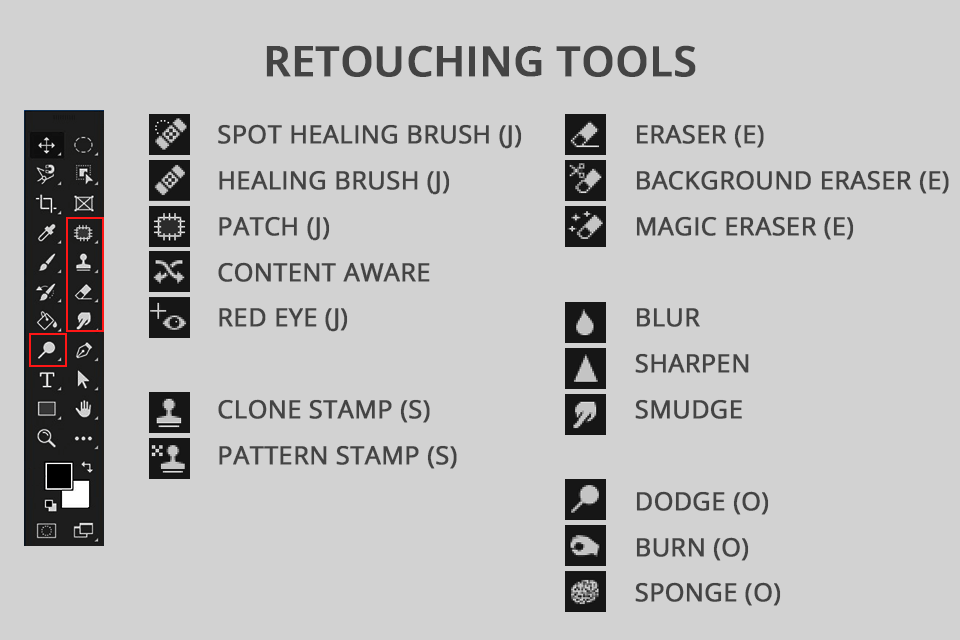
These tools will come in handy to smooth skin in Photoshop and to do various techniques, e.g. frequency separation.
Spot Healing Brush Tool is used to remove imperfections and defective parts of your picture.
Healing Brush Tool allows fixing larger defects by overpainting them.
Patch Tool is designed to freehand outlining the part of an image that contains imperfections that you want to remove.
Content-Aware Move Tool is great for selecting and moving the picture area to another part. Then the space left by the initial spot is auto-filled with elements located nearby.
Red Eye Tool is provided by Photoshop toolbar specifically for removing widespread red-eye problems caused by the camera flash.
Clone Stamp Tool is aimed to remove objects in Photoshop. It samples pixels from one zone of the project to paint another zone with pixels.
Pattern Stamp Tool is provided for painting any pattern over the picture.
Eraser Tool is perfect to erase pixels in a layer. It also draws in a prior state of history.
Background Eraser Tool helps to erase canvas parts with the same color by overpainting them.
Magic Eraser Tool is used to find and select canvas parts with the same color just by single-clicking to further delete them.
Blur Tool allows painting over zones with their further blurring and softening.
Sharpen Tool offers the same as the abovementioned tool, but with sharpening instead of blurring.
Smudge Tool is a real find for creating a finger-painting effect, as it allows smudging and smearing of the image parts you painted over.
Dodge Tool allows lightening the zones you overpainted before.
Burn Tool offers the same as the previous one, but with a darker instead of a lighter effect.
Sponge Tool refers to saturation, suggesting its increase or decrease.
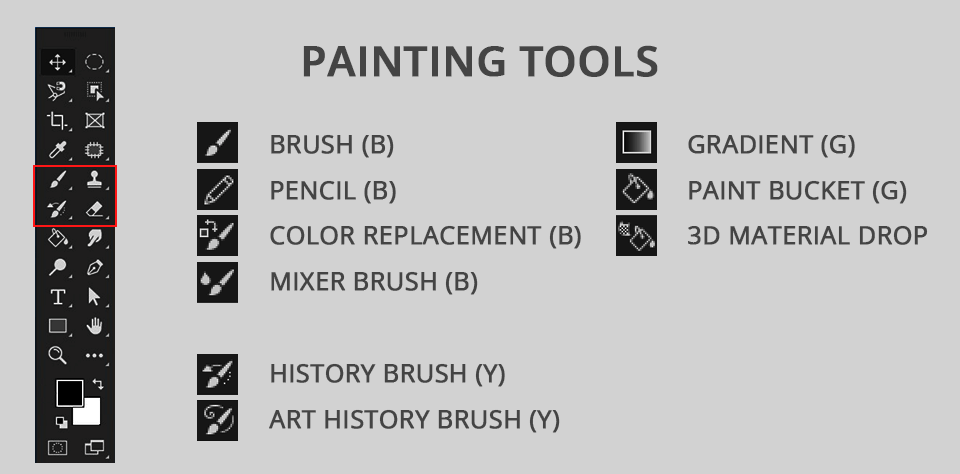
Painting tools in Photoshop are designed to modify a picture with strokes and coloring as if you are drawing on a real canvas. This software offers plenty of features to paint and edit colors in your project.
Brush Tool is one of the fundamental drawing tools. Refer to it when painting brush strokes. You can do it on both a layer and a layer mask.
Pencil Tool is another basic drawing tool used for painting with hard edges.
Color Replacement Tool is designed for replacing the object color with another color with less effort.
Mixer Brush Tool is perfect for simulating real painting. It can create a color mixing effect, wet paint effect, and so on.
History Brush Tool is designed to paint a snapshot of one of the previous stages of history on the current version of your project.
Art History Brush Tool performs the same actions as the abovementioned tool but with stylized brush strokes.
Gradient Tool offers to make a gradient in Photoshop – just draw a smooth transition between different colors.
Paint Bucket Tool allows filling an image part of the same color with the Foreground color or a pattern. You can specify what similar colors and hues will be processed in the zone you choose in the Tolerance parameter.
3D Material Drop Tool is great for sampling material from one part of an image for its further dropping into another part of the model, mesh, or 3D layer.
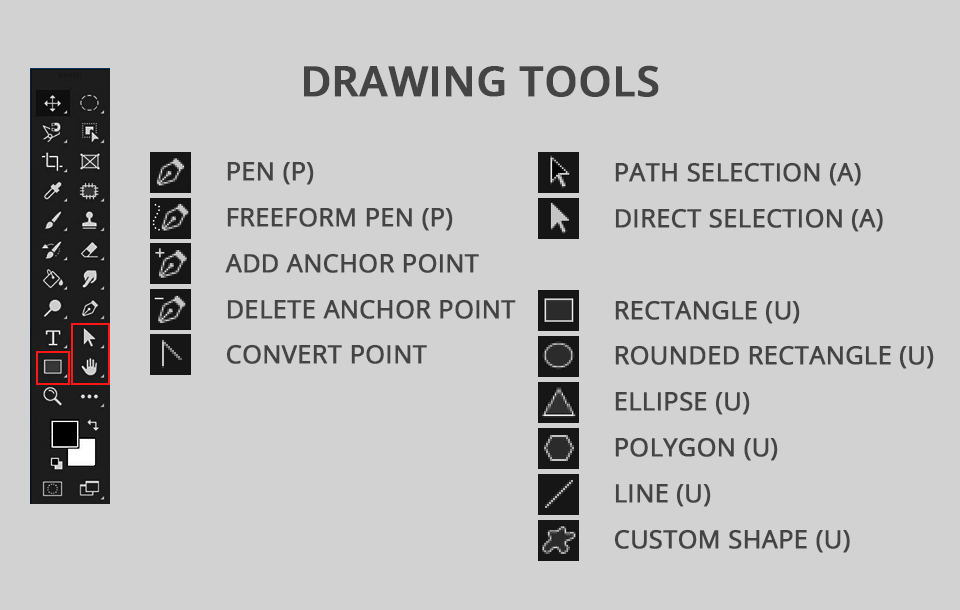
Finally, we come to the Drawing Photoshop tools and uses designed for creating and altering vector objects. These tools work well with vector-based paths that often transform into selections.
Pen Tool is a real find for drawing the clearest vector paths, shapes, and selections.
Freeform Pen Tool is used for freehand drawing of vector-based paths and shapes.
Add Anchor Point Tool adds extra reference points on the path.
Delete Anchor Point Tool deletes current reference points on the path.
Convert Point Tool performs conversion of the smooth reference points to the corner reference points and vice versa.
Path Selection Tool selects and moves the whole path at once.
Direct Selection Tool selects and moves a separate part of the path, reference point, or direction guide.
Rectangle Tool is great for drawing vector-based rectangular shapes, paths, or pixel shapes. You can make its corners pointed and rounded.
Ellipse Tool helps to draw vector-based elliptical shapes, paths, or pixel shapes.
Triangle Tool offers the same as the previous tool but with a triangle shape.
Polygon Tool helps to draw a polygonal shape. Make as many sides as you need.
Line Tool lets you draw a perfectly straight line and even arrow.
Custom Shape Tool allows selecting and drawing a custom shape.
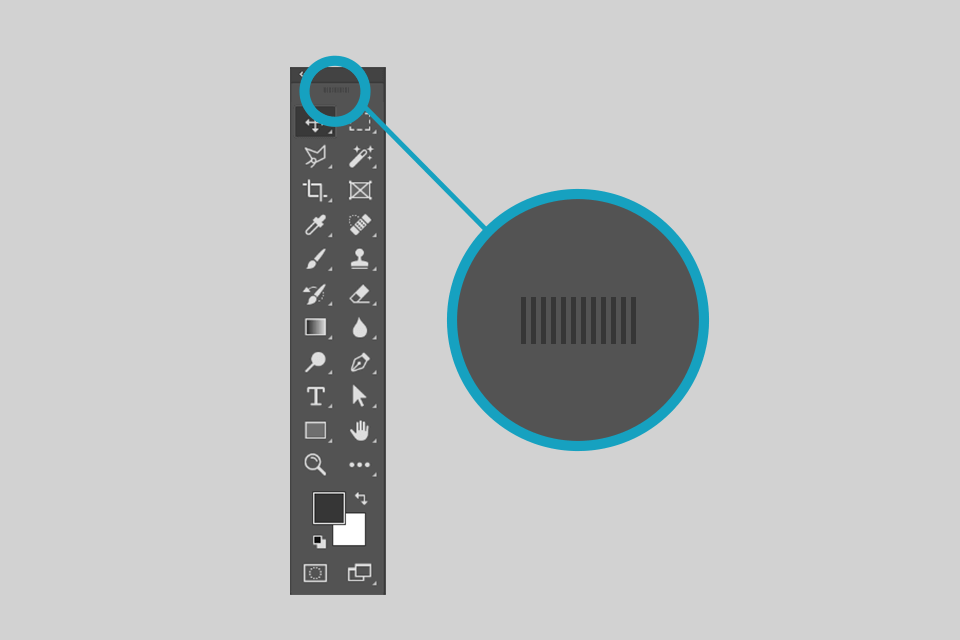
To customize the placement of the Photoshop toolbar, first, find the vertical line icon at the top of the toolbar, and then drag it where you want it. This will unbind the panel from its default location.
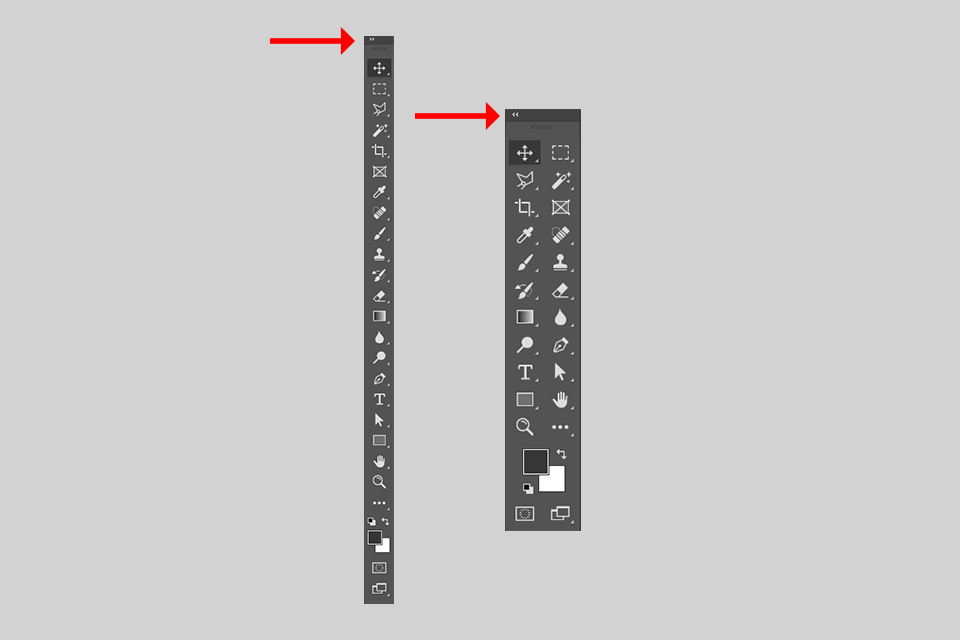
If it’s more convenient for you to have all the tools in two columns, and not just one, then first find the icon depicting two triangles at the top of the panel, and then click on it. To return everything as it was, click on the icon again.
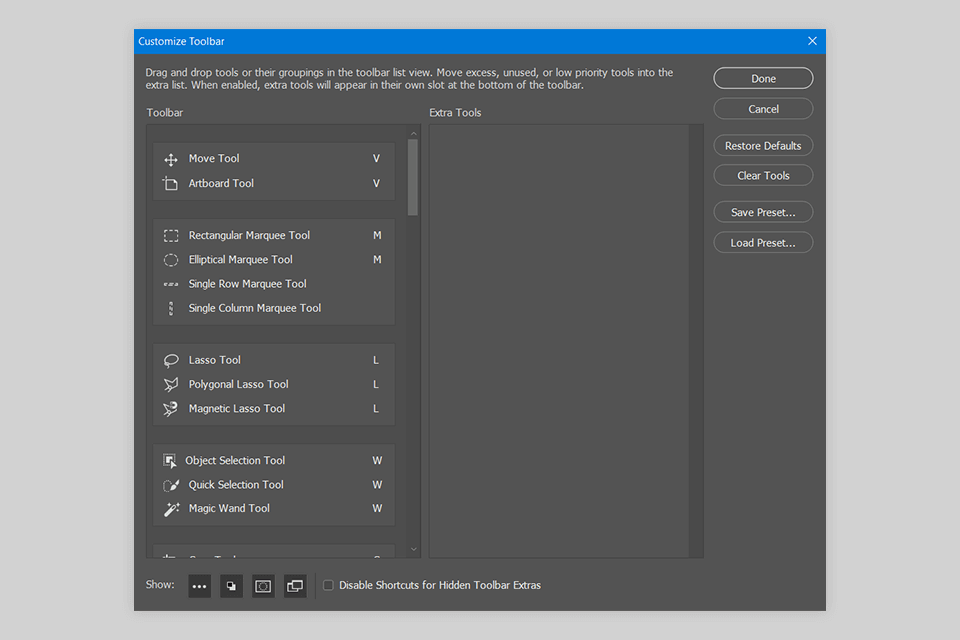
If some tools have disappeared from the toolbar or you want to add those that you often use, then at the bottom of the panel you need to find the icon depicting 3 little dots and click.
When you click, a drop-down menu will appear in front of you, in which you can find the disappeared tools. If you are using a toolbar with standard settings, then you need to find the Edit Toolbar button, click on it, and find further Customize Toolbar. In the window that opens, simply select the tools you need on the panel.
If the panel contains those tools that you hardly use by default, you can move them to Extra Tools so that they do not interfere with you. To do this, click on such a tool, moving it to the Extra Tools column. You can also do the reverse action – drag any tool from Extra Tools to the Toolbar. After all the settings, click on Save Preset, and if you want to return everything as it was by default, just click on Restore Defaults.

After learning the tools in the Photoshop toolbar, you will need to spend a lot more time learning how to edit like a pro. Save your time and effort by learning how to install Photoshop actions. The effects in this bundle were created by FixThePhoto professionals to help you achieve eye-catching results in seconds. What’s more, it’s completely free.