If you are tired of scrolling through hundreds of pictures in search of what you need, you’d better organize photos on your iPhone. It automatically organizes shots by date, location and people, but you can get better organization. Often, after you snap a picture, you edit it, post it on social networks, and then just forget about the original and the edited copy. The number of such pictures may be endless.
While you will find numerous applications to organize iPhone photos, there is a free and optimized way for simpler organization in the iPhone Photos app, offered by default. Now the app boasts integrated smart search, scene, object and facial recognition, sorting and filtering in addition to synchronizing with your iCloud storage – what else can you ask for?
Once you start using iPhone albums, you will be able to find your shots in seconds. Your phone automatically creates a number of different albums, such as Recent, Favorites, albums with content from different applications like WhatsApp and other social media. But you may still organize photos on iPhone into iOS photo albums that you created yourself.
Quickly move pics to certain album folders in order to separate funny memes from professional shots taken on iPhone or a digital camera. If you wish to sort shots by theme or your own rules, here is how to save them in the album on the iPhone.
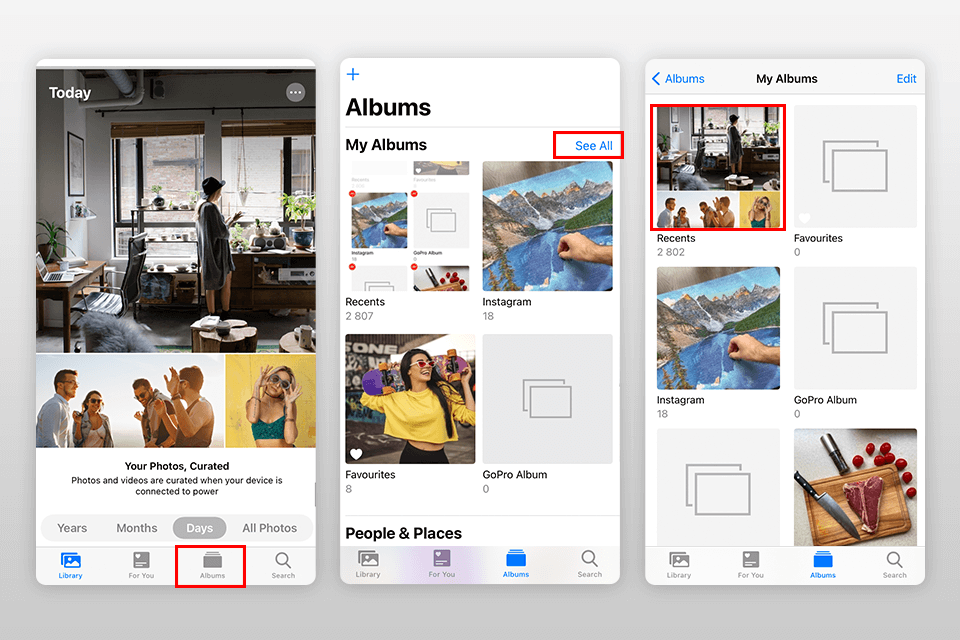
To locate the iPhone photo albums, open the Photos app, then tap Albums at the bottom of the screen. To view all the owned albums, tap See All in the top right corner of the screen. The first album you’ll see is Recents. The iPhone’s previous generations saved all Camera Roll shots as part of your albums. But in iOS 13, Camera Roll was replaced.
Now every shot is stored in the Recents album. You may even spot shots you didn’t take: pictures sent via text message and email or pics imported from the browser or third-party applications.
Despite the title, the album includes ALL your pictures, GIFs, downloaded files and videos. It is indeed nice that everything is stored in one place. On the other hand, once you open this album, it may seem overwhelming, requiring you to know how to organize photos. It is just a stream of images with missing organizational elements. The only thing that Recents lets you do is to select the pics you wish to add to other albums. By the way, we will do it later.

When navigating to Albums, you usually don’t have a single screen to display all the albums created by the system. It is smart enough to perform primary sorting by Media Types; people with their name and face recognized if you have previously entered their name; locations with map display when geolocation is enabled.
For instance, pics snapped in Portrait camera mode (with a beautifully blurred background) are saved to the Portrait album. Shots taken in burst mode are saved to the Bursts album. Shared is designed to share pics with tagged people. People & Places albums are perfect for searching for shots of a particular person or place. Many will be fully satisfied with this way of organizing photos on iPhone, but we should go further.
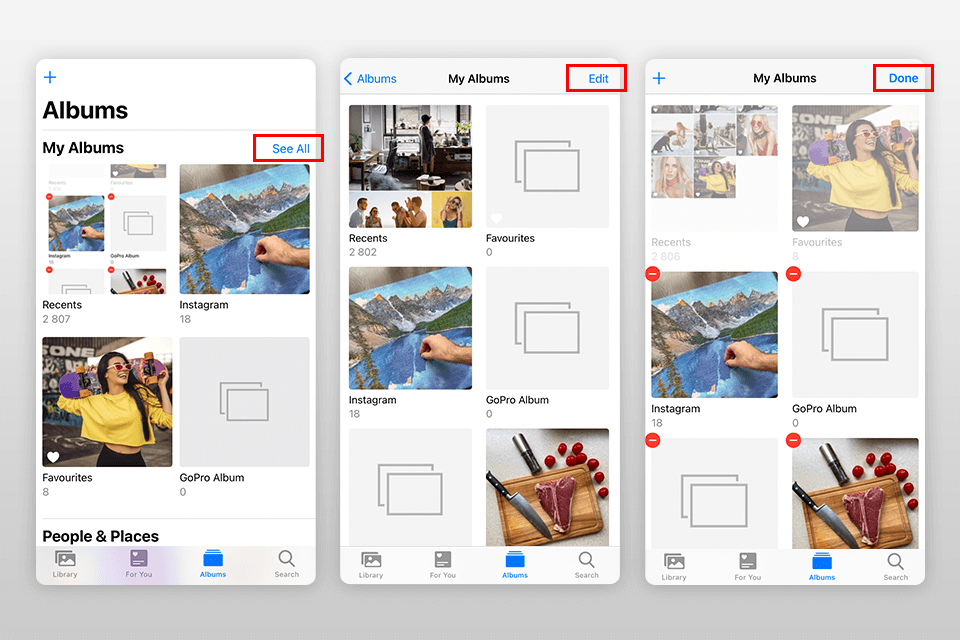
In the Albums tab, you may see some older albums that you no longer need, or even a few albums created by other applications (such as Whatsapp or Snapchat). Unless you can’t do without these albums, get rid of them so they don’t make it hard to find the relevant albums.
Navigate to all albums on the device as in step 1, then tap Edit. Mark unwanted albums using a red button with a minus next to them. When finished, hit Done.
Viewing the entire Recents album can serve as some preliminary preparation, for instance, if you delete bad shots, duplicates, irrelevant screenshots, and highlight the pics that you especially like. Then create a small separate album called Favorites, and mark all the shots that you plan to place into custom albums.
If you decide to use a duplicate photo finder for iOS like Gemini Photos, you will effortlessly eliminate junk (similar, bad and blurred pictures, notes and screenshots) before viewing all pictures. Simply run the app and follow its hints, but mind to set your priorities straight.
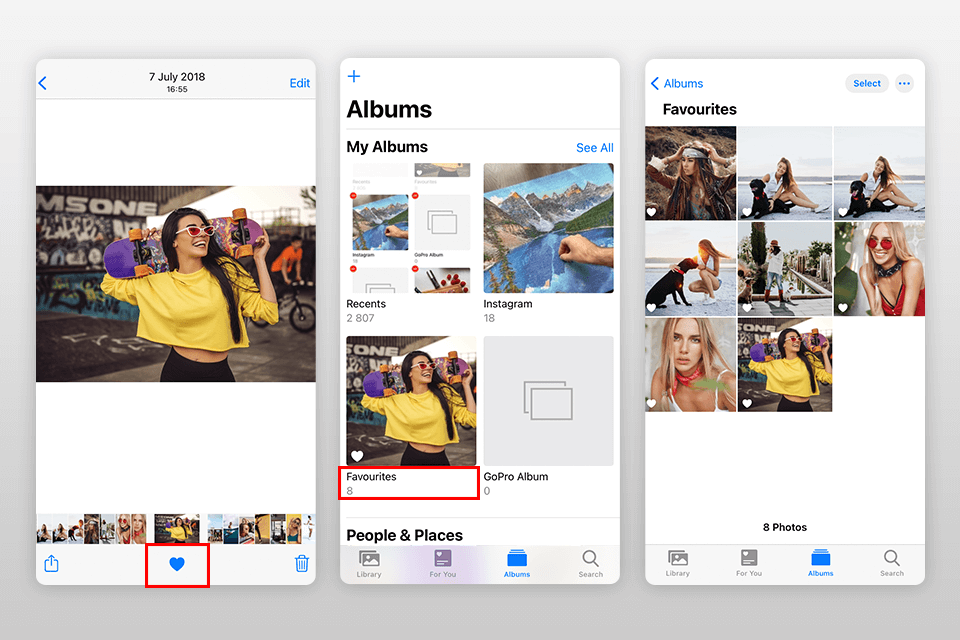
When you open a picture in Photos, a heart appears below it. By tapping on the heart, you save the pic in the Favorites album. If you tap on the heart again and it becomes white instead of red, the picture will be removed from this album.
If it didn’t take much time to view all pics, it will be just as simple to create several albums of the selected themes. There you will distribute pics remained after you’ve added pictures to Favorites. By the way, one shot may be placed into different albums, including Favorites. If you are tired of browsing through pics in order to find the best frames for the Favorites album, proceed to step 7.
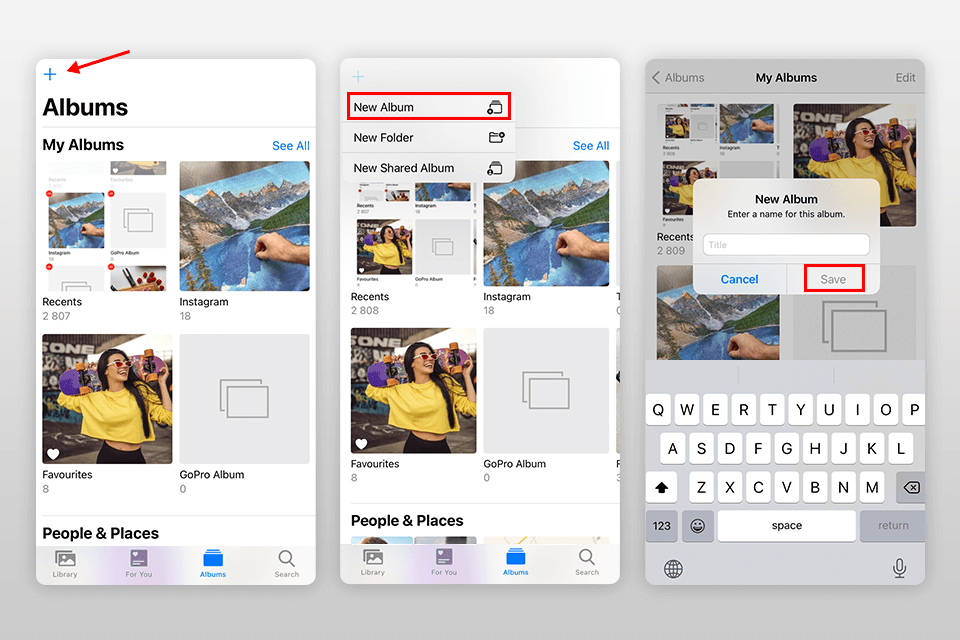
In Photos, you will see the “+” button on the top left, tap it. The app will ask you if you wish to create New Album or something else. Select new, enter the album’s name and hit Save. That’s it – the album is successfully created and is accessible through the Albums tab.
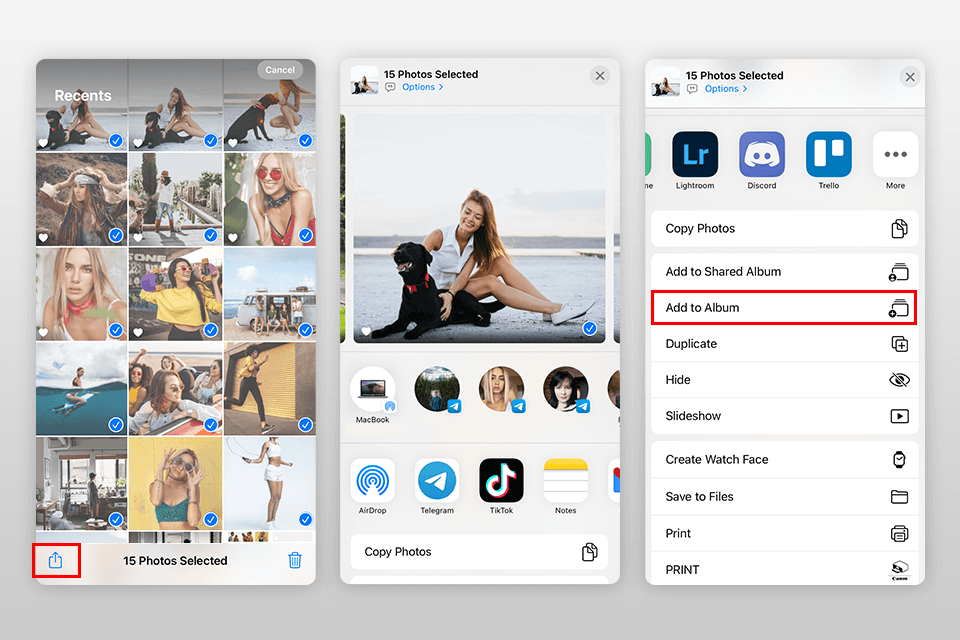
Add as many shots as you wish – there are no restrictions. Later on, it won’t be a problem to add pictures to the album without even entering it. Select the pics to be added to your existing album, tap the Share icon below on the left. Then hit Add to Album from the list of actions where the available albums will be offered.
Once the album is created, adding pictures is incredibly easy: both inside and outside the album. If you didn’t add the material right when you created the album, don’t worry. In the Albums tab, select the album to be filled in and click Edit at the top right. Now you will see the Add to option below, tap it. Now mark any picture from your collection on the iOS device and add it to the open album.
If you are disappointed with a huge number of shots, using the search function is a nice starting point to create albums and organize pictures on iPhone. The Photos app simplifies the task of creating an album based on location or theme. Use Search to add certain pictures to the corresponding albums or to albums created on the fly.
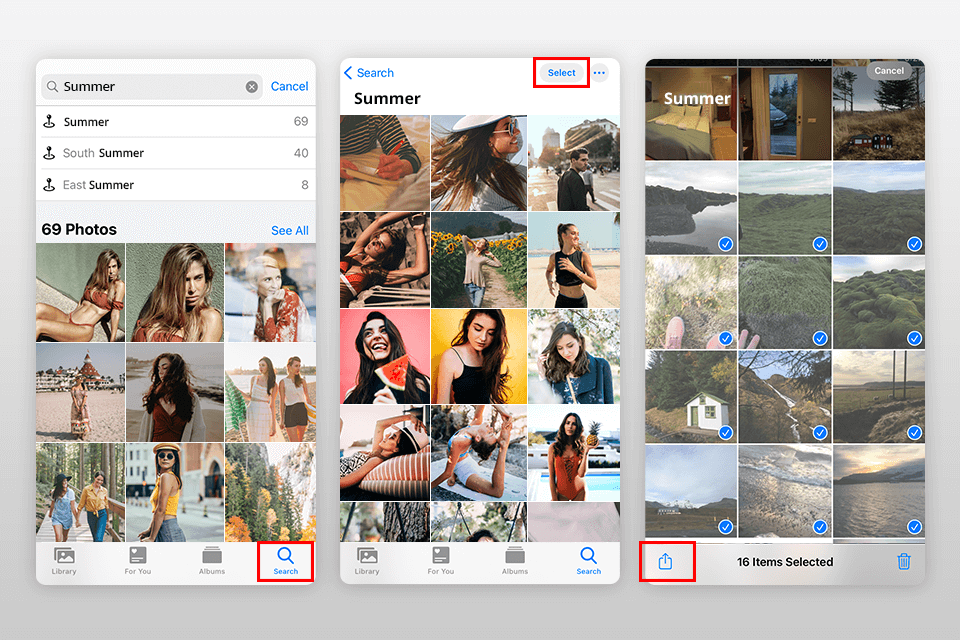
In the Photos app, tap the Search button in the lower right corner. Feel free to enter diverse options, including a theme, date, location or a combination of options. As a result, the app will find the appropriate pictures. Once the app is done searching, click See All or proceed straight to Select. Tick several pics or select all pics simultaneously by holding and dragging.
When done selecting, tap the Share icon in the lower-left corner of the screen and then Add to Album. Now pick any of the existing albums or tap New Album at the top of the screen, name it accordingly and hit Save.
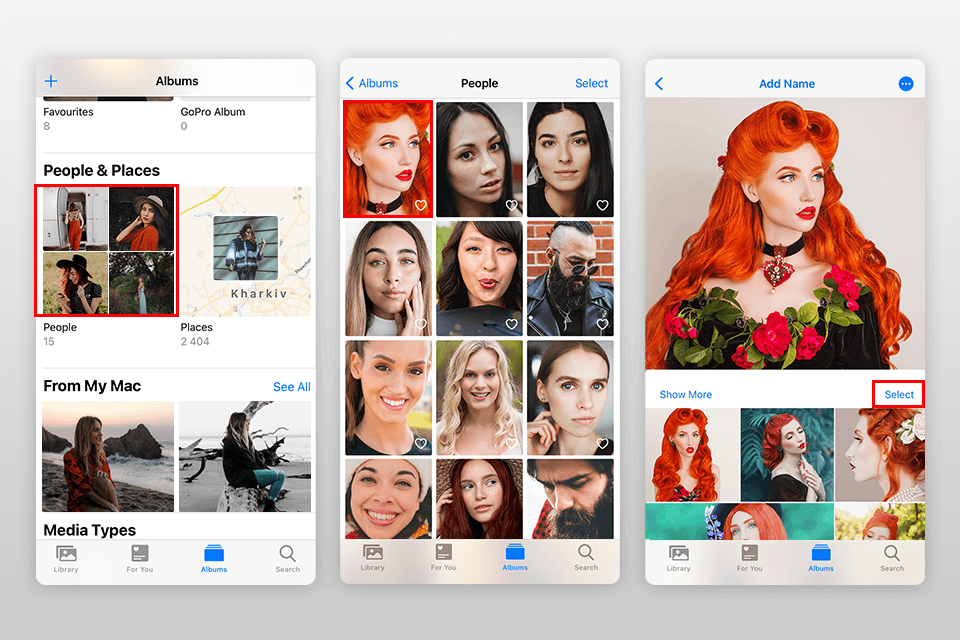
One of the Photos app’s most incredible smart capabilities is facial recognition, which attempts to identify all the people in the shots. If you wish to create an album based on a specific person, open the Albums tab, scroll down to the People & Places section and tap People.
Then select the thumbnail of the person, tap Select. Now select all the pics with that person that you wish to add to the album – the process is the same as described in step 7. When done selecting, tap the Share icon below on the left and then Add to Album. Now create New Album, name it in accordance with the chosen person and hit Save.
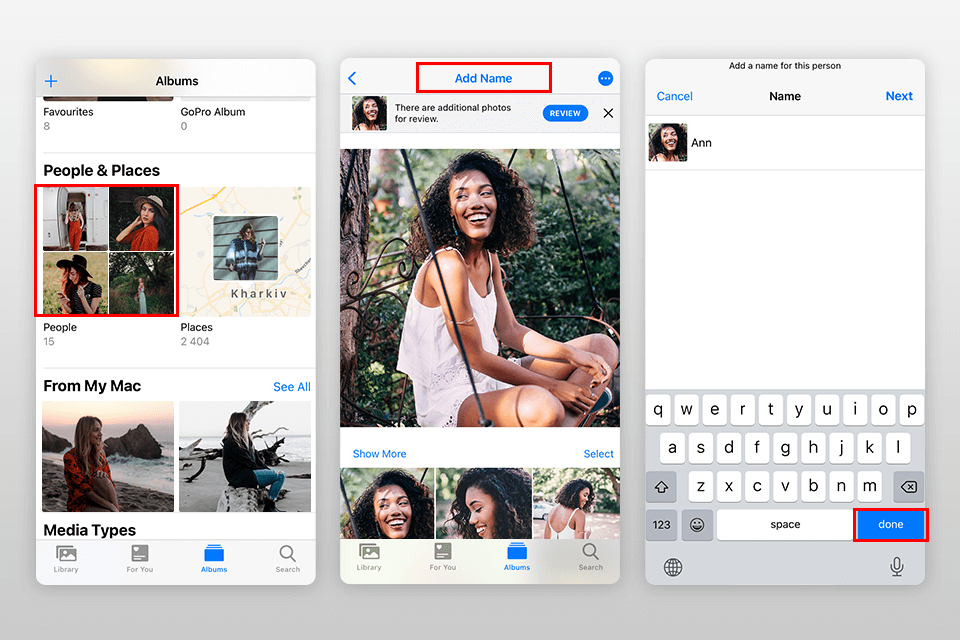
If you only wish to tag the person that Photos has detected in your shots for simplified search, open the Albums tab, scroll down to the People & Places section and tap People. Then select the person to be tagged.
At the top of the screen, hit Add Name, enter the person’s name and tap Next. The app will show you other shots of this person. Select the appropriate shots and hit Done. The more shots are viewed and tagged with this person, the more efficient the Photos app will be when tagging them in the future.
Unfortunately, the Favorites album can’t be erased. This is one of the standard albums that the Photos app automatically creates and, like the Recents and Favorites albums, it is impossible to move, rename or remove them.
No. In fact, the picture is saved only once on the iPhone. When you add a picture to one more album, it isn’t duplicated. But it can be viewed in several albums. The album is just a cover for the pics organized by the system or the user’s actions.
No. When you erase the album, only the album as a cover is erased, but not the pictures inside it that remain in Recents. If you force delete all pics from the album, they will be stored on the device for a 30-day period and can be restored during that time.
Apart from the above-mentioned Gemini Photos and the pre-installed Photos, you should try its equivalent, Google Photos, for backup, Motif for creating individual photo projects, the online store Shutterfly for unlimited storage and systematization.


