Working as a retoucher at FixThePhoto, I would occasionally notice that my images looked too harsh or flat. I quickly discovered that these issues were caused by the same problem, and my photos required gamma correction. This is why I decided to explore the importance of gamma correction in image processing in this guide.
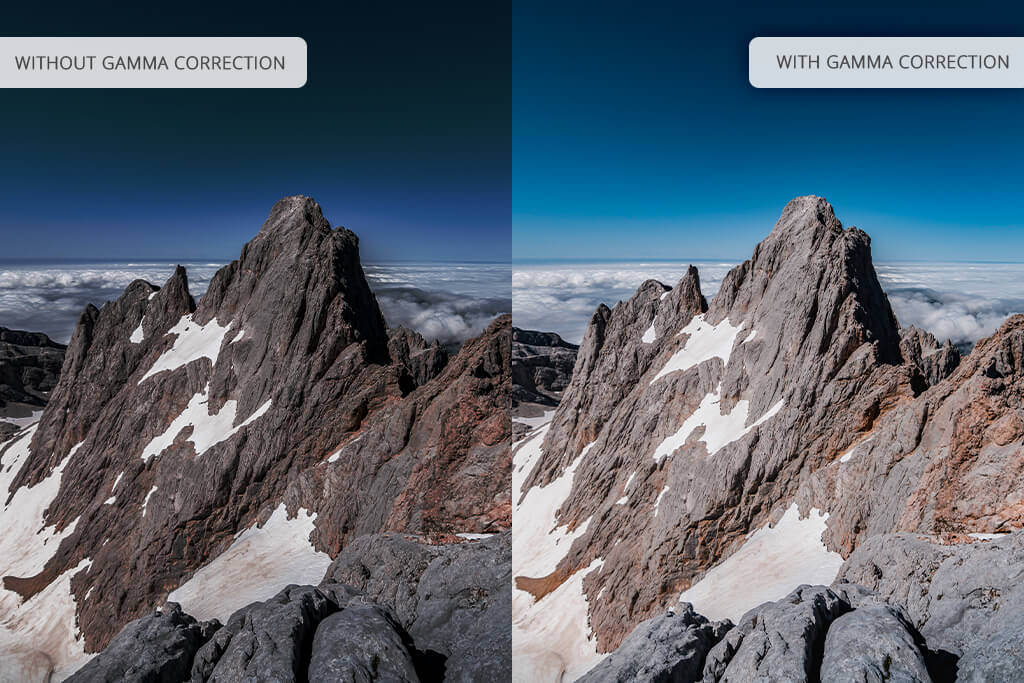
Gamma correction impacts how we perceive brightness and contrast. It can help you make your photos look more natural and eye-pleasing. Different screens have different gamma values. Retouchers and photographers should learn how gamma works to avoid issues with excessive shadows, highlights, or unrealistic hues.
What makes it different from adjusting contrast and exposure is that gamma correction impacts midtones in a subtle way without making highlights and shadows too noticeable.
Whether you need to enhance RAW files, prepare images for web use or printing, or want your photos to look more natural, learning how to perform gamma correction is necessary. Here are the main reasons I do it:
Gamma as a correction won’t fix major issues with your image. It’s better to use it at the beginning or at the end of your retouching process, especially if you want to subtly transform the mood of your image. A barely noticeable gamma shift will help you add a warmer and softer feel to your images without performing complex color grading.
“When I need to retouch scanned pictures, gamma allows me to make them less bleak. It’s impossible to achieve the same effect using a contrast slider.”

Based on my experience, gamma issues can significantly affect the overall look of an image even if the exposure looks perfect.
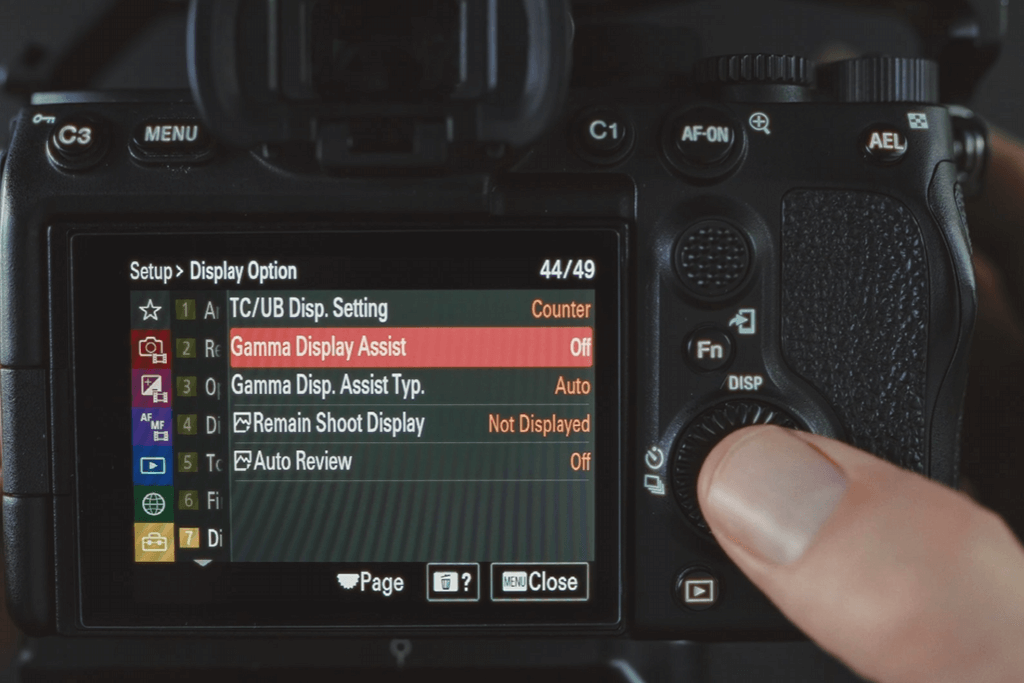
Now that you know what is gamma correction in image processing, it’s time to learn how to use it. If you want to enable gamma on your camera, open the settings and find the gamma correction or gamma display assist feature in the menu. Each camera has a different menu, but most models list gamma-related settings under the picture profile or display settings.
Here is how I change these settings when using my Sony camera:
Step 1. I open the Display Options menu.
Step 2. I turn Gamma Display Assist ON. It allows me to see an accurate preview on the screen even if I record footage in a flat profile.
Step 3. Then, I find and select the S-Log3 setting under Gamma Display Assist Type. I prefer to use that profile, as it allows me to achieve an improved dynamic range and smoother hues, which facilitates post-processing.
When I adjust these settings, my file remains unaffected, but I get a more realistic preview when capturing photos. It allows me to evaluate exposure and composition, especially when the footage appears bleak and flat in S-Log.
I prefer to use these settings whenever I am going to perform gamma correction during the editing stage. It allows me to save time and achieve better results when editing my photos afterward.
“When I enabled gamma-related settings, I was able to take photos with high confidence in difficult lighting conditions, knowing that it would be easier to edit them afterward.”

If you are interested in the importance of gamma correction in image processing, use professional software to compare the before and after results. Photoshop has dedicated tools for performing gamma correction. This program allows me to achieve the desired effect without causing highlights and shadows to look unnatural.

Step 1. Open your file in Photoshop. Open the photo you want to enhance. It should be in a standard RGB color mode (Image > Mode > RGB Color).
Step 2. Create a Levels Adjustment Layer. Open the Layers panel and click the New Adjustment Layer icon (circle half-filled) at the bottom. Click on the Levels option. It will allow you to create a new Levels adjustment layer above your picture. This way, you will be able to make edits without worrying that your original image will be affected.
Step 3. Find the Gamma (Midtone) slider. Go to the Properties panel of the Levels layer. There are three sliders under the histogram: black (shadows) on the left, white (highlights) on the right, gray (midtones) in the middle.
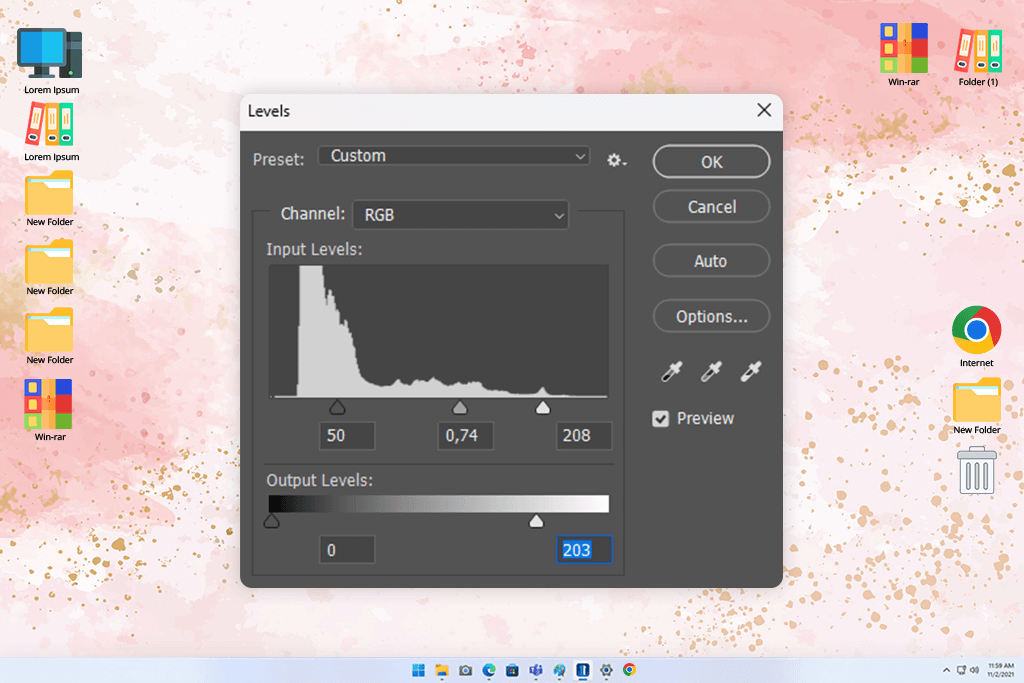
Step 4. Drag the Gamma slider carefully. Drag the gray slider left to lighten the midtones (increase gamma). Drag it right to darken the midtones (decrease gamma). Make subtle adjustments – usually, small shifts (e.g., from 1.0 to about 0.9 or 1.1) make a big difference. Adjust until the image feels balanced and natural.
Step 5. Enhance the image using other tools if needed. After performing gamma correction, be sure to adjust exposure, contrast, and perform color grading. When I edit portrait photos, I subtly adjust gamma and then work on contrast to improve the overall effect. It allows me to create a more natural-looking image.
Step 6. Save your work. When you are fully satisfied with the result, save your image. It’s better to save it in a PSD format to save the adjustment layer. Then, export the image.
We tested a variety of tools. You can perform gamma correction in Lightroom, Inkscape, Blender, and some free photo editing apps with the help of curve or tone adjustment tools like Photo Curves, Photo Tone Curves, etc.
If you take a look at your photos, you may notice unnatural highlights and shadows or midtones that have an artificial feel about them. In such cases, gamma correction is a must. It will allow you to fix issues with inaccurate colors or retouched skin that looks patchy.
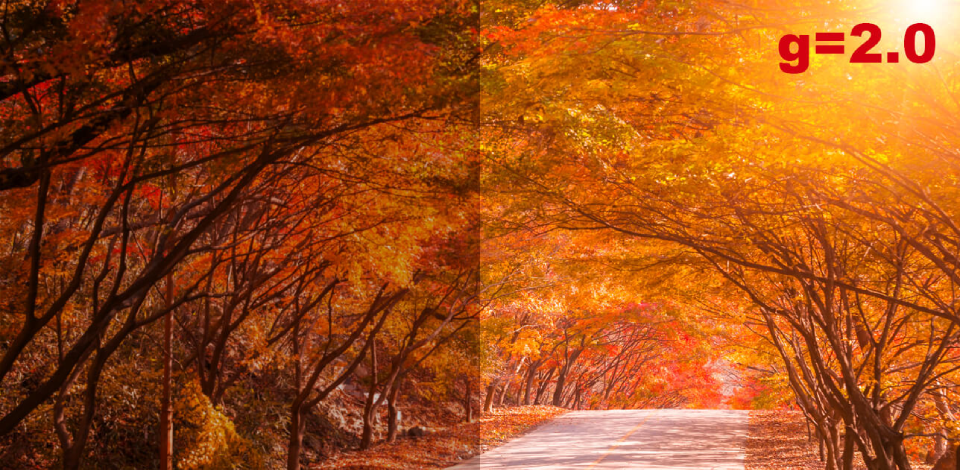
While brightness and contrast adjustments are linear, gamma is nonlinear. Gamma impacts the speed at which hues become lighter. Using it, you can enhance midtones without affecting shadows or highlights.
Yes, if you want to fully transform the atmosphere in your image and achieve a dramatic effect, lower the gamma. You may also increase it to achieve a soft, airy effect. You can use such adjustments to subtly change your photos and videos.
No. Screens utilize gamma (like 2.2 for sRGB), but printers use only color profiles like ICC. As a result, their interpretations of tonal ranges are different. Due to this, soft proofing is necessary before printing.
Yes, each device has specific gamma curves and screen calibrations. This is why it’s essential to perform gamma correction if you want to achieve high color accuracy.
The typical gamma value for sRGB is around 2.2. It’s an average value that is suitable for most displays and online sharing.
Not quite. While you can tweak or recover hues this way, it won’t replace exposure adjustment. It will allow you to polish your image, but won’t fix the underlying issue.


![Ripped Paper Effect in Photoshop [+FREE Bonus Tools]](/placeholder-450x300.svg)


