I run a beginner photography course at FixThePhoto and ask my students about the factors that can influence the way people look in images. Most of them said that camera, lighting, and angles play the main role. Frankly speaking, I was surprised that very few students mentioned focal length for portraits.
In fact, the focal length has a direct impact on the quality of photos and how models look. Unfortunately, many novice photographers underestimate its significance. With many years of experience in photography, I know that it is the focal length that affects perspective, background compression, distortion, and the general aesthetics of the picture.
For instance, if you choose a 24mm lens for close-up portraits, you will get images with exaggerated facial features that can look strange or comical. If you switch to a telephoto lens, e.g., 135mm, facial proportions will be accurate and a subject will pop against the background.
In this article, I provide general details on the best focal length for portrait photography, elaborating on recommended optics for solo, family, full-body, couple, group, and environmental portraits. I’ve also prepared information on how to pick the perfect aperture for different focal lengths and how to create an ideal setup based on your needs.
If you’ve noticed portraits where the person’s face looks strange or the background is screwed up, it is likely the effect of focal length. Many people new to photography think that any lens for portraits is OK, but actually, each focal length gives a unique look.
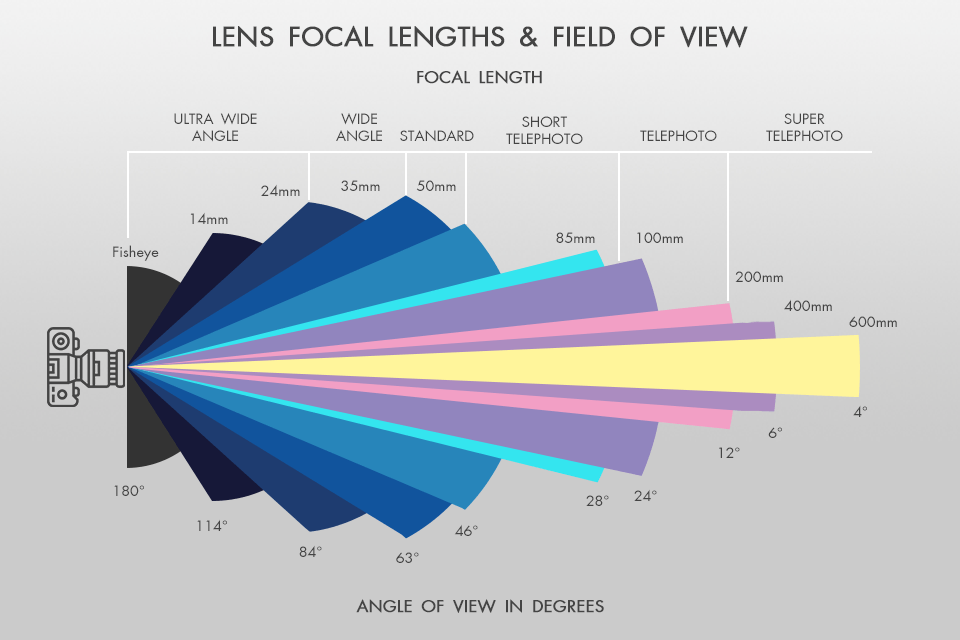
It is paramount to understand the best focal length for portraits in different situations, as this parameter directly affects:
To take professional-quality portraits, you need to grasp the focal lengths comparison. Take your time to choose the right one, as it can make a bigger difference than even good lighting or editing.


Taking images of people is interesting and inspiring. However, to capture the true self of a person, you need to consider technical aspects. One of the most important decisions is the optical gear. Even if you pick the most expensive equipment, you may not get the best lens focal length for portraits. When shopping, you should answer the following questions:
How do you want your portrait to look? Do you want to show the person in their environment, or focus solely on them with a soft background? The answer to that question will help you pick the right focal length.
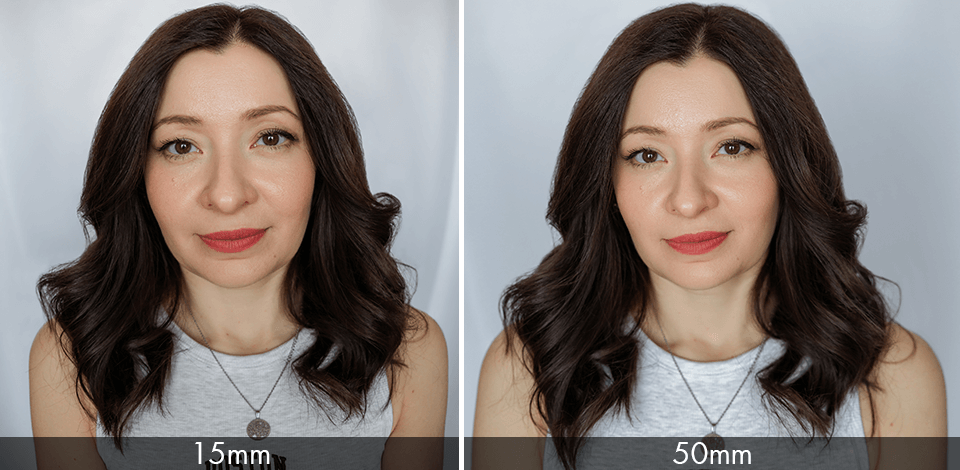
What camera type are you going to use? If you have a camera with a smaller sensor (APS-C), you need to remember the “crop factor” (around 1.5x or 1.6x). This means your lens’s focal length is multiplied. So, a 50mm lens acts like a 75mm or 80mm lens, changing your composition and how close the background appears.
Can you afford to buy a new lens? Most people can’t just buy a new lens for every type of photo. That’s why it’s essential to understand how to get the best portraits using the lenses you already own.
I don’t carry a lot of equipment. I rely on three main zoom lenses - the Sony 16-35mm f/2.8 GM, the Tamron 28-75mm f/2.8, and the Sigma 70-200mm f/2.8 DG OS HSM. They go from 16mm all the way to 200mm. With such a set of lenses, I can easily adapt to different portrait photography conditions.
I use the 28-75mm lens for most of my portraits. It’s on my camera for portraits nearly all the time. I prefer to shoot between 45mm and 55mm because this way I can get a realistic perspective and accurate facial features.
My second go-to lens is the 70-200mm. It’s perfect for taking beauty shots and close-ups, especially when I want that soft, blurry effect. The 16-35mm is the lens I use the least. I only pull it out for behind-the-scenes work or when I want to capture a wide view of the surroundings in my portraits.
To tell you the truth, I can do most of my work with just my favorite lens. The other two give me peace of mind and flexibility when I want to try some creative ideas. Now, I’d like to dwell on which focal lengths are best for various portrait styles.

When you take portraits with a 16mm lens, you get a strong, almost exaggerated effect. Some people say it’s cool, but I know it is easy to overdo it and get a bad result.
I use a 16mm lens very rarely for portraits, because it’s the widest lens I’d ever dare to use. The distortion is so extreme that anything near the lens appears much larger than it actually is. Besides, the background looks stretched and unnatural.
You should be very careful. Otherwise, you’ll get photos where people look like cartoons, with oversized heads and shrunken bodies.
However, if you know what you’re doing, a 16mm lens can become the best camera focal length for portraits that are attention-grabbing and lively. It lets you create memorable compositions, instead of highlighting subtle details. This lens can fit the bill if you want to show things from very different viewpoints, capture a narrative, or experiment with unique shots.

Choose for:
Avoid for:
Similar to a 24mm, this 16mm lens lets you focus on many items, even with wide aperture settings. If you want to make the background blurry, so that your subject stands out, you need an ultra-wide f/1.4 lens. Besides, there should be sufficient space between your subject and the background.
Personally, I think a 24mm lens is one of the widest lenses you should use when practicing portrait photography.
Some photographers claim this is the best focal length for family portraits, as you can get a special, storytelling kind of picture. However, it’s not easy to learn how to use it right. When you use such a wide lens, objects near the camera will always look huge. This can be confusing.
I won’t risk using this lens for close-ups. On the other hand, if you know what you’re doing, the 24mm lens can produce powerful, visually interesting images.
When I want to incorporate more space around my subject into the frame, I grab my 24mm lens. For instance, I can take a wide city scene, a beautiful landscape, or a portrait for business use. However, if I’m only shooting a headshot, I’d never use it.

Choose for:
Avoid for:
When using a 24mm lens, it is really difficult to create a mesmerizing, out-of-focus background. Since it captures a wide area, even when you use f/2.8, the background is usually sharp. If you want a really blurred background, you’ll need an ultra-wide aperture, such as f/1.4. Alternatively, you can move your subject further from the background.

Out of all the wide-angle lenses, a 35mm option is the one I’d recommend most for taking portraits.
Using such a lens, you can get perfect portraits without the overly distorted look that most wider lenses produce. Thus, you can demonstrate both the main subject and the environment around it in a flattering manner.
When I asked my colleagues about the best focal length for environmental portraits, many recommended this one. They say it is possible to do so much with a 35mm lens. For instance, it is possible to capture a person and the surroundings, as well as take casual, everyday photographs and documentary-style shots.
Although 35mm is less likely to distort your image than 24mm, you still need to use it accurately. If you get too close to your subject, their facial features may appear elongated. It usually happens at the picture’s borders.
Choose for:
Avoid for:
You can get some background blur with a 35mm f/1.4 lens, but it won’t be as pronounced as with longer lenses. Therefore, don’t rely on blur solely. Play with the edges of the picture, leading lines, and lighting to make the subject the centerpiece of your photo.
You probably doubt that a 50mm lens is the best focal length for full-body portraits. It is a general misconception. In fact, it is in the middle of two really popular lengths - a 35mm lens that shows you everything around you, and an 85mm lens that makes your subject pop with a blurry background, providing the best of these distances.
It is paramount to learn how to use 50mm lens to get the most out of it. Once done, you will marvel at the results.
I particularly like the 50mm lens because it gives a very realistic view of the world. It captures scenes in a way that’s very similar to how our eyes perceive them. So, I often resort to this length when I want natural, undistorted portraits. However, you shouldn’t expect the flattering "squishing" effect that an 85mm lens gives for close-up headshots.

Choose for:
Avoid for:
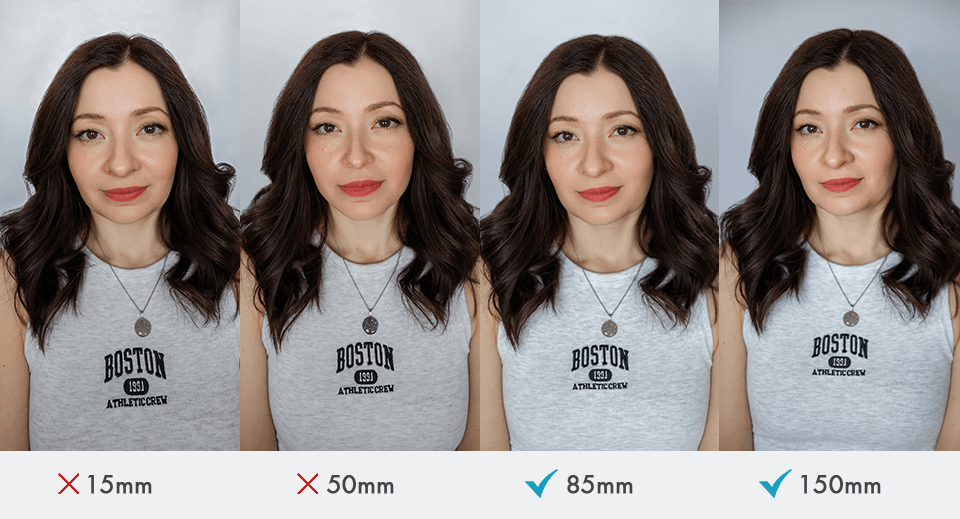
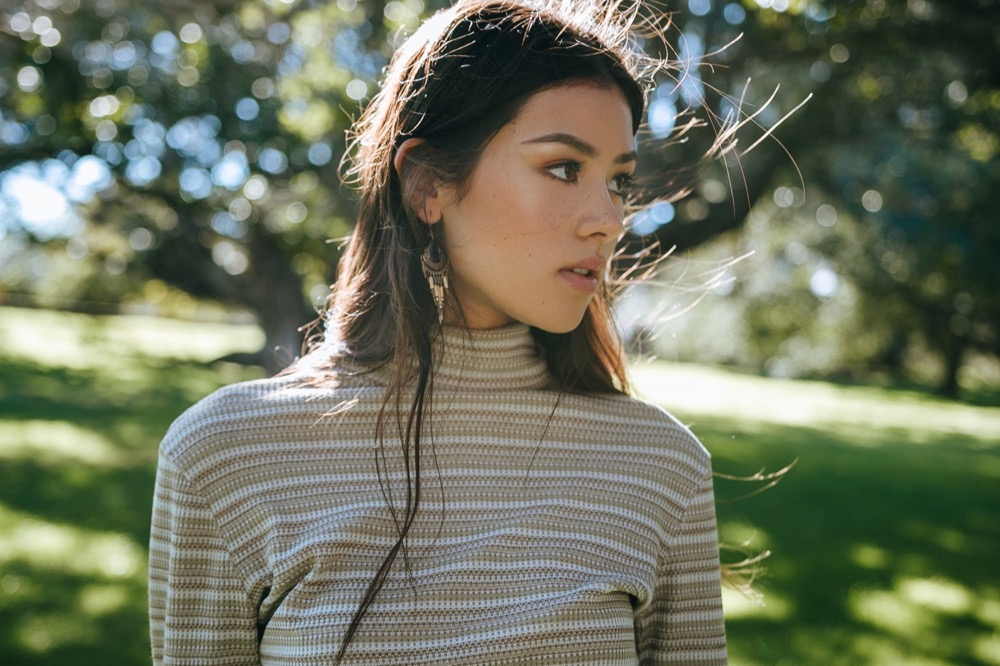
If you ask “What is the best focal length for portraits?”, nearly every portrait photographer answers that it’s an 85mm lens.
This lens is feted for creating winsome blurry backgrounds, which is why it’s called the “bokeh king”. It separates the person from the background neatly, produces nice compression, and provides a natural, close-up view without distorting their face.
Choose for:
Avoid for:

If you mention a 100mm lens, most people will assume you’re talking about macro photography. In fact, this lens is really terrific at taking close-up shots of flowers, insects, and other objects, showing all their tiny details.
Still, thinking a 100mm lens is only for macro shots is a mistake. Though it can’t be called the best focal length for portraits full frame, it allows you to take pictures of people with a flattering perspective, a lovely blurred background, and without being too close to them.
A 100mm lens resembles an 85mm one in a way it flattens facial features, without degrading the natural look. Plus, it creates a really nice, soft background blur at f/2.8. So, you can get a beautiful, dreamy effect without purchasing a f/1/2 lens.
Choose for:
Avoid for:
One of the best things about a 100mm lens for portraits is that it gives you a comfortable working space. You don’t have to be right in someone’s face or way back across the room. When paired with a full-frame camera, it’s ideal for headshots, beauty portraits, and detailed images.

With telephoto lenses, we can create a very strong background blur, which is often used for a cinematic effect. However, the “depth of field” becomes extremely shallow, so it is very difficult to keep the subject sharp.
135mm and 200mm lenses may be a good solution if you want to take subject-isolating portraits with a professional vibe. Still, you need to remember their unique characteristics and limitations.
Choose for:
Avoid for:

Such telephoto lenses, 135mm and more, are specialized tools. However, if you know how to use them properly, you will get incredible portraits with a model nicely separated from the background. If you often work in vast outdoor settings and want to preserve a cinematic style, you can take advantage of this lens range.
Match lens to subject:
Avoid distortion:
Consider the environment:
For the best bokeh:
Depth of field matters:
Prime vs. zoom
To get great portrait photos, you need to consider not only focal length but also aperture and depth of field. Both focal length and aperture for portraits control the brightness of your image, the level of background blur, and the overall sharpness of your subject.
Why aperture choice matters. Some photographers love using the widest opening, e.g., f/1.2, just because they can. But those settings are hard to work with. The area that’s in focus is very small, so even the slightest movement can make your picture blurry. I rarely go below f/2, unless I’m trying to make the photo look dreamy.
For group photos, use f/4 or f/8 to make sure everyone is in focus. This setting is suitable even if models aren’t perfectly aligned. When photographing one person, choose f/2.8 to get a blurry background and keep the person’s facial features accurate.
Choose the right aperture according to the focal length. An 85mm lens at f/2.8 makes the background beautifully blurry, so your subject pops. But a 35mm lens at f/2.8 may not blur the background enough. Experiment with camera setting for portraits and zoom levels, but always think about your subject and general composition.
Instead of just guessing what focal length is best for portraits, my FixThePhoto team and I decided to do some meticulous testing. We went to different places and photographed actual people using various lenses.
I used different portrait lenses from reputable brands. I wanted to see how each lens affected facial features, isolated subjects, changed background, and generally impacted the scene. My testing was divided into 3 main stages:
Studio portraits. I took photos in a studio with controlled lighting to evaluate subject distortion, background blur, and depth of field.
Outdoor natural light portraits. I went outdoors to evaluate lens performance in different lighting conditions and see how well each model handled bokeh, subject isolation, and natural light rendering.
On-location lifestyle portraits. I tested how practical and flexible different lenses were by photographing couples, individuals, and small groups in different environments, such as cities and forests.
Key findings from my testing:


![Does the Camera Really Add 10 Pounds [+ Practical Tips]](/placeholder-450x300.svg)


