
If you ever asked yourself, “Why do my photos look soft at f/22?”, then you’re familiar with the pain of dealing with diffraction in photography.
At the beginning of my retouching career at FixThePhoto, I believed that if a client provided us with photos taken with a full-frame camera and a $2,000 lens, they would always be perfectly sharp. However, I soon found out that even the most expensive equipment can’t guarantee detail, particularly when diffraction is involved.
If you want to learn more about what difraction is in photography, how to recognize it, how it affects both photographers and retouchers, and how to prevent it, this article will provide answers to all of those questions in an easy-to-understand manner.
Diffraction in photography is image softening caused by the light going through a tiny opening in the lens, typically at narrow apertures like f/16 or f/22. As the aperture decreases, light waves start to curve and spread, overlaying each other. This creates a blur that obscures the finer details, reducing sharpness throughout the entire shot.
In contrast to motion blur and improper focusing, diffraction isn’t caused by your shooting technique, but rather by how light works. Even a perfectly framed shot with a premium lens can result in a blurry photo if you narrow the aperture too much.
You’ll see this happen frequently with high-megapixel sensors, as even the smallest amount of detail lost is immediately apparent. Such a problem can’t be seen through the viewfinder, but the moment you zoom in on a photo in editing software, you’ll notice it instantly.
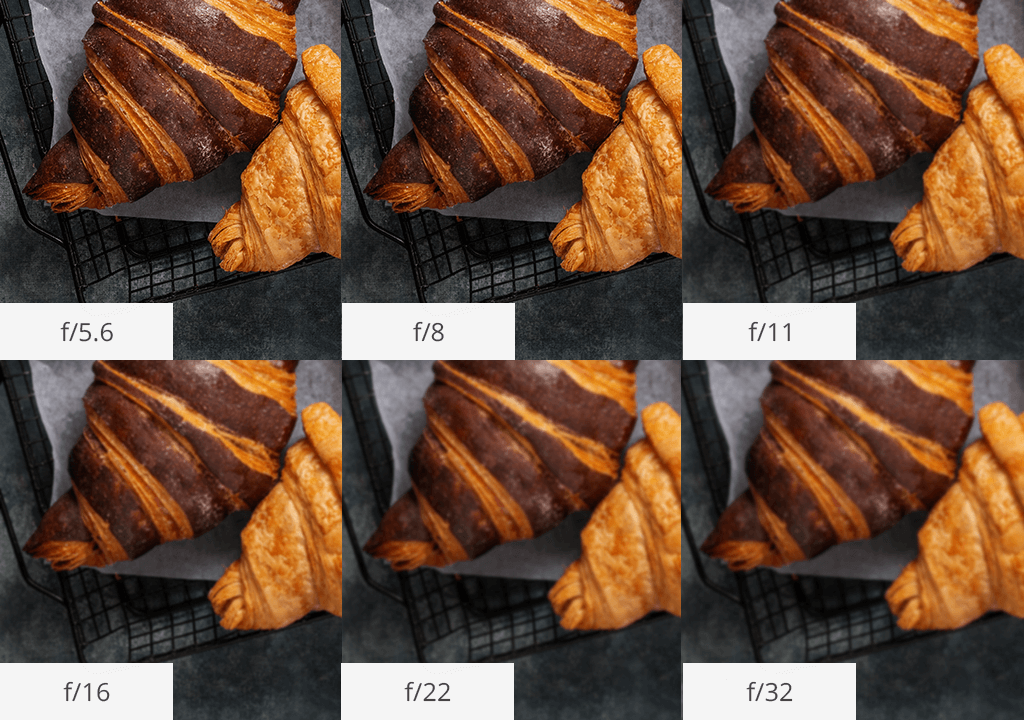
Aperture and depth of field are tightly intertwined in this aspect. Apertures like f/16 or f/22 raise the depth of field, keeping a larger amount of the environment in focus, but they can also strengthen the diffraction effect. You can’t always increase sharpness by stopping down further. Moreover, picking a setting outside of your lens’s optimal aperture range tends to cause increased softness.
The first time I noticed the diffraction of light in photography was when I was retouching some product images at FixThePhoto. The photographer set the aperture to f/22 to ensure the shot was in focus, but all photos looked weirdly soft despite the camera having a premium-grade lens.
After doing some digging, I found out what lens diffraction is – a softness created by the bending and spreading of light that goes through a lens opening. It’s not about focusing or motion blur – just a matter of physics. The narrower the aperture, the more light waves collide with each other, softening detail.
It can be broken down into the following stages:
I recommend sticking to f/5.6 and f/11 to enjoy maximum sharpness with minimum diffraction.
If you’ve set the focus correctly but sharpening doesn’t help bring out the detail, the photo still looks soft, and you’ve used an aperture of f/16 or smaller, you’re dealing with diffraction. This issue is more prominent on crop sensors and high-megapixel lenses since the higher pixel density exaggerates even a small loss of detail.
At FixThePhoto, we estimate the threat of diffraction by looking at the following table:
| Aperture | Risk of diffraction | Recommended use |
|---|---|---|
|
f/1.8–f/4
|
Low
|
Portraits, low light
|
|
f/5.6–f/8
|
Minimal
|
Sharpest zone (sweet spot)
|
|
f/11
|
Moderate
|
Landscapes, careful use
|
|
f/16–f/22
|
High
|
Only when maximum depth is needed
|
If you have a full-frame lens, diffraction appears at f/16. However, if you have an APS-C or Micro Four Thirds sensor, the softening can even start appearing at f/8. Lastly, on a 45MP+ sensor, even f/11 can be too much.
That’s why the optimal camera settings for portraits lie in the f/1.8 to f/4 range to add a pleasant backdrop blur and completely eliminate the risk of diffraction.

Probably the most prominent example of diffraction ruining a photo I’ve seen was when I was editing wedding pictures taken at the Dolomites. The scenery was magical – warm lighting, mist-covered mountains, and professional composition.
However, once I took a closer look at the RAW files, I noticed that the bride’s dress wasn’t as textured as it was supposed to be, and the mountain peaks looked soft. The photographer set an f/22 aperture for the entire shoot to keep the entire scene in focus, but that decreased the overall clarity.
Despite going through several sharpening and contrast-strengthening editing rounds, I still wasn’t able to bring out all the lost detail. That is the biggest issue with lens diffraction in photography – if it’s there, you can never get rid of it entirely.
Should the photographer have taken all those photos at f/8 or f/9 with focus stacking during the retouching phase, the final result would have been significantly better.

This example is an important warning to everyone planning professional engagement photography shoots in expansive scenic locations: don’t give in to the temptation of stopping down too far. Capture the sharpness of clothing, hair, and facial features by setting a midrange aperture and adding depth during retouching. Balancing mood and clarity is essential when shooting romantic portraits.
Rather than going as narrow as f/22 and risking diffraction, I suggest doing focus stacking, particularly for macro, product, or landscape photography. It’s a technique used by most professionals since it allows preserving optimal sharpness across the shot without lowering optical quality.
A month ago, a product photographer we collaborate with had problems including all facets of a diamond ring in a single photo. He set the aperture to f/18 while using anamorphic lenses for photography, which increased the softness around the edges.
I recommended bumping the f-stop to f/8 and shifting focus points before merging the shots. The result looked crisp and clear.
We took care of the retouching for him and leveraged our hands-on focus-stacked blending and advanced sharpening approach, much to the satisfaction of the client. You don’t have to chase sharpness by only using aperture, as there are better methods available to you.
“I never increase the aperture above f/8 since I hate it when diffraction creeps into my photos. Focus stacking provides full-shot sharpness without lowering the visual quality.”

After spending years retouching photos of all genres, I’ve concluded that diffraction in photography poses the biggest risk when you forget about its existence. The photographer becomes entirely focused on framing and exposure, neglecting to adjust the aperture. If you take pictures at f/16 and beyond, you’ll get a lot of softness in your shots.
The easiest solution is to maintain the aperture in the/5.6 to f/8 range to ensure optimal lens performance. That is also the range that allows FixThePhoto’s team to do the least number of changes during the image editing phase. Obviously, there are certain scenarios that require stopping down, but be prepared to do more retouching work afterward.
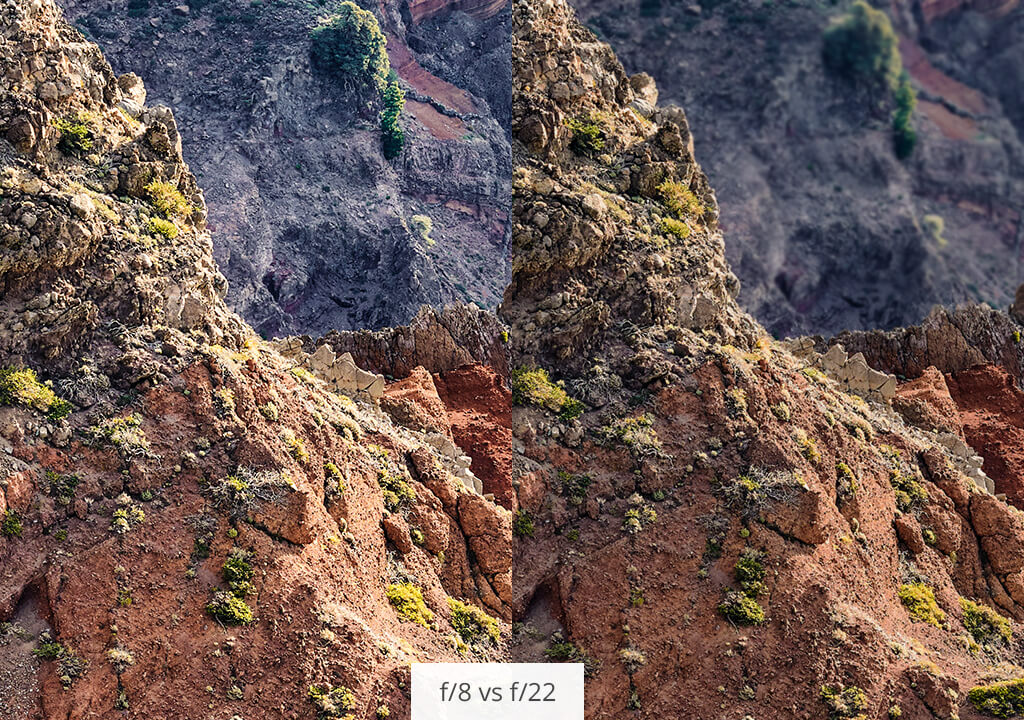
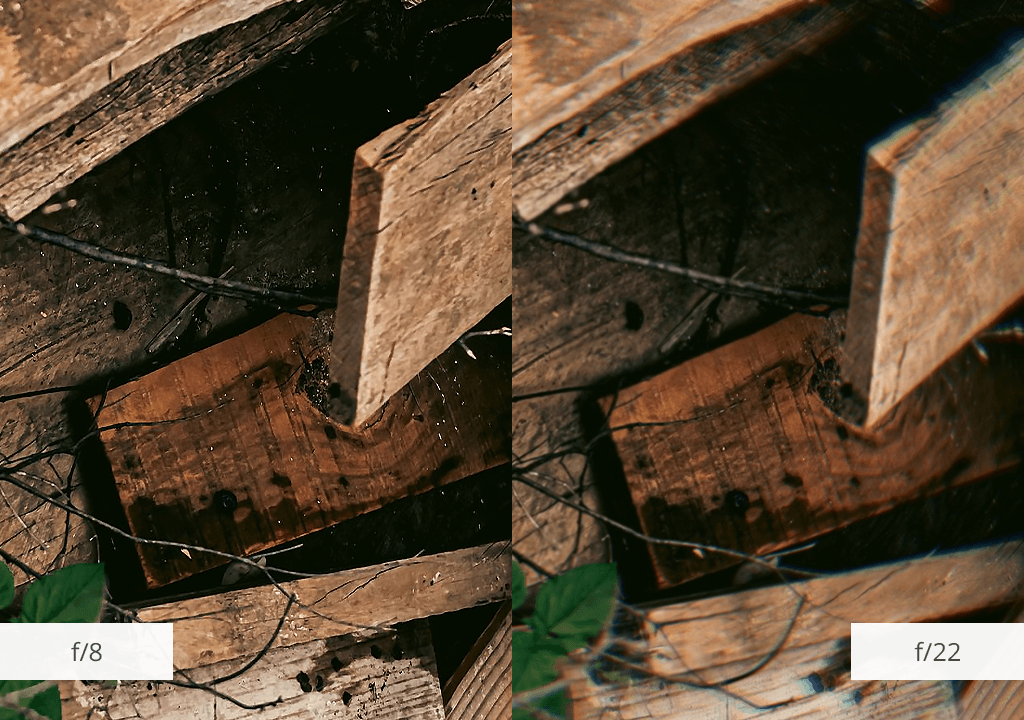
If you have a crop-sensor body or a 40+ MP sensor, the danger of diffraction is a lot bigger. Lastly, if you don’t know if your lens is prone to it, take pictures of the same subject at f/8 and f/22, then compare the textures on the hair, clothing, or tree bark. If the softness is there, it will be immediately apparent.
You took a closer look at your photos and noticed some details looking soft, possibly from having the aperture set at f/16 or f/22. You’re on location, don’t have a laptop, and the client is requesting previews.
Rather than running home to use Lightroom or trying to download a mobile retouching app, you can pick an easier method as long as you have your smartphone and WiFi connection.


Simply launch the FixThePhoto app, import the image that looks soft because of diffraction, and type in a brief request like “restore sharpness” or “soft at f/22.” One of our experienced retouchers will perform the necessary adjustments and send back an edited, sharper version that can be shown to your client.
No filters, no guesswork, and no over-edited mess. It’s the quickest approach to dealing with diffraction blur when time and quality are both equally important.
Many people who notice photography diffraction tend to use AI-based apps to perform the sharpening for them, but most of these solutions aren’t made for dealing with diffraction. It’s a different type of softness that makes it more challenging for the AI to identify and fix it without lowering the overall quality of the image.
AI functionality tends to detect strong edges and boost contrast. However, when it comes to diffraction, the issue isn’t contrast – it’s smaller details that have been lost. This can make the AI malfunction, prompting it to sharpen the wrong areas or overcompensate, which can result in halos or artificial-looking textures.
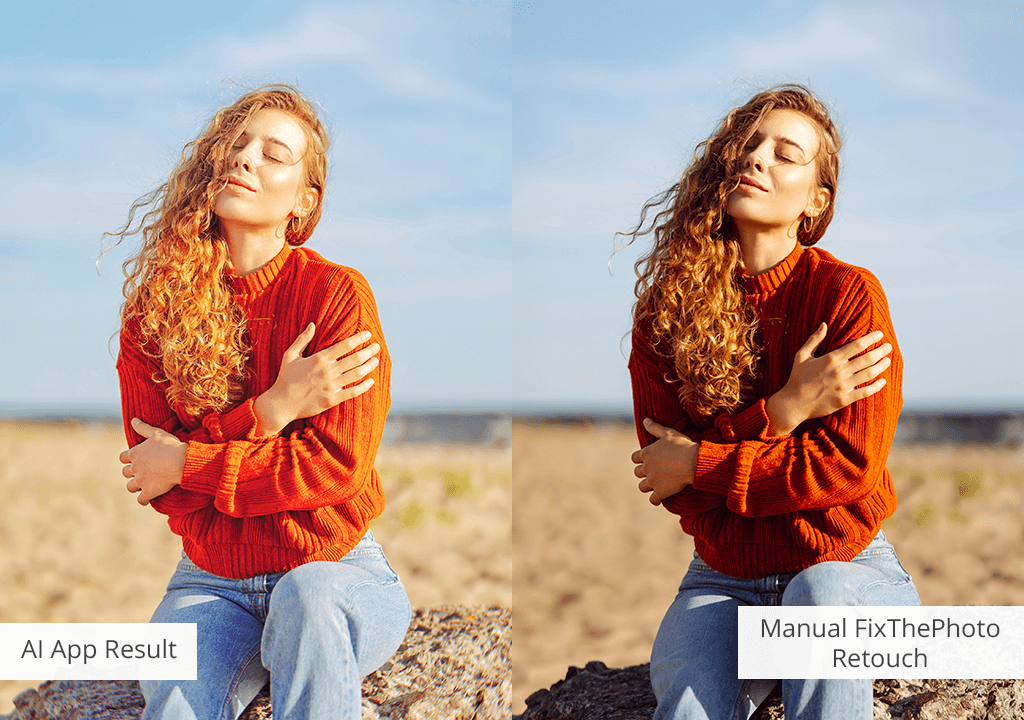
At FixThePhoto, we carefully examine all diffraction-affected parts of the photo before making any changes. Our retouchers employ frequency separation to adjust the micro-texture, selective sharpening to prevent halos, and blend masking to maintain the transitions between soft and sharp areas. Such an approach ensures the photo looks natural and balanced.
We test all photos, preferably by editing the RAW file when available, and look at all areas under 100% zoom. Our exports make targeted edits in Photoshop and double-check the final look on calibrated monitors before sending the image to the client.
In contrast to AI-powered apps, we examine the specific effects of the lens and aperture and adapt to the situation instead of simply applying a generic preset.
Diffraction is represented by a decrease in image sharpness caused by light bending through a small aperture opening. It’s an optical issue that can’t be entirely mitigated during retouching.
Stick to midrange apertures (f/5.6–f/11), don’t stop down unless you absolutely have to, and employ focus stacking to add depth instead.
No. Tinier and high-megapixel sensors suffer from diffraction sooner than full-frame models.
No. Blur is ordinarily caused by motion or poor focus, while diffraction is a physics problem caused by the aperture size.
Yes, genres like pinhole photography or dreamlike portraiture tend to utilize diffraction to soften the shot in a stylized manner.
Yes, newer smartphones in particular have very small sensors and tiny apertures. The diffraction might not be noticeable on-screen, but it is a lot more apparent when printing or cropping the image.


