Light leak effect is achieved when there is a gap or a hole in the body of the used camera or any other optical equipment. Due to this, rays of light simply “leak” into cameras that are light-tight.
It’s generally considered to be an imperfection commonly found in photos shot on film cameras. However, lately, it’s become a trend, and many photographers are trying to emulate this look.
Most of the tutorials on the web teaching this technique are complicated and require extensive PS knowledge. I’d like to show you a very easy way to achieve this effect. Following the steps below, all film photography lovers will cope with the task.
Open the photo of your choice. Since this effect is widely used in portrait retouch, you can try a portrait shot. It also looks good in landscape shots.
Next, create a copy of your photo. For quicker results, I recommend using Photoshop keyboard shortcuts. Use the Ctrl+J/Cmd+J key combination to instantly create a copy.

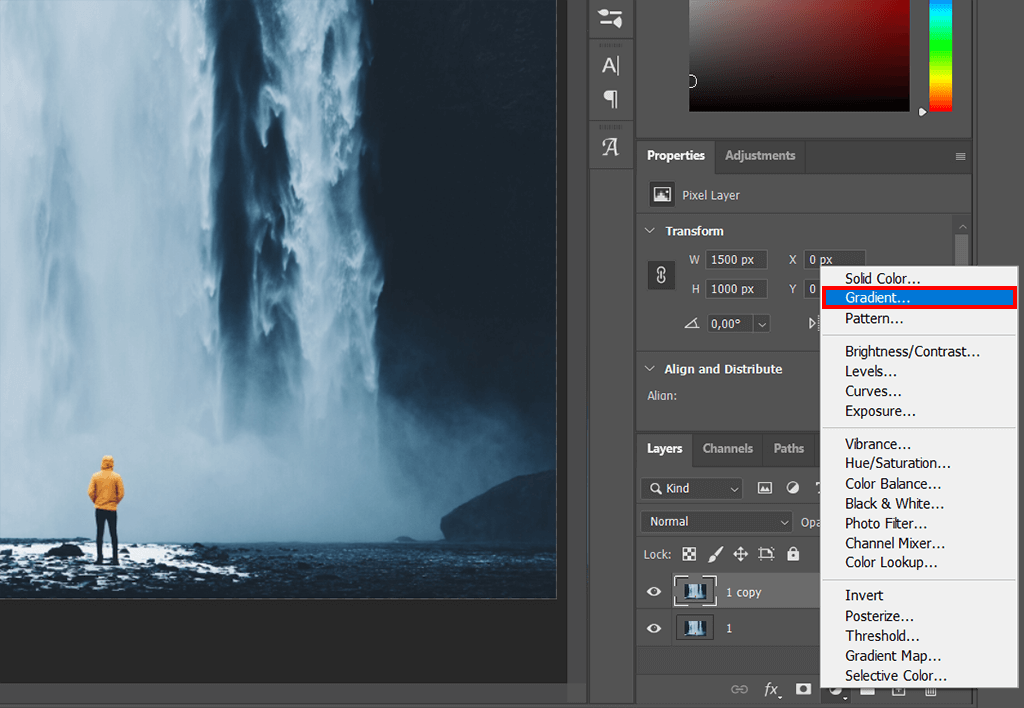
To create light leaks in Photoshop, you’ll also have to learn how to make a gradient in PS. Click the “New Fill or Adjustment Layer” icon. It can be easily found at the very bottom of the Layers panel. Select the second option from the top in the fly-out menu that appears.

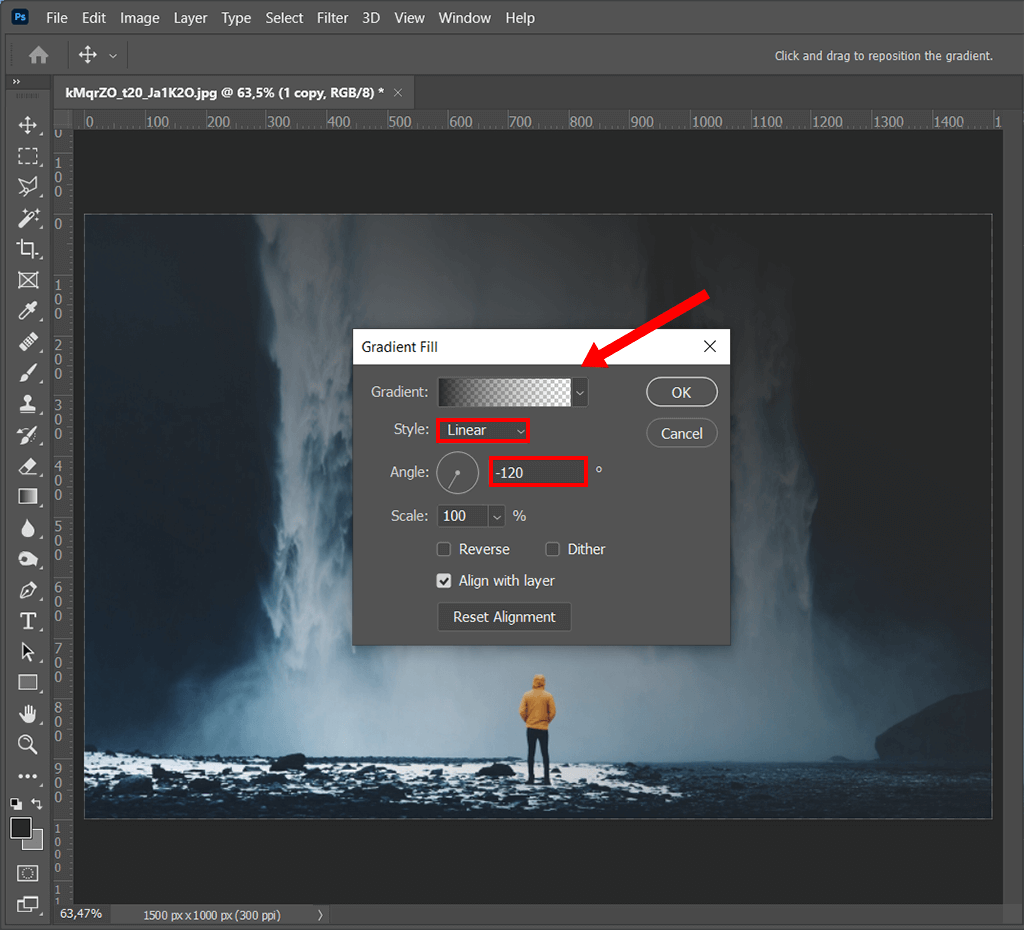
Make sure the setting in the Gradient Fill window are identical to the ones you see in the screenshot below. However, you are free to choose the angle properties to your liking.

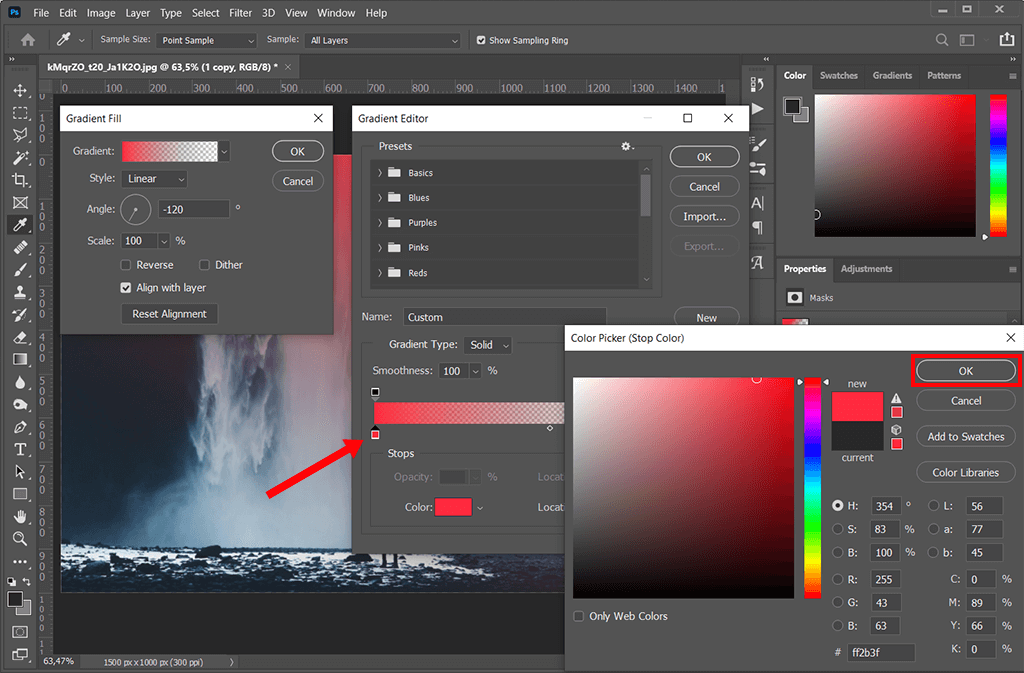
To make our gradient look like a light leak, we need to change its color. For it to be realistic, it should be either warm red or yellow.
Double-Click on the gradient map icon to bring up the Gradient Editor. Then, click the left color stop under the gradient bar to activate the Color Picker. Select the preferred color and click “OK.”

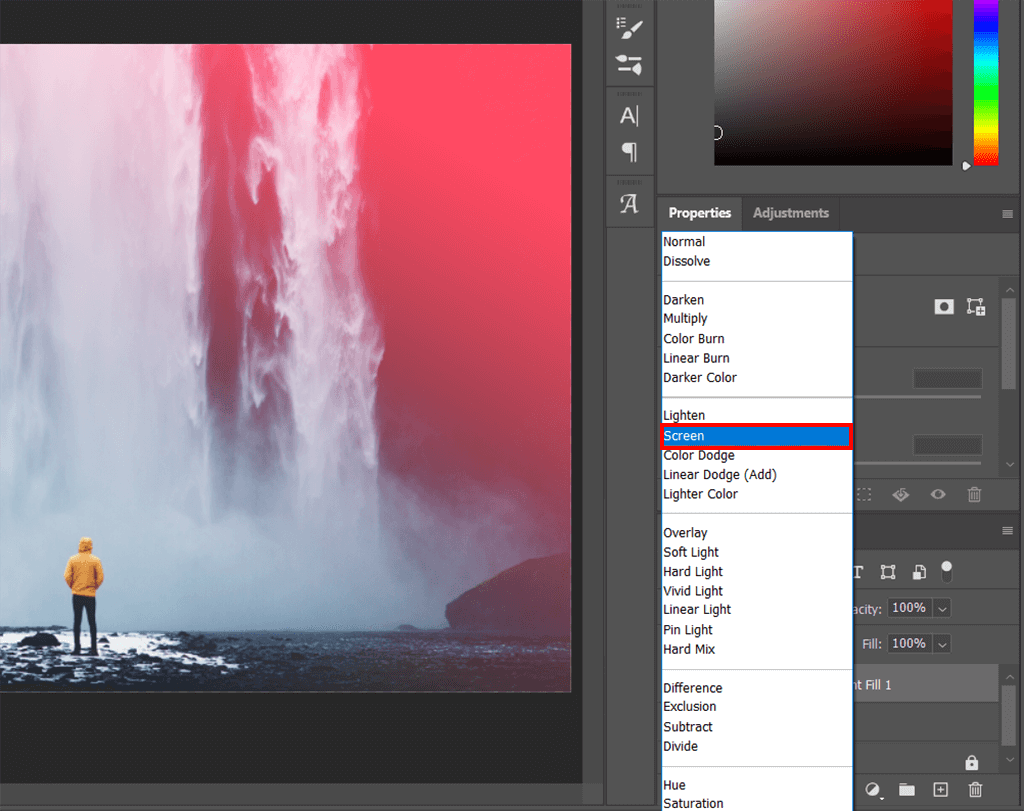
Next, we need to change our Blend Mode. Choose the “Screen” option from the pop-up menu. It should make our gradient lighter and the transition smoother.

The Photoshop light leak effect is now completed. In combination with photo post production services with affordable retouching prices, light leak effect produce result beyond any description. In case you want to add more brightness, address photo color correction services.

Today there is a big variety of informative Photoshop tutorials on YouTube that show how to get light leaks in digital photography. Still, for a beginner it might be difficult to find an exactly suitable light leaks Photoshop tutorial. To solve this problem, we have prepared a list of the most simple, detailed tutorials that are in free access.
The main feature of this tutorial is that it shows how to get realistic Lightroom effects. From one side that is quite difficult, but still the result is worth it. Photo outcomes are so true-to-life that it can be even used in headshot retouching. Moreover, many photographers will appreciate that this tutorial is quite short. It lasts only 9 minutes.
This light leak photography tutorial amazes with the variety of described techniques. After watching the video you will get familiar with such Photoshop options as blending, brushing and blurring. Additionally, you will be taught how to create a new colour palette and how to paint in flares. Thus, the tutorial will be useful for general Photoshop skills.
After this tutorial you will be aware of creating wonderful lens flare with the help of Photoshop. The video is based on portrait retouch. The photo contains visible bright light from the sun that is sitting on the background. That will become a suitable basis for creating necessary leak effect.
Light leaks are used very often used, when learning how to make a photo look vintage. And this tutorial will teach you how to create light leaks in Photoshop and dealing with vintage effects can be a captivating process.
This video is the shortest out of all presented samples about how to create light leaks in Photoshop. Still, you should not think that it is not useful and informative. After it you will know how to get a sweet rainbow light leak overlay on your photography. Again like in the first video you will have to use a gradient adjustment layer.
That is a brilliant example of light leak love effect that is used to add a surreal feeling to an ordinary portrait. The algorithm is quite simple. If to be short, you will be taught how to use varied blending options and the special gradient tool.
Definitely the widespread popularity of light leaks Photoshop has led to a great diversity of offered types of this technique. This light leak photography tutorial will show how to add an elegant feeling. It will suit mainly for portraits.
This is one more variation how to use artificially created light beam for your benefit. This tutorial slightly differs from the previous ones, but still it is quite simple. Moreover, if you have any questions, the author is always ready to support you in chat.

Want to create light leaks in Photoshop much quicker? Download this high-quality bundle of overlays made by professionals. It includes a beautiful light leak, light ray, bokeh, and light flare effects.