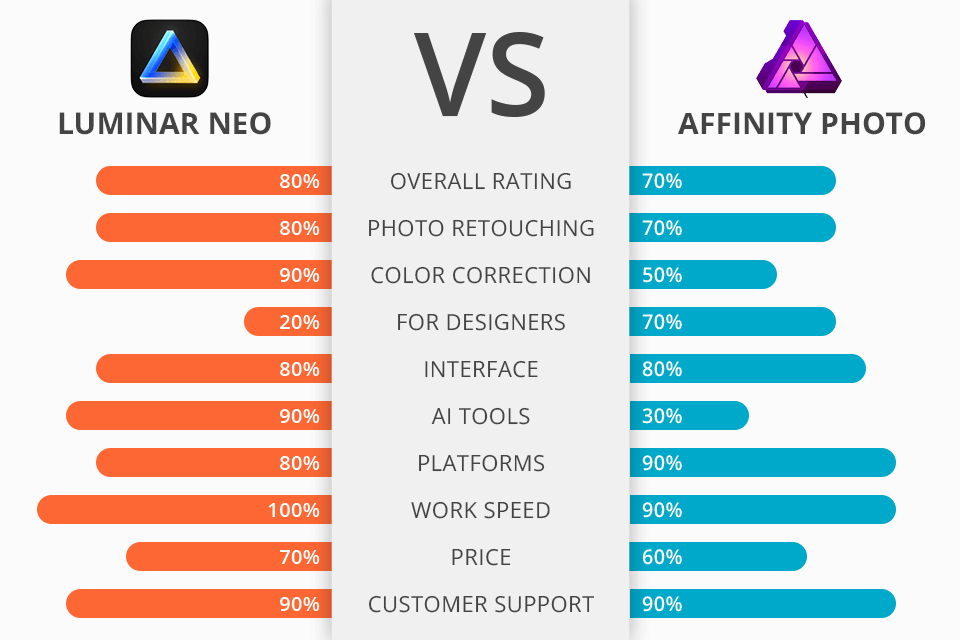
The Luminar Neo vs Affinity Photo comparison looms large for people, who wants to find a functional alternative for Adobe products.
Luminar Neo has a user-friendly interface and AI-based tools. It can work as a standalone program as well as a plugin for Adobe Photoshop and Lightroom. The subscription monthly price is $9.95. Besides, you can get the program for lifetime use for $99. Currently, you can purchase Luminar Neo with $10 off the price by using the FIXTHEPHOTONEO promo code.
Affinity Photo resembles Photoshop a lot when it comes to image editing. It allows users to perform non-destructive image processing, smooth photo stitching, HDR manipulations, and advanced picture compositing. The software costs $69.99.
The core engine. Comparing Luminar vs Affinity Photo and similar programs, I was amazed by how powerful its modular engine is. Each editing area has an individual processor for better optimization. While Luminar AI was a bit overloaded, this software version stands out with a much smoother operation.
Lightroom-like workspace. While Affinity Photo has a working space very similar to that of Photoshop, Luminar Neo is more resemblant of Lightroom. You will see such tabs as Catalog, Edit, and Presets. If you want to access instrument for photo enhancement, you should click the Edit tab. There are several thematic groups – Essential, Creative, Portrait, and Professional. Some tools correlate with those available in Lightroom, while others, e.g., Landscape and Atmosphere, are completely unique.
Convenient photo organization tools. Managing files in Luminar Neo is very easy. You can select or simply like your photo to arrange them into collections. The cataloging system available in Lightroom seems more confusing. The “Catalog” module consists of 5 locations that are automatically updated based on what you do – All Photos, Single Image Edits, Recently Added, Recently Edited, and Trash. Moreover, you can create “Albums” to store similar photos in one place.
One-click editing. The Enhance AI tool will surely catch the attention of rookie photographers who compare Luminar vs Affinity Photo. It meticulously analyzes images and immediately makes color corrections, improves details and toning by altering color balance. Besides, the program has lots of cool presets, overlays, and LUTs for streamlined editing.
Great tools for portrait processing. Portrait improving is a tedious task considering how many details you need to work on. Luminar Neo one-ups its opponent in the Luminar Neo vs Affinity Photo comparison in this regard. Thanks to AI functionality, you can accurately remove defects and soften skin without sacrificing realism. Besides, the program suggests the most suitable corrections. AI neural nets define different facial features and allow you to improve them without affecting the rest of the frame.
Can be a bit slow. The speed of editing in Luminar Neo is dependent on the capabilities of your computer. People owning Mac devices can work without performance drops if their computer is equipped with CPU Intel® Core™ i5 or better, the M1 chip, 8 GB RAM or more (16+ GB RAM is recommended), macOS 10.14.6 or higher, a hard disk with 10 GB free space. The SSD is indispensable for the best performance.
Windows users should ensure their computer has CPU Intel® Core™ i5 or better, AMD Ryzen™ 5 or better, Open GL 3.3 or later compatible Graphics Cards, at least 8 GB RAM or more, Windows OS 10 version 1909 or higher (only 64-bit OS), a hard disk with 10 GB free space. If you want to enjoy the max performance, you should upgrade your PC with an SSD.
Local Editing Capabilities. Affinity Photo has powerful local editing capabilities with incredible sub-pixel precision. Unlimited adjustment layers, gradients, masks, blend modes, this is just a glimpse of what this software can offer to a user. These advanced tools allow you to significantly ramp up your photo editing game. In addition, Affinity Photo includes an array of brushes for you to highlight every essential detail in your images.
Photoshop-like Interface. If it comes to a user interface, Affinity Photo resembles Adobe Photoshop. The UI is stylish and uncluttered which allows you to focus on your document rather than the program’s layout. You can customize the necessary UI elements according to your taste. This is especially helpful if you want to optimize your workflow.
Affinity Photo for iPad. Affinity Photo kicks some extra points in Affinity vs Luminar battle due to the availability of a mobile version. Being created for iPad, it includes the majority of image editing features found in the desktop version. With Affinity Photo for iPad, you can transform your device into an on-screen drawing tablet.
Drawing & Painting. Affinity Photo comes with a complete set of brushes that can be used for digital painting. Serif has collaborated with digital painting experts DAUB to pack the program with a few collections of these amazing tools, and they turned out to be pretty interesting. Besides, the developer designed an impressive vector drawing toolkit for those, who want to create illustrations with vectors and masks.
Tone Mapping. This feature resembles an HDR tool allowing you to work with 32-bit HDR photos merged from multiple bracketed images or create an HDR effect from a single photo. It may seem a bit time-consuming to load the Tone Mapping persona. Nevertheless, you can quickly achieve amazing results even if you are working with a single photo.
Complicated RAW processing. It often takes a long time to make even minor changes. I tested Affinity on a rather powerful computer. However, quick slider adjustments may slow down the software before the changes are made, especially when I tweaked several settings.
Improper work of automatic lens correction profiles. Due to some kind of issue with the user interface, I couldn’t preview/disable corrections or they weren’t properly applied.
Working with masks may seem complicated. Unfortunately, gradient masks and brush masks don’t work together. Moreover, you can’t use a brush to modify a gradient mask. Imagine you want to enhance the sky by highlighting interesting details, but there is an object in the foreground intersecting with the horizon. In this case, it is impossible to apply the gradient mask or remove it from the masked area.
You can get Luminar Neo by paying once or choosing a suitable subscription plan. The program is compatible with Mac and Win computers. The developer offers discounts and sales from time to time, so you can receive this powerful program at a reduced cost. Currently, you can use the FIXTHEPHOTONEO promo code and pay $10 less for the software.
- Luminar Neo Explore — $9.95/mo
- Luminar Neo Pro — $14.95/mo
- Luminar Neo Lifetime — $99
Affinity Photo is more affordable if we compare Luminar vs Affinity in terms of pricing. It is worth mentioning that it is necessary to buy Affinity separately for each operating system.
- Affinity Photo for Mac — $69.99
- Affinity Photo for Windows — $69.99
- Affinity Photo for iPad — $19.99
Affinity Photo and Luminar are both powerful and feature-rich editors. They include advanced features that allow you to take your photography game to a whole new level.
Affinity Photo is a great option if you need something similar to Photoshop at a lower price. You will get great color grading features as well as incredible retouching and drawing tools.
Luminar Neo offers a large number of tools for fast and automated image editing. I would say that Luminar is an excellent Lightroom alternative with more advanced retouching capabilities.
Luminar Neo allows you to streamline the process of editing by using LUTs. They will help you make a color correction so that you don’t need to make any additional adjustments. The Mood is a highly popular Luminar Neo feature. With it, you can get access to the bundle of LUTs that come with Luminar Neo.


