HomeByMe Review
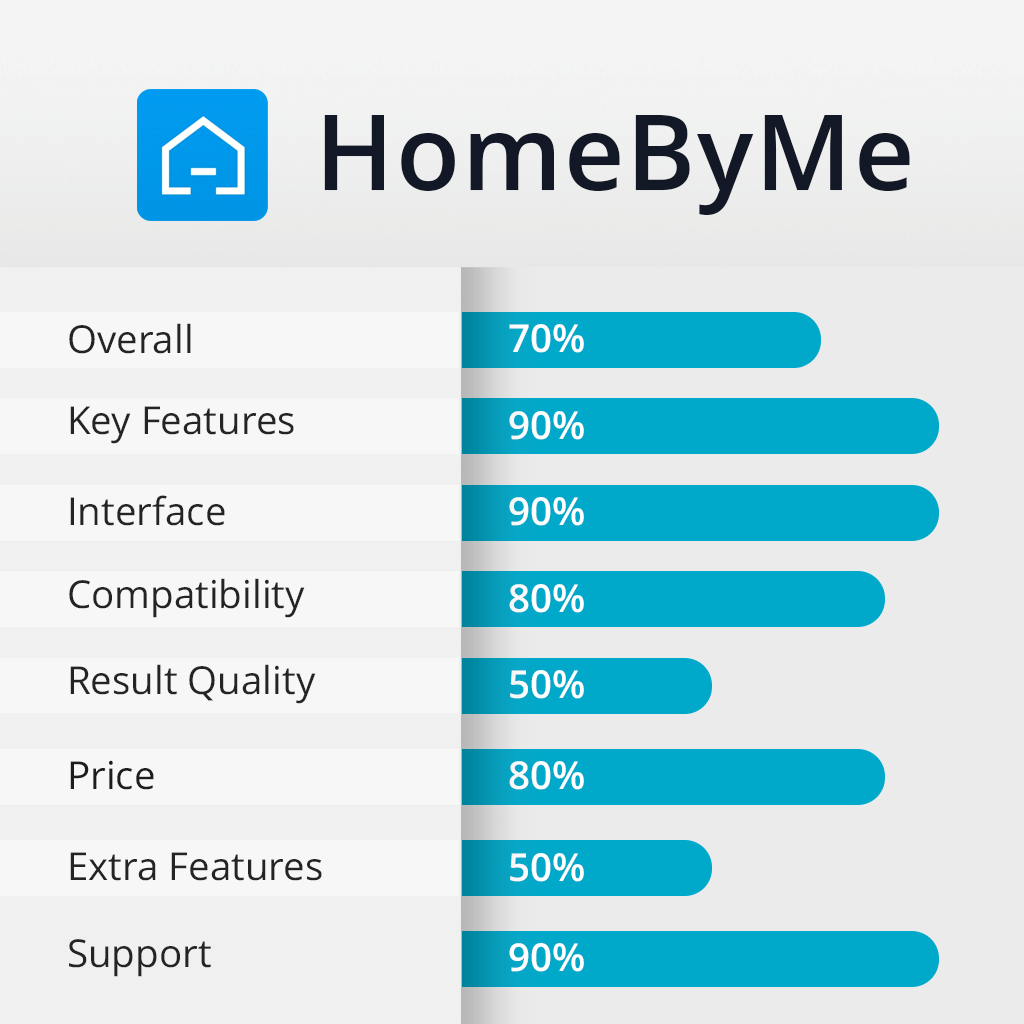
Verdict: HomeByMe helps to create virtual houses, flats, and other spaces. The program has a huge catalog of branded products, but a slow rendering of low-quality pictures spoils the reputation of this virtual staging software. Although the quality of processed photos is good, all outputs have watermarks.

The biggest advantage of HomeByMe is the availability of a free plan. Thus, you don’t need to pay for staging a house if free features are sufficient for your projects.
Using the program, you can create up to 5 projects and take advantage of HomeByMe's rendering tool for 3 high-quality, lifelike images and 9 standard-definition ones absolutely for free. However, if you want to get rid of a watermark, you have to upgrade your plan from the free tier to the top-tier package.
HomeByMe is available for free but you have to put up with some limitations. If you want to get access to full functionality, you have to pay for a subscription.
The Premium plan costs $29/month. Users can create unlimited projects, unlimited HD images, unlimited standard-definition images, a free pack of 5 x 4K images, and a free collection of 5 x 360° photos. Besides, it is possible to upload 3D models.
The Unlimited+ plan is priced at $65/month. You will get everything from the Premium plan and unlimited 4K images, a free pack of 5 x 360° images. Your projects will be protected from copying and will have no watermarks.
In addition, you can purchase extra images, with prices starting at $1.90 for 2 pictures. Furthermore, there's a service for enhancing your home or creating a 3D floor plan, beginning at $69 and $14.99, respectively.
HomeByMe is a web-based 3D interior design app suitable for creating interior designs and discovering ideas for furnishing them. In fact, this app offers cutting-edge 3D planning possibilities for those engaged in the sphere of interior design.
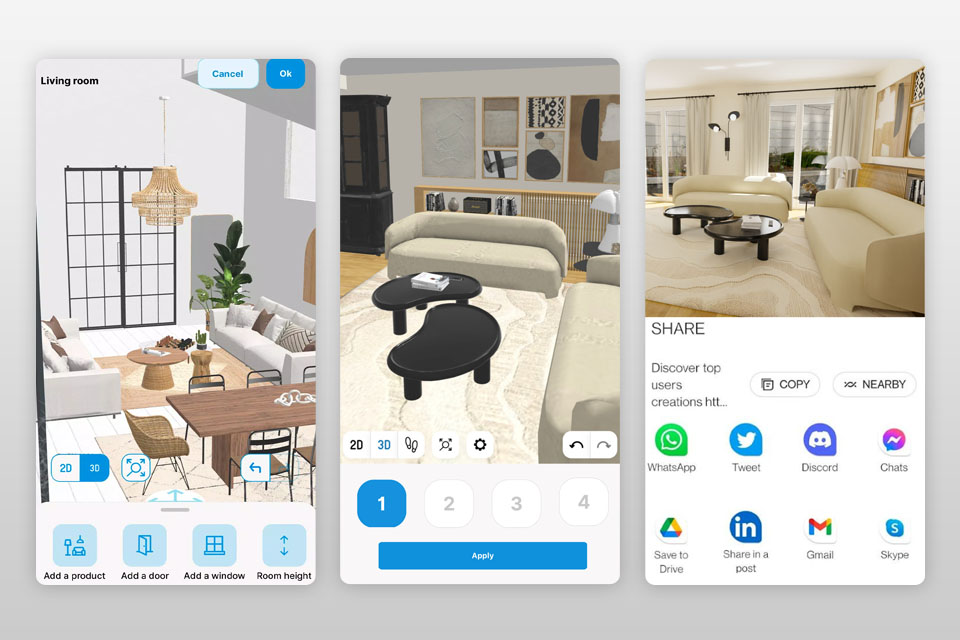
Besides, users can upload or create HomeByMe floor plans in 2D turn them into a 3D space, as well as inspect the house from the inside by moving a virtual avatar from one room to another.
To get access to all program’s tools and features, you need to register. You can either do it via your Google or Facebook account or enter a valid email and come up with a password.
Once done, you’ll see a step-by-step tutorial on how to use the software. To my mind, this guide calls for improvement because it is likely to cause confusion instead of acquainting users with the program. So, you can simply skip it.
There are pre-made room templates (“Room by Room”) that resemble ones available in interior design software. You can use them to expedite your work or draw all elements manually (“Draw Walls”).
Though the collection of templates isn’t really huge, it is sufficient to get started. Anyway, it is a wonderful option for total novices. Whatever variant you choose, you will get the same building environment. At this stage, you can change the distance between walls and add more points to a wall to divide or extend it.
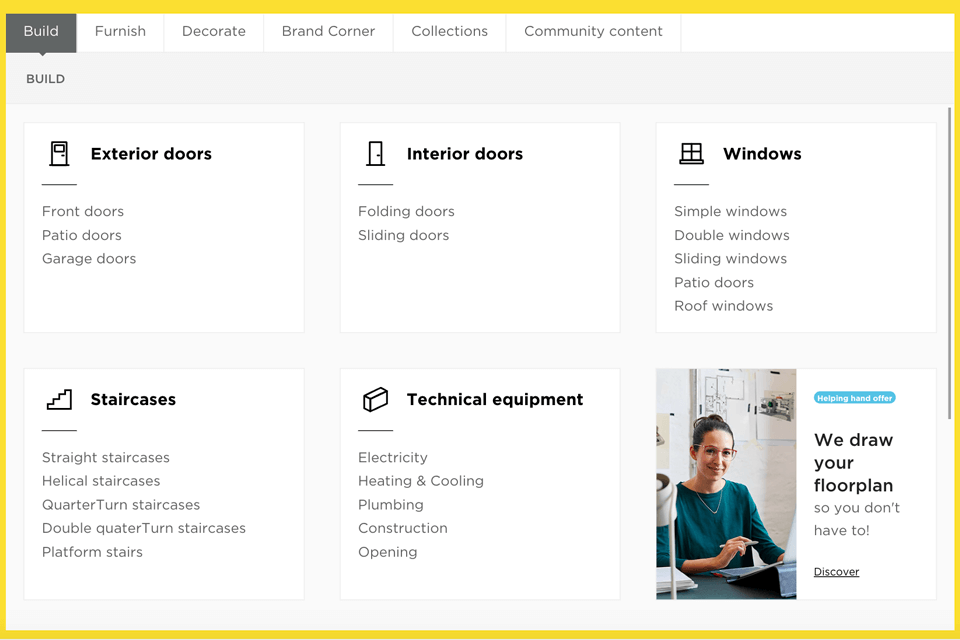
The catalog of 3D branded products deserves a special note in this HomeByMe review because it can stay on par with those offered by a high-profile virtual home staging company. You can embellish your virtual house with stylish furniture pieces and decorative knick-knacks from more than 300 brands.
For example, there are 67 front doors, 10 original garage doors, 41 window types, 36 staircases, and more. However, the best part is that you can adjust every element to your liking and create a unique house.
In fact, there is a plethora of cool items to add to your virtual environment. The variety of 3D models is amazing, so you can let your creativity run wild.
Besides, all objects are divided into smaller groups and you can narrow down the choice even more by initiating the search by brand. Head to the “Brand Corner” and flick through hundreds of companies.
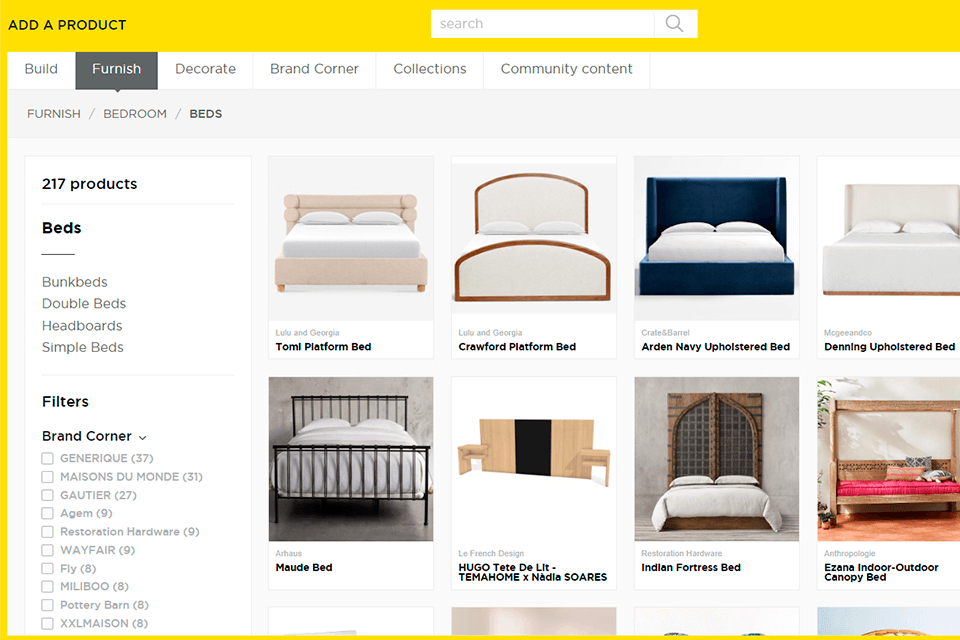
The catalog is replete with different furniture models, so you are sure to find something meeting your demands.
Besides, you can change the color, size, and texture of any item. As for painting walls, you can choose standard colors (500+ options) or pick something more unique. The famous brands have submitted over 1000 color shades and they are all at your disposal.
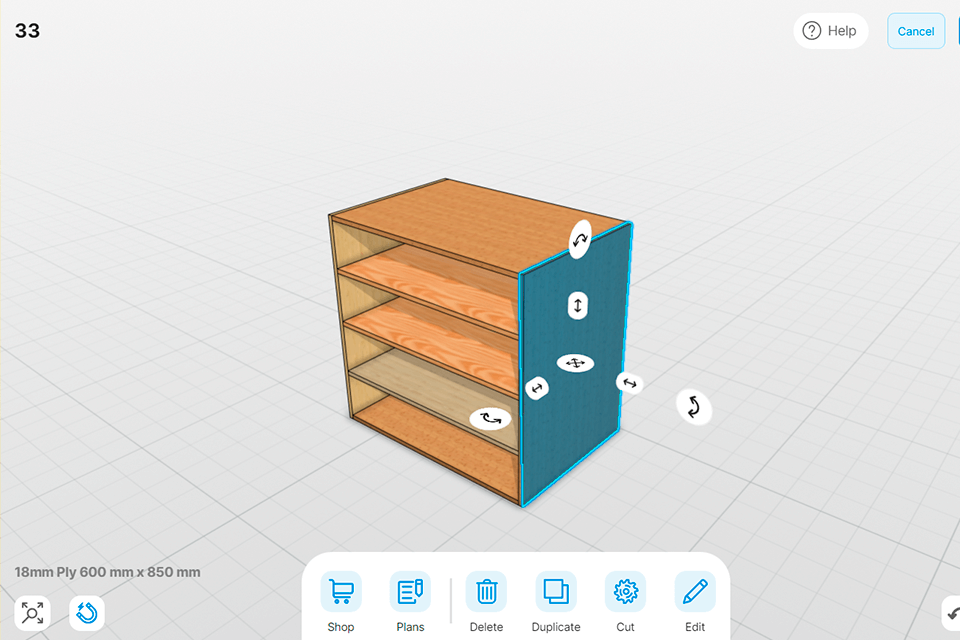
HomeByMe has a special tool called MakeByMe. Using it, you can design bespoke furniture pieces for your project. If you have created furniture in third-party furniture design software, you can upload it to this program. However, the 3DUpload feature is available by subscription.
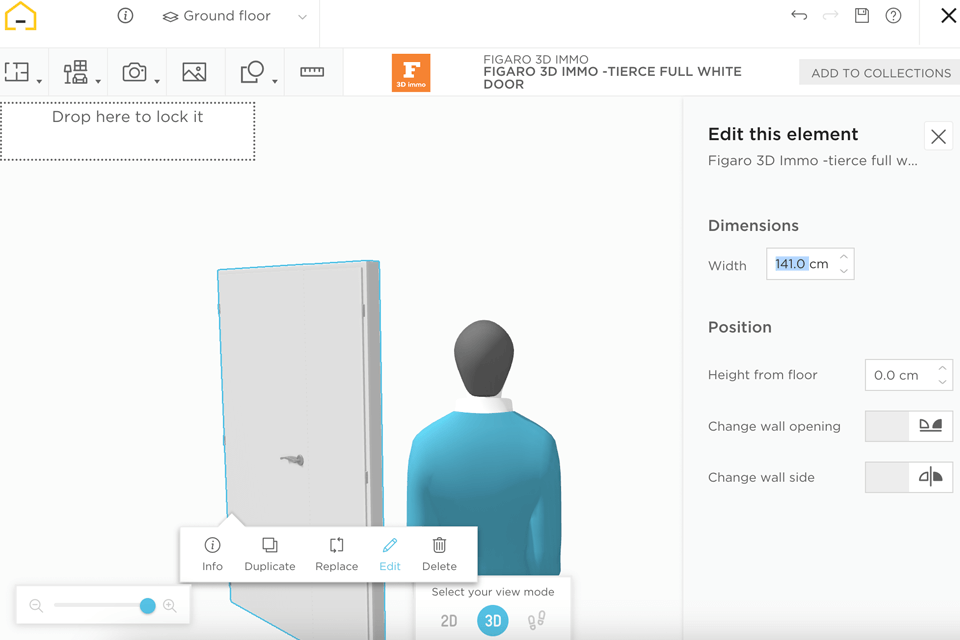
Once you find the needed item, click on it to add it to your HomeByMe 3D design. You can quickly move it to the desired spot, spin it around, or even adjust its height. If you want to tweak an object's size, just select it and hit 'Edit' to open a sidebar with a set of customizable options.
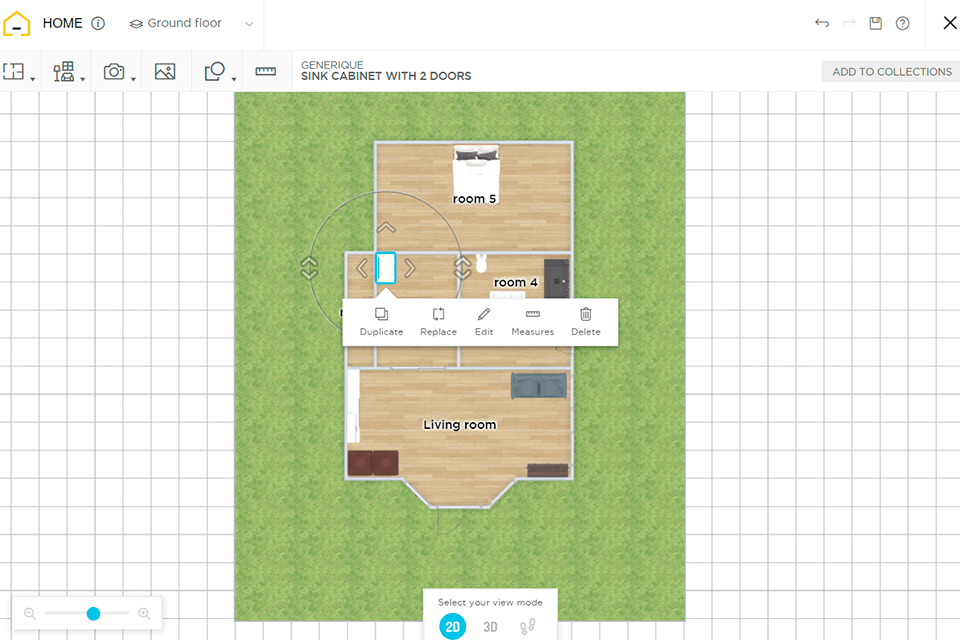
By default, you start designing a top-down 2D plan. But you can easily switch to a 3D environment by clicking on the corresponding option at the bottom of the screen. Thus, you will receive a 3D project that is easier to manipulate.
Click the feet icon to see a room as if you are staying in it. You can adjust the height with a slider and use keyboard arrows to go from one room to another. Besides, you can click and drag a mouse or trackpad to get closer to different elements and scrutinize them.
All your collections, projects, and associated libraries of furniture and decorations are stored on your personal page. Open it and share projects in one click. If you want to protect your renderings from unauthorized use, you can make them non-copyable.
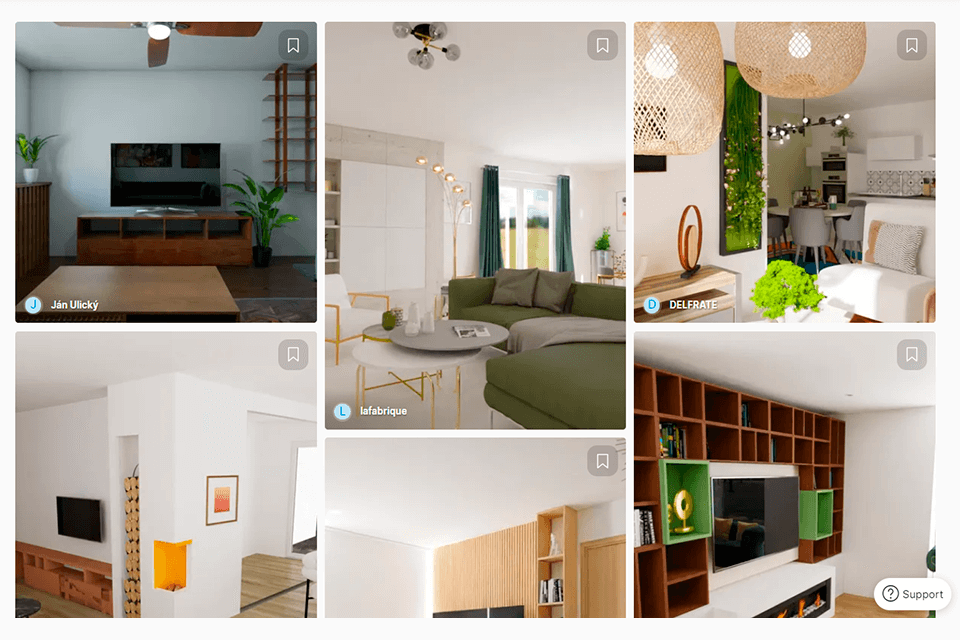
HomeByMe's website contains many cool design ideas neatly categorized by room. There are over 16 million projects crafted by other users. You can pick an image and get a close-up view of a product. There are also filters for choosing themes that pique your interest, be it an item, a specific color, or even a particular brand.
You can easily generate high-definition or 4K images to gain a precise representation of how things will appear in reality. Besides, you can make panoramic 360° images to attain a comprehensive view of your indoor space. However, these formats aren't available in a free version.
You can personalize your designs by harnessing HomeByMe's cutting-edge technology. For instance, you can make slanted walls perfect for an attic or upper-level flat, or add a mezzanine floor in a loft-style space. There is also the Free Shapes feature suitable for making unique decorative items and tailor-made furniture pieces to satisfy clients' needs.
Furthermore, you can obtain pro-grade DWG/DXF 2D drawings, suitable for design and construction purposes by exporting your 3D project as a standard 2D floor plan file to DraftSight.
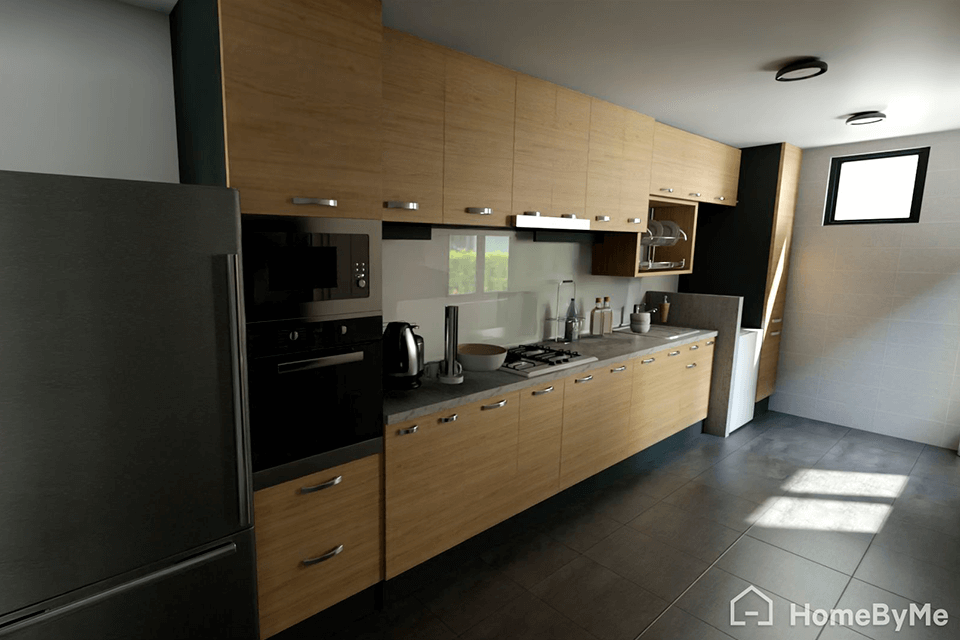
Rendering results are decent, though you have to wait several minutes to get them. Users can choose the view from the window, the position of the sun, and the time of the day. Besides, there are several light variants – warm, cold, golden hour, and night. Keep in mind that it’s possible to indicate your preferences concerning the light.
The thing that upset me a bit is that some objects may simply become invisible if an avatar doesn’t look directly at them. When you rotate a virtual person, those objects return to a room.
Another annoying point worth mentioning in HomeByMe review is that switching from feet to meters is cumbersome. Unfortunately, you need to wade through settings because there is no separate option right on the plan. That is very inconvenient.
In the app, you can flick through 3D real estate photos to get inspired by as well as create a HomeByMe 3D design from the ground up. Feel free to explore the feed until you come across an image that resonates with your personal style. Once you've found it, you can replicate the room's elements and then make precise adjustments to the decor to reflect your unique vision.
Another cool feature is that you can use the HomeByMe app for a real-life room scan. It will automatically generate a 2D and 3D representation of your room, complete with your furniture and decor. Moreover, you have access to a catalog of over 20,000 products from renowned brands to furnish and adorn your living space.
People can not only make use of the program but also delegate their tasks to professionals. However, when it comes to HomeByMe services, you won't see reviews, and the information is somewhat tucked away on the website. You can request the development of either an unfurnished or fully furnished 3D floor plan, along with virtual staging that includes rendering and comments from designers.
The team needs up to 7 business days to complete a virtual interior design project. Besides, the cost for a single image is four times higher compared to what competitors offer, starting at $69.
HomeByMe is a solid tool for making interior designs, but it can hardly replace professional services. Even when considering that the developers offer their own floor plan development services, the quality is somewhat questionable, as genuine reviews are absent.

FixThePhoto is your one-stop solution, addressing a wide range of needs, from creating lifelike renderings to editing real estate photographs and handling HDR bracketing. They're equipped to complete your task swiftly, typically within 1-3 business days, all while maintaining competitive pricing. Besides, you can place a test order to evaluate the quality of their services. Finished photos will have no watermarks which is the issue with HomeByMe.


