If you want to improve your workflow with Adobe programs, check out the top Creative Cloud tips. They will help you get more out of the Adobe suite. You will learn how to organize a library, sync files, create a color palette, etc.
Adobe Creative Cloud includes 20+ software including Photoshop, Illustrator, InDesign, Lightroom, Adobe XD. In this article, you will find tips for using these programs and learn more about the latest design trends, including animation, minimalism, and responsive design.
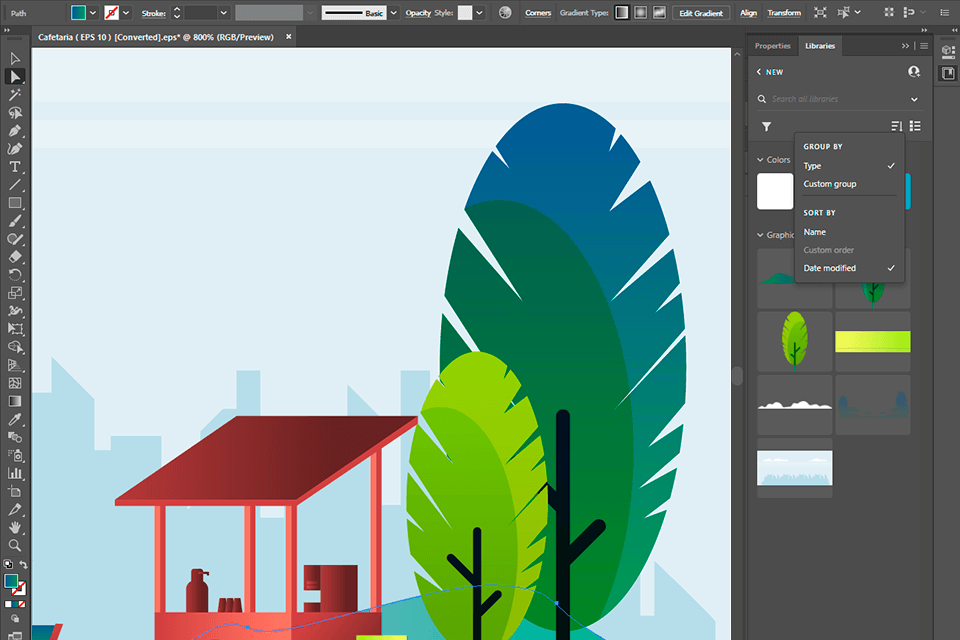
Creative Cloud programs include libraries that allow users to organize color palettes, logos, and fonts to make the process more user-friendly. You can use these libraries with any design software that supports them.
If you want to create a new library, you need to open Creative Cloud and go to the Libraries module (in the Windows menu). To create a new folder, click on the drop-down menu and select the Create New Library option. You can assign any name to the new folder, including a client’s or project’s name.
You can add any design elements from an open document to the library. You can either use the drag-and-drop option or click on the + icon to select items.
To access these elements from another document, open the Libraries module and find the library. Then, you can add any elements to the new document.
Creative Cloud allows you to use 100 GB of cloud storage and sync projects across all devices. If you want to manage sync or create a separate folder, you'll need to download the Creative Cloud desktop version.
To save traffic, the program allows you to adjust the download and upload speed. Once you have configured the sync folder, all added files will be available across the Adobe software.
One of the most important Creative Cloud tips and tricks is element locking. Locking is necessary for comfortable work with selected items. With the help of hotkeys, you can quickly toggle this lock on and off. Mac users should press Cmd + L after selecting the item. The element will remain static until you turn the lock off using the same key combination.
Windows users don’t need to use the Object menu to lock the element, they can right-click to use the Lock option. By pressing it, they can lock any item.
By using the Masks option, users can hide layers. First, you need to import a photo and create a new shape on top of it. To make the process easier, you don't need to manually adjust the shape of the image. Use the Object menu and click on the Mask with Shape option.
Alternatively, you can select the desired shape and image by right-clicking. The program will create an editable mask that you can change after double-clicking on it.
When using the curve handle independently, use the Alt or Opt keys. If you want to make it dependent, double-click once to return the handle to an angle and one more time to make it dependent.
Adobe Creative Cloud lets you duplicate a style and apply it to the whole text.
Select the desired text with the appropriate style and create a new text element. The resulting text will have the same style, font, and color as the original. Then, you can simply change the text without changing additional settings.
When you work with elements, Adobe CC automatically snaps them. You can disable snapping if needed. Hold down Ctrl or Cmd, respectively, while moving an element. As long as you hold down the key, you can fully control the object.
These Creative Cloud tips will come in handy for those who often draw in Adobe Creative Cloud. When drawing objects, users start from the upper left corner by default. This option is not always convenient especially if you want to draw from a different point. You can bypass this setting by holding Alt or Opt keys. Adobe CC will let you draw elements from the center.

Select an item and set the number on the numeric panel. Each value affects the opacity by 10%. Thus, if you select 1, the value changes by 10%. If your goal is 100% opacity, choose 0. With this method, you can compare different opacity values to find the one that suits your design.

By holding down the Shift button, you can move an object. This option allows you to move the element 10 pixels in the selected direction. Choose the object and drag it to the desired location. With slight nudges, you can put it wherever you need.
Adobe Creative Cloud can help you make a quick draft without using pencil and paper. Once you've downloaded a mobile app, sync it with the desktop version of Adobe CC. You can launch the application and start drawing with the stylus or just your finger.
Thanks to synchronization, all sketches go to your Illustrator library. You can work with them in Illustrator in the future or export them to other digital design software.
These helpful Photoshop keyboard shortcuts will help you optimize your workflow.
For Windows, replace the buttons:
You can perform various manipulations with keyboard shortcuts in the Keyboard Shortcuts dialog box. If you need to find them in Photoshop, click Edit > Keyboard Shortcuts. Alternatively, use the following keyboard shortcuts:
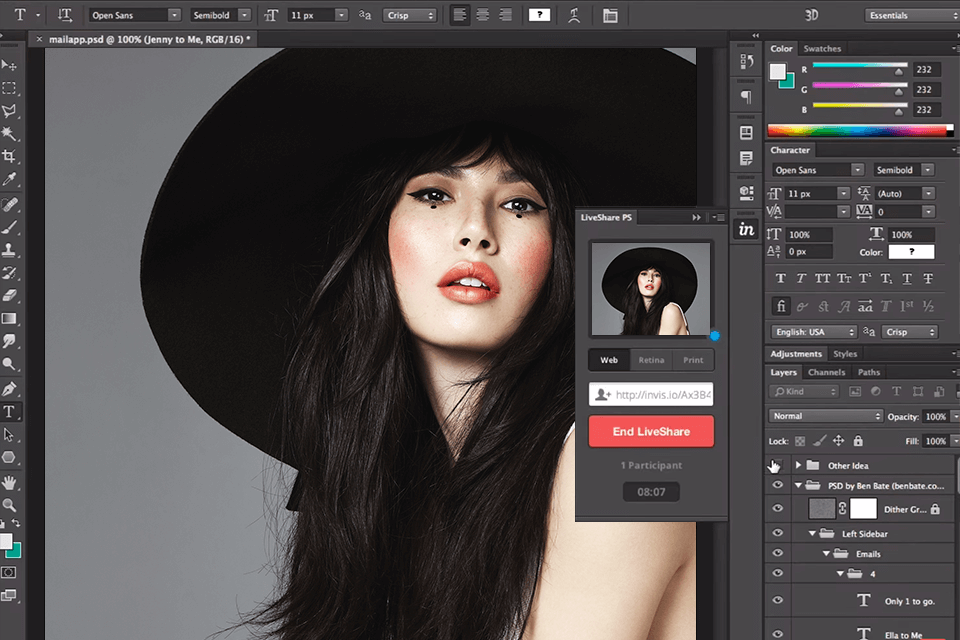
Photoshop LiveShare PS is a plugin that lets you share Photoshop documents. Besides, you can create a video conference and open a Photoshop document in the screen-sharing mode. Each team member can view and edit this document. You will see all the corrections on the screen in real-time.
The plugin also allows you to create screenshots that you can send to other users. With LiveShare PS, you can preview a Photoshop document on a smartphone.
If you want to identify the font of the text from a photo, you need to take a pic of it and open it in Photoshop. Use the selection tool to draw a box around the text, and click Type> Match Font.
Photoshop will provide you with a variety of options so that you can choose the most similar one. You can download photography Photoshop fonts directly from Adobe Typekit.
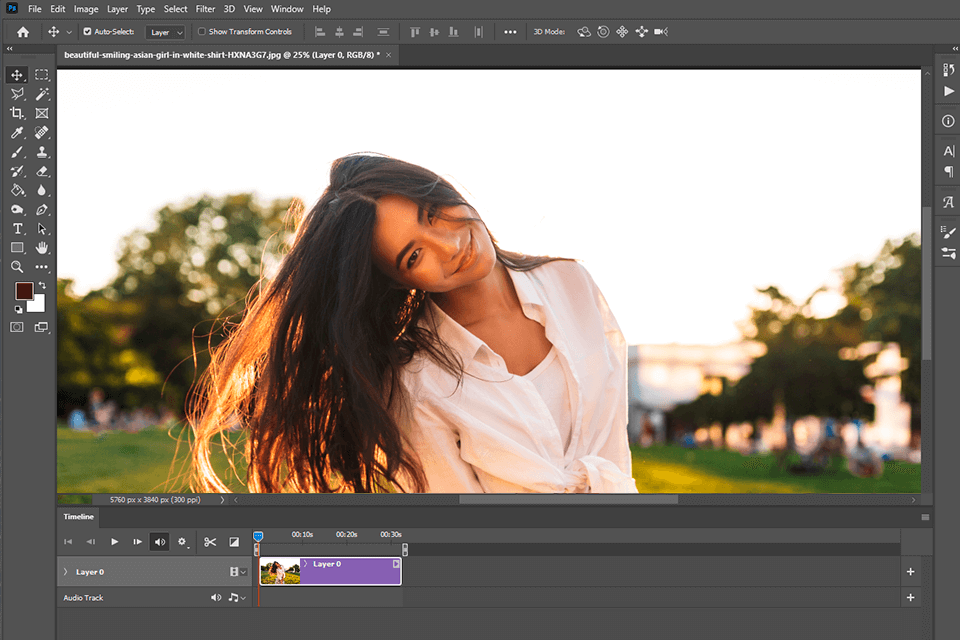
Select the part of a photo you intend to animate. Copy the selection to a new layer. Under the Windows menu, find the Timeline panel and click on Create Video Timeline. You can keyframe a position at the end of the frame using the Position key. Drag the relevant layer and put it in the desired place at the end of the animation.
To check the animation, press the spacebar. If you need to change the video, create more keyframes or change the position of the animation layer.

If you want to automate repetitive tasks, you can use actions. It allows you to record a sequence of steps so that Photoshop can reproduce them later. Actions are supported by Photoshop CS 4-6, Photoshop CC.
How to proceed:
You can export files in different sizes and formats for different devices.
For Illustrator:
Alternatively, you can use the hotkeys: Alt + Ctrl + E for Windows, Cmd + Opt + E for macOS.
If you want to copy the entire work area, there is no need to duplicate each item separately. Select the artboard and hold Alt or Cmd. Start dragging your artboard to create a copy.
You can put a copy on a new Artboard to make changes without editing the original image. This option is especially useful if you need to make several variations of the same design with minor changes.
With the Live Trace option in Illustrator, you can make a new design based on an existing image. Open an image in Illustrator and use the Live Trace tool to create a vector sketch.
The program allows you to adjust trace accuracy to match the original image, change the line width, and correct jagged edges.
To make an interesting logo, you can create unique lettering in Illustrator. Check out these Creative Cloud tips to learn how to do it.
Select a font that suits your design. Using the direct selection tool, select any letter to find its control points. You can change the font design, round letters, or lengthen lines by dragging these control points. Besides, you can select an entire text and move it around. It will help you adjust the spacing between letters or change the horizontal alignment of letters in one word.
With the Shape tool, you can easily draw, edit, and combine shapes in one image. To select any shape tool, go to the Tools panel. If you need to find the whole list of shapes, click and hold the Rectangle tool in the Tools panel.
Use the Smart Guides (View> Smart Guides) to control the size of the shape while painting. This option allows you to see when an ellipse becomes a perfect circle and a rectangle becomes a perfect square.
Since most of the shapes are Live, you can edit them right away. Besides, you can customize shapes by editing their corner radius, number of sides, etc.
If you need to create a color group, go to the Window menu and select the Swatches option. You will see the entire palette. Copy the desired Swatch into an existing group. To create a new group, use the New Color Group option. Save the new group and give it a name to make it easier for you to find it in the future.
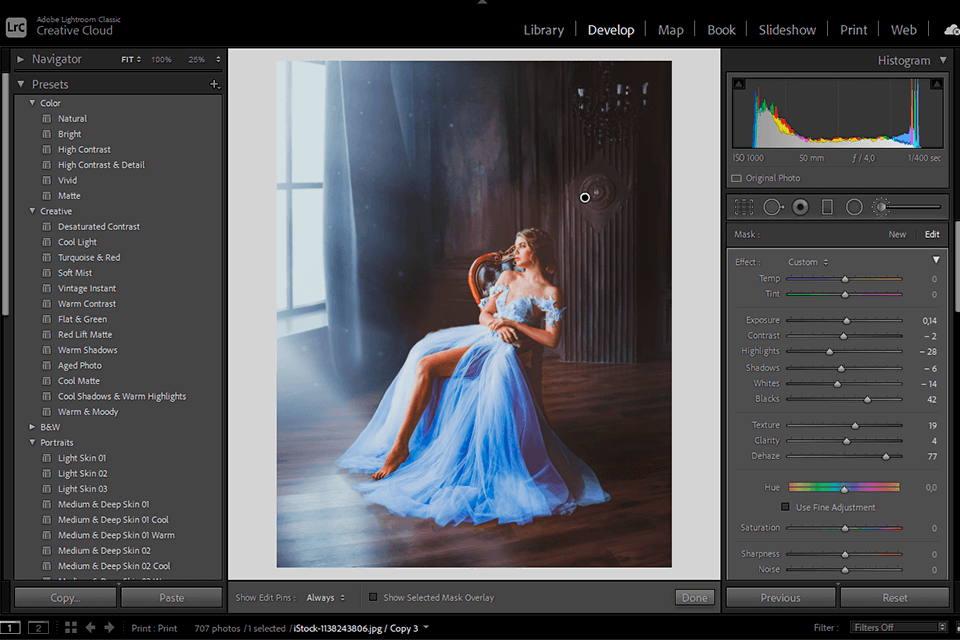
Lightroom brushes allow you to quickly improve images. You can also create presets to speed up the retouching process.
If you want to create a set of brushes, go to the Develop panel in Lightroom and click on the Brush option. Adjust the settings of your photo and click on the Custom button at the top of the panel. You will see a drop-down window where you need to click Save Current Settings as New Preset and select a name for it.
It’s one of the best Creative Cloud tips and tricks that will help you process photos in Lightroom faster. With presets, you can adjust contrast, add brightness, or create a vintage effect.
Follow these steps to set and use presets:
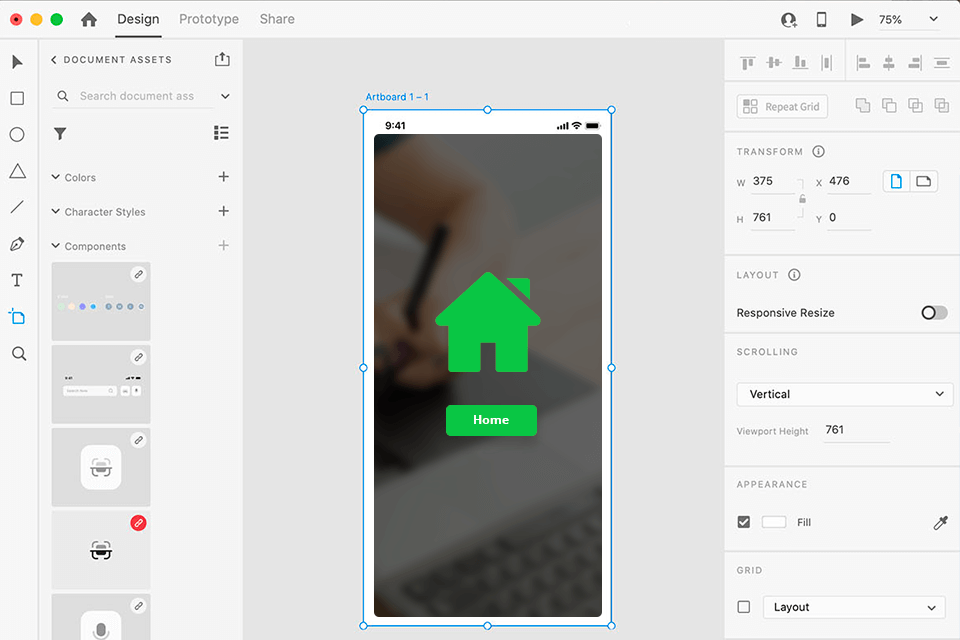
While working on a project, you can share your artboards with your colleagues. When you do it, they will see the Home artboard by default. You can change the artboard that other users see first using the Home option.
You need to switch the prototype mode in Adobe XD and select the desired artboard. A Home icon will appear next to the highlighted area. Click on the icon to select your Home Board. Keep in mind that you cannot make these adjustments unless you select the artboard in the prototype mode.
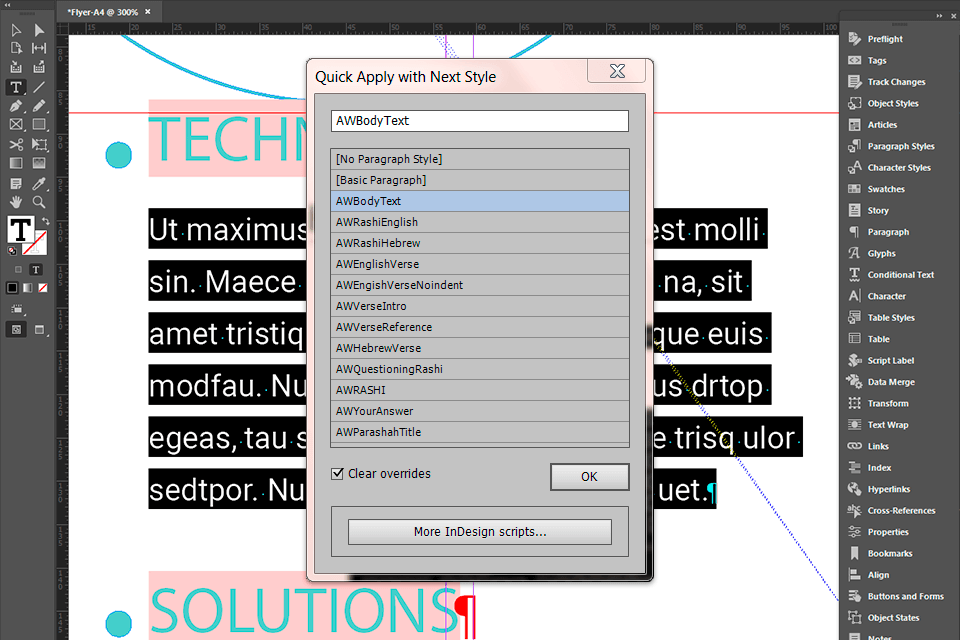
Using Quick Apply in InDesign, you can quickly apply menu commands, styles, scripts, etc.
Follow these steps to format your text:
To experiment with different styles, press Shift + Enter. Thus, you can apply the style and leave the Quick Apply window open. If you are happy with the result, press Esc. As you become more confident in using this function, use Quick Apply to run scripts, find obscure menu commands, and apply object styles.
You can style the box and the text within it in InDesign with ease. First, use the Next Style option to change the paragraph styles. Then, check Apply Next Style in your object style.
If you create your object style by clicking on the object with Selection Tool and then make a new object style based on the selection, the Paragraph Styles will be ignored by default. Check the box to activate this option. Otherwise, the Object style will not use the paragraph style.
I have prepared these overlays to help photographers optimize their workflow. With their help, you can improve shots faster. The collection contains 400+ free professional tools for Photoshop. You can easily apply overlays to any image, including photos of snow, sky, sunset, or sunrise. These effects can be applied to images in JPEG and PNG formats.


