Picktorial Review
Price: FREE or $4.99/month

VERDICT: Picktorial can be used for organizing and editing images. The interface of this Mac photo organizer is well thought-out. It is convenient to have the photo editing section of the program and the library combined together because then you don’t need to switch between modules (unlike in Lightroom with its separate Library and Develop modules).

You have access to simple tools that don’t require any special skills to use them, several basic instruments for skin correction, and overlays, that allow you to add watermarks and read metadata.
However, this works at a basic level, without any deep settings. Although the price is acceptable, it’s better to add $4 and use Lightroom for both basic and advanced tasks.
Picktorial Review

As soon as I opened the software to write my Picktorial review, I had no difficulties navigating it and quickly saw the logic behind its layout. To start editing your photos you just need to open the program, upload images, and start working.
In Picktorial, you can apply and create presets, make full-color correction and basic photo retouch, use some effects, etc.
Simple and Customizable Interface
Simplicity is probably one of the main advantages of the program because it doesn’t have dozens of windows, various operating modes, only Presets, Adjust, Info and History - you will spend more time in the second mode. Also, the interface is fully customizable.
Synchronization and Backup
You may use photo cloud services as Dropbox, Google Drive, iCloud, Microsoft OneDrive, and others to synchronize your changes. Picktorial saves your photo settings as a separate document (in case of RAW) or embedded within the image (for JPEG, DNG and TIFF).
- View more about the best cloud storages for photos.
When you open Picktorial on another computer and synchronize it with your cloud storage, it will instantly update and synchronize all changes.
Easy Crop & Rotate
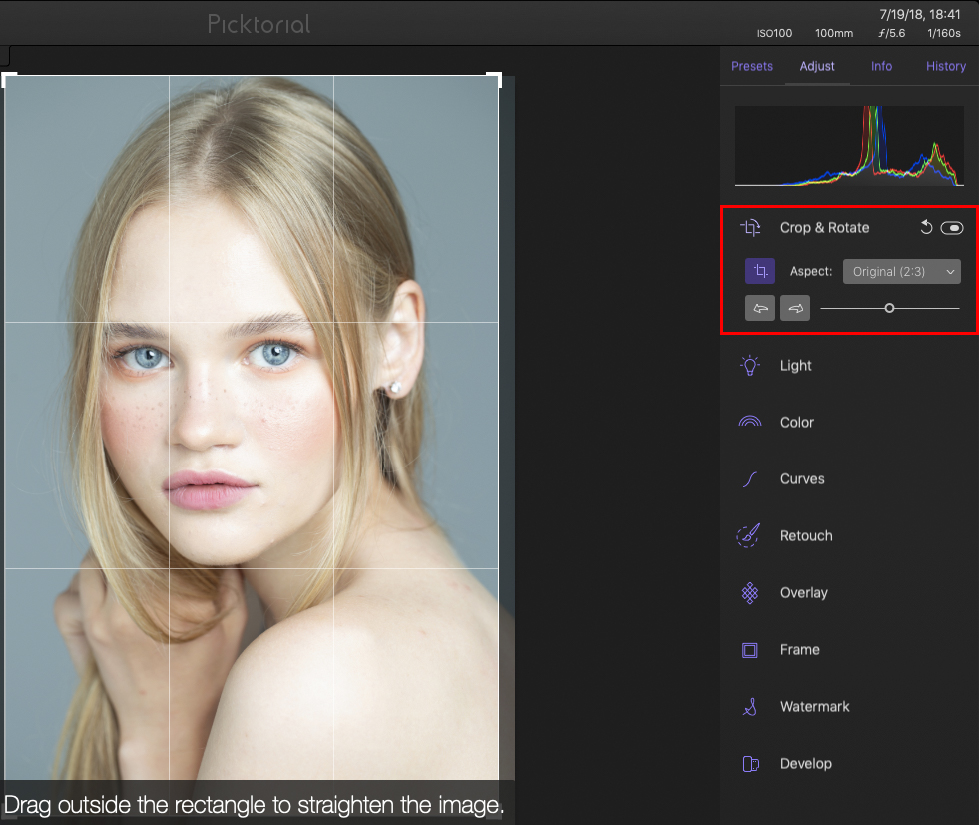
First on the list is the standard Crop & Rotate tool. Picktorial did not bring anything new to it, but it would be nice to add Auto Rotate to it. There are a dozen templates for cropping, even a template for Facebook cover.
Convenient Picture Management
When you use the photo management software Mac for viewing your photos, you have the opportunity to sort these images using the star rating and keywords.
- Read more about the best free photo organizing softwares.
Professional Color Correction
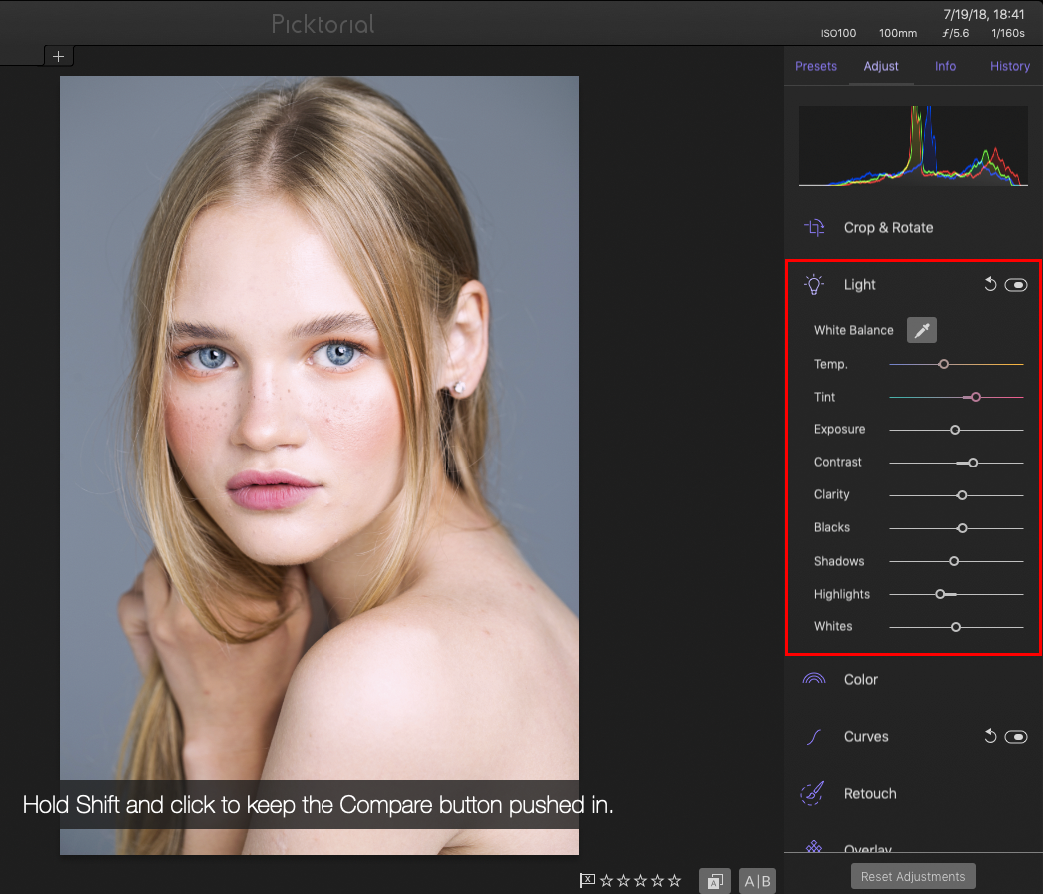
These are classic tools for basic color correction. I would say that this is the main panel, using which you will edit photos. To correct the white balance, exposure, increase the contrast, work with highlights & shadows, etc., you can use the Light tool.
In my case - I corrected the white balance. Here it is done with Eyedropper, no auto settings available. I also adjusted some settings. To see the “Before” and “After” photos, you need to press “\” as in Lightroom or click the button next to the stars.
Create Color Effects
Picktorial image editor has all the settings that are related to color: Saturation, Vibrance and HSL. Saturation controls hue, saturation and brightness of the entire image. Vibrance only affects low-key colors and does not affect skin tone and already saturated colors. HSL offers more detailed and fine-tuning of hue, saturation and light for each shade separately.
Adjustable Curves
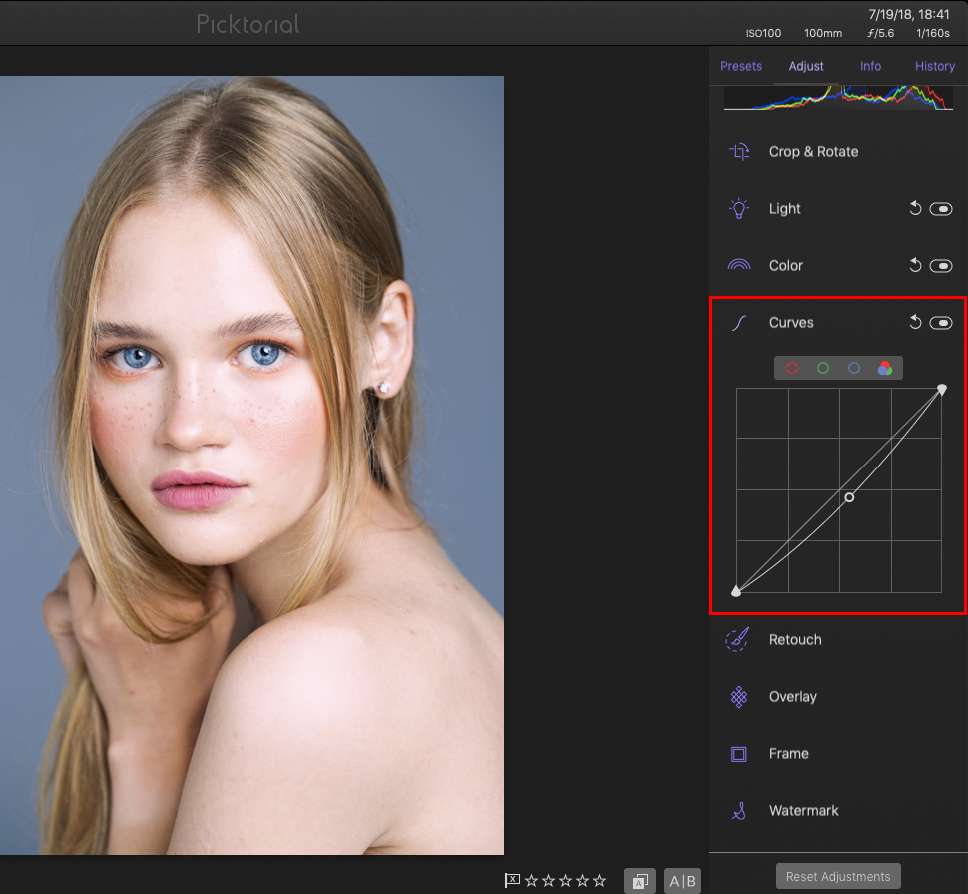
This is a classic tool for fast color correction. With one mouse click, you can edit three primary colors - red, green and blue, both together and separately.
Non-Destructive Photo Editing
This means that the information source always remains the same, all modifications are recorded in such a way that at any moment you can simply return to the original data and start editing the photo again (or make it completely different).
Can’t Do Complex Photo Retouching
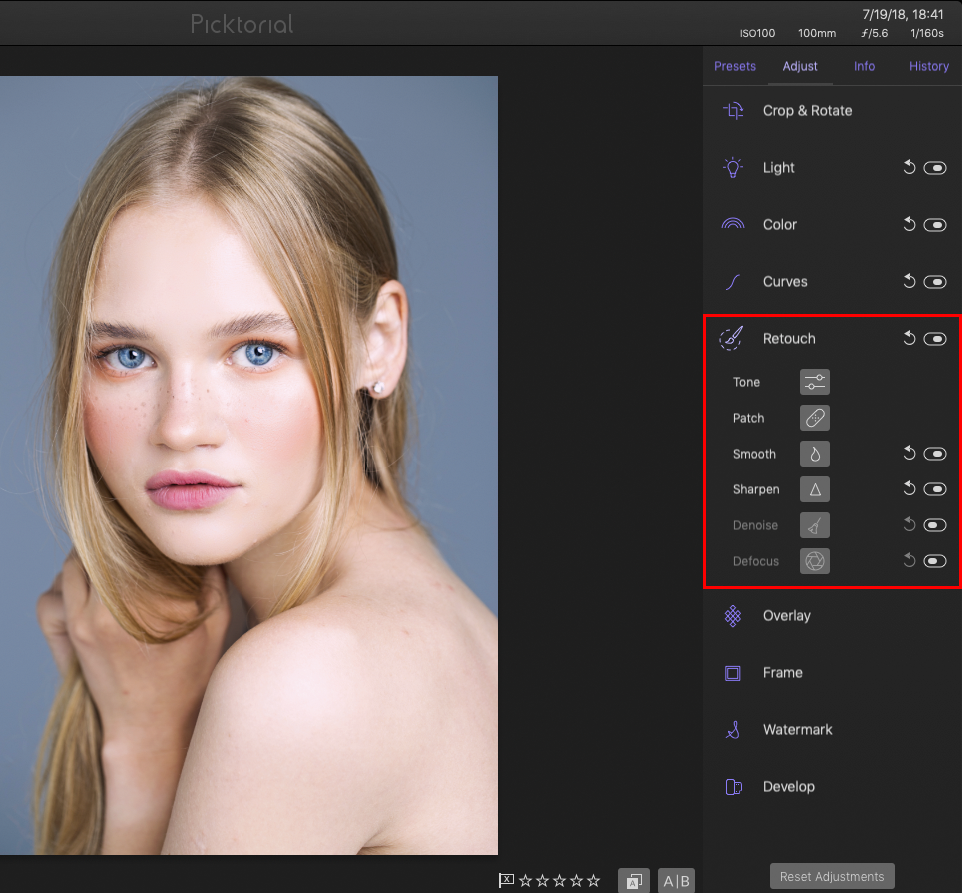
Picktorial is positioned as a program for color correction, conversion and image sorting. If you need complex photo retouching and work with layers - this program is not for you. It provides basic skin editing and that’s it.
- View more about free photo editing softwares for Mac that do photo retouching.
Tone: local color correction with a brush - you simply select the zone and work with its color separately using the “Light” tool.
Patch: the name speaks for itself - correction of small skin imperfections.
Smooth: it is also made for skin retouching, it just blurs the texture slightly, but does it pretty well.
Sharpen: makes the texture sharper, this helps a lot when fixing flaws with Patch because all tools work separately here and photo retouching can be turned off at any time.
Denoise: a noise reduction tool to improve the quality of your noisy shots.
Defocus: a very unpopular tool that emulates a blur that a lens makes at low aperture.
Basic Work with Overlays
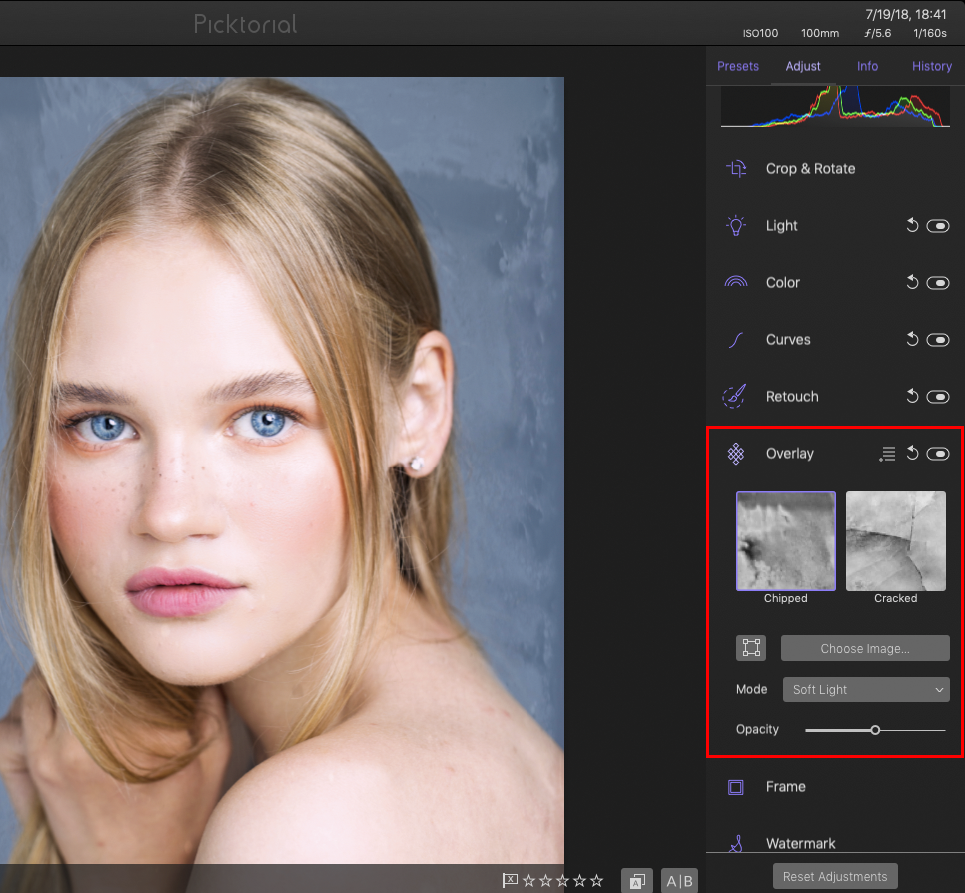
A pretty popular thing in Photoshop is also present in Picktorial. 10 Built-in overlays, as well as the possibility to upload your own ones. The big drawback of this tool is that you cannot apply more than one overlay to a photo, as well as select a zone to which you want to apply it.
RAW Photo Editing in Premium Version
If you need a good RAW converter, and you are used to working only with RAW shots - Picktorial is a great option, but for a small fee. The free version of the program allows you to view RAW images but not to convert or change them.
You Can Work with Presets
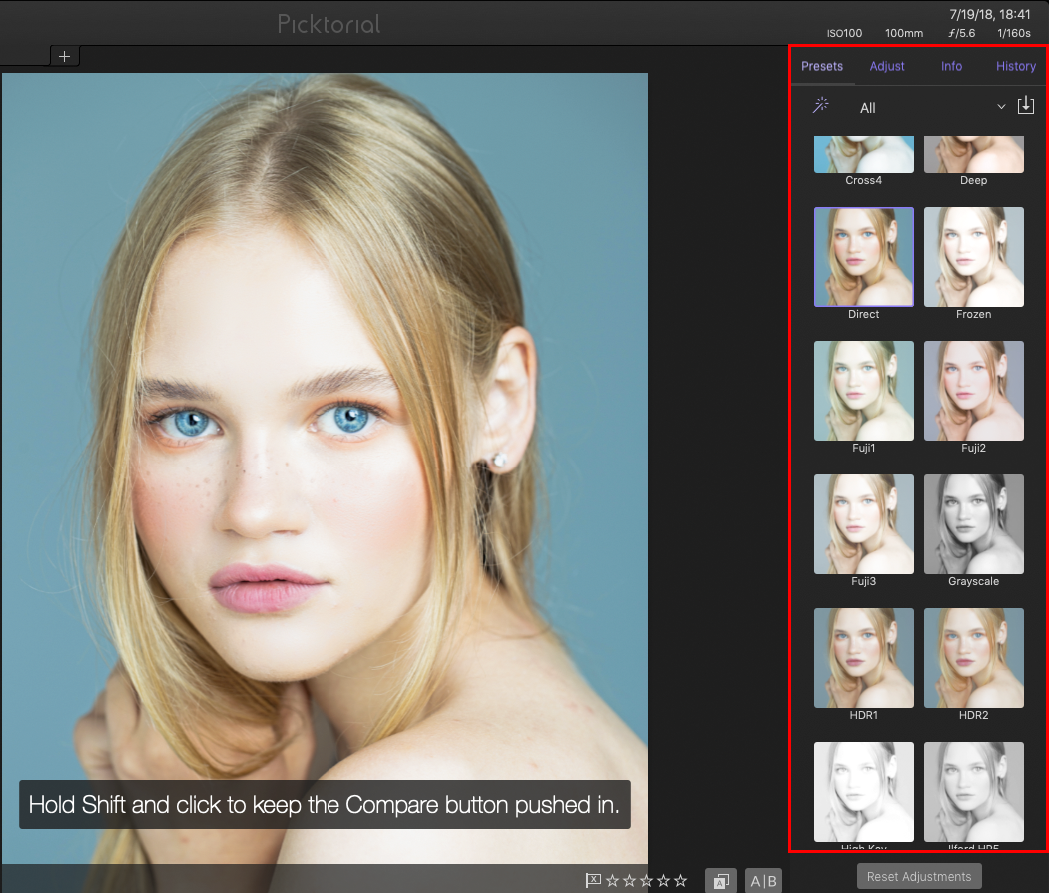
Picktorial presets are located in another tab. You can also create presets by adjusting the image as you like and by clicking on “Create Preset”. Later you can import them.
Read Photo Metadata
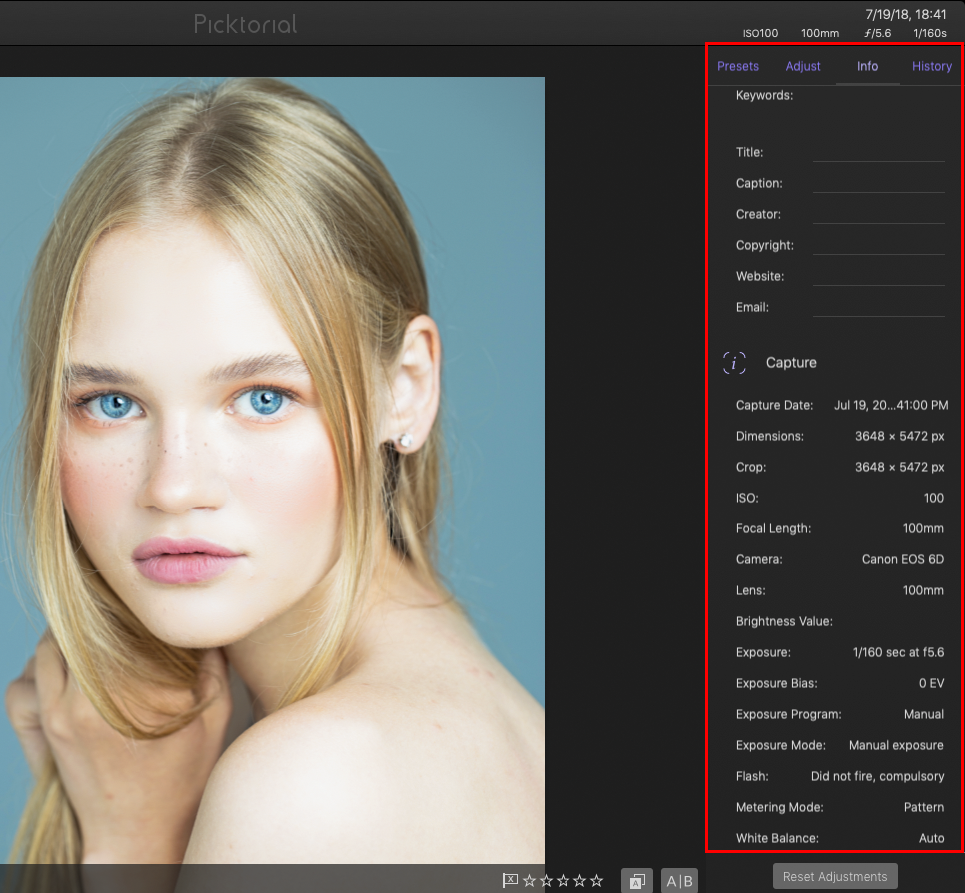
Here you can find out detailed information about the image, the equipment used to take it including the flash. Also, here you can set keywords for more convenient search and distribution of photos.
Additional Functions
It’s a rare thing that you find free programs for work with photos in which there is History to comfortably return to any stage of photo editing any time you need. It has the Frames Tool that is no longer such a popular tool when editing photos. The only place where it seems to be convenient to use them is when you plan to place your photo in a frame and want to know which part of it will be in the frame. Here you cannot find the size of the frame that you applied.
You can add watermarks to your photo by uploading your watermark on a transparent background.
Many Panels
The interface attracts with extremely convenient arrangement of tools and functions. As I said before, you can remove the working panels at any time.
The sorting panel is one of the most convenient that I ever saw in photo editors. Absolutely no fuss with catalogs or anything like that, you simply add any folder on your computer (I personally just added a desktop) and from there you can view and edit the image.
The image viewing panel: it's possible to change the size of the thumbnails (see the View menu, and there is also a keyboard shortcut for this).
While optionally syncing the two viewers would be a great enhancement, it also useful for working with the same image opened in both viewers in different zoom levels.
The toolbar is a classic set of tools for color correction and image editing, but the most convenient feature of this Mac photo organizer that you may turn on and off each function separately.
Why is this convenient? Because each tool has its own layer of work, which is not related to others. Thus, you can, for example, by increasing the sharpness, conveniently retouch the skin, then turn off the sharpness and enjoy the result.
Price
Picktorial image editor is free and allows you to use it for editing pictures without any restrictions, but for additional, rather deeper features, you need to purchase Picktorial Premium, which has a small price: $1.69/month (Standard version) and $4.99/month (Premium Pro version).
Similar Products
There are a lot of programs that are designed for easy photo editing and it would be logical to make a couple of Picktorial comparisons with some of them.
Picktorial vs Lightroom

4.0

4.5
Picktorial vs Lightroom is quite an interesting comparison because Picktorial is the same as Lightroom but with its own view on photo editing and with slightly reduced functions. Lightroom is a classic, which is its advantage because to find a lesson for Lightroom you just need to go to YouTube and you will find thousands of them on any of the topics.
- Watch free Lightroom tutorials for doing professional photo editing.
Picktorial also has its own base of lessons, as well as tips about the program itself, but this is still not enough for a deeper study of its functions. The second plus of Lightroom is presets. Yes, in Picktorial they are also available and quite abundant, but they are all built-in and if you can find user presets on the web, there will be several dozens of them, not more.
Over the years of its existence, Lightroom has gathered its fans among which there are quite many retouchers who share their presets with the world, which can give your photo a completely different look.
But Picktorial, regardless of that, still has a more pleasant and user-friendly interface that many users look for it. My opinion - if you need a simple program for good color correction, choose Picktorial, if you want to go deeper into color correction - choose Lightroom.
Picktorial provides nice photo editing functionality and some features are not available in Lightroom, such as deep work with Curves, HSV and blending modes in local adjustments.
Picktorial vs Affinity Photo

3.8

4.2
If Picktorial is positioned as an alternative to Lightroom, then Affinity Photo does the same with Photoshop. It is quite difficult to compare Picktorial vs Affinity photo since they have different goals and are designed for different work.
- Read my Affinity Photo vs Lightroom comparison.
Picktorial is a simple RAW converter with the possibility of color correction and basic photo editing. It is not designed for professionals, who can spend hours working on improving one photo.
Affinity Photo, on the contrary, has a fairly wide range of tools and allows you to perform complex image retouching, as well as digital drawing, and has its own, more advanced analog of Camera RAW.
If Affinity Photo has a larger selection of features, then why not use it? My answer is complexity. Opening Picktorial, you already know everything about it in a minute and can start working. Affinity Photo requires more time, because if the program puts itself on the market as an alternative to Photoshop then it can never be simple.


