How to Free Up Disk Space on Your PC Easily

Getting an alert that your disc space memory is almost full can be stressful especially when doing an important job. So, my tips to free up disk space provided in this article below will definitely come in handy.

If your computer keeps informing you about low drive space, looking for alternative variants like removable storage will be a smart decision.

What Consumes My Hard Drive Space the Most?

When working on the computer, you may observe your hard disk space getting smaller and smaller, wondering what trash occupies your hard drive. Defining the applications and files in Windows Explorer that cause the space decrease can be a real brainteaser for most users. Fortunately, there is a dedicated solution for analyzing disk space in Windows 11.

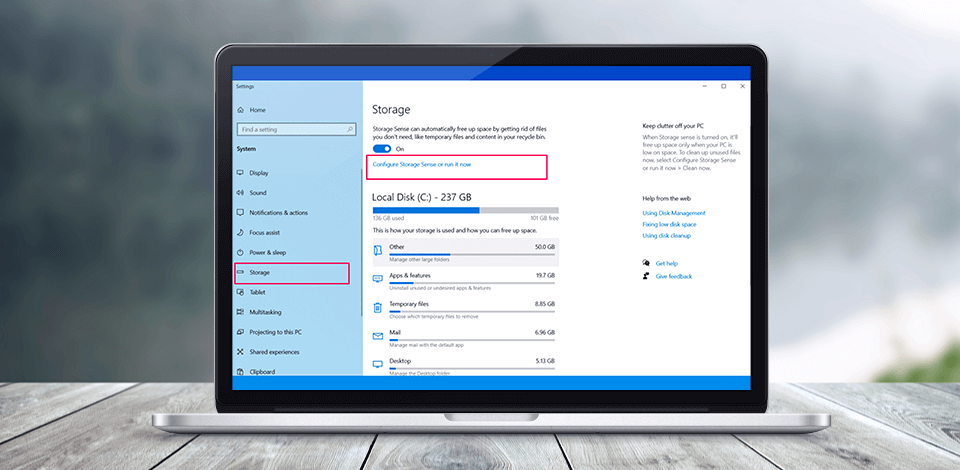
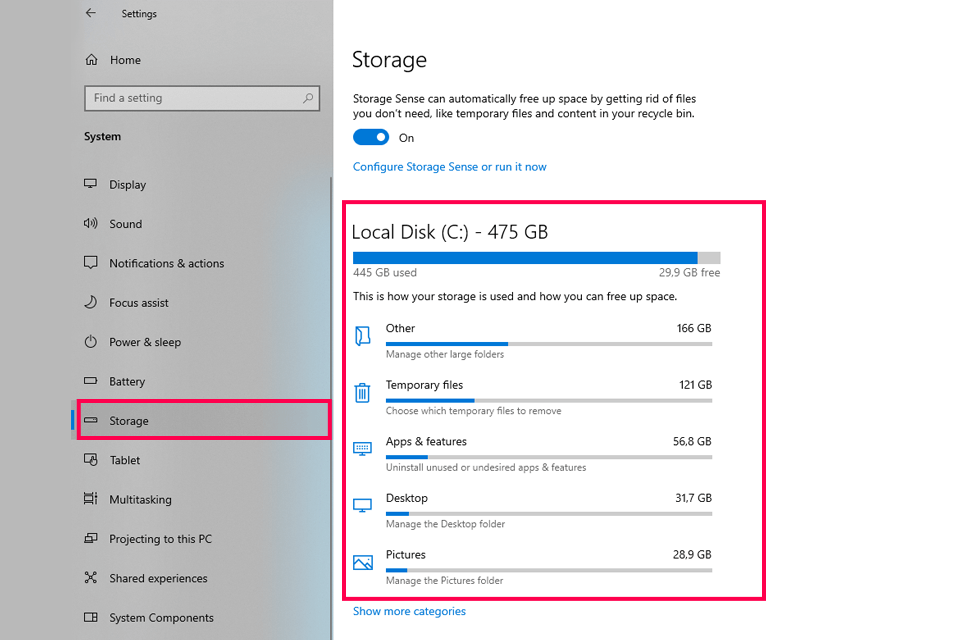
Follow this path Settings > System > Storage to see all computer drives.

Choose the one you are interested in to see how much space is left.

Moreover, you’ll be able to analyze each application or game to discover the amount of space it occupies. Once you know how much space is available on your PC, the next question is to make clear how to free up disk space Windows 10/11? Here you’ll find 10 working methods to perform this important task.

10 Ways to Free Up Your Disk Space

Nowadays most computers are equipped with SSDs (solid-state drives), but their capacity is often not enough to meet the space demands of modern games and apps. As the cases when hard drives become overwhelmed, this section describing ten effective strategies for optimizing your storage will help you optimize storage by doing some simple steps.

1. Check the Current Space on Your PC

free up disk space checking current space

Accessing disk space settings on Windows:

  1. Swipe inward from the right edge of the screen to access the Quick Settings. The next step is to hit Change PC settings. If you use a mouse, drag its pointer to the lower right corner, then move it up, and select Settings - Change PC settings.
  2. Click the PC and devices option and then choose Disk space.
  3. Free up space on this PC section shows the disc's total capacity and the amount of space that is available.

My recommendations:

  • There is a See my app sizes option that you can take advantage of to define how much your Windows Store apps weigh and decide whether they are worth being kept on your PC.
  • One of the quickest ways to get more space on your PC is to delete all the unnecessary files from the Recycle Bin.

2. Run the Disk Cleanup

free up disk space running disk cleanup

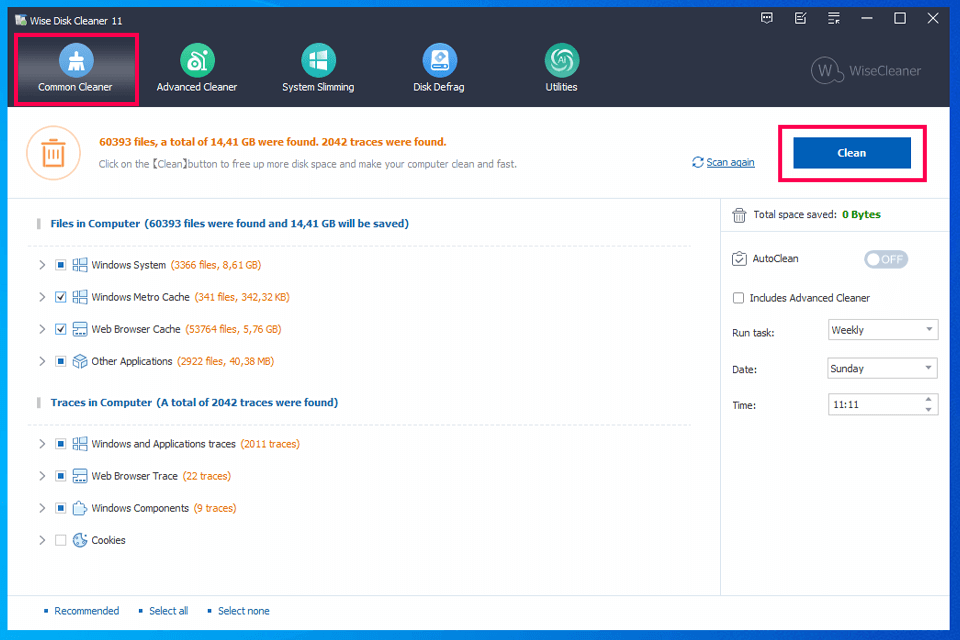
Windows 10 comes equipped with multiple tools for keeping your computer storage tidy. There is a cleaner for Windows 10 and 11 for removing temporary files that can weigh many gigabytes. Do these steps to perform the task.

  1. Choose This PC. Then click on the required hard drive with the right mouse button, followed by Disk Cleanup.
  2. Select the files you want to remove confirming your decision with the OK button.

My software recommendation: Wise Disk Cleaner is an excellent free disk cleanup and defragment program for erasing excessive files and accelerating the performance of your PC.

There are several offers you can find very useful due to freeing up your laptop or PC space. Junk file cleaning: Defines and erases files you do not need anymore, temporary files, and system cache to get more disc space.

Configurable cleaning: Users define the types of files or specific sections of the hard drive to perform cleaning based on their needs.

Scheduled cleaning: It is possible to set up the cleaner to perform the cleaning process automatically to optimize your system on schedule.

Browser cache deletion: Erases temporary files, history, cookies, and any traces of browsing activity left on the host's hard disk for better security.

Configurable scan options: The scanning process is easy to customize by choosing the specific sections or file types to get rid of.

Optimization of Windows system: Erase system files, log files, and other items you do not require any more to improve overall system performance.

"Wise Disc Cleaner has improved my workflow considerably. I create content, so managing large files is very important for me. And this tool has made things easier for me." - Lisa Anderson, content creator. ★★★★★ (5/5)

3. Uninstall the Apps You No Longer Need

free up disk space apps uninstalling

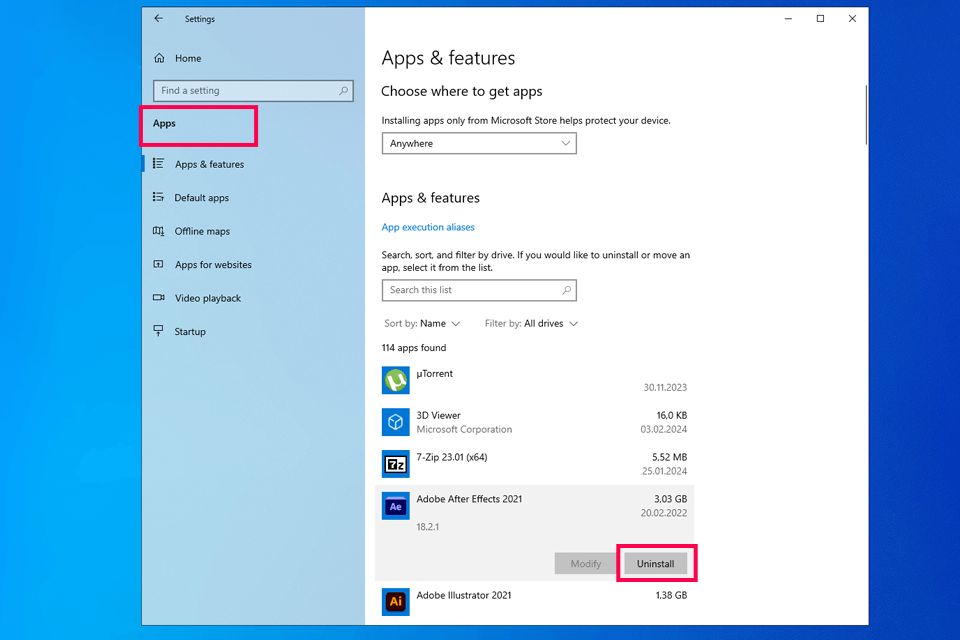
To delete or tweak a program:

  1. Click the Start button to open Programs and Features. Follow the next path Control Panel – Programs - Programs and Features.
  2. Choose the program and hit Uninstall. In some cases, you’ll have the option to change or repair the software instead of uninstalling it, but the majority of tools can be only uninstalled.
  3. To tweak a program, select Change or Repair. If you're asked for an administrator password or confirmation, enter the password or confirm the selection.

Note: If the program you want to delete is not in the list, it is probably not designed for this version of Windows. In this case, you should check whether it comes with an uninstaller, and try this option.

My additional recommendation: There are also methods for uninstalling Store apps you don't require anymore:

  1. After swiping in from the right edge of the screen, hit Settings, followed by a click on Change PC settings.
  2. Open Search and apps, and then choose App sizes to define the size of each application stored on the local drive.
  3. Find an app you want to erase from your PC, select it, and then hit Uninstall.

4. Transfer the Files with Large Size

free up disk space transferring large files

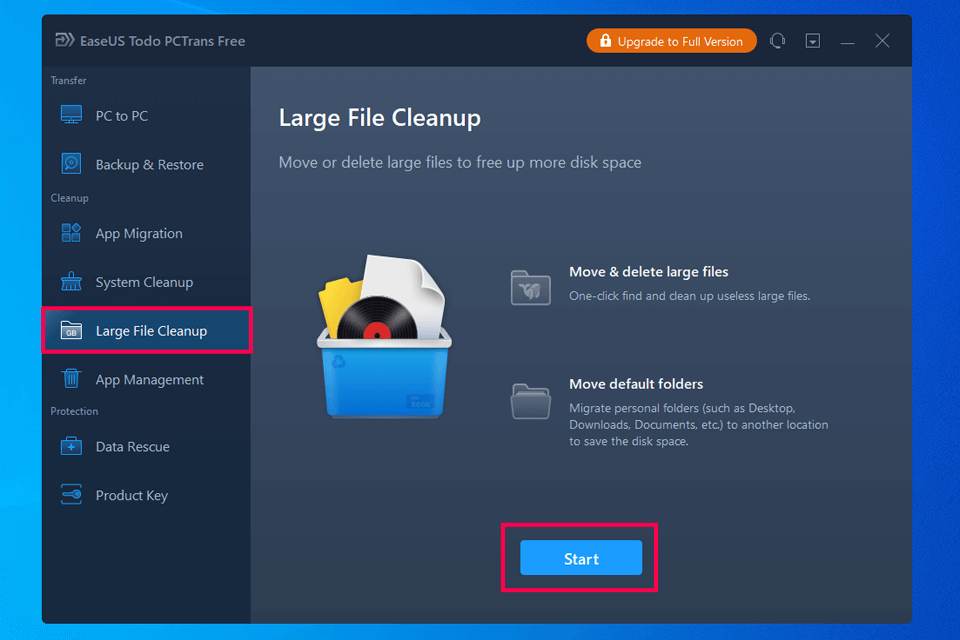
Another way to clean up free disk space is to relocate bulky files from one drive to another. EaseUS Todo PCTrans is an excellent photo transfer app, which is compatible with multiple file types except for pictures. With its help, you can easily relocate large files to another disc in just a few clicks.

  1. Launch EaseUS Todo PCTrans on your computer. Go to Large File Cleanup > Click Start button to continue.
  2. Choose the disc for scanning and launch the process by hitting the Scan option.
  3. When it is over, the files, the size of which exceeds 20MB will appear in the list. Pick the desired files and their new storage location. It is possible to select the required destination either by clicking on the triangle icon or choosing the Browse option.
  4. Press the Move button, then a pop window will appear with the files for you to check. Then click the Move button again.

"EaseUS Todo PCTrans is a blessing for a small business owner like me. Transitioning files to a new computer used to be a headache, but this tool made things simple." - James Thompson, small business owner. ★★★★★ (5/5)

5. Minimize the Size of the WinSxS Folder

free up disk space minimizing winsxs folder
Caution! Erasing data from the WinSxS folder or removing the entire WinSxS folder may cause serious damages to your system, so you won’t be able to restart or update your PC.

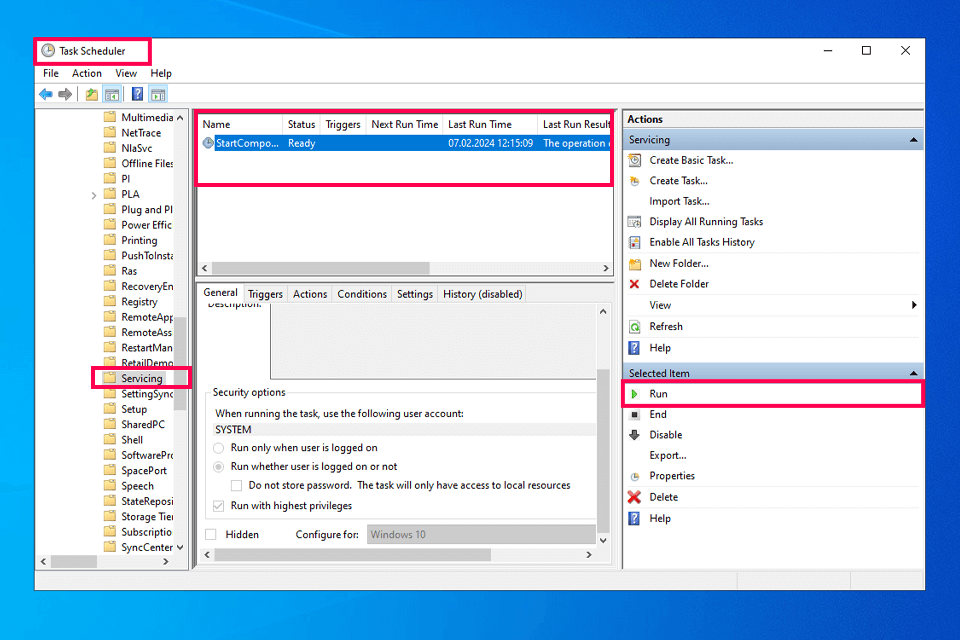
To access WinSxS folder, head to the Windows folder on your computer like C:\Windows\WinSxS. Here you’ll find Windows Component Store files, thanks to which it is possible to tweak and update Windows. Task Scheduler is what you need to make this folder smaller.

  1. Swipe in from the right edge of the screen, and choose Search.
  2. Use the search box to find the Control Panel and select it.
  3. Hit System and Security, and then press Schedule Tasks under Administrative Tools.
  4. There is an arrow next to Task Scheduler Library. Choose Microsoft – Windows - Servicing.
  5. Opt for StartComponentCleanup and hit Run under Selected item.

6. Turn on OneDrive Files On-Demand

free up disk space turning onedrive files on demand

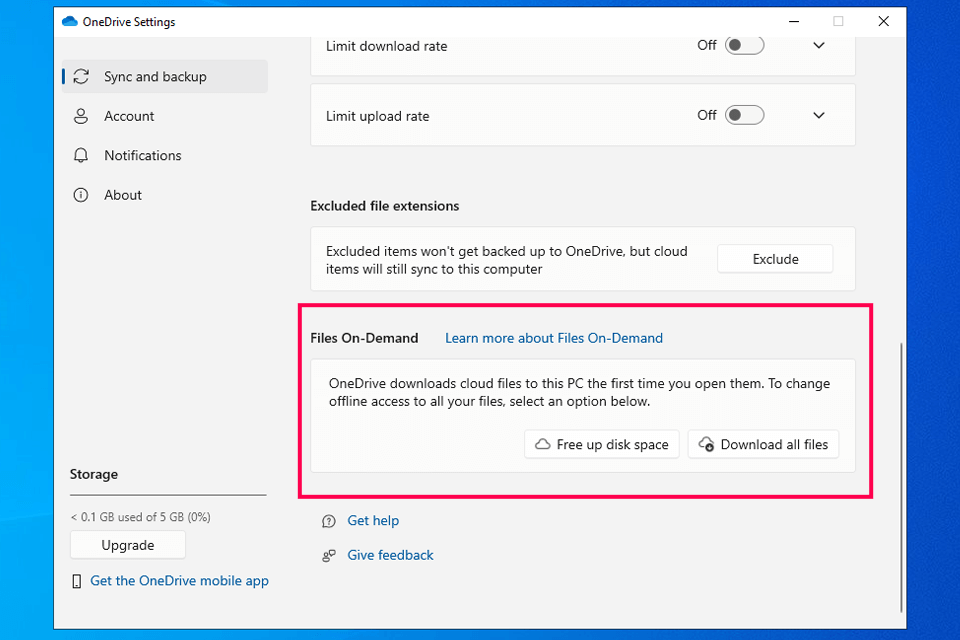
Files that you store offline occupy much space on your PC. There should be also 200MB of your computer memory to launch file synchronization. To free up a lot of disk space, you should work with some files only online. For this, turn on OneDrive Files On-Demand.

  1. Hit the OneDrive icon, and provide the credentials to enter your account.
  2. Click on the OneDrive with the right button of the mouse and choose Settings.
  3. Head to the Settings tab and tick the box next to the Save space and download files when you use them option.
  4. Open your OneDrive, pick all files and folders, launch the context menu, and hit the Clear Space option. By doing so, you’ll store all the files in the cloud making more free space available on your computer.

Notes:

  • If Access all files offline option is ticked, uncheck the box to make the files online only.
  • If some files are still being uploaded to OneDrive, you do not have to wait until the process is over before making files online-only.

7. Empty Recycle Bin

free up disk space emptying recycle bin

Complete the following steps to clear the Recycle Bin entirely.

  1. Recycle Bin icon should be on your desktop. Find it.
  2. Apply the selection to all files in your Recycle Bin, click on them with the right mouse button, and hit Delete.

8. Utilize Storage Sense to Remove Unneeded Files

free up disk space utilizing storage sense

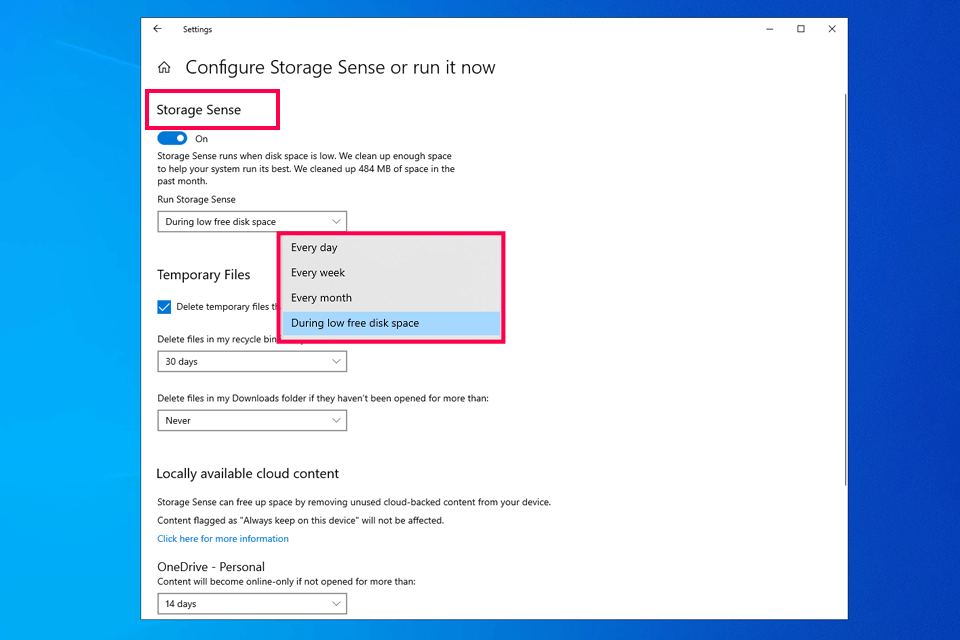
In the Windows 10 release, there is a functional Storage Sense tool for clearing the Recycle Bin of temporary data and other unnecessary files. If Storage Sense is turned on, the system will scan and erase the trash automatically.

To activate Storage Sense, perform the following steps.

  1. Head to Start Menu > Settings > System > Storage. Activate the Storage Sense and select the Change how we free up space option.
  2. In the next window, indicate the type of temporary files you want to erase. Then get rid of the unnecessary files by pressing Clean up now immediately.

9. Disable Hibernation Mode

free up disk space disabling hibernation mode

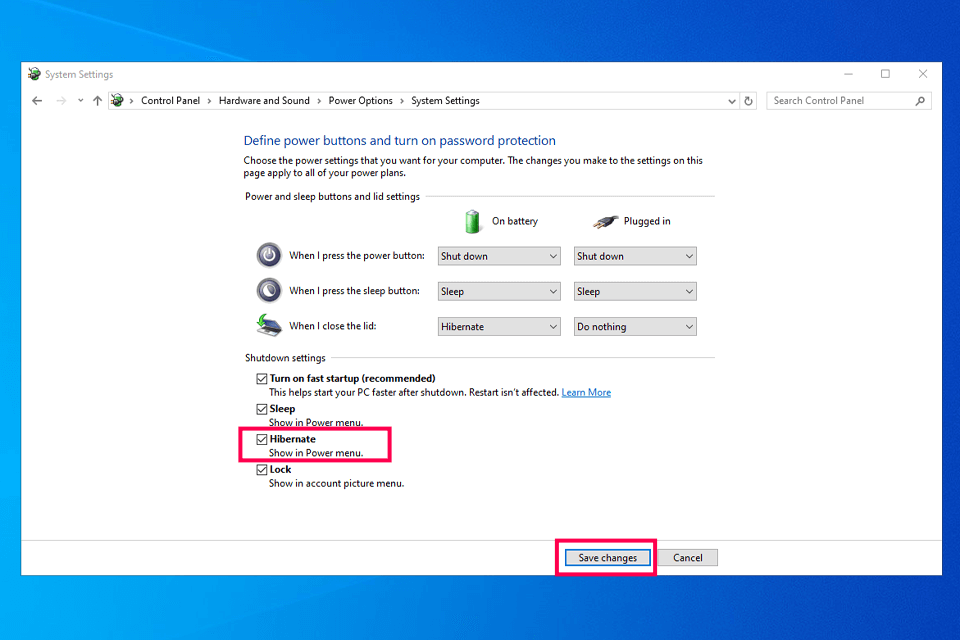
The Hibernation Mode is very handy, as it allows you to quickly turn on a computer after powering it off. If this mode is activated in Windows, it will consume much memory of your C drive. So, study this guide to find out how to turn it off.

This process is quite intuitive, you need to open CMD and enter the following command: powercfg /hibernate off.

10. Add More Storage

Removable storage like SD cards, USB flash drives, DVDs, or CDs is a sure and removable way to increase your computer memory for the long term. Cloud storage or network drives are also great options.

Types of removable storage:

  • Secure Digital (SD) cards. You can think of expanding your computer memory with such SD card types: SD (32.0x24 mm), miniSD (21.5x20 mm), and microSD (15.0x11 mm). However, to make the right choice, you need to make sure that the selected SD card option is compatible with your PC.

Note: Surface users can add up to 64 GB of storage with a microSD card. microSD card reader is below the kickstand on the right side of Surface RT. On Surface Pro, you can find the card reader on the right edge, above the power connection.

  • USB and external drives. Most computers are equipped with several USB ports for plugging any external drive. Modern PCs come with a USB 3.0 port that boasts a transfer speed, which is 10 times faster than USB 2.0. Keep in mind that it is possible to use a USB 2.0 flash drive in a USB 3.0 port, but not vice versa.
  • A CD, DVD, or Blu-ray Disc drive for reading and recording optical media can work as an SD or USB flash drive for extending the memory of your PC. To take advantage of this option, insert a blank disc into the PC and select Like a USB flash drive option.
  • There is a OneDrive app in every Windows, which provides access to free OneDrive online storage. By uploading files to the cloud storage, you can easily free up disk space and work with them on the web right in the OneDrive website or using the applications for Windows 8.1 and Windows RT 8.1, desktop apps for a PC or Mac, and apps for your mobile devices.

You can see the report on how much room is free and usable and enlarge the memory of your PC by swiping in from the right edge of the screen or pointing to the lower-right corner of the screen (for mouse users) and following this path Settings - Change PC settings - OneDrive. This can be also done on the OneDrive website using the Manage storage option.

Contents:
SAVE UP TO 60% OFF SAVE UP TO 60% OFF