The Before & After Slider app
Verdict: The Before After Slider app allows comparing photos in interactive slider mode. You can use it to highlight certain advantages, tell a story, compare products and services, and emphasize the differences between them. The app can be employed as a visual aid to convey a certain idea to your users.
What I especially like about The Before After Slider app is how simple it is to use. Moreover, it can be of great help if you need to showcase how your product is different from the competitors or when you want to present your services and products to your users with maximum clarity and efficiency.

The Before & After Slider app can serve as a visual aid for presenting your products and services to your customers. Moreover, the application is fully customizable and has vertical and horizontal sliders, edge separators, and allows you to edit the aspect ratio. Such an app can be useful for any website owner. For instance, photographers can conveniently showcase their image editing or retouching results to their clients.

The main purpose of The Before After Slider App is to provide you with the means necessary for easily comparing the differences between anything you want – weight loss, pet height, your drawing skills, image editing results where, for instance, you can show your double exposure photography work, etc. The app also allows creating as many sliders as you need while customizing the design according to your needs by editing the colors, fonts, and intervals.

The Before & After Slider application allows you to showcase the advantages and distinct features of your services with the help of horizontal, vertical, and even diagonal sliders. You can create as many sliders as you want and tell a visual story as you see fit. By the way, the slider workflow is extremely straightforward and will only take a few minutes of your time.
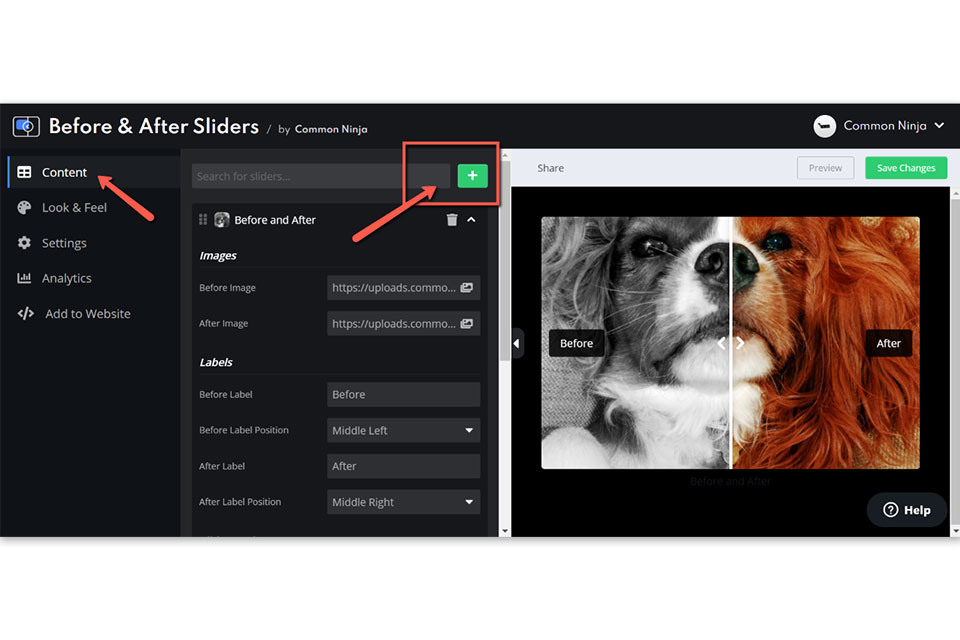
You can create several “Before” and “After” sliders to display multiple versions on a single page while having them stack on top of each other. All you have to do is open the editor, go to the “Content” tab, and press the green “+” icon on the top. You can get the same result by pressing the “Add a slider” button that you can find at the bottom of the list, after which you'll see a new “Before and After” slider that you can work with.
If you want to stand out from the competition and make the slider more original, you can use the angled option. To do so, simply go to the “Look and Feel” tab in the editor and select the “Basic” option, and in the “Slider” section pick “Angled” from the pop-up menu.
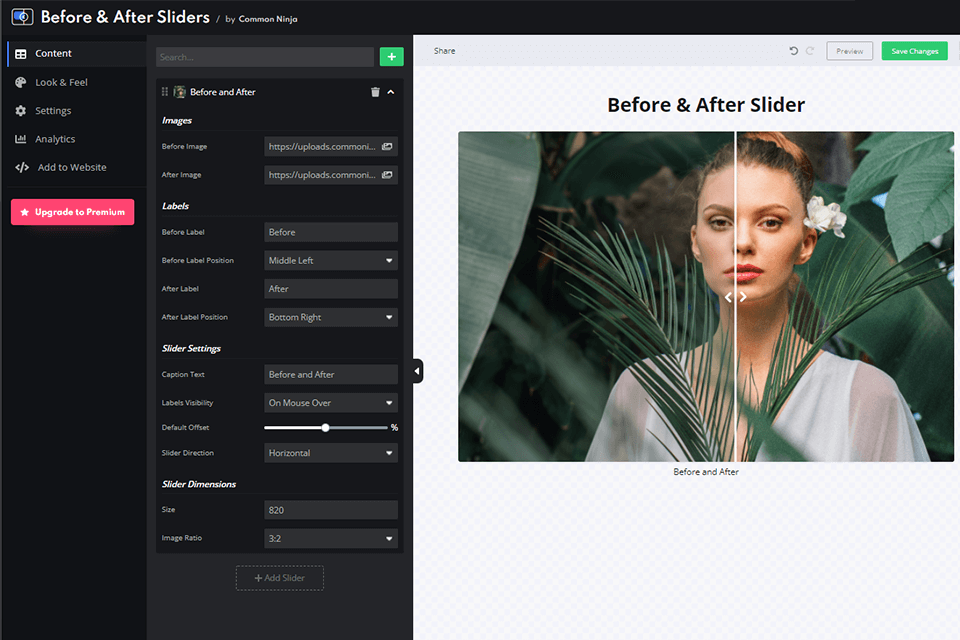
One of the key advantages this app has over similar software is the ability to change the slider’s size. That’s why it doesn’t matter if you’re working with wide-angle, narrow, or square images since you’ll always be able to set an appropriate slider for their size. You can adjust the size in the “Content” tab by choosing the “Slider Dimensions” category from the “Before and After” section. Here you’ll find lines that allow you to set the width of the slider and choose the image’s aspect ratio from a dropdown list.

The Before After Slider app allows quickly editing the slider’s design according to your needs as well as enhancing it with various effects. If you have experience working with AI photo editors, then you’ll be glad to find an array of similar basic editing tools including ones for changing the font, size, color, and text.
You can change the main “Before and After” title to any text you want. Simply open the “Settings” tab in the editor and go to “General Settings” to change the plugin title. Alternatively, you can completely hide the title in the settings by changing its opacity to 0%.
The app also lets you change the color and width of the divider, the element that appears on top of the images, and allows the user to move and open images. The “Look & Feel” tab has an “Advanced” category that allows you to adjust the parameters of the slider’s separator. Meanwhile, the “Background” section lets you change its color and width.
Less than a year ago, the app was updated with a feature that allows adding effects. Sadly, currently, users only have access to a single effect but the developers have promised to expand the selection soon. The effect of the Magic Trail feature can be seen when the user drags the slider around, as the effect follows the slider and adds a cool, unique look to it. To activate or deactivate the effect, you simply have to go to the “Look & Feel” section and set “Magic Trail” as active or inactive in the slider parameters.

If you want to start taking full advantage of the app’s capabilities, you have to register first. Akin to similar image comparison software, The Before After Slider app has a pleasantly straightforward control panel and if you have any questions about some of the parameters, then you can find all the needed answers in the help center.
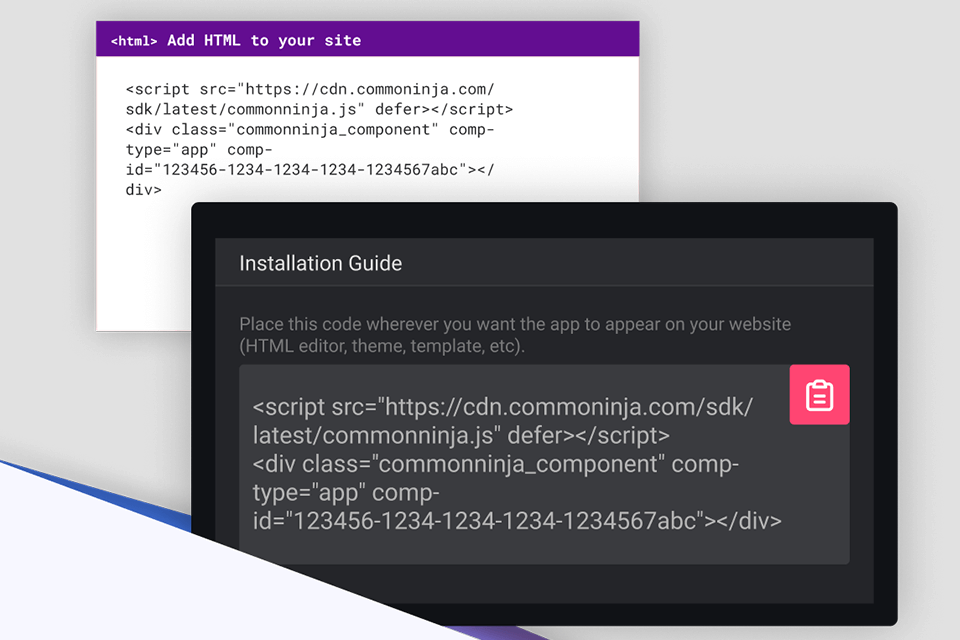
The Before & After Slider app can be easily integrated into your website. To do so, simply follow these two simple steps:
STEP 1. Once you’re done working in the app, copy the HTML text that you can find in the “Add to Website” section of the tool panel.
STEP 2. When in the website builder, find the “Embed” widget and place it where you want the app to be, and then paste the previously copied HTML code into the widget.
The app is fully adaptable and is guaranteed to look good on any device. You also don’t have to worry about confidentiality because the application meets all existing GDPR and CCPA requirements.
The Before After Slider app requires all users to register on the official website and offers a free trial version. The Free plan provides 300 views for your site’s visitors a month, 2 plugin instances, and 1 slider instance. If you want to receive access to more functions, then you should consider one of the paid subscriptions. The Basic plan costs $3.59 and offers up to 2000 plugin views for your users a month, 5 plugin instances, and 3 slider instances along with the ability to remove the app’s logo watermark.
The Pro plan will cost you $6.39 a month with the number of views being increased to 50 thousand, the number of plugin instances to 30, and the slider count being boosted to 10. The ability to get rid of the company’s logo is also included in this plan. The Business plan will cost you $12.70 a month while offering 3 million user views for your website a month, 100 plugin instances, and 50 slider instances along with user-created CSS and watermark removal.
If you’re not satisfied with any of the premium plans, don’t worry. Simply reach out to contact@commoninja.com and the company’s experts will do everything they can to devise a suitable personal plan.
The company accepts all main credit cards as well as PayPal payments. Additionally, if you no longer have use of the app, you can cancel the subscription at any time. To do so, you have to go to the Common Ninja toolset panel and pick the “Billing” tab. Once there, pick the subscription you want to deactivate and press “Cancel”.